The fleet of cars with carburetor engines is still large, and such an operation as carburetor adjustment (periodically necessary for these cars) continues to be relevant for many car owners. At the same time, the question remains relevant: should you turn to specialists for adjustment or do it yourself?
The complexity of the carburetor adjustment process is supported by many facts: for example, the specialization of carburetor mechanics has been preserved among specialists to this day. However, for car enthusiasts who are not at all unfamiliar with technology, after becoming familiar with the design and basic principles of operation of the carburetor, a number of basic settings and adjustments with their own hands will be quite within their grasp.
We recommend watching detailed video instructions for adjusting the carburetor, which is located at the end of this article.
And so, in order to understand how to properly adjust the carburetor, we suggest first familiarizing yourself with its structure and operating principle.
Main problems with carburetor operation
• The engine is unstable at idle
Let's say if you set the idle speed at 800, drove some distance and the idle speed increased to 1500, then this is a reason to look under the hood and make the correct carburetor adjustment. Perhaps in this case the problem is not in the “carb” itself, but in the wire connecting it and the accelerator pedal, but still, it’s worth a look.
• Spark plugs are constantly dirty and wear out more often
This happens when there is an excessive supply of the combustible mixture, which can occur for two reasons, the first is a burnt-out valve or the second is an incorrect fuel level. If in the first case it is necessary to replace the valve, then in the second case there is a problem with the float, excessive pressure or the float chamber itself.
• Gasoline is leaking
And in this case, the fuel pressure and problems in the float chamber are to blame (the float may be sinking).
Features of Ozone and Solex carburetors
Before the production of injection engines, almost all Soviet and then Russian cars were equipped with carburetors produced by the Dmitrovograd Automotive Aggregate Plant - DAAZ. For VAZ cars, which form the basis of the domestic car fleet, two-chamber Ozon carburetors have been produced since 1979, and since the mid-80s, two-chamber Solex carburetors.
The main differences between these types of devices:
- The design features of the Ozone float chamber provide for the installation of a carburetor on longitudinal engines (VAZ “classic”);
- Ozone carburetors are less demanding than Solex in terms of fuel quality due to the size of the jets. For the same reason, they have slightly higher fuel consumption and worse acceleration dynamics;
- In the Solex design, simplifications were made justified by the operation of Ozone (for example, replacing the pneumatic throttle valve drive with a mechanical one);
- The Solex design provides an economizer for power modes, which is absent in Ozone.
Both types of carburetors (though Solex to a greater extent) are successfully used today.
Correct carburetor adjustment
A car carburetor is a mechanism that does not require constant intervention in its operation, but twice a year, for prevention, you should pay the necessary attention to setting up this unit, which in turn will improve the operation of your car’s engine and extend its shelf life.
Before we properly adjust the carburetor, let’s understand a little about its structure and purpose.
The carburetor is the heart of a car's fuel system. It prepares the air-fuel mixture for the engine. Correct operation of the machine at idle, at medium speeds and at maximum loads is also the prerogative of this technical unit. Do not forget that starting a completely cold system also depends on the carburetor, because for each engine operating mode, it “prepares” the required fuel mixture in composition, by the way, a lot has been written about cold starting on our prokarbyrator website. ru. Therefore, the question is “How to properly adjust the carburetor?” is quite understandable, because the quality of operation of the engine and the machine as a whole depends on it.
Tools needed
To repair and properly adjust the carburetor, one screwdriver is not enough, as many drivers believe, so you need to make sure you have the necessary tools.
For this you need:
- Screwdrivers of different lengths with different blade sizes. Of course, this is the main tool, but we must remember that you cannot use a screwdriver with rounded edges, this can lead to deformation of the adjusting screw or nozzle. The size of the blade must completely match the slot of the parts being dismantled.
- Open-end spanners. Sizes from 6 to 24 mm.
- Union heads (thin-walled).
- Spark plug keys.
- Pliers.
- Tweezers.
- Air compressor (if purging is planned)
A medical disposable syringe may be useful for cleaning carburetor holes and crimping channels. And also toothpicks to get out small parts (very convenient).
Description of the operation of the fuel pressure regulator
Before moving on to the question of how to check the fuel pressure sensor, you need to understand the principle of its operation. This will give a complete understanding of this process. As stated above, DDT consists of two parts - mechanical and electrical. The mechanical part is a metal membrane that bends under the influence of force caused by pressure in the fuel system. It should be noted that on sensors designed for different pressures, the thickness of the membrane will also be different. In particular, the thicker the membrane, the greater the pressure the sensor is designed for. It is also worth noting that some machines use two sensors - in the high pressure circuit and in the low pressure circuit. They are named accordingly.
The electrical part of the fuel pressure sensor consists of four strain gauges, which change the value of their electrical resistance depending on the mechanical pressure exerted on them. The strain gauges are connected using a Winston bridge electrical circuit and voltage is applied to them through an amplifier. Accordingly, its output value will change depending on how much the membrane bends. Basically, testing the fuel pressure sensor involves measuring the output voltage from the fuel pressure sensor.
Based on information from the sensor, the ECU gives a command to open the fuel valve, as a result of which its pressure is released due to the fact that it is bypassed from the rack. This is true for both gasoline engines with injection and modern Common Rail diesel systems, which are controlled using electronic systems.
Fuel is supplied under pressure into a ramp, the element of which is a sensor with a membrane. In this case, the membrane bends, as a result of which the resistance of the resistors changes. The specified input voltage can range from 0 to 80 mV (accordingly, 0 indicates that there is no pressure at all, and 80 mV indicates that the pressure value is the maximum permissible). With the help of an electronic amplifier, the output voltage range increases to 0...5 Volts, which are transmitted to the electronic engine control unit (ECU).
The output voltage is the same, but the pressure of gasoline and diesel engines is known to be different. For reference:
- For a diesel engine, the output voltage is 1.3 Volts at 250 Bar and it increases to 4.5 Volts at 2500 Bar (1 Bar = 100 kPa).
- For gasoline engines, the voltage will be 1.3 Volts at a pressure of 50 Bar, and the value will be 4.5 Volts at a pressure of 200 Bar.
The data given is approximate, and is taken as an example for a sensor from the BOSCH company, installed on some models of automakers BMW, Alfa Romeo and many others. Similar characteristics may differ for specific car brands, including those using different fuel pressure regulators.
Older diesel engines use a mechanical fuel pressure regulator. However, due to the fact that it is practically not used on modern cars, we will not consider its design.
The main problems in the carburetor and how to eliminate them
Let's give an example of the most common malfunctions in the fuel system of a car that depend on a carburetor malfunction.
• No fuel supply
We unscrew the fuel line from the carburetor and use the manual pumping lever, or, placing a gasoline container under the hose (a small leak is possible), manually turn the crankshaft. If fuel flows, then simply wash the inlet filter; the fuel pump itself is fine. If fuel does not flow, we inspect the pump - there are stains from gasoline, then tighten the housing coupling screws. You can also wash (replace) valves and filters, and, if necessary, the diaphragm.
• No idling
Incorrect engine idling may be caused by the carburetor supplying a lean fuel mixture. This can be determined by ear or by looking into the first chamber of the carburetor; there, droplets of fuel will be visible on the walls. Gradual enrichment of the mixture will lead to stabilization of engine operation.
It is also necessary to check the condition of the solenoid shut-off valve. In the vast majority of cases, it simply flies off the connectors, disrupting the functioning of the motor system. If the carburetor is adjusted correctly, removing the wires from the EMC (solenoid valve) will stop the engine.
• High engine speed at idle
Most likely the throttle valve is faulty. We change the position of the lever relative to the adjusting screw, completely covering the inlet hole in the chamber. For self-adjustment, you need to know that when the gas pedal is fully pressed, the damper must be fully open.
• Difficulty starting a cold engine
The reason most likely lies in the high level of fuel in the carburetor float chamber. Such violations occur when the shut-off valve or float holder is faulty. The level is also affected by the condition of the float itself, which, if necessary, must be checked for leaks by dismantling and lowering into water with a temperature of 80 degrees. Also in this case, you need to check the mesh filter, which is located under the plug.
• Engine does not start
If the problem is in the carburetor, then the cause may be an air damper that does not close completely. To adjust the damper drives yourself, you need to know that when the “choke” handle is fully recessed, it must be open. It should also be mentioned that if the air damper does not open completely, this inevitably leads to an increase in fuel consumption, and it becomes impossible to adjust the idle speed.
Malfunctions
| FAULTS | CAUSES AND REPAIRS |
| The appearance of a characteristic knock at the bottom of the engine. | This indicates problems with the main bearings. The car must be towed by a tow truck to a service center and the appropriate repairs must be carried out. |
| The appearance of a pronounced knocking sound with a metallic sound. | The reason for this is problems with the bearing rods and piston pins. It should be said that operating a car with such problems may subsequently lead to the need for expensive major repairs. |
| Engine troubles at low speeds. | There may be several reasons for engine tripping: first of all, it is the use of low-quality gasoline. It is also possible that carbon deposits may appear in the combustion chamber. In rare cases, problems are observed in the operation of the injection system. Repair in this case is carried out only after a comprehensive diagnosis. |
| Loud knocking sound when the engine is not warmed up. | This may indicate the beginning of camshaft wear. This problem is typical for power units whose mileage exceeds 100,000 kilometers. It is necessary to carry out appropriate diagnostics and then replace the camshaft. |
Also interesting: How does the transfer case work on a Chevrolet Niva || Transfer case switch for Niva Chevrolet
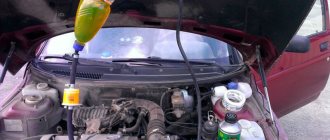
Carburetor adjustment with screws
First of all, before proceeding with the appropriate adjustment, it is necessary to debug the ignition system, make sure that the spark plugs are in good condition, adjust the fuel supply system, set the permissible gap on the device for automatically interrupting the current circuit, remove the gas pedal rod from the throttle valve and only then proceed to carburetor settings.
The engine must be warmed up to operating condition, otherwise after debugging “cold” during operation it will work completely differently. We completely disconnect the crankcase tube, completely eliminating the influence on the crankcase gas setting. The equipment you will need is a simple slotted screwdriver and preferably a tachometer (digital, since the dial does not show revolutions up to 10 units). In service centers, they could use a gas analyzer as a necessary, but not obligatory, one for fine tuning, but we will make do with the specified accessories.
- We reduce the number of idle speeds to a minimum using the “quantity” screw (the engine is running, but is about to stall).
- Using the “quality” screw, we look for the position at which the number of revolutions is maximum. We begin to screw it in, raising the speed; if the engine stalls, we unscrew it to the required criterion.
- We check the quality of the fuel mixture.
Give the gas sharply - the engine should not stall. If it suddenly stalls, then unscrew the “quality” screw until the engine starts working normally. The setup is complete.
Experienced drivers make such adjustments “by ear” based on the sound of the engine; for “confident” drivers, there are many instructions and training videos; for “beginners”, it is better to carry out the correct carburetor adjustment in the appropriate service centers.
Reasons for failure of the fuel pressure sensor
There are actually few reasons for the failure of the fuel pressure sensor. This is either damage to the internal parts of the sensor or its wiring. In the first case, this may be mechanical damage to the body, its rusting due to mechanical damage or simple old age. It may also damage any electrical contact inside the sensor. As a rule, it cannot be repaired and must be replaced.
However, more often than not, it is not the sensor itself that is damaged, but its signal wiring or connection connector (the so-called “chip”). In some cases, it is noted that under the influence of vibration, wires fray, their insulation deteriorates, and a short circuit may even occur, which can cause the engine to stall while driving. In this case, it is necessary to perform additional diagnostics and replace the wiring and/or connector that fits onto the sensor.
It is noted that on some cars, when replacing a sensor with a new one, it is necessary to “register” it in the memory of the electronic engine control unit. This is especially true for non-original sensors. To do this, it is necessary to use additional hardware and software, so it is better to seek help from a specialized service center.
As for the mechanical fuel pressure control valve, it can simply allow a certain amount of fuel to pass through, which is why there will be low pressure in the system with all the ensuing consequences, in particular, a drop in engine power, “twitching” of the car and other troubles.
The cause of the breakdown may also be a clogged mesh on the regulator. Clogging can be caused by debris getting into the fuel if the fuel filter does not cope with the tasks assigned to it or it is simply clogged and debris from it passes into the fuel line. As for diesel engines, in cold weather the diesel fuel can freeze, and solid paraffin particles form in it. In this case, it makes sense to use diesel fuel defrosters.
Another reason is wear or jamming of the locking element inside the pressure regulator housing. Another cause of the malfunction is a loose fit of the regulator cone inside the rack. The cause of the malfunction may also be the electronic control system (coil, microcircuit with strain gauges).