The principle of operation of a power window is similar to that of many of the systems discussed earlier, that is, there is a system for reversing the power supply to the motor, which is controlled either by a relay or directly by the switch.
More complex systems are now becoming popular for reasons of safety as well as increased comfort. Many manufacturers now provide the following options:
- moving up or down at a time
- moving an inch up or down
- slow blocking
- return
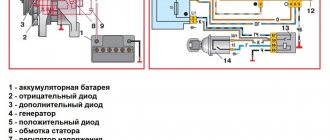
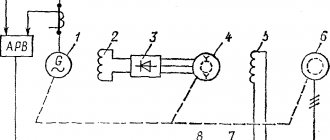
The complete system consists of an electronic control unit containing the power window motor relay, switch packages, and interconnection system to the door lock and sunroof control circuitry. The system is presented in the form of a block diagram in the figure.
Rice. Block diagram of connections between door locks, windows and sunroof controlled by an infrared key
When the power window operates in one command or one touch up mode, the window moves in the selected direction until the switch is reversed, stopping the motor, or until the ECU receives a signal from the door circuitry. The problem with the one-touch movement is that if a child gets caught in a window, for example, there is a serious risk of injury. To prevent this, the return property is used. An additional commutator is attached to the motor armature, which through two brushes transmits a signal proportional to the motor rotation speed. If, when closing the window, a change in motor speed below a certain threshold is detected, the ECU will reverse the direction of the motor until the window is fully open.
By counting the number of pulses received, the ECU can also determine the position of the window. This is important because the window regulator should not reverse direction when the window stops in the closed position. In order for the ECU to remember the window position, initialization must be performed. This is usually done simply by turning on the motor until the window is fully open, then until it is completely closed. If this is not done, the one-touch close function will not work.
Some systems use Hall effect sensors to determine motor speed. Other systems monitor the current drawn by the motor and use its value as an indicator of speed.
The "slow lock" feature allows the vehicle to be completely locked with one command from the infrared remote key. This is done through connections between the door lock control unit and the sunroof and window control unit. Upon a signal, all windows are closed in turn, then the sunroof, and finally the doors are locked. If required, the security mode will be set. The windows are closed one at a time to prevent excessive current consumption that would occur if all the windows were operated at the same time.
Rice. Power window control circuit
The schematic diagram of electric windows is shown in the figure. Let us note the connections of this circuit with other systems, such as the door lock and the rear window insulation switch. The latter is usually installed to allow the driver to lock operations on the rear window, for example for the safety of children.
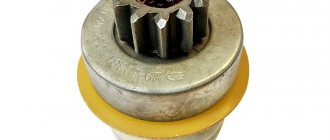
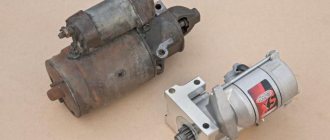
The illustration below shows a typical window motor used for manual or power window systems.
Rice. Window lift motor for manual or power window lift systems
Causes of malfunction
So, we gradually approached the issue of malfunctions. What if the window regulator cannot go down or up? Before you remove the window regulator, disassemble and repair it in your car, let's look at the main reasons. If the rear or front windows do not work, the reason may be either electrical or mechanical.
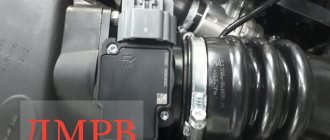
Detailed design of the EP system
Electrical faults
First of all, if the window regulator has stopped working, it is necessary to diagnose the safety element responsible for the functionality of the system. If you realize that the power window is not working due to a fuse, then you just need to replace it. But if the fuse is working, then you will need to measure the voltage at the electric motor terminals. This task can be accomplished using a regular 12-volt lamp or using a tester.
We recommend: How much oil is poured into a car engine
If you find that the driver's window or any other door does not work due to voltage, then you need to further check:
- wiring;
- relay;
- system control unit.
Sometimes a car owner thinks that the window regulator is broken if, after opening the window, it automatically begins to close until the key is turned in the ignition. As a rule, in this case the problem lies in the contacts, which should be cleaned. Much less often, but it still happens that repair of electric windows includes replacing or repairing a button.
Mechanical defects of the mechanism
If, after measuring the voltage, you realize that there is current in the system, but it does not go down or the window regulator does not work at all, most likely the problem is mechanical. As a rule, in this case, something is interfering with the device, so you will have to disassemble the door and look for the reason. Much less often, the reason lies in a failed electric motor (the author of the video is the channel In Sandro’s Garage).
How to raise the glass if the electric seal is broken - there are several options:
- Purchase a window regulator repair kit and repair the device, after which you can fully use the system.
- Try to grab the glass on both sides with your hands and pull it up. If the glass falls after being lifted, you will have to disassemble the door and place a support of the appropriate size under it.
- If you can’t lift the glass with your hands, you can take a fishing hook on a fishing line and lower it into the door card. You need to try to pry the glass and lift it.
The right window lifter on Kalina does not work
VAZ (Lada) Kalina I 2004 - 2013
The power window button stopped responding to lowering, both on the driver's and passenger's sides. Right front door. That is, the glass goes up, but there is no reaction when it goes down.
I tried swapping the two top right relays in the fuse box. What else can you see?
- Rear window rolls down tightly, Kalina – 3 answers
- Turn signals do not blink constantly in Kalina - 2 answers
- The car does not start, the relay clicks, VAZ Kalina – 2 answers
- Where is the ground terminal for the power windows and central locking located in Kalina? – 1 answer
- The window regulator does not work on Kalina - 1 answer
Most likely a wiring break. Remove the door trim and disconnect the glass window chip. and check the power supply and mass for lowering. Maybe the motor itself is to blame. But most likely the break is either in the corrugation between the door and the counter. Or even lower, maybe in the threshold, there is ESP wiring. Search
You can replace the button on the right door. It’s better to first check whether the lowering voltage comes from the left button to the right, whether it passes through the right button.
The funny thing is that you end up disassembling and reassembling the engine and that’s it. It feels like when closing the window, an impact occurs and the shaft gradually disengages. I suffered with both the right and left doors.
It is easy to check the serviceability of the button without disassembling the door. With the engine turned off, you press the button and if it is working properly, the light in the instrument panel will dim slightly.
- Are the DTOs the same in Lada Kalina? – 1 answer
- Heater radiator leaking in Lada Kalina - 2 answers
- What adapter for Lada Kalina diagnostics? – 1 answer
- No speed readings on Lada Kalina - 1 answer
- Speedometer does not work in Lada Kalina - 2 answers
- What pressure should be in pirelli 185/60 R14 82H tires? – 2 answers
- Error P0172 in Lada Kalina - 3 answers
- Lada Kalina does not gain momentum - 2 answers
- Lada Kalina heater radiator is leaking - 3 answers
- Is it possible to install a rear beam on Kalina from 2109 or 2110? – 1 answer
This is interesting: Selection of Koni shock absorbers by car brand
The window regulator does not work on Kalina
The car does not start, the relay clicks, VAZ Kalina
Rear window rolls down tightly, Kalina
Where is the ground terminal for the power windows and central locking located in Kalina?
Power window fuse
The oldest and most proven types of car electrical systems include window drives. Indeed, the usual mechanical window lifters can be found only on some car models, while the electric drive has long come into use and is used everywhere. The operation of the window regulator would not be possible if it were not for such an important element as the fuse. In this article we will talk about where the power window fuse is located and how to find out which element is responsible for their operation.
How power windows work on a VAZ-2110
Wiring diagram for electric windows.
This vehicle cannot lower or raise the windows unless the ignition is turned on.
For window regulators, relays rated for a current of 30 Amps are used.
The relay, which is located in the mounting block, is responsible for the operation of the window lifters. It is located in the passenger compartment on the driver's side.
The relay is marked with an arrow.
The window regulator does not work on Kalina
The number of electric windows installed on the VAZ-2118 Kalina passenger car can be two (only on the front doors) or four (on all doors). It all depends on what configuration of the car its owner purchased.
This is interesting: How does a refueling nozzle understand that the tank is full?
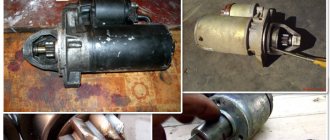
One of the most common malfunctions of electric windows on this make of car is the freezing of the commutator brushes of the electric motors that drive the side windows of the car. The whole point is that when the electric motor is running, the graphite brushes of the commutator heat up, and since they are not inserted into a metal socket, but into a plastic one, which begins to melt when heated, which leads to the brush sticking to this socket.
As a result, the brushes lose mobility and, having worn out a little, begin to not reach the commutator plates, and the force of the spring is not enough to tear the stuck brush away from the socket and press it to the commutator. In order to restore the operation of the electric window motor, sometimes it is enough to knock on the door trim 3-4 times, but if this technique no longer helps, then you will have to remove the door trim and disassemble the electric motor.
The second problem with the electric windows of the Kalina passenger car is that the contacts of the driver's control panel for all window lifts bear a fairly large load, since there is no unloading relay in the electrical circuit of this device. As a result, the driver's control panel sometimes cannot withstand such loads and fails.
The driver of a Kalina car must be especially careful when using electric windows in the cold season , when wet glass freezes to the marigolds at subzero temperatures and, when trying to open it, can cut off the teeth of the plastic gear of the gearbox. In this case, you will have to change the gear motor assembly.
If the power windows of all doors do not work simultaneously, then first of all you will have to check the integrity of the 30 amp fuse F2, located under the hood of the car in the mounting block. If it fails, you will have to look for the location of the short circuit, which led to an increase in current in the circuit. When checking the integrity of the wire insulation, special attention will need to be paid to the places where the wires pass from the car body to the doors.
The electrical circuit of the power windows also includes a control controller; if it fails, you need to know that Kalinas are equipped with two different types of controllers that are not interchangeable.
Instructions for replacing the electric motor
Repairing a window regulator may include different stages depending on the breakdown. In this case, we will tell you how to repair a window regulator by replacing its electric motor; as mentioned above, this problem is one of the most common.
The replacement process is considered using the example of a Lada Kalina car:
- First you need to buy a new electric motor, which is sold in a housing with a gearbox. The door trim is dismantled - this operation cannot be performed in the cold, since the trim is fixed using plastic pistons, which will quickly break.
- Unscrew all screws and other fasteners securing the inner handle.
- All wires must be disconnected; for greater convenience, you can remove the speakers. After these steps, the glass, which is fixed in the guides, is unscrewed. In order for the glass to sink to the bottom, you need to unscrew four more screws; to do this, use a 10 key. There is a curtain at the bottom of the glass unit, which must be removed.
- The window regulator itself is mounted on nuts and guides, the electric motor itself is secured with three more nuts. The block can be pulled out through the technological holes in the door. If you disassemble the gearbox, the electric motor will fall apart into two parts. In general, the gearbox must be dismantled and replaced with a new one, further reassembling in the reverse order. The gear cable should be lubricated before use.
1. First remove the door trim.
2. Disconnect all wires.
3. Disconnect the gearbox and replace it with a new one.
Operating principle of the window lift system
An automatic window lift is an electromechanical device that allows you to close or open your car windows. The basic principle of operation is the movement of glass by transferring force from the gearbox of the device to the glass itself.
The design of the unit is based on four main components:
- The gearbox is also the drive mechanism. Provides force to move the glass in the door. Works in tandem with a gear or worm drive. This arrangement allows you to open the window to the desired height. However, it does not fall or sink.
- On and off device. Simply put, it’s a button that adjusts the height of the glass.
- Directly glass.
- Lifting mechanism. A device that transmits force from the gearbox to the glass. This mechanism can have different operating principles:
- force transmission through a rack and pinion system;
- lifting glass using cables;
- transmission of force through a system of levers.
Depending on the force transmission system used, they speak of a rack-and-pinion, cable- or lever-type window lift mechanism.
In modern cars you can most often see the last two options. Despite the simplicity of the design, the unit may begin to work incorrectly or even fail.
Reference! The first power windows appeared in the USA in 1940 on Packard 180 cars. A year later, Lincoln equipped its seven-seat sedans with the new unit.
Fuses and relays VAZ 2110 - 2112, electrical diagrams
If some devices on your VAZ 2110 or VAZ 2112 , fuses or relays may be to blame. At the very least, the first thing you need to do is check them, and then draw some conclusions regarding the malfunctions.
Correct diagnosis of many electrical problems will allow you to accurately determine the cause of the inoperability of a particular unit. To find out what the fuses and relays of the VAZ 2110 - 2112 are responsible for and how to find the right one, read this article.
We recommend: Classification of passenger car bodies
As in many other cars, in the VAZ-2112 and VAZ-2110, when the engine is turned off, the devices are powered directly from the battery. When the engine is running, voltage is supplied to the devices from the generator, which simultaneously charges the battery. If the current exceeds the permissible value or a short circuit occurs, the circuit fuse will blow. Powerful electrical appliances are connected via relays.
Fuse and relay box
The fuse and relay box is located on the left, lower part of the instrument panel. It is accessible by pressing the button and folding the lid down. To remove fuses, there are special non-conductive pliers in the upper left part of the mounting block.
1 - K5 - high beam relay . If the high beams in two headlights do not work, check this relay. If one of the high beam headlights does not work, check fuses F3 and F13, as well as the lamps and the high beam switch.
2 - K4 - low beam relay . If the low beam in both headlights does not work, check this relay. If only one low beam headlight does not work, check fuses F2 and F12, as well as the lamps themselves and the light switch.
3 - K1 - lamp health control relay.
4 - non-conductive tweezers for removing fuses.
5 - power window relay . If your power windows stop working, check this relay. It could also be in fuse F5, or in the window lift drive system itself. To get to the mechanism, you need to remove the door trim. Check the electric motor, the appearance of the gears and the absence of binding of the mechanism.
6 - K3 - turn signal and hazard warning relay . If your turn signals or hazard lights do not work, check this relay and fuse F16, as well as the turn signal lamps themselves and their switch.
7 - starter relay . If the car does not start and the starter does not turn, check this relay. It could also be a dead battery, as well as the starter mechanism itself.
8 - backup fuses.
9 - fog lamp relay . If the fog lights do not work, check this relay and fuses F4 and F14. Also check their connection diagram, the serviceability of the wiring and connectors, as well as the lamps in the headlights and the power button.
10 - K2 - windshield wiper and washer relay . If your windshield wipers or windshield washer are not working, check this relay. Also check the wiper motor, washer pump and washer fluid level in the washer reservoir.
11 - K7 - rear window heating relay . If the heating does not work and the rear window fogs up, check this relay and fuses F8 and F9. Also check the connection contacts to the terminal points of the heating elements (at the edges of the glass at the rear pillars). If everything is in order, but the heating does not work, the issue may be in the wiring (the wires are frayed or something else).
12 - K6 - add. relay, ignition relay . If your ignition does not turn on or is having problems with it, check this relay. This relay protects the ignition switch contacts from burning. Also check the ignition switch itself and the contact group.
13 - row of fuses F1-F10
14 - row of fuses F11-F20
Circuit breakers
Now let's see which fuses are responsible for what in the same mounting block. I will also give the main reasons for troubleshooting.
F1 (5 A) - license plate lighting lamps, dashboard lighting, side lights on the panel, trunk lamp, left side lights . If any of the listed lamps do not work, check this fuse, as well as the lamps themselves and their contacts. If everything is in order, check the headlight switch button.
F2 (7.5 A) - low beam in the left headlight . If both low beam headlights do not work, also check relay K4 and the lamps themselves. It could also be the light switch and its contacts.
F3 (10 A) - high beam in the left headlight . If both high beam headlights do not work, check the K5 relay, the lamps themselves and the high beam switch knob.
F4 (10 A) - front fog lamp on the right side . If both fog lights do not work, check relay 9 and the headlight bulbs themselves, as well as the switch and its contacts.
We recommend: Full decoding of car tire markings
F5 (30 A) - window lift motors . If the power windows do not work, check this fuse and relay 5. In winter, check if the windows are frozen, warm them up and clear them of ice if necessary. It could also be the window lift motor, its mechanism and gears; in order to get to it, you need to remove the trim of the desired door.
F6 (15 A) - portable lamp fuse.
There may also be problems with the cigarette lighter. To check, unplug the cigarette lighter from the connector. If this fuse stops burning, then the problem is in the cigarette lighter.
F7 (20 A) - engine cooling fan, sound signal . If the cooling fan does not turn on and the engine overheats, check this fuse. Also check the operation of the fan motor by connecting it directly to the battery. It could also be the coolant temperature sensor or thermostat.
F8 (20 A) - heated rear window (element) . If the heating does not work and the rear window fogs up, check this fuse, fuse F9 and relay K7. Also check the contacts on the terminals of the heating elements, check the wiring, sometimes the wire frays. It could also be the heating switch and its contacts.
F9 (20 A) - recirculation valve, windshield wipers and washer, headlight washer, rear window heating relay coil . If the heating does not work, similar to the previous one. If the windshield wipers or washer do not work, also check relay K2, the fluid level in the washer reservoir, the washer pump, and the wiper motor. Another issue may be their switching handle, its wiring and contacts. The wires may be squashed or frayed and shorted to the housing.
F10 (20 A) - backup fuse.
F11 (5 A) - right side dimensions . If the left side does not work, check fuse F1. If none of the side lights work, check the light switch and its contacts. Also check the dimensions of the lamps themselves.
F12 (7.5 A) - low beam in the right headlight . Similar to fuse F2 for the left headlight.
F13 (10 A) - high beam in the right headlight, high beam lamp on the dashboard . Similar to fuse F3 for the right headlight. If the blue lamp on the panel does not light up when you turn on the high beams, check this fuse, as well as the lamp itself and the wiring to it.
F14 (10 A) - front fog lamp on the left side.
Similar to fuse F4 for the right fog light.
F15 (20 A) - seat heating, trunk locking . If the heated seats do not work, check this fuse and the power button on the dashboard, its contacts and wiring.
F16 (10 A) - direction indicators and hazard warning lights, hazard warning lamp . If the turn signals or hazard lights do not work, also check relay K3 and the lamps in the turn signals themselves, as well as the hazard light switch button.
F17 (7.5 A) - interior lighting, lighting, ignition switch lighting, brake lights, clock, on-board computer . If the brake lights do not work, check this fuse, the lamps themselves, and also the switch installed in the pedal unit.
F18 (25 A) - glove box lighting, heater controller, cigarette lighter . If the cigarette lighter does not work, check this fuse, disassemble the cigarette lighter and check for a short circuit in it, especially on the washer and contacts. Bend them if necessary or replace the entire cigarette lighter. Do not insert non-standard size connectors into it.
F19 (10 A) - door locks, control relay for brake lights and parking lights, turn signals and lamps for turning them on on the panel, reverse lamp, generator winding, control indication of the on-board system, dashboard, clock, on-board computer.
F20 (7.5 A) - rear fog lights.
If the rear fog lights do not work, check this fuse and relay 9. Also check the lamps themselves, wiring, connectors and the switch on the panel.
Never replace blown fuses with fuses of a higher rating (current), this can cause burnout of tracks on the mounting block, failure of devices, etc. In this case, repairs will cost more, so it is better to deal with the problem immediately and fix the problem. If you cannot find what’s wrong on your own, contact a car service; usually such problems are dealt with by electricians, who will not have any difficulty identifying the problem and fixing it.