Where is the front caliper located?
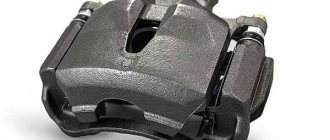
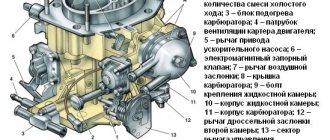
A caliper is a kind of housing for the brake system of the front wheels, in which replaceable pads are mounted, as well as working cylinders. This part is made of steel. Located on the brake discs. The design of this device has parallel holes on both sides in which the brake cylinders are located. These cylinders drive pistons, which move when you press the brake pedal.
The pistons in the working cylinder act on the pads, which are pressed by a friction layer against the brake disc rotating with the wheel. Thus, the vehicle's movement slows down. Without this housing, it is almost impossible to implement a disc brake mechanism, therefore, when malfunctions of the device occur, they must be eliminated as quickly as possible. This mechanism fails extremely rarely, and it can last up to 500 thousand km, however, under the influence of certain factors, its service life can be reduced by 2-3 times.
The mechanism belongs to the category of non-repairable devices that, if they fail, need to be replaced. Exactly how to remove the caliper on a VAZ 2107 is discussed in detail in the material, which will allow not only beginners, but also experienced professionals to remember how to do it correctly.
What tools are needed for removal
Before you begin repairing or replacing the brake caliper on a VAZ 2107, you will need to find out what exactly caused the breakdown. Most often, the pads are changed; when the friction layer wears out, they must be replaced. However, to replace the pads, there is no need to remove the part.
In addition, the working cylinders may fail, and if they fail, they will need to be repaired or replaced. To make the replacement, you first have to remove the caliper. To dismantle it you will need tools and materials:
- The caliper is complete with new working cylinders. If the mechanism body itself is in good condition, then only the working cylinders, of which there are 2 in the design of each device, must be replaced.
- A set of keys for 10, 14 and 17.
- Slotted screwdriver.
- Pliers with a hammer.
- Jack and goatee.
After replacement, you will need to fill the brake fluid into the system and remove the air - bleed it.
Removing the caliper on a VAZ 2107
Removing the caliper on a VAZ 2107 car is performed in the following cases:
- If the slave cylinder needs to be repaired or replaced.
- In case of deformation and damage to the mechanism body.
Replacing brake calipers on a VAZ 2107 is performed in the following sequence:
- Pump out fluid from the brake system expansion tank if it is still serviceable. If it is not suitable, then you don’t have to do this, since when unscrewing the hoses, it will flow out of the system.
- First, the desired car wheel is lifted with a jack.
- Using a wrench, unscrew the bolt of the brake hose mounting bracket.
- Remove the bracket so that it does not interfere with subsequent manipulations.
- Unscrew the bolt securing the rubber hose.
- Remove the bolt from its seat. Remove the two o-rings.
- Drain the liquid from the hose into a previously prepared container. The liquid does not need to be drained, but to do this you will need to insert, for example, a wooden cap into the hole in the tip.
- Remove the cotter pins that secure the friction pad fingers.
- Remove the pins that secure the pads. To remove them you will need to use a beard and pliers.
- Remove the springs from the brake pads that hold them in place.
- Remove the friction pads. If you do not plan to change the pads, then you need to note which part and where it was located.
- Using pliers, straighten the lock washers on the bolts that secure the device.
- Unscrew the bolts that secure the mechanism to the steering knuckle.
- Remove the device from its seat.
When dismantling the caliper, you need to take into account that the brake mechanism mounting bolts have different head shapes. You need to remember or mark which bolt was removed from which seat.
How the repair is carried out
If the mechanism is damaged or there are deformations, it must be completely replaced. Repairing a VAZ 2107 caliper involves replacing non-working cylinders. The repair procedure is as follows:
- The device is fixed in the jaws of a vice.
- Unscrew the fastenings of the connecting metal tube. After this, the tube must be removed.
- Knock out the working cylinders from the guides.
- If there are none, remove the clamps and replace them with new cylinders.
- Place the cylinders in the guides, and then install the connecting tube, followed by tightening the fittings.
- If it is necessary to repair the brake cylinders on the caliper, then the essence of the repair actions is to change the rubber seals.
- To make repairs, you will need to remove the cylinder and then remove the rubber cap from the cylinder using a screwdriver.
- Press the piston out, then remove the sealing ring using a screwdriver.
- In place of the old ring you need to install a new one from the repair kit. The cylinder, as well as the piston and ring, must be lubricated with brake fluid.
- Install the piston into the mechanism cylinder.
You can install old parts in place only if they are in full working order and without scratches, deformations or damage. Otherwise, if there are any, they should be replaced.
Device installation
Installing the front caliper on a VAZ 2107 will not be difficult after removing, repairing and replacing it. The installation is completed by bleeding the system to remove air. If the fluid is outdated (changed color and darkened), then it must be replaced.
When replacing calipers completely, you need to take into account that these mechanisms are different for the left and right wheels. After completing the work, you need to check that the system is working correctly. This completes the process of repairing the mechanism, and in conclusion it is worth noting that it is recommended to change them in pairs.
If your car's brakes fail while driving, it won't lead to anything good. The rule is true for all cars, and the VAZ 2107 is no exception. This car, for all its popularity in the vast expanses of our vast country, could never boast of reliable brakes. Most often, on “sevens” the brake caliper fails, which has to be urgently replaced. Is it possible to make such a replacement yourself? Yes. Let's try to figure out how this is done.
How often should you change front pads?
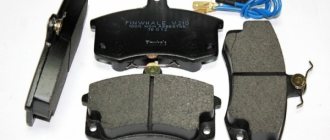
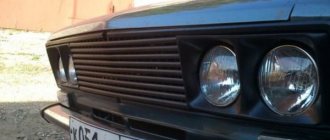
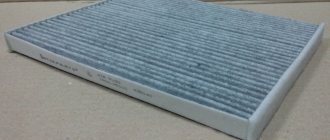
Let's start with the fact that on the VAZ 2107 the front brakes are represented by a disc system, which in some ways is much better than a drum one, but that’s not about that now. There are 2 pads on each caliper at the front, which are responsible for effective braking of the car. The front brake pads of the VAZ 2107 have the following appearance, shown in the photo above.
Essentially, the products are a steel plate onto which a special friction layer is applied. It is this friction layer that is the basis for car braking. When this layer wears off, which depends not only on the frequency of use of the brake pedal, but also on the nature of driving, then the car owner urgently needs to replace the brake pads on the VAZ 2107. If this is not done in a timely manner, then you understand what the outcome may be.
How often it is necessary to change the parts in question depends on the following factors:
- condition of the brake system;
- character and driving habits;
- product manufacturer;
- regular maintenance.
But our mentality is such that we don’t pay attention to how often we need to change the pads, and we do it when it’s pressing. The reasons that indicate that the car requires repair work on the brake system are due to the following symptoms:
- the appearance of extraneous sounds when you press the brake pedal: creaking or grinding;
- to brake, you need to apply force;
- When braking, the car begins to skid.
Approximately, it is necessary to replace the front pads on a car every 25-30 thousand km. But this range is average, since someone can travel 50 thousand km without replacing products, but they can only do 10. Let’s look at what it is to replace the front brake pads of a VAZ 2107 in more detail.
Detailed description of replacing front pads on a VAZ 2107
Replacing pads on a VAZ 2107 is a simple process that needs to be taken seriously. First you need to purchase new products. You need to buy them as a set, and replacement should be done on both wheels at once. After this, make sure that you have a basic list of tools:
- screwdriver;
- hammer and chisel;
- pliers;
- standard set of wrenches;
- WD-40 lubricant;
- Brake Cleaner (optional).
Let's start the workflow:
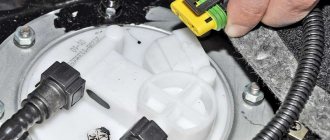
- Initially, some of the fluid should be removed from the brake reservoir, which is done to prevent it from overflowing and entering the engine compartment.
- Place shoes under the wheels, then install a jack and lift the front end. Afterwards, the wheel is removed, and then the surface of the caliper is cleaned of dirt and dust.
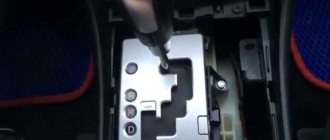
- Using a thin screwdriver, remove the two visible cotter pins. These cotter pins are designed to hold the pad rods. The photo below shows the location of these two cotter pins.
- Using a screwdriver, you need to press out the pad rods. If your own efforts are not enough, then you can use a hammer and a punch.
- The products are additionally held by spring structures, which can be seen in the photo above. They also need to be dismantled, for which you need to use pliers.
- When the rods and springs are removed, you can begin to dismantle the products themselves. Usually the pads do not sit tightly, so you just need to pry them off with a screwdriver and remove them, as shown in the photo below.
- Once the pads are removed, it is recommended to clean the seat using special products, and you can begin installing new ones.
- To do this, using a mounting tool or a screwdriver, you need to separate both cylinders, thereby preparing a place for new (thicker) pads. At the same time, do not forget to monitor the level of the displaced liquid in the barrel and, if necessary, remove it.
After installing the new products in their places, install the rods and mounting springs in the reverse order. This completes the replacement of the front pads on the popular VAZ 2107 car. As you can see, there is nothing complicated at all. Everything is simple and clear, but the main thing is to perform all the steps in the order described above. After installing new system elements according to the instructions, there is no need to bleed the brakes.
If you decide to replace worn-out products, then it is recommended to purchase new ones from companies such as Ferodo, ATE or Nippon. They will last much longer and will also delight you with their quality and braking performance. If you still don’t know how to change the front brake pads on a Zhiguli, then this material will be a good help. And remember that you will always have time to overpay the mechanic at the service station, but only then will you not be able to gain invaluable experience in repairing your car.
Design and purpose of the brake caliper on the VAZ 2107
To understand why the “seven” needs a brake caliper, you should clearly understand how the brake system of this car is designed. First of all, it should be said that the VAZ 2107 has two brake systems: parking and working. The parking system allows you to lock the rear wheels after stopping the car. The working system allows you to smoothly block the rotation of the front wheels while the machine is moving, changing its speed until it comes to a complete stop. A hydraulic braking system consisting of four cylinders, two brake discs, four pads and two brake calipers allows you to achieve smooth blocking of the front wheels.
The brake caliper is a housing with a pair of holes, made of light alloy. Hydraulic cylinders with pistons are installed in the holes. When the driver presses the pedal, brake fluid is pumped into the cylinders. The pistons from the cylinders extend and press on the brake pads, which in turn compress the brake disc, preventing it from rotating. This changes the speed of the car. Thus, the caliper body is the basis of the VAZ 2107 working brake system, without which the installation of brake cylinders and discs would be impossible. It should also be noted here that brake calipers are installed only on the front axle of the VAZ 2107.
As for the parking system of the VAZ 2107, it is designed differently. Its basis is large brake drums with internal pads installed on the rear axle of the car. When the driver, after stopping the car, pulls the handbrake lever, the brake pads move apart and rest against the inner walls of the drum, completely blocking the rotation of the rear wheels.
Signs of a faulty brake caliper
There are not many signs of malfunction in the VAZ 2107 brake caliper. Here they are:
- The car does not brake fast enough. This usually occurs due to a brake fluid leak. It can escape either through worn hoses or through hydraulic cylinders that have lost their tightness due to wear. The first version of the problem is solved by replacing the brake hoses, the second - by replacing the damaged cylinder;
- constant braking. It looks like this: the driver, pressing the brakes, stopped the car, and when he released the brake pedal, he discovered that the front wheels remained blocked. This happens because the cylinder pistons are stuck in the open position and the brake pads are still pressing on the brake disc, holding it in place. In such a situation, they usually change the entire caliper, since finding new hydraulic cylinders for the “seven” on sale becomes more and more difficult every year;
- squeaking noise when braking. The driver, pressing the brake pedal, hears a quiet squeak, which can intensify with increasing pressure. If you have to brake sharply and at high speed, the creaking turns into a piercing howl. All this suggests that the brake pads in the caliper have completely worn out, or rather, the coating of these pads. The material that covers the front part of the block has increased wear resistance, however, it eventually becomes unusable, being worn down to the ground. As a result, the brake disc is compressed by two steel plates without a protective coating, which leads not only to a loud squeaking sound, but also to increased heating of the caliper.
Caliper jammed on the road: causes and symptoms
The caliper jams and fails due to overheating, dirt and moisture getting into it. There are also other provoking factors:
- Wear of the brake mechanism. This happens when the driver does not monitor the car parts and does not carry out timely diagnostic maintenance. The caliper becomes unusable and jams, often right on the road.
- Incorrect pad installation. When they are not parallel to the discs or in the wrong places due to an error during the repair, the brake mechanism jams.
- Lack of lubricant or incorrect selection. Typically, drivers try to save on lubrication, which is fraught with many problems. It is necessary to select a product that can reduce friction during the operation of parts and has cooling properties. High-quality lubrication should provide the mechanism with protection from exogenous adverse factors. Especially in winter, when the road is strewn with ice, snow, and stones.
When a caliper jams, it is accompanied by a number of characteristic symptoms:
- the discs become very hot, there is a burning smell in the cabin (these manifestations are typical for overheating of the brake mechanism parts);
- when you press the brake, the car pulls to the side (usually to the one where the jammed caliper is located);
- after releasing the brake pedal, a creaking sound is heard in the cabin - a sign of wear on a part of the brake system;
- brake fluid is heavily consumed;
- There are drops of oil visible on the wheel rim.
If the caliper jams on the road, the car may begin to brake on its own. This happens because the brake pads are in constant contact with the discs. As a result, the car will constantly brake, even when the driver does not touch the brake pedal. The pads will begin to deteriorate faster.
If even one of these phenomena is detected, it is important to take immediate measures - diagnose the brake system, level out the identified problems
Replacing a brake caliper on a VAZ 2107
To replace the brake caliper on a VAZ 2107, we will need a number of tools. Let's list them:
- open-end wrenches, set;
- new brake caliper for VAZ 2107;
- flat screwdriver;
- a piece of rubber hose with a diameter of 8 mm and a length of 5 cm;
- jack;
- goatee
Sequencing
Before removing the caliper, the wheel behind which it is located will have to be jacked up and removed. Without this preparatory operation, further work will be impossible. After removing the wheel, access to the caliper opens, and you can proceed to the main work.
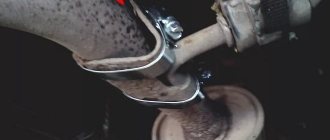
- The brake hose is connected to the caliper. It is mounted on a bracket that is attached to the caliper with a bolt. The bolt is unscrewed with a 10mm open-end wrench, the bracket is slightly raised and removed.
Video: changing the caliper on a VAZ 2107
Here it is impossible not to tell one case related to the prevention of brake fluid leakage from the “seven” hose. One driver I know, who did not have the above-mentioned rubber plug on hand, found a simple way out of the situation: he pushed an ordinary 19mm bolt that was lying nearby into the eye of the brake hose. As it turned out, the bolt fits the hole in the eye perfectly, and the brake fluid does not leak. There is only one problem: you can only get such a bolt out of the eye using pliers. The same person assured me that another ideal brake hose plug was a stub from an old Constructor pencil. This is a thick Soviet pencil with a round section, and the driver has been carrying it in the glove compartment ever since.
Rear brake pads and their types
Brake pads are the most important element of the braking system, ensuring the process of slowing down and stopping a vehicle. Pads are divided into two types:
- on the front wheels (disc)
- on the rear wheels (braking occurs using linings adjacent to the drum)
It is the latter type that we are talking about today.
The principle of operation of the pads is that when the driver presses the brake pedal, the impulse from it is transmitted to the brake system, to the pads.
Fitting tightly to the drum (this is the case with the rear units, and the disc, if we talk about the front units), the pads act as a barrier that prevents the wheel from spinning, as a result of which the car stops. If the pads fail, this has the most negative impact on the operation of the braking system, which can lead to serious consequences, such as loss of control of the car while on the road and an accident. That is why it is so important to keep under control the condition of the vehicle’s brake system components, as one of the most important systems responsible for traffic safety.
You can determine that the components are out of order by a characteristic squeaking noise, which intensifies as the car accelerates.
There are two ways to solve this problem:
- Contact a mechanic
- Fix the node defect yourself.
But contacting a specialist can cost a pretty penny, because, to hide it, our country has now taken the path of market relations, where man is a wolf to man, which is not good, and sometimes in auto repair shops they also increase the price for the simplest work.
Doing this work yourself will not be so difficult, it is only important to be patient, have the necessary equipment, read the instructions in detail, and also purchase new rear pads.
There is a large selection of these parts on the car market. But most often motorists give their preference to three options:
- Pilenga, of high quality and good service life, the price per part is 580-600 rubles.
- Allied Nippo, cost about 1000 rubles.
- Tornado - sold at a price of 950-1000 rubles.
The pads have been purchased and a free day has been carved out for work. Here we go?
Important points
When repairing the brake system of a VAZ 2107, you should remember several very important nuances. Without mentioning them, this article would be incomplete. So:
- On later VAZ 2107 models, spring washers began to be installed under the fastening bolts of the brake brackets. They are thin and very easy to lose when removing the bracket. To prevent this from happening, it is advisable to spread some newspaper or rag under the caliper. If the puck does pop out, it will be much easier to find it;
- If the driver does not plan to change the brake pads when replacing the caliper, then before removing them they should be marked with a marker or chalk so that they can be installed in the same place during reassembly. If you change the original location of the pads, they will become unusable much faster;
- If the driver decides to leave the caliper in place and plans to change only the brake pads, then he will have to buy not one, but two sets of pads, since these parts are always changed on two wheels, and not on one. If you leave old pads on one of the wheels, this will inevitably lead to rapid wear and new problems in the operation of the brake system;
So, replacing a brake caliper is not at all as difficult a task as it might seem at first glance. The main thing that the driver should remember when changing this part is its extreme importance. If a mistake is made when installing the caliper or pads, this does not bode well for either the driver or the car. It is for this reason that the article described in as much detail as possible all the nuances of installing a brake caliper. And it is strongly recommended to pay close attention to these nuances.
The front wheels of the “Seven” are equipped with disc brakes that are highly efficient. Each of the components of the VAZ 2107 car has two working cylinders, which bring the pads together and clamp the part located between them. This causes the disk to stop rotating. During operation, parts wear out and the faulty caliper needs to be replaced with a new one.
Typically, the cause of unit failure is corrosion processes of the cylinder walls and piston. In a working mechanism, they are protected from moisture by special rubber cuffs. Damage to these elements leads to moisture getting inside; over time, the unit loses its mobility and requires replacement or qualified repairs. Restoring the brake mechanism can be done independently.
Master brake cylinder
The GTZ of the VAZ “kopek” is a hydraulic type mechanism, consisting of two sections and designed to operate a system with two circuits.
If problems arise with one of the circuits, the second, although not as effective, will ensure that the car stops. The GTZ is mounted to the pedal assembly bracket.
Pistons 3 and 5 are responsible for the performance of different circuits. The initial position of the piston elements is ensured by springs 8, by means of which the pistons are pressed into screws 7. The hydraulic cylinder is sealed with the corresponding cuffs 6. In the front part of the housing is plugged with a plug 1.
The main problems with the GTZ are wear of the lip seals, the piston or the cylinder itself. If rubber products can be replaced with new ones from the repair kit, then if the cylinder or piston is damaged, the device will have to be completely replaced. Since the product is located under the hood near the clutch master cylinder, replacing it does not cause any difficulties.
Dismantling the unit
To carry out repair work on the brake system of a VAZ 2107, you will need spare parts: a caliper assembly or a set of cylinders. Tools you will need: a set of keys, screwdrivers, pliers and a hammer. It is advisable to organize the work in a garage box; a portable lamp is used to illuminate the workplace. Repair of the brake system is carried out in the following order:
- The front part of the car is lifted with a jack and placed on a support, the wheels are removed.
- A thorough inspection of the caliper is carried out and it is cleaned of contaminants, using a key set to “17” we unscrew the bolt securing the brake hose and drain the liquid into a previously prepared container.
- Carefully move the brake pads apart using a screwdriver, applying force to the metal parts of the base. Using a drift of a suitable size, the guides are knocked out and the pads are pulled out.
- We unscrew the bolts securing the housing to the knuckle, thereby releasing the mechanism, and remove it from the brake disc.
Replacement of faulty cylinders installed in the caliper grooves is carried out by knocking it out. It is advisable to carry out repairs in a vice, having previously treated the grooves with a special penetrating liquid. Installing new cylinders usually does not cause any particular difficulties; they are inserted into the housing and driven all the way to the stop using a hammer and a soft metal drift.
Step-by-step process for replacing brake pads
After preparing all the tools, first measure the fluid level in the corresponding reservoir. The engine must be turned off. If the indicator is exceeded from the maximum, select some of the fluid so that nothing subsequently gets on the brake disc.
Raise the handbrake and place chocks under the wheels to prevent the car from rolling. Only now can you lift the car using a jack. Remove one wheel and clean the entire mechanism responsible for braking using a rag. If rust is visible, apply WD-40 for easy removal of the guides.
Unsplit the guides with thin-nose pliers
Place a drift in a convenient position and carefully knock out the guides (not completely) to the extent that the brake pads are freed
Remove the pressure springs from the pads. Now take pliers and use them to press the pistons into the cylinders. Once completed, you can remove the brake pad from the mechanism.
After dismantling the part, carry out an analytical inspection - determine the degree of production; if everything is normal, replacing it is a waste of time. The part can still continue to work out its service life, and the malfunction itself lies in a completely different functional unit of the car. If you determine the presence of wear, prepare a new pad for installation.
Take some grease and apply it to the guides. Be especially careful - the product should not come into contact with other functional components of the brake system.
To successfully install a new brake pad, all steps are performed in reverse order:
- Install the block.
- Install the springs.
- Reinstall the guides to secure the pad.
- Use thin-nose pliers to tighten the guides.
- Check that all mechanisms are secure, after which you can install the wheel.
- Lower the jack and remove the supports.
Once the procedure is complete, repeat the same with the other front wheel.
Once the pads are installed, start bleeding the brakes. To do this, simply press the corresponding pedal sharply several times. Then check the brake fluid level in the reservoir. If the level is lower than required, add the missing amount.
If you feel that you do not have enough experience to perform this work, contact a private workshop where a specialist will complete the work in a short time.
Installing the brake mechanism and bleeding the system
The restored caliper of a VAZ 2107 car is put on the disc and secured with bolts to the steering knuckle. The pads are inserted into the gap and fixed with guide springs; if necessary, parts are replaced with new ones. The brake hose and tube are installed in place, and the system is filled with fluid to the specified level. Repair of the brake mechanism ends with bleeding to remove it from the system.
This process on a VAZ 2107 car is carried out as follows: a hose of a suitable diameter is put on the nipple of the working cylinder. Its other end is lowered into a container with liquid. The assistant sits behind the wheel and presses the brake pedal several times and holds it in that position. Using the key, release the nipple and let out the air. We repeat this action until bubbles stop appearing in the container.
An important part of the brake mechanism is the caliper. It holds the brake wheel cylinders, which, when the pedal is pressed, compress the brake disc, slowing down the rotation of the wheel. Over time, the brake cylinders and the brake caliper of the VAZ 2107 wear out and the wheel begins to brake worse, which can lead to pulling to the side when braking or brake failure. Therefore, these parts need to be monitored and, if necessary, repaired or replaced.
Vacuum brake booster
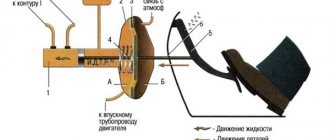
A rod connected to the amplifier is connected to the pedal. The design of the VAZ-2107 vacuum brake booster is quite interesting; it is shown in the figure:
The amplifier is a sealed container, internally divided into 2 chambers by means of a membrane. The chamber located closer to the pedal is called atmospheric, and the chamber separated from it by a membrane is called vacuum. The diaphragm itself is connected to the piston rod of the master cylinder.
The vacuum chamber is connected by a pipe to the intake manifold of the engine, where the vacuum comes from. The design also includes a follower valve controlled by the pedal rod, which does all the work.
When the pedal is released, this valve connects the chamber cavities through a channel, providing identical pressure. When the pedal is applied, the valve closes the channel connecting the chambers and opens the channel connecting the atmospheric chamber with the atmosphere. Since a vacuum is maintained in the second chamber, atmospheric pressure begins to put pressure on the membrane. Since it is connected to the piston rod of the master cylinder, due to the movement of the piston, fluid is displaced from the cylinder into the pipelines.
What is needed to remove the caliper
- screwdriver or bit;
- keys for 17, 14 and 10;
- pliers;
- a piece of rubber tube or bolt with a diameter suitable for the inner diameter of the brake hose tip;
- marker.
It is necessary to remove and install the caliper when replacing it in case of deformation or damage. This is also a necessary action in order to repair the VAZ 2107 caliper.
To carry out the work, you must lift the car on a lift or use a jack. The latter option is somewhat more tedious, but ideal for home use.
Removing the brake caliper
To remove the caliper you must do the following:
- lift the car on a lift or jack up the wheel on which the brake caliper needs to be removed;
- Using a wrench, remove the bolt securing the brake hose bracket;
- remove the bracket so that it does not interfere with further actions;
Important: under the bracket fastening bolt there is a spring washer, which must not be lost when dismantling the bolt and bracket.
- unscrew the bolt securing the brake hose;
- remove the bolt after first removing the two o-rings;
- insert a rubber tube or bolt of a suitable diameter into the hole in the brake hose tip to prevent brake fluid from leaking out;
- Use pliers to remove the cotter pins securing the brake pad pins;
- pull out the pins securing the brake pads and remove them using a bit or a thin, but not sharp, screwdriver;
- remove the retaining springs from the brake pads;
- remove the brake pads;
Advice: if you plan to use the brake pads in the future, they should be marked with a marker so that during reassembly they can be installed in the same place where they were. If this is not done, they will wear out faster and brake worse.
- bend the locking plates of the washers on the caliper mounting bolts;
- unscrew and remove the bolts securing the caliper to the steering knuckle;
- Remove the brake mechanism (caliper) of the VAZ 2107 from the brake disc.
Important: the upper and lower caliper mounting bolts differ in the shape of the head. When installing the unit in place, it is necessary not to mix them up.
Caliper device
Let's move on. The front axle mechanisms are disk ones, consisting of calipers with the main brake elements - pads, and brake discs.
A caliper is a body with cylinders made in it for the pistons. This model has two of them, one for each block. The support structure is shown in the figure.
The caliper pistons have the form of a glass, which is placed in their cylinders, but they can move along it. To prevent fluid leakage, the pistons are equipped with o-rings.
Pads are small metal plates onto which linings made of friction material are glued.
The brake disc is made of metal for better adhesion to the surface of the pads; its side surfaces are well processed so that there are no protrusions or shells on them.
The VAZ 2107 brakes work like this: the fluid moves into the caliper cylinders, where it begins to push out the pistons. They come out of the cylinders, pressing the pads against the disc.
Repair of brake caliper VAZ 2107
A damaged or deformed brake caliper on a VAZ 2107 needs to be replaced. Caliper repair involves replacing faulty brake wheel cylinders. In some cases, instead of replacing the cylinders, they can be repaired.
The procedure for replacing cylinders is as follows:
- clamp the caliper in a vice;
- Unscrew the fittings of the connecting tube with a 10 mm wrench;
- remove the tube connecting the working cylinders;
- Use a hammer to knock out the working cylinders from the guides, after pressing the lock with a screwdriver;
- remove the clamps and replace them with new cylinders (if they are missing);
- insert the cylinders into the guides;
- install the connecting tube and tighten the fittings.
Repair of working cylinders consists of replacing the rubber sealing rings on the pistons. The order of operations is as follows:
- remove the brake cylinder;
- remove the protective cap from the piston using a screwdriver;
- apply compressed air to the cylinder to push the piston out;
- remove the sealing ring by prying it off with a screwdriver;
- install a new ring;
- lubricate the cylinder, piston and ring with brake fluid;
- insert the piston into the brake cylinder.
Important: before installing new sealing rings and assembling the cylinders, you must make sure that the inner surface of the cylinder and the piston are free of damage, cavities, and deformations. Otherwise, replace the brake cylinder with a new one.
How to remove the caliper VAZ 2108, 2109, 21099
The caliper (front wheel brake mechanism) will have to be removed when replacing its brake cylinder, replacing damaged parts, replacing the front wheel hub bearing, or painting. Let's look at two ways to remove the caliper: “fast” and “slow”.
Required Tools
— Open-end wrenches for “13”, “14”, “15”, “17”
Preparatory work
— We hang and remove the front wheel of the car
— We clean the front wheel brake mechanism from contamination
We remove the caliper (front wheel brake mechanism) VAZ 2108, 2109, 21099
"Quick" way to remove the caliper
If you plan to disconnect the brake hose from the caliper, before removing it, use an open-end wrench to “14” (in some cases to “15”) to loosen the tightening of the hose tip on the brake cylinder. Place a container under the caliper to collect the brake fluid.
— Through the inspection hole of the caliper, use a slotted screwdriver to slightly move the brake pads apart (so that they move away from the brake disc)
See photo at the beginning of the article.
— Using a socket wrench set to “17”, unscrew the two bolts securing the caliper to the steering knuckle
We unscrew the two bolts securing the caliper to the steering knuckle. It is better to access the lower bolt from below, and access to the upper bolt from above.
— Remove the caliper by sliding it up the brake disc
We remove the caliper assembly by lifting it up. If the brake disc does not have much wear, it is not difficult to move it.
— Holding the tip of the brake hose with a key at “14”, rotate the caliper until the tip is completely turned out
VAZ 2108, 2109, 21099 caliper removed
"Slow" method of removing the caliper
— Disconnect the floating caliper bracket
Using a screwdriver, bend the edges of the locking plates of the guide pin bolts. Holding the guide pin with an open-end wrench set to “17”, use a wrench set to “13” to unscrew the lower bolt. We lift up the floating bracket by prying it with a screwdriver. We remove the brake pads. We lower the bracket. Similarly to the lower one, unscrew the upper bolt and remove the bracket along with the brake cylinder. We remove the guide pins from the holes in the fixed bracket.
Unscrew the bolts securing the guide pins
— Disconnect the brake hose
The brake hose will have to be disconnected when the caliper is completely removed. In another case, for example, when replacing a wheel bearing, the brake hose is not disconnected, but the removed caliper is moved to the side and suspended on a wire. The hose tip is turned off with an open-end wrench to “14”. You can hold the tip with a key and rotate the brake cylinder until the hose tip is completely unscrewed from it. There is a copper O-ring underneath. We bend the brake hose and secure it with wire so that the brake fluid does not leak out.
— Disconnect the fixed caliper bracket
Using a 17" socket wrench, unscrew the two bolts securing the fixed bracket to the steering knuckle. Remove the fixed bracket.
We unscrew the two bolts securing the fixed guide of the caliper pads to the steering knuckle
— Disconnect the brake (wheel) cylinder
It is better not to remove the brake cylinder unless necessary. We clamp the floating caliper bracket in a vice and with a 10-point socket, unscrew the two screws securing the brake cylinder and separate it from the bracket.
That's it, the VAZ 2108, 2109, 21099 caliper is completely removed and disassembled.
We assemble and install the caliper in the reverse order. The tightening torques of the fixed bracket mounting bolts are 29-36 N.m, the guide pin bolts are 31-38 N.m, the brake cylinder mounting screws are 115-150 N.m.
If the brake hose was disconnected when removing the caliper, then after assembly and installation it is necessary to remove air from the brake system (“bleed” the brakes).
Notes and additions
— The front wheel brake mechanism (caliper) on VAZ 2108, 2109, 21099 cars consists of a fixed bracket (brake pad guide) attached to the steering knuckle with two 17-point key bolts and a floating bracket consisting of two screws fastened together under edge on “10” of the brake cylinder and the caliper itself. The brake cylinder is fastened with two bolts with a wrench set at “13” to the guide pins (wrench set at “17”) installed in a fixed bracket. A brake hose is connected to the brake cylinder.
TWOKARBURATORS VK -More information on the topic in our VKontakte group
Installing the brake caliper
Installation of the brake caliper on the VAZ 2107 is carried out in the reverse order of its dismantling.
After installing the brake caliper, it is imperative to bleed the brake system, removing air from it. Until this operation is completed, operating the vehicle is strictly prohibited.
The left and right wheel calipers are slightly different, so you need to pay attention to this when purchasing new ones.
After repairing and installing the VAZ 2107 brake caliper, it is necessary to check the brake system for fluid leaks and, if necessary, repair them.
Replacing front brake discs
Replacing the front brake discs on a VAZ 2107 car is carried out according to the step-by-step instructions below.
- Put the car on the handbrake.
- Secure the rear axle with wheel chocks.
- Jack up the front of the car.
- Unscrew the wheel mounts and dismantle them.
- Unscrew the brake hose mounting bracket.
The process of unscrewing the bolt that holds the brake hose bracket
- Remove the brake hose from the bracket. Some car owners recommend removing the tube and plugging it, for example, using a bolt of a suitable diameter. This action will allow you to completely remove the caliper, without the need to hang it. It should be taken into account that there is a risk of airing the circuit and therefore the process of bleeding the brakes becomes inevitable.
Brake line hose Pressing in piston
- Using a flathead screwdriver, unbend the locking plates that secure the caliper mounting bolts.
Bending the locking plates
- Unscrew the caliper mount.
Unscrewing the fasteners Removing the caliper
- Unscrew the two pins that secure the brake disc. If it turns, you need to place a mounting bracket or a metal rod, as shown in the photo below.
Unscrewing the pins
- Remove the spacer ring.
Removing the spacer ring
- Using a hammer, remove the disc from its seat.
Using a hammer to remove a disc Disc removal process
- Install a new consumable and assemble everything in the reverse order of removal.
- Check the operation of the brakes.
Source