It is quite easy to determine a malfunction of the brake system by the first signs - a beating in the steering wheel and a metallic squeak coming from the front wheels. Such phenomena indicate that it is time to change the brake pads.
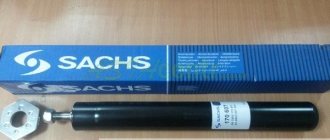
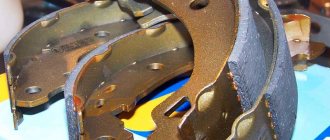
Brake kit
The sound of grinding metal is the most obvious indicator that the pads have worn away, meaning they no longer have the asbestos coating on them. Consequently, when braking, the metal of the worn-out device rubs against the brake disc, which leads to rapid destruction of the latter.
It is recommended to replace the rear brake pads on a VAZ 2110 simultaneously with changing the front ones. The fact is that the main part of the load during braking is taken on by the front elements. This is approximately 70 percent of the load. The rear ones serve more as a balance, so they wear out much less intensively than the front ones.
Let's take a closer look at how the rear and front pads are replaced on a VAZ 10.
Front
Before starting work on replacing the front brake pads on a VAZ 2110, be sure to arm yourself with a set of tools, which includes:
- Hammer with short handle;
- A small sharp chisel;
- Two wrenches - socket and socket 13;
- Open-end wrench 17;
- Pliers;
- Small crowbar;
- Jack;
- Balloon wrench;
- New pads.
When everything is ready to go, you can begin the replacement process.
- Park the car in such a way that it cannot roll away. It is best to put some kind of stoppers under the wheels. It is advisable to use special devices rather than simple bricks.
- Loosen the bolts on the front wheels and lift the car to one side using a jack.
- Completely remove the wheel mounting bolts, remove it and place it under a raised part of the machine. This is a simple safety measure in case the jack accidentally comes off.
- Now we determine the location of the front brake pads on the VAZ 2110. The calipers are located in front of the brake disc, so to easily replace the left pad, turn the steering wheel all the way to the left, and vice versa.
- To make it easier for you to access the part, arm yourself with a thin chisel and a hammer. These tools will unlock the top bolt.
- Unscrew it with a 13 socket wrench, holding it on the other side of the caliper with a 17 socket wrench.
- There is no need to remove the pad yet, since the caliper is now in its extreme position. That is, the new part will not fit into place.
- Do not completely unscrew the bolt; use a crowbar and insert it between the body and the pad, pressing the caliper all the way.
- Once this is done, unscrew the top bolt all the way. This will move part of the caliper to the side, thereby providing access to the pad itself.
- Remove the old pads and put new ones in their place.
- During assembly, simply follow the reverse order of dismantling. Just remember the importance of bolt countering. The washer must be bent onto the edge of the fastener. At this point the replacement can be considered complete.
Features of replacing rear brake pads on a VAZ 2110
Raise the desired side of the car with a jack and remove the wheel. Be prepared for the fact that the drum is stuck and will have to be removed using a special method.
In this case, act gradually - make half a turn of each guide screw in turn. Be careful, as there have been cases of stripped threads or broken guide bolts.
After removing the drum, begin dismantling the lower and upper spring, keeping in mind that it has much greater rigidity than the lower “sister”. tightening block. Remove the handbrake cable end. located on the spacer bar.
Next we proceed to assembly. Attach the handbrake bar to the newly purchased pads. Press the piston of the brake cylinder firmly and put the pads in place.
Return everything in reverse order. In this case, the maximum number of problems arises with the installation of the upper spring (it is installed after the installation of the lower one).
But the task can be simplified. Take a screwdriver with a long blade, thread its ring onto the edge of the spring and rest the tool against the protrusion of the block (near the place where the spring should go on).
Now pull the screwdriver in the other direction with the expectation that the spring will slide off the tool and take its position.
Upon completion of the work, be sure to start the car and press the brake pedal to the floor several times. Now open the hood and check the amount of brake fluid in the reservoir.
Please note that over the next few days the braking performance will be worse than before (this is normal).
As soon as the new pads break in, everything will return to normal. Therefore, it is not worth testing the brakes for strength over a couple of days - you may not calculate the distance and “get” someone with the bumper of your car.
Thus, installing new front and rear brake pads will not be difficult. The main thing is to allocate personal time, be responsible for your work and follow the instructions. Have a good trip and of course no breakdowns.
Removal
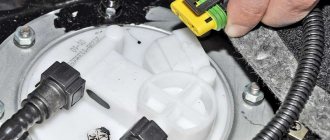
1) If you have a car with a wear sensor (it’s easy to find out by removing the wheel and looking if there is a connector and wire block next to the brake hose, as shown in the photo below), then remove the minus terminal from the battery terminal (for details, read the article: “Replacing the battery in a VAZ”, point one). Disconnect the wire block (indicated by the red arrow) and the connector (indicated by the blue arrow) going to the sensor. Remove the brake hose, indicated by the green arrow, from the bracket on the telescopic stand, indicated by the black arrow.
2) To remove the sensor, you need to use a screwdriver to get into the disconnected connector and press the antenna holding the wire inside. By pressing the tendril, it will be possible to remove the wire from the connector and insert it through the hole in the brake hose holder. Leave it hanging and proceed to remove the pad itself.
Note! Having sorted out the wiring, be sure to check how much brake fluid you have in the brake reservoir (in the small photo the reservoir is indicated by an arrow). If the fluid is up to the MAX mark, then pump it out a little using a rubber bulb, then move to the brake pads and bend them with a screwdriver (shown in the large photo below). Use the screwdriver as a lever and press it against the brake rotor, pushing the pad away.
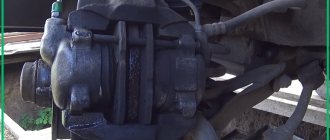
3) Use a screwdriver to bend the lock washer (marked with a red arrow) and unscrew the lower bolt securing the lower part of the caliper (the bolt is marked with a blue arrow).
Note! It is advisable to first clean the mechanisms from dirt with a metal brush. It is easier to wipe off dirt using alcohol (but in no case gasoline/diesel fuel).
READ Ceiling VAZ 2104 Do It Yourself
4) Using a socket and wrench or a regular wrench, unscrew the lower bolt securing the caliper, indicated by the red arrow. If the guide pin rotates and cannot be unscrewed, then take a second wrench in your hands and clamp the guide pin, and unscrew the bolt with the main one.
5) Fold the caliper bracket up and remove both brake pads, replace them with new ones.
Note! Clean the surface where they stood from dirt and rusty deposits with a brush. ,Inspect the brake element and make sure that brake fluid is not dripping.
Rear
For clarity, we recommend watching a video about replacing the rear brake pads on a VAZ 2110. This will make it easier to complete the task and have a visual representation of each stage of repairing the brake system.
It will be good if you once installed disc elements on your rear brakes. The beauty of them is that the process of replacing the rear pads will be similar to the front ones.
In some cases, depending on the design of the rear brakes, it may be necessary to completely remove the rotor and caliper. All other activities are carried out in exactly the same way as in the case of the front pads.
The situation is completely different for those who use factory drum braking systems. The work will have to be done delicately, but completely achievable on your own.
To get started, arm yourself with a set of tools, which includes:
- Balloon wrench;
- Jack;
- Pliers;
- Screwdriver;
- Hammer;
- Sharp chisel;
- Open-end, socket and ring wrench sizes 12, 13 and 17 - 3 sizes of each type of wrench.
Now we proceed directly to replacing the rear brake pads.
- Place chocks under the front wheels and remove the rear wheel.
- Unscrew the guides using a 12mm wrench.
- Guides are required for fixing to the axle shafts of the drums.
- It may be quite difficult to remove the drum from its place. This is where you will need a hammer and a wooden stand. Tap the inside of the drum. It is strongly not recommended to hit the drum directly with a metal hammer, as the mechanism may be damaged.
- If the drum cannot be removed even after hammering, treat the contact areas with the hub with WD40 or other penetrating lubricants.
- Then, arm yourself with pliers and remove the springs from the bottom and top of the pads.
- Remove the guide spring located in front.
- This will allow you to completely remove the block.
- When the bar is removed, you can begin to remove the spring from the rear pad.
- Well, now remove both parts of the block. When removing the back one, remember the hook. It comes from the handbrake cable.
- After removing the old block, put a new one in its place. Assembly is carried out in reverse order.
- But there is one caveat - the bushing must be removed from the drive arm, which will greatly facilitate the reassembly process. The upper part of the pads is inserted into the grooves located on the cylinder rod.
- Be prepared for the fact that certain difficulties may arise when installing a new element. The reason is the large output that remains as a result of the operation of old brake elements.
- Take two pry bars and squeeze the two blocks together to bring them as close as possible. At this point the replacement can be considered completed.
- At the last stage, mandatory bleeding of the brake system is carried out. Without it, not a single intervention in the design of car brakes can be done.
As you can see, replacing the pads is not difficult if you act consistently. The best option is to install disc brakes everywhere. They are easier to work with, they are more efficient in their tasks, plus replacement is carried out without any problems, unlike drums.
Replacing brake pads on a VAZ 2110 with your own hands (video)
It is quite easy to determine a malfunction of the brake system by the first signs - a beating in the steering wheel and a metallic squeak coming from the front wheels. Such phenomena indicate that it is time to change the brake pads.
Brake kit
The sound of grinding metal is the most obvious indicator that the pads have worn away, meaning they no longer have the asbestos coating on them. Consequently, when braking, the metal of the worn-out device rubs against the brake disc, which leads to rapid destruction of the latter.
It is recommended to replace the rear brake pads on a VAZ 2110 simultaneously with changing the front ones. The fact is that the main part of the load during braking is taken on by the front elements. This is approximately 70 percent of the load. The rear ones serve more as a balance, so they wear out much less intensively than the front ones.
Front
Before starting work on replacing the front brake pads on a VAZ 2110, be sure to arm yourself with a set of tools, which includes:
- Hammer with short handle;
- A small sharp chisel;
- Two wrenches - socket and socket 13;
- Open-end wrench 17;
- Pliers;
- Small crowbar;
- Jack;
- Balloon wrench;
- New pads.
When everything is ready to go, you can begin the replacement process.
- Park the car in such a way that it cannot roll away. It is best to put some kind of stoppers under the wheels. It is advisable to use special devices rather than simple bricks.
- Loosen the bolts on the front wheels and lift the car to one side using a jack.
- Completely remove the wheel mounting bolts, remove it and place it under a raised part of the machine. This is a simple safety measure in case the jack accidentally comes off.
- Now we determine the location of the front brake pads on the VAZ 2110. The calipers are located in front of the brake disc, so to easily replace the left pad, turn the steering wheel all the way to the left, and vice versa.
- To make it easier for you to access the part, arm yourself with a thin chisel and a hammer. These tools will unlock the top bolt.
- Unscrew it with a 13 socket wrench, holding it on the other side of the caliper with a 17 socket wrench.
- There is no need to remove the pad yet, since the caliper is now in its extreme position. That is, the new part will not fit into place.
- Do not completely unscrew the bolt; use a crowbar and insert it between the body and the pad, pressing the caliper all the way.
- Once this is done, unscrew the top bolt all the way. This will move part of the caliper to the side, thereby providing access to the pad itself.
- Remove the old pads and put new ones in their place.
- During assembly, simply follow the reverse order of dismantling. Just remember the importance of bolt countering. The washer must be bent onto the edge of the fastener. At this point the replacement can be considered complete.
Rear
For clarity, we recommend watching a video about replacing the rear brake pads on a VAZ 2110. This will make it easier to complete the task and have a visual representation of each stage of repairing the brake system.
It will be good if you once installed disc elements . The beauty of them is that the process of replacing the rear pads will be similar to the front ones.
In some cases, depending on the design of the rear brakes, it may be necessary to completely remove the rotor and caliper. All other activities are carried out in exactly the same way as in the case of the front pads.
The situation is completely different for those who use factory drum braking systems. The work will have to be done delicately, but completely achievable on your own.
To get started, arm yourself with a set of tools, which includes:
- Balloon wrench;
- Jack;
- Pliers;
- Screwdriver;
- Hammer;
- Sharp chisel;
- Open-end, socket and ring wrench sizes 12, 13 and 17 - 3 sizes of each type of wrench.
Now we proceed directly to replacing the rear brake pads.
- Place chocks under the front wheels and remove the rear wheel.
- Unscrew the guides using a 12mm wrench.
- Guides are required for fixing to the axle shafts of the drums.
- It may be quite difficult to remove the drum from its place. This is where you will need a hammer and a wooden stand. Tap the inside of the drum. It is strongly not recommended to hit the drum directly with a metal hammer, as the mechanism may be damaged.
- If the drum cannot be removed even after hammering, treat the contact areas with the hub with WD40 or other penetrating lubricants.
- Then, arm yourself with pliers and remove the springs from the bottom and top of the pads.
- Remove the guide spring located in front.
- This will allow you to completely remove the block.
- When the bar is removed, you can begin to remove the spring from the rear pad.
- Well, now remove both parts of the block. When removing the back one, remember the hook. It comes from the handbrake cable.
- After removing the old block, put a new one in its place. Assembly is carried out in reverse order.
- But there is one caveat - the bushing must be removed from the drive arm, which will greatly facilitate the reassembly process. The upper part of the pads is inserted into the grooves located on the cylinder rod.
- Be prepared for the fact that certain difficulties may arise when installing a new element. The reason is the large output that remains as a result of the operation of old brake elements.
- Take two pry bars and squeeze the two blocks together to bring them as close as possible. At this point the replacement can be considered completed.
- At the last stage, mandatory bleeding of the brake system is carried out. Without it, not a single intervention in the design of car brakes can be done.
As you can see, replacing the pads is not difficult if you act consistently. The best option is to install disc brakes everywhere. They are easier to work with, they are more efficient in their tasks, plus replacement is carried out without any problems, unlike drums.
Source: https://luxvaz.ru/vaz-2110/69-zamena-tormoznyh-kolodok.html
How to replace front and rear brake pads on a VAZ 2110
Brake pads are an extremely important element of the car’s braking system, and the safety of both the car and road users largely depends on their serviceability. Therefore, you need to constantly monitor the condition of the brake pads and replace them in a timely manner. This operation is not very complicated, so it is easy to carry out yourself if you have all the necessary tools, without going to an expensive service station. As an example, consider the process of replacing pads on a VAZ 2110.
Self-replacement of brake pads on a VAZ 2110
Welcome, friends, to the DIY auto repair website. Brake pads are an inconspicuous but very important part of a car. Braking efficiency and driving safety largely depend on their work.
Responsible drivers, as a rule, do not forget to look at the brake fluid reservoir. check the oil level and listen for any extraneous sounds.
But few people know how often to change brake pads and how to do it on a VAZ 2110.
When to change pads
The brake pads of the VAZ 2110, if you don’t delve into their design, consist of a friction lining and a special frame. Friction linings perform braking and, precisely by the material from which they are made, these linings are distinguished. This material (for the friction lining) is based on a special reinforcing component, which determines such design parameters as strength, stability, heat resistance and reliability of the braking qualities of the system.
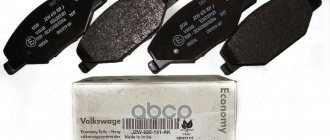
New brake pads for VAZ 2110
Like any part, VAZ 2110 brake pads have their own service life, which is usually 30,000–50,000 km of vehicle mileage or the friction lining reaches a thickness of 1.5 mm. (that is, they practically grind down to zero, but most often when braking, piercing unpleasant sounds arise from under the wheels). When the thickness of the brake linings is less than 1.5 mm. Excessive stroke of the brake cylinder pistons occurs, which leads to its leakage.
Brake pads should also be replaced if:
- the friction linings are covered with an oily substance (oiled);
- mobility of the linings on the base was detected;
- Deep chips, grooves or cracks have appeared on the surface of the friction linings.
It is also necessary to monitor the wear of the brake discs, which should be replaced when they reach a thickness of 17.8 mm. (for ventilated discs) or 10.8 mm. (for non-ventilated ones).
How to remove the pads
In order to remove defective rear pads from a VAZ-2110, you need to prepare the following arsenal of a car mechanic:
- a jack is needed to raise the rear of the car
- key 12, it will become the main tool in our business
- pliers are useful for removing parts
- hammer, yes, you will have to make physical efforts to knock out old parts
- a screwdriver, a good helper in removing old pads
- the block is an excellent stand.
Work begins
- The very first thing you need to do is put the car on a jack.
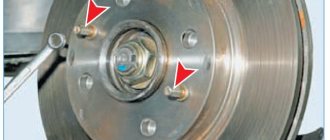
- Remove the rear wheel and disc. We can see the drum ( 6 ), which is attached to the entire structure with two bolts (cotter pins ( 7 )). These need to be removed. Here you will need a 12mm wrench (you can also use a 12mm wrench , it is just suitable for working with tens pads.
- Remove the brake drum ( 6 ). This is probably the most difficult thing in the process of replacing the rear pads, because over the years of the car’s service the drum “sticks” almost tightly, and in order to remove it without damaging it, you will have to work hard. A hammer will help here by tapping the drum, but before doing this, it is important to place a previously prepared block to prevent deformation of the drum, otherwise it won’t take long and break into pieces, which we, of course, don’t need.
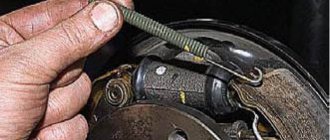
- Carefully and slowly remove the spring securing the rear pads of the car. The spring is removed using pliers or a simple screwdriver( 9).
- Now you should disconnect the spring ( 8 ) fixing the block on the shield ( 1 ).
- Loosen the upper spring ( 3 ), which secures the unit. In order to weaken the spring, you need to turn the block a little to the side, about 50-60 degrees .
- To remove the unit, carefully remove the part from the support and brake cylinder ( 2 )). To do this, you need to grab the block ( 4 ), which is not connected to the handbrake (a sorcerer in common parlance). We pull the part as if we are trying to move the pads apart from each other. You will have to loosen the part several times until it is disconnected and pulled out.
- In order to remove the second block, we disconnect the handbrake rod (sorcerer) from the cable. Now the block is easy to pull out
The process of removing the units is completed, now you can begin replacing the old pads with new ones.
We recommend: How to clean the air conditioner in your car yourself
Which ones to choose for replacement?
The quality of braking and comfort when slowing down the car (no whistling or grinding noise) also depend on the quality of the brake pads. It is also necessary to consider the following when choosing a consumable:
- Poor quality pad material can be the main cause of squeaking, as well as accelerated pad failure;
- When purchasing, choose front brake pads with manufacturer catalog number 21100-3501080-00;
- The same brake pads can behave differently with different brake discs, which significantly complicates the choice;
- To make the right choice when buying brake pads, you need to read reviews in magazines about cars, directly at points of sale, among friends.
Recently, Ferodo, ATE, Allied Nippon and Lucas brake discs have become very popular for the VAZ 2110.
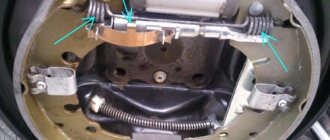
Rear brake mechanism diagram (brake drum)
Let's say we are sure that the rear pads have died and need to be replaced with new ones. Ten to fifteen years ago, no one even thought of throwing away old worn-out pads; they scrupulously changed the linings, riveted them and put them on special glue.
Now this is easier, the public has become richer and can afford to replace the entire element. In order not to forget what the rear brake mechanism looks like, below is a diagram.
Brake mechanism diagram
The work is completed. For the first time, it is better to put detailed instructions in front of your eyes, so as not to get confused and make a mistake, it would be good to also watch video materials on installing brake pads.
The second time, this work will be performed automatically and will take no more than half an hour. The main thing is not to delay replacement: brake pads are a serious matter that cannot be tolerated, because they ensure the safety of the vehicle.
We recommend: Everything you wanted to know about athermal tinting
With the wheel already removed, it is recommended to also inspect other parts of the brake system, as well as the suspension. Brake hoses must be intact and absolutely free of cracks. Brake pads need to be replaced only as a set (in pairs), otherwise the car will pull to the side when braking.
Replacing front brake pads on VAZ 2110, VAZ 2111, VAZ 2112
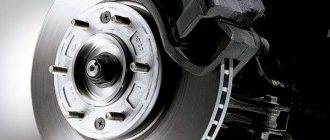
Brake pads are located at the back and front of the car and are responsible for braking. The front pads are in contact with the brake disc, and the rear pads are in contact with the brake drum, causing strong friction, forcing the car to stop. The quality and condition of the pads determine whether the car will stop quickly or slowly in an emergency.
Note! You will need the following tools: screwdrivers, a rubber bulb, a clamp (to push the brake cylinder inside), a wire brush (to clean the brake mechanism from dirt) and alcohol.
Location
On all cars, including classics and families of nines, tens, etc. The front pads are located on the inside of the caliper. You can see them by removing the wheel. If you have cast or forged wheels of large diameter, then you can see the details without removing the wheel. In the photo below, the red arrows show the detail clearly:
When to change front pads?
- In case of large cracks (although even small deep cracks indicate the need to replace the pad).
- No traces of oil are allowed on the pad linings.
- Overlays should not be less than 2 mm.
Note! In the bottom photo, the red arrow shows the brake lining, and the blue arrow shows the lining body, made of metal. The combination of these parts is called the block! This pad, by the way, must be firmly attached to the body and should not dangle or move away. If you find this, immediately replace the pad with a new one in your car.
Keeping track of the pads while removing them is quite labor-intensive. There is an alternative method of checking them for wear: when braking, the car makes a grinding sound of metal and loud noise - therefore, the linings have worn out and it’s time to urgently replace the pads.
Note! Cars of the tenth family were equipped with brake wear sensors: when the pads were worn out, an indicator on the dashboard was displayed. The electronics are not reliable - you shouldn’t trust the dashboard 100%. In addition, this sensor is located in the brake system of the car, and when driving it is most susceptible to moisture, the sensor quickly rusts and becomes unusable. In general, use your eyes, ears and powers of observation.
How to change pads on VAZ 2110, 2111 and 2112
The effectiveness of the brakes is the most important criterion for safe driving. In this case, the brake mechanisms have a consumable part - pads, which are directly involved in the process of stopping the vehicle. The braking distance of the car, as well as the comfort of deceleration, depend on their condition and degree of wear. How to determine the period for replacing the rear and front pads on VAZ cars of the “tenth” family and directly carry out the replacement work on your own?
When do you need to replace the pads and how to determine the degree of their wear?
The service life of the pads on VAZ-2110 cars and its derivative modifications is, on average, 15–20 thousand kilometers for the front ones, and 40–50 thousand for the rear ones. However, their wear directly depends on a number of factors. Thus, during city driving, the degree of wear is higher, as well as when operating on dusty roads, when there is a high risk of mechanical particles getting on the working surfaces.
The main sign of a malfunction is the appearance of a characteristic whistle during braking. This is due to the fact that the pad design contains signal indicator strips, and when the working surface of the pad wears down to a critical minimum, the strips are exposed and create this sound.
Along with this, problems can be expressed in the form of a metallic grinding sound in the event of destruction of the friction layer and exposure of the metal structure of the pad. In this case, during the braking stage, vibrations and knocks may appear, as well as a characteristic creaking sound in the area of the front wheel (or the rear wheel if the rear pads become unusable). In other words, the pads whistle, rattle or knock, indicating a malfunction.
Difference in thickness of old and new pads
Necessary tools to change parts
Changing the brake pads on a VAZ-2110 on your own is not difficult if you have basic skills. For this you will need:
- keys for 13 and 17,
- regular wire cutters
- jack for raising a car.
If the rear pads are being replaced, the kit should include:
- 7" head with knob,
- pliers,
- head “30” in case there are difficulties in removing the drum.
The process of replacing front brake pads on VAZ 2110, 2111, 2112
Replacing the front pads on cars of the “tenth” family is quite simple. To do this you need:
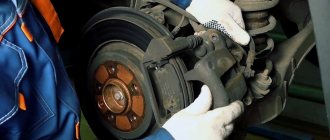
- Jack up the car and remove the front wheel.
- Bend the locking plate to gain access to the bolt and unscrew it, installing the keys “17” inside and “13” on top.
Bend the locking plate
Unscrew the lower mounting bolt
Removing the bolt and plate
Pry the caliper with a screwdriver to open it
Removing worn out brake pads
The work process takes about 30 minutes for one wheel and can be completed with minimal knowledge in the field of auto repair.
How to replace the rear ones
Replacing rear pads on VAZ-2110 series cars and their derivatives is somewhat more difficult, since they are of the drum type. Replacement work is carried out as follows:
- The rear of the car is jacked up, after which the wheel is removed.
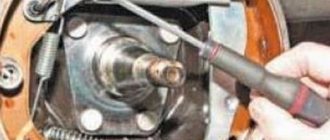
- The guide pins located on the drum are unscrewed (if the pins become soured, it is possible to remove the drum along with the hub after unscrewing it).
The work is carried out with a 12 key
It is better to tap through a wooden spacer
Or using a mounting blade
Troubleshooting possible replacement problems
There are relatively few difficulties when replacing brake pads. As a rule, they are associated with souring of bolts due to rust. The drum elements that are most susceptible to corrosion are the mounting pins. In case of possible difficulties, the drum is removed along with the rear wheel hub, and when unscrewing the studs, it is allowed to use a penetrating lubricant such as WD-40
However, when working with brake mechanisms, lubricants should be used extremely carefully, avoiding their contact with the working surface of the pads or disc (in the case of the front wheels). Otherwise, the efficiency of the brakes may be significantly reduced, up to severe slipping between the working surfaces of the pad and drum linings or disc
To summarize, we can note the ease of replacing brake pads on a VAZ-2110. The procedure does not require special skills or tools; it can be done in an ordinary garage without any particular difficulties. Knowing the order of operations when replacing allows you to complete this procedure quickly and efficiently.
The procedure for replacing pads on a VAZ 2110-VAZ 2112
Note! Remember, the pads must be changed as a set: if you decide to change the front ones on the right side, you will have to replace the ones on the left. Otherwise, the car will brake unevenly, and there will be an increased risk of an emergency situation: when braking sharply, the car will be carried away from the direction of your movement.
Removal
1) If you have a car with a wear sensor (it’s easy to find out by removing the wheel and looking if there is a connector and wire block next to the brake hose, as shown in the photo below), then remove the minus terminal from the battery terminal (for details, read the article: “Replacing the battery in a VAZ”, point one). Disconnect the wire block (indicated by the red arrow) and the connector (indicated by the blue arrow) going to the sensor. Remove the brake hose, indicated by the green arrow, from the bracket on the telescopic stand, indicated by the black arrow.
Note! You must understand that the sensor is built into the pad, so it is best to throw away the old brake pad with the old sensor and buy a new brake pad with a sensor already installed on it at the auto store.
2) To remove the sensor, you need to use a screwdriver to get into the disconnected connector and press the tendril holding the wire inside (photo 1). By pressing the tendril, it will be possible to remove the wire from the connector and insert it through the hole in the brake hose holder (photo 2). Leave it hanging and proceed to remove the pad itself.
Note! Having sorted out the wiring, be sure to check how much brake fluid you have in the brake reservoir (in the small photo the reservoir is indicated by an arrow). If the fluid is up to the MAX mark, then pump it out a little using a rubber bulb, then move to the brake pads and bend them with a screwdriver (shown in the large photo below). Use the screwdriver as a lever and press it against the brake rotor, pushing the pad away.
3) Use a screwdriver to bend the lock washer (marked with a red arrow) and unscrew the lower bolt securing the lower part of the caliper (the bolt is marked with a blue arrow).
Note! It is advisable to first clean the mechanisms from dirt with a metal brush. It is easier to wipe off dirt using alcohol (but in no case gasoline/diesel fuel).
4) Using a socket and wrench or a regular wrench, unscrew the lower bolt securing the caliper, indicated by the red arrow. If the guide pin rotates and cannot be unscrewed, then take a second wrench in your hands and clamp the guide pin, and unscrew the bolt with the main one.
5) Fold the caliper bracket up and remove both brake pads, replace them with new ones.
Note! Clean the surface where they stood from dirt and rusty deposits with a brush. ,Inspect the brake element and make sure that brake fluid is not dripping.
Installation
New pads are installed in the reverse order of removal. It will be necessary to recess the piston into the brake cylinder, otherwise the new pads simply will not fit into place. Take the clamp and install it as shown in the figure. Place some kind of spacer (small board) between the clamp and the piston itself and after all operations, start wrapping the clamp, waiting until the piston is completely sunk into the cylinder.
Note! Don't forget to bend back the lock washer, which will prevent the guide pin bolt from coming loose. After installation, press the brake pedal a couple of times (2-4 times) so that the pistons are in the working position and the car brakes normally without any interruptions. ,Adjust the amount of brake fluid in the reservoir to normal. Please note that new pads require grinding in, so it is not recommended to drive very hard for 100 kilometers and it is not recommended to press the brake pedal sharply, drive smoothly and carefully.
If you decide to keep the old pads, then make marks on them with a felt-tip pen; they must be strictly installed in the same places; it is not recommended to rearrange them among themselves or place them on different sides (for example, moving pads from the left side of the car to the right side) - this can lead to to deterioration of the brakes.
Replacing pads for VAZ 2112
Well, now that the pads have been purchased and the tools are prepared, you can begin. We change the front brake pads of a VAZ 2112!
Removing old brake pads
Replacing brake pads VAZ 21124
So:
- First, secure the car in place. To do this, put it on the parking brake (on the handbrake), and also place wheel chocks under the wheels.
- Now, using a balloon tool, loosen the wheel bolts of one of the front wheels of the car.
- Raise the car using a jack.
- Unscrew the wheel bolts completely and remove the wheel.
- Turn the steering wheel to a position so that it is convenient to work with the inside of the wheel.
- As you have already noticed, the brake caliper is secured with two bolts secured with metal plates.
- On the bottom bolt, use a hammer and chisel to open the metal plate to provide access to the fastening bolt.
- Using a socket or a 13mm wrench, unscrew the bottom bolt and remove it from the seat along with the washer plate.
- Then you need to tilt the caliper towards the upper bolt.
- If you cannot fold the caliper, you need to move the pads slightly apart. For this you will need a mount.
- Once the caliper is folded back, you can remove the old pads.
So, we removed the front brake pads of the VAZ 2112.
Brief diagnostics of the brake system
- Before installing new pads, it is necessary to press the piston into the brake caliper as much as possible. This is done so that the new pads fit well into the grooves and the caliper fits on them.
- Open the brake expansion tank cap to make this easier. Don't be alarmed - brake fluid will most likely pour out of there.
- A problem may arise - a jammed piston. If your piston is stuck, it needs to be replaced. Never lose sight of this! After all, without a functioning piston, one wheel of your car will not brake.
- Another problem is a warped brake disc. If the condition of the pads was worse than extreme, the brake disc could become damaged.
- If the pads overheated, the brake disc could lead, that is, its geometric shape would be disrupted. The disk needs to be replaced.
- If the pads are worn out, the disc could be scratched. In some cases, the disc can be ground, but not too much - the thickness of the disc should not change significantly. Usually the disk is replaced.
- If an edge has formed along the edge of the brake disc, which can be easily felt with a finger, the disc must be replaced!
- Replacing a disk is, of course, not a pleasant procedure, and it costs more, but it will have to be done.
Monitor disk health
- Check the condition of the brake hose. The most vulnerable places in brake hoses are near the rolling joint. Bend the hose and see if there are any cracks in it.
- Liquid does not have to leak from the crack. But if they are present, it would be better to replace the hose with a new one. Otherwise, the brake fluid may simply leak out along the way and the car will be left without brakes!
God forbid this happens on the road
replacement of front brake pads VAZ 2109, 2110, 2114, 2115, Kalina, Granta, Priora
Installing new pads
So:
- Once the brake system has been brought to excellent condition, or after you are convinced of it, you can install new pads.
- The pads should be installed in the seat in the same way as the old ones were.
- Then put the caliper on them. If it doesn’t fit, it means you haven’t pressed the piston in enough (read above).
- After installing the caliper, it should be secured with a bolt.
- Tighten the bolt with sufficient force and tighten it in the same way - bend the washer using a chisel and hammer.
- Put the wheel back!
Replacing brake pads on a VAZ 21124
Then perform all operations on the second wheel. In principle, we changed the front brake pads on the VAZ 2112. Don't forget to press the brake pedal a couple of times before leaving the garage. So, now you can change the brake pads yourself. Not everything is clear? Watch a detailed description of the process in the attached video. Take care of yourself and your car!
Signs of wear on VAZ 2110 pads
- The characteristic sound during braking is a creaking, grinding sound.
- When pressing the pedal, a shaking (beating) is felt; this occurs if the pad is deformed.
- “Sinking” of the brake pedal, change in pedal sensitivity.
- Increased braking distance.
- Black carbon deposits on the wheel rim.
- When the friction lining reaches one and a half millimeters.
Replacing brake pads (linings) yourself will not be particularly difficult, and given the current cost of service at stations, it is also quite important for the average driver. Let's look at this process step by step below.
Self-replacement of brake pads on a VAZ 2110
Welcome, friends, to the DIY auto repair website. Brake pads are an inconspicuous but very important part of a car. Braking efficiency and driving safety largely depend on their work.
Responsible drivers, as a rule, do not forget to look at the brake fluid reservoir. check the oil level and listen for any extraneous sounds.
But few people know how often to change brake pads and how to do it on a VAZ 2110.
Replacing front brake pads
In the “ten”, the service life of the front brake pads averages from thirty to fifty thousand kilometers, but in general it greatly depends on driving style. What will you need to replace it yourself?
- Keys from "13" and "17".
- Pliers.
- New details.
Replacement sequence:
- First, we remove the wheel on which we will replace the linings;
- Then we find a bolt in the wheel cylinder and use pliers to bend its locking plate;
- We unscrew the bolt with a key to “13” and remove it, while fixing the guide pin with a key to “17”;
- The cylinder needs to be pryed and lifted so that the old pads can be removed;
- Clean the guides and all grooves from debris and carbon deposits;
- Install new pads and reassemble everything in reverse order.
Don't forget to check the level of the brake fluid in the reservoir. When finished, press the brake pedal several times until the brake cylinders are in place.
How to change brake pads on the front wheels of a VAZ 2110
Attention! Do not use gasoline, diesel fuel or mineral solvents to clean brake pads.
Replace the pads at the same time on both front wheels.
The block on which the wear sensor is located is installed on the inside.
You cannot change the pads between the left and right wheels or the inside and outside. This will result in uneven braking.
The friction linings of the brake pads must be at least 1.5 mm thick.
It is recommended to replace brake pads in the following cases:
if the thickness of the friction linings is less than 1.5 mm;
the friction lining does not adhere well to the base;
the surface of the linings has deep grooves and chips.
1. Disconnect the negative cable from the battery.
2. Put the car on the handbrake and place stops under the rear wheels. Remove the front wheel and clean the brake mechanism from dirt.
3. Check the brake fluid level in the reservoir: if it is at the maximum, then you need to pump out some of the brake fluid from the reservoir.
4. Disconnect the block with the wear sensor wire from the wire on the wiring harness and remove the rubber seal along with the hose from the bracket.5. Using a thin screwdriver, disconnect the block from the sensor wire.6. Remove the wire from the holder on the brake hose.7. Using a screwdriver, bend the corner of the lock washer of the upper bolt.8. Unscrew the upper bolt securing the bracket body, holding the guide pin from turning.9. Turn the bracket body down around the axis of the lower guide pin and remove the pads.
10. Clean the brake parts from dirt. This must be done carefully so as not to damage the protective cover of the cylinder.
11. When installing new pads, press the piston into the cylinder. To press it in, put the old pads in place and lift the bracket body. We press the screwdriver onto the inner pad and, leaning on the brake disc, press the piston into the cylinder.12. We install new pads. Make sure that the pressure springs are parallel to the top edge of the pads.
13. Turn the bracket body upward and tighten the upper bolt, holding the finger from turning.
14. Bend the antenna of the lock washer. We put the wheel in place and lower the car to the ground. After this, you need to press the brake pedal several times to set the piston to the working position. If necessary, add brake fluid to the reservoir.