Damage, desire to carry out tuning, replace old devices with new ones. These are the most common reasons why motorists begin to think about how to remove the headlight on a VAZ 2110. In our material today, we will understand the nuances of lighting equipment on the domestic “ten”, talk about the procedure for dismantling the device, as well as removing the glass from head optics.
Tuned
Photo and video instructions on how to remove a headlight on a VAZ 2110
In order to replace a light bulb, removal, much less disassembly, of the headlight unit is not required.
But in the case when there is a desire to tune, replace glass, etc., it won’t hurt to know how to remove the headlight on a VAZ 2110. Headlight for VAZ 2110
Types of lighting devices
Depending on the year of manufacture, the VAZ 2110 can be equipped with either Kirzhach or Bosch headlights. Both of them are a block that includes high and low beam headlights, side lights, and direction indicators.
No matter how much difference there is, there are some nuances:
- In Kirzhach, the glass is sealed, so both removing it and replacing it with a new one is more difficult. In addition, the low beam glass has a lens that makes the light output more focused, although limited;
Left headlight block Kirzhach
Right headlight block Bosch
It’s difficult to say unequivocally which headlight unit is better. But disassembling Boshevskys is definitely easier. In any case, it doesn't hurt to know how to do it in both cases.
Dismantling
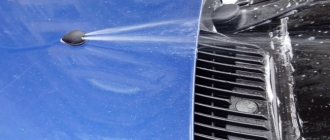
To remove the headlight unit, you need to open the hood:
- De-energize the VAZ 2110 (this must always be done during repairs, especially anything related to electricity) by disconnecting the negative terminal from the battery;
- Remove the lining from the radiator;
- Disconnect the block with wires from the headlight;
- Press the latch of the hydraulic corrector cylinder and, turning it 90° to the right, remove it from the socket. There is no need to disconnect the hoses;
- Unscrew the three bolts securing the headlight unit, then move it back;
- After which, move the device to the side, towards the center of the car, until it disengages with the wing hook;
- Loosen the upper bumper bolts;
- Press the pad from below until its flange disengages from the buffer, then remove the pad;
- Unscrew the nut securing the headlight from below;
- By pulling the headlight unit towards you and disconnecting the block from the turn signal, you can remove it.
Parsing
Having carried out the correct removal without breaking anything, you can replace it with new equipment. Or you can disassemble and perform tuning or independent repairs.
The disassembly goes like this:
- Unscrew the fastening screws (there are two of them);
- Disengage the two hooks on the turn signal from the headlight. Now you can disassemble it into two parts.
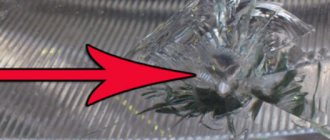
How to remove glass?
Removal will be necessary if, for example, it is necessary to replace broken glass on a VAZ 2110 or it has become cloudy, covered with microcracks, etc.
If you are dealing with Bosch, then you need to release the latches, then easily remove the glass. When installing a new one, it’s worth inspecting the rubber; replacing it won’t hurt either. Some also use sealant, although there is no particular need for this, unless, of course, you are dealing with genuine products and not Chinese fakes.
You'll have to tinker with Kirzhach a little longer. Here, in order to remove the glass, you must first carefully insert a flat-head screwdriver into the corner of the glass, forming a gap. Then connect a thin stationery knife to the process.
So, with the help of a knife and a screwdriver, you may be able to detach the glass. If the sealant “sticks”, you need to warm it up with a hairdryer and immediately continue removing the sealant while it is warm.
When installing new glass, the headlight block can be placed on a softer, construction sealant. In addition, by removing the glass, you can disassemble the reflector from the outside of the car if it also needs replacement.
Disassembly
After removing the device, it can be replaced with a new one, the old one can be repaired, or the optics can be tuned. Here the decision depends entirely on your needs and wishes.
Foggy
Disassembling the headlight unit is not a tricky task. But there are some peculiarities:
- Unscrew the two screws that are responsible for fastening;
- Disengage the two hooks located on the turn signals from the headlights;
- Thus, the optics is disassembled into two components.
How to remove a headlight on a VAZ 2110
If you need to remove a headlight on a VAZ 2110, I recommend that you read this step-by-step guide to removing headlights.
It took me about 10 minutes to remove the headlight on a VAZ 2110. Read about how I filmed it below.
After that I replaced the glass with a new one.
I used a utility knife to cut off the old sealant. Of course I had to tinker, but I did it)
This is what the headlight looks like without glass.
I bought this sealant at an auto store. It was inexpensive, only 182 rubles.
Next we'll look at how to remove the headlights..
Unscrew this fastener.
We unscrew this bolt and push the headlight into the engine.
How to remove the headlight on a VAZ 2110, watch this useful video:
“Angel Eyes” - a new type of tuning
Installing “angel eyes” on a car yourself is not at all difficult. There are several options for this procedure:
- buy finished products;
- make them yourself using LED strip;
- make it yourself using a transparent tube.
As practice shows, it is much better to make “angel eyes” yourself, since stores sell very low-quality and short-lived products. You can buy a ready-made LED strip and glue it to the inside of the optics with special glue or sealant. But it will still be more effective and brighter if you use an LED ring made of a plastic tube.
The work in this case consists of the following stages:
To begin with, the plastic tube is heated using a hair dryer. This must be done so that it bends well. However, you also need to understand that if the product is overheated, it will become deformed. After this, use pliers to bend the tube around the can, so you get an even circle. When the part has cooled, the edges are sawed off. Resistors and LEDs are assembled using the same scheme.
It is important to sand the ends thoroughly. Then, using a hacksaw, notches are made around the perimeter at approximately a distance of 2-2.5 mm. The ends are covered with foil and a special tube. Next, the made ring is attached with glue around the optic lens
It is important that the notches are on the inside.
How to change the headlight on a VAZ 2107
If you clearly follow the instructions and correctly carry out all stages of the work, the updated headlight will have a very presentable appearance and will be able to last about 7 years without replacement.
Tuning headlights for VAZ 2110
How to remove the headlight on a VAZ 2110 and replace the glass with your own hands
Damage, desire to carry out tuning, replace old devices with new ones. These are the most common reasons why motorists begin to think about how to remove the headlight on a VAZ 2110. In our material today, we will understand the nuances of lighting equipment on the domestic “ten”, talk about the procedure for dismantling the device, as well as removing the glass from head optics.
Tuned
Types of lighting equipment
Bosch optics
Both devices have a unit in their design that includes low and high beams, dimensions and direction indicators. That is, there are no fundamental differences between them, but it will be useful for you to know certain nuances.
- Equipment from the domestic manufacturer Kirzhach is characterized by glass sealing, which causes certain difficulties during replacement. Also, the low beam area is equipped with a lens. This makes the flow limited but more targeted compared to its German counterpart.
- In the case of Bosch, the glass is fixed with special latches, and sealing is done using rubber gaskets. They are easier to remove. But there are no lenses for low beam. There is a reflector here, due to which the boundaries of the glow are more blurred.
Many believe that Kirzhach is superior to Bosch optics in many respects. But this opinion can be called controversial.
But when it comes to dismantling and replacement, here German devices are the clear favorite, since they are much easier to disassemble.
Dismantling
Replacement
To resolve the replacement issue, you will first need to dismantle the headlight unit. By following fairly simple instructions, you will quickly understand the device and be able to remove it.
- Disconnect the negative terminal from your battery. This way you will de-energize the car, thereby protecting yourself from electricity.
- Remove the radiator trim.
- Disconnect the connectors with wires from the flashlight. Don't forget to disable the second one too.
- Now press the latch on the hydraulic corrector cylinder, turn it clockwise 90 degrees, which will allow you to remove the element from its seat. You will also see hoses there. There is no need to turn them off. They won't bother you.
- The headlight unit is held on by three bolts, which can be unscrewed with a regular wrench.
- Slide the light back and then to the side, moving towards the center of the car. Move until the hook disengages from the wing.
- The top bolts on the bumper will have to be loosened. There is no need to completely dismantle them.
- Press the trim from below until the flange disengages from the buffer. This will allow you to remove the cover.
- There is a nut at the bottom that holds it in place. It needs to be unscrewed.
- Now pull the headlight unit towards you, disconnect the block from the turn signals. That's it, the device is dismantled.
Principle of operation
The principle of operation is this: you turn the key in the lock, and current flows to the excitation wire. The magnetic field that the armature creates penetrates the stator windings, at the terminals of which voltage appears. When the armature reaches a sufficiently high rotation speed, which is provided by the pulley and belt drive, the so-called self-excitation mode occurs.
The rectifier unit converts alternating current into direct current. The voltage regulator starts working when the crankshaft speed changes (accordingly, the armature rotates faster or slower) and regulates the time for which the field wire is turned on. Sometimes a generator malfunction may occur due to a blown fuse in the circuit.
Replacing headlights on a VAZ 2110: do it yourself
Replacing headlights on a VAZ 2110
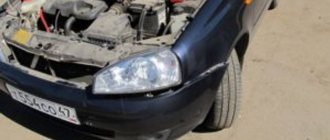
Almost all motorists at some time have to deal with dismantling and installing headlights. It happens that for some reason it is necessary to replace the headlights on a VAZ 2110, headlight glass or daytime running lights. Various objects (for example, small stones) often flying from under the wheels of cars in front cause some damage to the car. Quite often, headlight glasses suffer from this, where the bulk of the impact from a foreign object occurs. And in this case, a mandatory replacement of the VAZ 2110 headlights is necessary.
How is the replacement carried out?
Replacing headlights on a VAZ 2110
As a rule, car headlights can serve for a long time without needing repair. But if there is an urgent need, you can replace the headlight without much difficulty. This is easy to do yourself, given that when carrying out repairs in the cold season, it is better to carry out it in a warm room so as not to harm the plastic decorative lining. In addition, many car enthusiasts, chasing beauty and wanting to make their car more attractive and unique, remove and replace headlights for the purpose of tuning. Properly selected accessories can fundamentally change the appearance of dozens. Tuning is carried out in various ways, the most popular of which is tinting the headlights. Headlights can not only be tinted, but also painted in a variety of colors, and the standard headlights can be replaced with others.
Replacing the headlight
Replacing headlights in a VAZ 2110
Replacing a VAZ 2110 headlight will require the following tools and materials:
- socket head to “10”;
- key to “10”;
- silicone grease;
- screwdrivers.
Replacement of headlights is carried out with extreme care so as not to damage the fragile plastic. To dismantle it, you will need to remove the radiator trim.
Note. The most difficult operation in the process of removing a headlight is to remove the decorative trim, also called the “eyelash”. This element complicates access to the lower nut securing the headlight.
- First, the negative terminal is disconnected from the battery for safety. After this, the 2 electrical connectors of the headlight are disconnected.
Note. If there is a fender liner, unscrew it from the bumper side. As a rule, it is fixed with two or three self-tapping screws.
- Using a “10” wrench, unscrew the two bolts securing the upper part of the headlamp. Then two bolts are removed that secure the decorative radiator grille.
Replacing headlights on a VAZ 2110
- You need to lift it and insert your fingers into the gap between the grille and the bumper. Two latches are released on both sides. The decorative grille is removed.
- One bolt is unscrewed that secures the headlight unit from below. Unscrew or loosen the two bolts of the upper bumper mounting and pull it back a little.
- Using a screwdriver or your fingers, carefully pull the edge of the decorative trim away from the headlight. This is a very difficult task during the dismantling process.
- For more convenient work and to avoid damage to body parts or scratches, you should remove the front bumper and continue working without it.
Note. This is necessary so that you can reach the lower nut that secures the headlight. It must be remembered that plastic becomes brittle in the cold, so it is better to carry out this work in a warm room.
Replacing headlights from VAZ 2110
- After this, in the opened gap you can see a plastic latch-tab, with the help of which the edge of the lining is fixed to the edge of the wing . Care must be taken to disengage it from the wing; this does not require much effort.
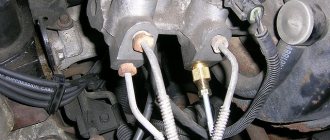
Note. It is necessary to press the latch of the hydraulic corrector cylinder, turn it 90 degrees until it stops and remove it from the socket without detaching it from the hoses. All actions are performed with your fingers.
- Then the three headlight fixing bolts are unscrewed and the headlight unit is moved back. The headlight trim is moved back, then towards the center of the car by almost 4 centimeters, so that its hook is released from engagement with the wing, and is pulled out.
Note. Before removal, it must be lubricated with silicone grease along the fixation arc to the bumper.
- Using a socket head at “10”, the nut of the headlight unit is unscrewed, with which it is fixed to the bracket, and removed.
- The hydraulic corrector clamp is pryed off with a screwdriver, turned and pulled out of the headlight housing.
- Reassembly is carried out in reverse order without using brute force. When installing the decorative trim in place, its lower edge is advanced with a screwdriver. The entire procedure for dismantling and installing the headlight unit takes only about 20 minutes.
Principle of step-by-step action
Let's start removing the lamp from the headlight unit. To do this, we need a thin screwdriver and an awl, as well as a magnet on a long handle (if possible). We unscrew the lamp protection box on the headlight unit on both sides by hand.
Remove the cover. Below it you can see the three-pin headlight power connection block, as well as the spring mechanism of the lamp holder.
Replacing the low beam bulb on a VAZ 2114 Before disconnecting this unit, you need to disconnect the contact block. Then you need to compress the lamp fastening spring and release the lighting element itself. With a slight movement of the hand, we remove the lamp from its standard mounting location and replace it in the reverse order.
Before changing the low beam bulb on a VAZ 2114, it is advisable to make sure that there is no condensation in the reflector unit. If moisture is present, this may be the main reason for the failure of this device.
To eliminate it, it is important to clean the drainage channel, which is located in the area where the turning lamp is mounted (left or right)
When performing this work, you must adhere to basic safety rules. When the lights for the VAZ 2114 stop shining on the road, you don’t need to stand on the side of the road, creating an emergency situation, but try to get to the nearest gas station or service station.
How to replace headlights on a VAZ-2110 step by step
Replacing headlights on a VAZ-2110 may be required as a result of gradual natural wear and tear, affecting lighting characteristics, or possible damage as a result of external influences.
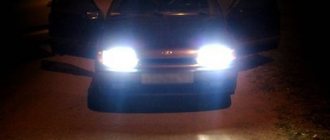
And the most dangerous malfunction is just natural wear and tear. A gradual decrease in the intensity of the light flux, unnoticeable to the driver, and a decrease in the efficiency of road lighting leads to increased fatigue when driving in the dark and can cause a serious accident, the culprit of which will be declared to be the driver of a car with faulty headlights. An examination of the lighting equipment of domestic cars, carried out by experts from the magazine “Behind the Wheel”, clearly showed that a modern headlight, equipped with halogen lamps with a bulb temperature of about 700 degrees Celsius, does not comply with GOST parameters by the end of the fourth year of operation and does not provide proper illumination of the road surface .
Adjusting the luminous flux
In order for the VAZ 2110 to be driven comfortably, all the rules of correct light supply must be followed so as not to blind oncoming drivers. There are special screws on the headlamp housing that are used to adjust the light supply.
When you turn the left screw, the angle of inclination of the optics changes vertically, respectively, turning the right screw changes the optics horizontally.
To correctly set the luminous flux, a horizontal line is drawn from the ground to the center of the headlights and another similar horizontal line is drawn 65 cm below it. After all the preparation has been completed, you can proceed directly to the adjustment:
- the right headlight of the car is covered with cardboard paper and the low beam is turned on;
- Using the adjusting screws, the center of the light beam of the left headlight is set, which is done in the same way with the right one.
How to properly remove a headlight from a VAZ-2110 car
If the car owner needs to replace a burnt-out light bulb in the headlights of the car, there is no need to disassemble the unit itself.
But if you need to upgrade the lighting fixtures yourself or remove the rear windows, then you cannot do without disassembling the headlights. In addition, the dismantling procedure is sometimes required if it is necessary to replace the hydraulic corrector - a convenient device that allows you to use a lever to adjust the level of light flux directly from the inside of your own car. Knowing the simple rules that will tell you how to remove the headlight on a VAZ-2110 step by step, you will not have to go to a service station. You can handle the work yourself.
What lighting devices can be installed on the VAZ-2110
Lighting devices installed on VAZ cars can be in two versions, depending on the year of manufacture of the car:
- Bosch;
- "Kirzhach".
The light block kit - from both the first and second manufacturers - includes:
- Headlights for high and low beams.
- Parking lights.
- Turning light indicators.
The differences between these blocks are as follows:
- for Kirzhach products, the glass is secured with a sealant, and in the Bosch version, special latches are used for fastening;
- the Kirzhach block is equipped with a lens, which is provided in the low beam glass, but the Bosch blocks do not have lenses;
- the first manufacturer, thanks to the presence of lenses, has a bright and clearly defined luminous flux, while the headlights from the second provide rather blurry illumination.
It is quite problematic to say with confidence which manufacturer makes the best headlight unit, but if you evaluate their removal and disassembly, then we can definitely say that it is easier to do this with Bosch products, since dismantling the unit from the latches is much easier than from the sealant, on which has Kirzhach headlights installed.
Step-by-step removal of headlights
Whatever manufacturer makes the light unit, every car owner should know exactly how to remove the headlight on a VAZ-2110 before starting work. It is carried out in stages:
- Having opened the hood, you need to disconnect the “–” terminal from the battery in order to completely cut off the power to the car;
- it is necessary to remove the protective lining from the radiator very carefully and slowly;
- lighting devices are disconnected from the block and wires;
- The fixing element of the hydraulic corrector must be pressed tightly and turned to the right at a right angle. Next, the hydraulic corrector is simply removed from the socket, and there is no need to unscrew the connecting hoses;
- using a wrench of the appropriate size, unscrew the bolts securing the headlight in order to be able to move the block to the side;
- the fixation of the upper connecting bolts that hold the car bumper is weakened;
- by pressing on the lining, you need to ensure that the flange is disconnected from the buffer so that the lining can be freely removed;
- the lower headlight clamp is unscrewed;
- The reflector must be disconnected from the block and the block can be quietly pulled out by pulling it towards you.
If the removal of headlights is carried out step by step and according to the rules, then you will not break parts, but installing new parts or repairing old ones, and maybe even making original tuning, is within the power of anyone. You can learn more about the algorithm of actions in the video, which was made by professional machine masters.
Replacement timing and choice of optics
In addition to the difficulties described above, which are familiar to motorists who drive long distances, there are more banal reasons related to the depreciation of the headlight itself. This mechanism does not have a specific shelf life, but the lamps “burn out” over time, and the reflector material and diffuser become unusable.
The last two elements have a shelf life directly related to the material from which they are made and the methods of car care. At the same time, even the best of them are still susceptible to the ingress of dirt associated with depressurization of the headlight structure.
The choice of headlights is extremely important for the convenience of the motorist. To be more precise, it is not the manufacturer itself that is important (although it affects the characteristics of the light), but the identity of the lighting fixtures. If your car has standard headlights, but you decide to replace only one, then find the original ones. You should not take AUTO SVET or BOSCH, which are similar in appearance.
From a technical point of view, the headlights will be the same, but the manufacturing technology of the optics differs from one company to another, and as a result, you will get two distinctly different headlights. Even if you don't care about the appearance of the car, don't forget about the properties of your eyes.
Human vision and the brain have a number of characteristics, and in this case they will manifest themselves in the fact that a more powerful headlight will create a “twilight zone” instead of a dimmer light. Consequently, there will be no improvement in visibility, and the brain will perceive the “blind spot” almost the same way if it did not exist at all.
What to choose?
It would seem that we are talking about German quality products, which by definition should be better than their domestic counterpart. But in reality things are somewhat different.
Let's look at the key features of Kirzhach and Bosch headlights to determine which ones you should choose for your VAZ 2110 model.
The purpose of any low beam is to provide good visibility of the roadway at night, while at the same time avoiding dazzling oncoming traffic. Headlights from German and domestic manufacturers cope equally well with these functions. The headlights from Kirzhach have a low beam lens, and a reflector is provided for the high beam. German products have two reflectors - for low beam and high beam. The lighting is ultimately the same, but Bosch has better brightness. Lenses are actually better than reflectors. They create a clearer line of light and allow the installation of xenon optics. As a study of reviews of VAZ 2110 owners using German devices shows, they are characterized by worse illumination in low beam mode. Bosch headlights have a very important plus for many - when driving a car in cloudy and rainy weather, they provide a better quality glow compared to Kirzhach devices
It's all about the larger surface of the low beam reflector. This Bosch plus also comes with a minus - you are deprived of the opportunity to install xenon optics. Note that, regardless of the manufacturer, these headlights contain H1 format lamps. If we take into account all other characteristics, then the undisputed leader here will be the products of the domestic manufacturer.
Headlight for VAZ 2110 Bosch
It is noteworthy that this is one of the few exceptions when domestic products turned out to be better than foreign ones. Sad but true.