About light transmission standards for tinted glass
Nobody forbids tinting the windows of a VAZ 2107. However, if this is done without regard to the law, problems with traffic police officers are guaranteed for the car owner.
The higher the percentage of light transmission, the more transparent the tint film
From January 1 of this year, the Legislative Assembly intends to seriously increase fines for improper tinting of a car to 1,500 rubles. The requirements for glass for light transmission according to GOST 32565 2013 are as follows:
- there are no restrictions on light transmission for the rear and side windows of cars;
- the light transmission rate for the windshield is 70%;
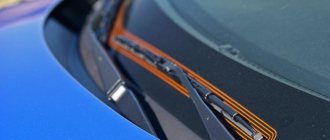
- it is allowed to stick strips of colored film on the upper part of the windshield; their width can reach 14 cm;
- finally, the current GOST says nothing about so-called mirror tinting, and their use is not regulated in any way.
Purpose of the windshield and rear glass
Glass is a transparent shield that is mounted in front of the car and protects passengers from air flow while driving. Additionally, this element affects aerodynamics and the final drag coefficient.
Front and rear windows increase torsional rigidity and retain heat in the cabin.
A shield with several layers is called triplex and is installed in the front of the car. A transparent film is glued between the layers of the part, which firmly holds large particles in the event of an accident or a large object. The multi-layer shield ensures the safety of passengers and the driver, eliminating serious injuries from fragments.
The hardened part consists of one layer. It is used for side arrangement and rear shield. The temperature effect increases the strength of the part and prevents the formation of large fragments in the event of an accident. After hardening, high-quality parts are broken into small particles with rounded edges that are not capable of causing injury. You can strengthen the rear panel using a tint film, which will hold the fragments in case of complete cracking.
The evenness and transparency of the glass surface ensure the safety of the driver while driving, and models with protection from ultraviolet rays prevent the interior from quickly heating up in countries with hot climates.
HOW TO CHANGE THE GLASS FOR A CLASSIC VAZ 2101-21099
HOW TO CHANGE THE GLASS FOR A CLASSIC VAZ 2101-21099
The article describes in detail the procedure and sequence for replacing the windshield and rear glass of a VAZ 2107 . The purpose and types of windshields are also described. Useful tips are given not only for installation, but also for maintenance of this important structural element of the car.
PURPOSE OF THE WIND AND REAR GLASS OF A CAR
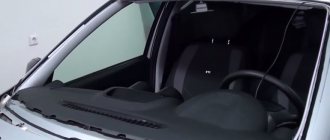
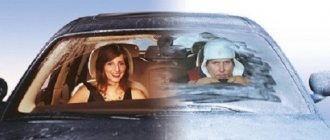
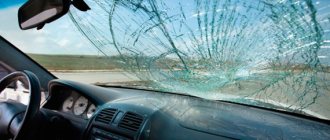
A trivial question: “Is it possible to drive a car without a windshield or rear window?” The answer is very simple: “Of course you can.” But in this case you will get maximum discomfort inside the car. Wind, dust, and any precipitation will be directed into the cabin, and the air temperature in it will be the same as outside. In addition, various insects and even birds will fly into the cabin, as well as stones from under the wheels of the vehicle in front. And we can’t even talk about what a car looks like without glass. Protecting the driver of the car and his passengers from external physical and weather factors, this is precisely the main purpose of the windshield and rear window.
WHAT TYPES OF CAR GLASS ARE THERE?
Modern automobile glass is manufactured using high technology. They differ from ordinary glass in their relatively high strength and specific design features. It is these design features that make it possible to protect road users from injury in the event of an emergency. Today, there are two types of glass in terms of the above-mentioned purpose - triplex and stalinite. In modern modifications of cars, triplex technology has become predominant for the manufacture of windshields and rear windows. It is also used for side windows and hatch windows. Triplex translated from Latin means “triple” and involves multilayer glass, namely two or more layers of organic or silicate glass. Such structures are glued together using a special film with further pressing under temperature. At the moment of destruction, such glass does not break into fragments with sharp edges and its broken parts remain on the surface of the film. Stalinite is tempered glass that is heated to a certain temperature and then gradually and evenly cooled in the air flow. When such glass breaks, many fragments with blunt edges are formed and, as a rule, in an accident they cause minimal harm to the driver and passengers. Glass of this type is less and less used in modern cars. The biggest temptation to install them on cars is their price. Attention: When purchasing new glass, you should pay attention to its markings. This is necessary in order to avoid purchasing handicraft products. The marking is engraved or chemically etched, is black and is located in the lower right corner (see photo below).
Before installing new glass, it is very important to correctly remove the old defective glass. The main task in mind is not to damage the seating edges of the window connector. To do this you need to: Using a flat screwdriver or wrench, remove the lock from the spacer wedge, which is located in the middle at the bottom of the glass fastening. Next, the wedge-shaped insert is carefully removed by hand. It is located along the entire perimeter of the glass. Then you need to cover the hood of the car with a soft cloth. Gently press on the upper corners of the glass, from the interior side, squeeze it out. Remove the rubber seal and clean the installation groove from dirt around the entire perimeter of the window opening. This is how the windshield is removed on a VAZ classic car. If you are interested in the question: “how to remove the rear window on a VAZ 2107?”, then the answer is clear. Exactly the same, but you just need to disconnect the rear window heating contacts. Having removed the old defective glass, after thoroughly cleaning the seating edges, you can begin installing new glass. Recommendation: Do not throw away old damaged glass. It may come in handy later when painting the car. Sequence of installation of the VAZ windshield 2107
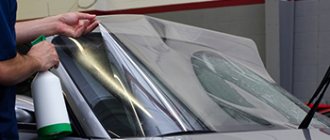
How to choose a tint film
Speaking about tinting a VAZ 2107, one cannot help but touch on the most important question: how to choose a tinting film? The main rule when choosing film is this: savings are unacceptable here.
Yes, there is a great temptation to buy cheap Chinese film. But the throughput of such film leaves much to be desired. When driving at dusk, the driver may no longer be able to distinguish obstacles located only fifteen meters from the car. And the service life of Chinese film is very short: a car owner will be very lucky if it lasts at least a couple of years. And when the driver finally decides to get rid of the cheap film, another unpleasant surprise awaits him: a dark layer of paint remaining on the glass. The fact is that on cheap tinting, the paint layer is usually mixed with the adhesive layer (it is precisely because of this feature that visibility deteriorates at dusk). After removing the film, the sticky paint simply remains on the glass and is not so easy to remove.
Expensive and high-quality tinting does not have this drawback, which is why you should pay attention to the products of the companies listed below
- Sun Control.
- Llumar.
- SunTek.
- Sun Gard.
Sequence of work
How to tint a car window so that the work goes smoothly and the result pleases you? Proceed according to the following instructions.
- Remove the rear window, this will provide you with convenience and quality work.
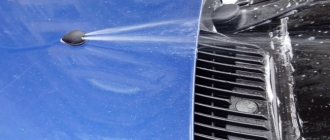
- Clean the work surface from dust and dirt by washing it with a special solution and wiping it dry with a lint-free cloth.
- Make sure that there is not a single speck of dust left on the surface of the glass.
- Cut the tint film according to your pre-measurements.
- Separate the layers of film using two pieces of tape glued at different levels.
- Apply the film to the canvas and adjust its position. To achieve ideal placement of the film sheet, you can use a soap solution.
- Now it's the turn of the rubber spatula. Tinting the rear window of a VAZ 2107 on your own will work perfectly if you move the spatula in one direction. Use a spatula until all air bubbles are out of the contact area between the glass and the film.
- Use a hair dryer to shape the film at the curves.
Percentage of light passing through film
Remember: the film is glued from top to bottom. It dries in about three days. During this entire time, the material must not be touched with hands, so place the car where no one can touch the glass, even by accident.
Tinting the rear window of a VAZ 2107 with your own hands will be much easier if you use a removable film instead of a regular film. This film adheres to the glass using static energy, does not impede the movement of the side windows, and can be removed and reapplied if necessary. It has significant advantages, because condensation does not accumulate under it. Removable tinting is also performed in conditions of perfect cleanliness.
Tinting the rear window of a VAZ 2107 on your own is not an easy procedure, but not extremely difficult either. With a minimum amount of knowledge and skills, and a good amount of patience, every car enthusiast can perform tinting without problems. Skillful hands, a bright mind and a good mood are the main components of high-quality work with any car!
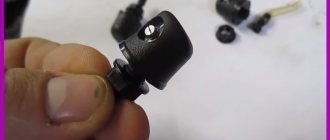
Windshield lock VAZ 2107
| Manufacturer: | Plastic JSC Syzran |
| Vendor code: | 21010-5206060-00 |
| Name: | Windshield lock VAZ 2107, 2105 (black) 21010-5206060-00 |
| Department: | VAZ |
| Product from category: | VAZ body elements |
Payment upon receipt:
- Cash
- Transfer to card
- By bank card
- By invoice (for organizations with VAT)
Important. Before receiving the product, check its availability by phone or place an order on our website
Delivery by courier in Yekaterinburg and nearby cities
- Payment in cash upon receipt of goods
- The cost of delivery within the city and nearby cities is 100-250 rubles
- Free delivery throughout Yekaterinburg for orders over 10,000 rubles.
- Please check with the RusAvto manager for delivery times and costs.
For minimum order and delivery costs, see the Delivery section.
| Minimum order | Cost of delivery | Free delivery from | |
| Ekaterinburg | 1000 | 150 | 6000 |
| Upper Pyshma | 3000 | 200 | 10000 |
| Berezovsky | 3000 | 200 | 10000 |
| Aramil | 3000 | 200 | 10000 |
| Revda | 5000 | 400 | 17000 |
| Pervouralsk | 5000 | 400 | 17000 |
| Polevskoy | 7000 | 500 | 26000 |
| Sysert | 7000 | 500 | 26000 |
| Novouralsk | 10000 | 600 | 34000 |
| Nevyansk | 12000 | 700 | 37000 |
| * does not apply to large spare parts and special goods. price |
Delivery by Russian Post
- Prepayment 30% of the cost of the goods (Cashless payment on invoice)
- The balance of the amount is cash on delivery upon receipt of your goods at the post office.
- Delivery services are paid by the recipient according to the current tariffs of Russian Post.
Why do we ask for partial payment in advance before shipping? In our practice, there have been cases when goods sent by cash on delivery remained for a long time in the recipient’s post office and were not picked up. We were forced to pay for storage and incur additional costs for returning unclaimed goods to our warehouse.
Types of glass
The following types are available for sale:
- classic, without darkening;
- with silk-screen printing;
- with spraying.
Factory spraying allows you not to glue the tint film on the rear and side windows, while protecting the interior from sunlight and improving the appearance of the car.
Silk-screen printing along the contour of the shield or in its upper part improves not only the appearance, but is also used as a visor from the bright sun. There are options on sale with images or inscriptions that are applied to the part using spraying.
The grille for the rear window is made of plastic and is attached to the rack using clamps or double-sided tape. The part transforms the car, but reduces visibility in the rear view mirror.
Transparent glass without chips or defects not only ensures an excellent appearance of the VAZ, but also affects the quality of viewing in bad weather conditions. Ease of replacement allows drivers to carry out the work themselves without visiting car repair shops.
New
- What maintenance needs to be done on the car?
- Car mat manufacturing process
- McLaren looks towards Le Mans again
- Sale and purchase of used tires and wheels
- "Analytics" - free service until the end of 2021!
- Why are Hyundai cars so good?
- Xenon kits for car headlights, what do you need to know about them?
- Why do we need parking sensors for cars?
- Automotive parts in the Exclusive online store at the best prices
- How to start a car using a smartphone
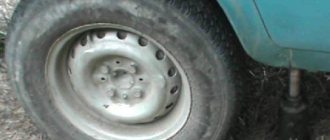
Dismantling the lobovukha
Replacing the windshield on a VAZ 2107 will require dismantling the interior decorative trims, as well as the rear-view mirror.
To dismantle a part from a VAZ:
Wash the car at the car wash and drive it into a warm garage. Bend the wiper blades. Use a screwdriver to pry up the windshield lock, which is located in the lower frame. Remove the wedge molding around the entire perimeter of the glass. Gently press on the corners from the interior side to press out the shield, holding it from the outside. When dismantling, you need to press the seal with a screwdriver, squeezing it out. When removing, it is important to be careful and not to fumble when pulling the part out of the groove. Do not press on the shield as this may cause the part to crack and cause injury to your hands.
Unusable VAZ consumables should be placed on a soft cloth or rubber mat. This will prevent chips in the corners and the appearance of potholes that can cut your palms during subsequent transportation.
Unusable VAZ consumables should be placed on a soft cloth or rubber mat. This will prevent chips in the corners and the appearance of potholes that could cut your palms during subsequent transportation.
What is required for the work
To replace a defective element on a VAZ 2021 with your own hands, you need to prepare the following tools:
- degreasing and cleaning agent;
- clean cloth;
- a cord with a cross-section of 4-5 millimeters and a length of at least 5 meters;
- assistant, since some operations are performed only by two people;
- new sealing rubber;
- molding.
You need to thoroughly wash and degrease the new product before starting work. This will prevent it from accidentally slipping out of your hands, and will also ensure a tight grip in the rubber groove.
All work should be carried out in a warm, windless place, observing safety precautions when using degreasing chemicals.
Causes of problems
- If the power button does not light up and the glass does not fog up, then most likely the control for turning on the heating relay has failed. In this case, you should check whether there is voltage on it.
- If the glass also does not defrost and the button does not light up, then, presumably, the control for turning on the heating relay is not working. The diagram will help you diagnose control voltage and ground, indicated on the relay as 85 and 86 and wires numbered 1, 2, 4, 9, fuse F7, power button.
- If the rear window heating does not work and the control light on the dashboard is on, then it is worth checking the power to the wires numbered 5, 19, 30, fuse F4 and whether the heating element is in working condition.
- If, when this function is turned on, the glass clears unevenly, it means that some of the threads carrying current have been damaged. In this case, the circuit is no longer needed. Below we will tell you how to solve this problem.
Basic data for adjustments and control
| Gaps in the valve drive mechanism between the cams and levers on a cold engine, mm | 0,15 |
| Minimum crankshaft rotation speed at idle speed, min" 1 | 820-900 (750-800*) |
| Oil pressure in the engine lubrication system at oil temperature +85 °C, MPa (kgf/cm2) | 0,35-0,45 (3,5-4,5) |
| Fluid temperature in the cooling system of a warm engine, "C | 95 |
| Coolant level in the expansion tank on a cold engine | 3-4 cm higher risks "MIN" |
| Deflection of the fan belt at a force of 100 N (10 kgf), mm | 10—15 |
| Gap between spark plug electrodes, mm | 0,5-0,6 |
| Initial ignition timing to TDC, degrees | 5-7 |
| Gap between breaker contacts in the ignition distributor, mm | 0,4+0,05 |
| Brake fluid level in brake and clutch reservoirs | to the bottom edges of the filler necks |
| Clutch pedal free play, mm | 25—35 |
| Free travel of brake pedal, mm | 3-5 |
| Free play of the steering wheel, degrees (mm) | 5(18-20) |
| Toe-in of the front wheels of a run-in car under load when measured between the wheel rims, mm | 2—4 |
| Camber of the front wheels of a run-in car under load, degrees | 0°30’±20′ |
| Longitudinal angle of inclination of the steering axis of the front wheels of a run-in car, degrees | 4°+30′ |
| Axial clearance in front wheel hub bearings, mm | 0,02-0,08 |
| Tire pressure 175/70 R 13, MPa (kgf/cm2): | |
| 0,17 (1,7) | |
| 0,16 (1,6) | |
| 0,20-(2,0) | |
| 0,22 (2,2) | |
| 0,23 (2,3) | |
| Tire pressure 165/80 R 13 (165 SR 13), MPa (kgf/cm 2): | |
| 0,16 (1,6) | |
| 0,19(1,9) | |
| 0,21(2,1) | |
| 0,22 (2,2) | |
| Maximum slope on dry hard ground, on which a vehicle with full weight is held for an unlimited time by the parking brake when moving the lever by 4-5 teeth of the sector, % | 30 |
Self-installation
Installing a windshield is not a difficult, but responsible process. Before starting work you need to do the following:
- Wash the surface of the frames and inspect for chips, rust, and abrasions.
- Degrease the surface.
- Place the cord in a new elastic band. The ends of the rope are located along the bottom edge in the place where the lock is located.
- Prepare a new part.
If pockets of corrosion are detected, clean the area with sandpaper, apply a primer and paint over it with enamel. The presence of rust in the contact area is unacceptable: this reduces the strength of the fastener, which is why water may enter the VAZ interior.
Before starting installation work, remove the side trims from the frames and the rear view mirror. This will make it easier to pull out the rope.
- Put on the rubber seal.
- Lay down the rope.
- Carefully attach the part to the frame.
- One person adjusts the position from the outside of the VAZ, and the second carefully pulls the rope into the interior. It's better to start from the bottom edge.
- When pulling out the rope, an assistant adjusts the part and presses slightly towards the seal.
After the seal is in place, the shield will take its position. The windshield frame on the VAZ 2107 is installed in the reverse order. This is where a flathead screwdriver with a large handle comes in handy.
When going around the bottom corners, be careful not to scratch the panel with the cord. After installing the seal on the glass, you can return the rear view glass and decorative trims of the pillars to their place
What is required for the work
If you decide to replace the windshield on a VAZ 2107, then, first of all, you need to purchase a new product. In addition, you will need to stock up on the following tools and materials:
- screwdrivers;
- textile;
- cord with a diameter of about 4 mm and a length of 5 m.
It is almost impossible to replace the windshield on a VAZ 2107 yourself, so you will need an assistant. You can ask a friend or family member. Next, let's find out where to start.
Removing the product
Before proceeding with the dismantling of a cracked product, a thorough inspection of the new one is required. Of course, this should have been done in the store, but a second inspection never hurts. Now you can begin the process of dismantling the product:
- Initially, you need to remove the lock from the spacer wedge located in the middle of the glass from the bottom. The process is performed using a flat-head screwdriver.
- After this, it is necessary to remove the wedge-shaped rubber insert. This is not difficult to do; to remove it you will need to walk around the entire perimeter.
- Place fabric on the hood. The softer the fabric, the better.
- After this, it is necessary to squeeze out the glass from the interior side. It is necessary to press on the upper corners of the product. An assistant must hold the glass from the back of the passenger compartment so that after squeezing it out, it does not fall on the hood. At the same time, do not forget to remove the wipers so as not to damage them.
- After removing the product, you need to remove the rubber seal and clean the installation groove on the car body. You can use a degreaser for cleaning. The presence of rust is unacceptable, so if necessary, areas of corrosion should be cleaned and painted over.
This is how the windshield of a VAZ 2107 is removed. After dismantling the product, the trim should be removed from it. Now you can proceed to installing the product.
Features of windshield installation
The seal that was removed from the groove should be cleaned and put on the new device. It is recommended to start from the corners. After the seal is completely placed on the glass, you will need to close it with a lock at the joint, having previously secured the wedge-shaped insert.
Installation of the windshield continues with the need to use a cord or rope, which must be inserted into the outer cut of the seal. The rope is inserted around the perimeter of the entire seal, and the connection should be made at the bottom. In this case, the ends of the rope need to be crossed and then secured, as shown in the photo below.
After this, together with an assistant, you should apply the glass to the car, adjusting its location. Once you have aligned the location of the product, we begin installation. To do this, one person sits in the cabin, and the second adjusts the position from the outside. Then he presses on the bottom of the product, and the second one slowly pulls the cord into the interior. All procedures should be done slowly, maintaining symmetry. Once the bottom part of the glass is installed, you can continue installing the side and top parts, while gradually pulling out the rope.
Windshield improvement
As you know, in VAZ 2107 cars the manufacturer did not provide such a function as a heated windshield. There is only its airflow, which allows you to remove the effect of “foggy glass”. If you want to improve your car, then you can become the owner of a heated windshield. This athermal glass can be installed independently without any problems, since all the necessary components are included with it.
This type of glass is ideal for the VAZ 2107, so a snowy, frosty morning will no longer be able to ruin your mood. Of course, heated glass is quite expensive compared to its simple counterpart. But you definitely won’t regret this windshield improvement.
What to do if the side window of your car breaks?
The question of choosing a car for everyone is conceptual, but only in cases where there is enough money to make your dream come true. And so, when the budget is severely cut, one has to be content with domestic classics. And we, as you know, are very prone to quirks and malfunctions. Therefore, it is not surprising if one day, at one fine moment, when closing the driver or passenger door with the glass half-closed, it accidentally, due to some unknown circumstances, breaks into pieces. At the same time, it partially spills into the cabin, outside the car and inside the door structure. In order to get home, you have to use standard tape and film. And already at home, decide what to do next: contact a workshop or try to solve the problem yourself.
Preliminary monitoring of prices for the service of installing a new side window is far from being in favor of car services. Considering that they own domestic classics, it is not at all clear why they want to take, for example, a Ferrari or Porsche.
Rear window replacement
The rear window of the VAZ 2107 can be heated or without it. Structurally, the parts are the same, with the exception of contacts that are disconnected before removal. The sizes and shape are the same.
- Using a screwdriver, remove the locks that are installed in the lower corners.
- Remove the wedge cover.
- Press out the glass from the inside.
- Remove the old shield from the posts.
If the shield is firmly in place and is not squeezed out from the inside, you should use a screwdriver to knead the molding along the contour and repeat the dismantling again. Removal is done with an elastic band, this will protect your hands from damage.
Rear part installation:
- Clean and degrease the surface of the frames.
- Install new locks and seals on the glass.
- The rope is inserted along the contour of the elastic band and overlaps at the bottom.
- The glass is applied to the frame and pressed down.
- Carefully pull out the rope, which must be inserted into the rubber edging.
Tuesday, February 19, 2021
How to remove and insert the windshield of a VAZ-2107
The windshield is removed when it is replaced, to clean or replace the seal, or to treat the body if corrosion occurs. We will need:
- Screwdriver flat and Phillips
- Blanket or similar
- Linen cord 5-6 m long, 3.5-4.0 mm in diameter
We move the windshield wiper arms with the brushes away from the glass. To facilitate dismantling, we remove the decorative edging and, if necessary, replace it with a new one after all the work.
We remove the decorative trims of the front pillars; it is not necessary to remove the remaining elements of the interior. Carefully use a screwdriver to pry up the seal in the upper corner of the glass from inside the passenger compartment and move it behind the body flange.
!If the glass has chips, cracks or other damage, you should work very carefully! By squeezing the seal with your fingers and simultaneously pressing on the glass, we remove its upper corner from the body opening, moving towards the opposite corner. We remove the top and side parts of the glass and remove it along with the seal and place it on a blanket.
We remove the seal, clean all grooves from dirt and rust, and wash them in soapy water. We clean and wipe the edge of the glass.
We clean the two drainage holes in the lower corners of the seal.
If mechanical damage or loss of elasticity is detected, the seal must be replaced. We clean the body opening from dirt, and if there is corrosion, we carry out paint and varnish work.
We put the seal back on the glass.
We insert the edging into the seal (it can be installed after installing the glass).
We insert the cord into the groove of the seal, with which it fits onto the flange of the body opening so that in the lower part of the glass the cord overlaps by about 20 cm and there are still free ends of 30-50 cm.
We attach the ends of the cord with tape to the inside of the glass.
To make work easier, you can lubricate the edge of the seal and the cord with soapy water. We insert the glass into the opening so that the groove of the seal where the cord exits fits onto the lower flange of the opening, and the ends of the cord are inside the body.
Slowly and carefully pulling out one end of the cord, and pressing the glass against the opening on the other side, we move the edge of the seal through the flange of the opening. If necessary, adjust the seal with a screwdriver.
We perform a similar operation alternately with the other end of the cord until it completely comes out of the groove in the middle of the upper side of the glass. We make sure that the edge of the seal has completely passed the flange and has no curls.
Align the seal from the outside along the perimeter of the glass, lightly tapping it with the edge of your palm. We make sure that the drainage holes in the seal coincide with similar recesses on the body.
We install the edging lock-plate.
We put the removed trim parts back in place.
Purpose of tinting on VAZ 2107
Gluing tint film to the windows of a VAZ 2107 allows you to solve several problems at once. Here they are:
- Window tinting on a VAZ 2107 allows you to protect the car interior from scorching sun rays. This simple measure will significantly extend the life of the dashboard, and other elements of the interior upholstery will also be protected from fading;
- in a tinted car, the driver is better protected from being dazzled by both oncoming and behind cars;
- the interior of a tinted car is better protected from unwanted prying eyes;
- if tinted glass breaks during an accident, the fragments will not fly into the driver’s face, but will remain on the tinting film;
- finally, the tinted “seven” looks more stylish.
Content
2 3 Improvement of the VAZ 2107 stove. 4 Caring for the VAZ 2107 stove.
- 4.0.1 Operating procedure.
Despite a decent number of shortcomings, VAZs remain loved by our compatriots. Today, we will tell you how to improve the operation of the stove on the classic. The heater and ventilation provide a favorable atmosphere inside the car. In the VAZ 2107, air is supplied from the street. Air, through gaps in the hood of the car, enters the inside of the car. At the same time, depending on the setting, it heats up or cools down.
The air intake box is located in the rear part of the engine block; the air is purified from moisture. The box is protected from the engine by special (rubber) gaskets. Moisture comes out, and the air flow enters the heating system. The gaps in the box are closed with a special partition (lid). When driving, part of the air flow exits through devices located above the dashboard.
Article: 2101-5206060
Order code: 000868
- Buy with this product
- show more
Buy analogues
Passenger cars / VAZ / VAZ-21012 drawing
- » href=»/catalog/vaz-3/legkovye_avtomobili-30/vaz_2101-3/okna-20/#part410″>Seal edgingWind and rear window / Windows
- » href=»/catalog/vaz-3/legkovye_avtomobili-30/vaz_2101-3/okna-31/#part730″>Seal edgingWind and rear window / Windows
Passenger cars / VAZ / VAZ-21031 drawing
» href=»/catalog/vaz-3/legkovye_avtomobili-30/vaz_2103-106/okna-10/#part9094″>Seal edgingWind and rear window / Windows
Passenger cars / VAZ / VAZ-21051 drawing
» href=»/catalog/vaz-3/legkovye_avtomobili-30/vaz_2105-6/stekla-18/#part15852″>Seal edgingWind and rear window / Glass
Passenger cars / VAZ / VAZ-21071 drawing
» href=»/catalog/vaz-3/legkovye_avtomobili-30/vaz_2107-8/okna-12/#part22160″>Seal edgingWind and rear window / Windows
Passenger cars / VAZ / VAZ-21022 drawings
» href=»/catalog/vaz-3/legkovye_avtomobili-30/vaz_2102-4/okna-20/#part4894″>Seal edgingWind and rear window / Windows
» href=»/catalog/vaz-3/legkovye_avtomobili-30/vaz_2102-4/okna-31/#part5214″>Seal edgingWind and rear window / Windows