02/16/2021 2,699 Electrical package
Author: Ivan Baranov
Safety on the road in bad weather while driving is ensured by the proper operation of the windshield washer, since its function is to clean the windshield from dirt, rain and snow. The article discusses how the windshield washer motor works, its main malfunctions, and how to replace the windshield washer motor.
[Hide]
How does a windshield washer motor work?
The motor in the windshield washer allows a stream of water or windshield cleaning liquid to be supplied under pressure. In some models, the jet is supplied not only to the front, but also to the rear window. It is not difficult to set up the operation of windshield washer parts, but when the motor breaks down, most car owners contact the service center to replace it. In fact, repairing a motor is quite easy, the main thing is to know a few secrets.
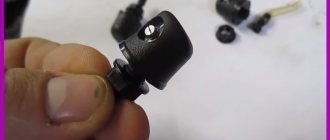
External view of the windshield washer motor
About the importance of the node
A windshield washer pump can be purchased without any problems; to replace it, you do not need to disassemble the motor or use a lift. So why does such a critical and easily replaceable unit often remain vulnerable? It's all about its maintenance, which is not performed in a timely manner. Sometimes the product is of such poor quality that the driver cannot fix anything.
In order to avoid getting into a stalemate on the road, you need to pay attention to the quality of the pump. Usually no one does this. Nevertheless, experts carry out working experiments and find out what is worth buying and what is not. We’ll talk about this at the very end, but now we’ll look at the key points that everyone, without exception, should pay attention to.
Washer failures, their causes and diagnosis
Most often, the cessation of fluid supply is due to clogged filters. Therefore, first of all, clean the system and eliminate the cause of the breakdown - contamination . If it turns out that the motor has stopped working, then you will need to clean its parts from rust and dust. Replacing the mechanism will only be necessary as a last resort. In some situations, electrical breakdowns occur. This is due to loss of contact on one of the connections. With frequent temperature changes, over time, the motor terminals oxidize, which leads to their complete or partial destruction. Most often, breakdown occurs due to:
- clogged washer nozzles;
- a broken hose;
- fluid leaks;
- washer switch malfunction;
- Damage to motor terminals.
Tip: First, inspect the windshield washer reservoir and clean the system of dirt, and only after that proceed to cleaning the motor.
Details of the whole
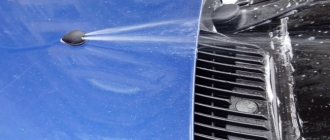
As you can see, the window washing system is not that complicated. It consists of several simple components: a motor, a tank and injectors. Of course, there are also lines through which the washer fluid passes. The pump pumps liquid, which, under pressure, approaches the tee. Tee - washer fluid distributor. Then it is sprayed through the nozzles directly onto the center of the windshield and spread around the perimeter by the wipers.
DIY washer motor repair
If you decide to repair your old washer pump, first of all you need to know the structure of the motor. It consists of:
- Cases.
- Housing covers.
- Motor stator.
- Anchors and brush assembly.
It seems somewhat difficult to disassemble the motor itself, since most often (for example, the VAZ 2110 or Zaz sens model), its body is one-piece and is made that way at the factory. It is possible to open the case if you carefully cut it with a hacksaw (it is best to do this in the area of the step, since in the future it will be easier to reconnect the case). Next, using a screwdriver, we separate the parts of the housing, while you need to pull out the stator and armature. the inside of the body , as well as the armature roller and bushings, from dirt, rust and oxidation. The bushings require great attention - they need to be cleaned so that they shine.
Before assembling the pump, you need to check whether the armature shaft rotates freely in relation to the motor housing. In addition, a very important part is the armature shaft seal, because most often it is the culprit of pump failure. If necessary, the oil seal must be replaced. Such oil seals can be purchased in specialized stores or made independently, but with precision observing all the necessary dimensions and clearances.
When assembling the motor, you should lubricate all the bushings and check the rotation of the armature. It is advisable to test the motor by connecting it directly to the battery, then you can finally assemble it. Assembly of the body, which is sawn during disassembly, is carried out using soldering or gluing.
Today there are a huge number of not only original pumps, but also their analogues from various manufacturers. To choose a powerful and high-quality, but at the same time inexpensive electric pump, you need to contact those who have already tested them, or read reviews on the Internet. They are often very informative and will help you make the right choice.
Replacement
If the old motor has failed, there is no point in trying to repair it somehow. To buy a new part, you will have to spend very little money. And the replacement procedure on most cars is extremely simple.
I will describe the main stages of work associated with replacing this element of the windshield cleaning system of any car.
Turning off the vehicle's power. A safety measure without which further work makes no sense. Be sure to remove the negative terminal from the car
It's simple but important. Otherwise, you not only risk burning the wiring, but also getting an unpleasant electric shock yourself. Search for a motor
Similar articles
DIY headlight washer
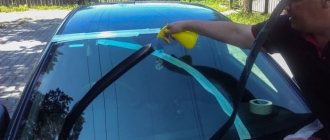
It all starts with identifying where your windshield wiper motor is located. It depends on your car. On some cars, just lift the hood and you will immediately see the washer reservoir. The motor itself is located on the reservoir (partially inside) of the windshield wiper, into which the liquid is poured. Do you see the tank? If yes, then you are in luck. If not, then you will have to look for it by removing elements of the engine compartment. On some car models, the tank is hidden so that the fender protection has to be removed.
- Disconnect the connectors with wires from the motor. Then remove the tank itself.
- The hose and fitting are separated from each other. Don't forget to drain the liquid. Filling a new one will not be difficult. Yes, and for prevention it won’t hurt to do it.
- Using a screwdriver, push the intake seal out of the bushing. This will allow you to completely remove the windshield washer motor.
- Don't forget to install a new bushing when reassembling. This often leads to the washer pump itself breaking down. So the old bushing goes to the landfill.
- Reassemble the assembly in reverse order. Here many craftsmen relax, because they consider the work done. In fact, reassembly causes more problems than disassembly. Advice from someone who made similar mistakes. That is, from me. Do not try to remember the location of parts unless you are confident in your memory capabilities. We got distracted by something, forgot, got confused. This happens to everyone, and there is nothing wrong with it. To ensure proper reassembly sequence, you can record, mark, or label the parts in the order in which they are removed. This will make it easier to put everything back together the way it was before.
The instructions are for informational purposes only, as the procedure may differ depending on the car model. Consult your machine's owner's manual for assistance. This is the best visual aid for self-repair.
There is nothing complicated in this work. Even the car owner who prefers to solve most problems with the help of a car service can easily cope with it. Repairs cost several hundred rubles and take a maximum of a few hours.
Thank you for your attention! Subscribe, leave comments, share your own experience in repairs and don’t forget to tell your friends about us! It may also be interesting and useful for them. (1 ratings, average: 2.00 out of 5)
(1 ratings, average: 2.00 out of 5)
1200 rub. for the photo report
We pay for photo reports on car repairs. Earnings from 10,000 rubles/month.
Write:
As the title suggests, this video will help the interested car enthusiast, if necessary, to carry out his own repair of the windshield washer motor.
One of the most common problems for the washer motor, both for branded and cheap Chinese analogues, is a leaking oil seal near the pump, as a result of which washer fluid enters the motor, causing corrosion and jamming.
It is known that the function of the motor is short-term, the washer turns on, the glass is washed and the motor no longer works. The load on it is small, it does not wear out, the whole problem is in that same oil seal. How to solve it - watch the video.
Instructions for replacing and repairing the tank
Replacing the washer reservoir is usually done as a result of its failure, which cannot be repaired. In particular, if the CP is cracked and it is no longer possible to restore its integrity.
Using the example of a VAZ 2114 car, let’s look at how to remove the washer reservoir:
- First open the hood. Before removing the BO, it is necessary to drain all remaining liquid from the container. If the liquid level in the container is high, then unscrew the cap of the washer reservoir, this will reduce the pressure in the system.
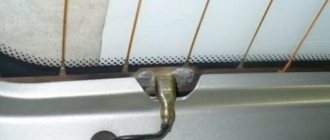
- Then the BO is removed from the grooves; to do this, it can be pulled up, and placed in such a way that you can easily dismantle the electric motors.
- You need to disconnect the contacts from the motors, as well as the water supply pipes.
- Next, the electric motors are removed from the container body - for this you can use a regular screwdriver to pry them off (the author of the video is the menstimecom channel).
As you can see, there is nothing complicated in removing BO. It is much more difficult to repair the washer reservoir. If the container is cracked, it is not a fact that it can be repaired, since everything depends on the size of the crack and its location.
If you don’t know how to seal the washer reservoir, then you have several options:
- For gluing, you can use special glue or cold welding. Before applying material to a crack, the BO must be thoroughly washed, and the area to be patched must also be degreased. Glue or cold welding is applied to the crack, while it is necessary to grab a few more millimeters from each edge of the crack. Depending on the type of glue and cold weld, the waiting time for the material to dry can range from 30 minutes to several hours.
- If the crack or hole is small, you can try to treat it with regular sealant. In this case, the repair procedure looks similar - the surface is first washed and then degreased. A certain amount of sealant is applied to the hole, which should completely fill the crack and the space around it.
- Another option that is best suited for larger cracks is the use of special plaster tape. It is also installed on a degreased surface, but before installation the tape should be coated with epoxy, and the material should be applied in several layers until all the cracks are closed.
- If all these options do not help you, then you can use a soldering iron or wood burning machine. With the help of these devices, the structure of the container is softened, which makes it possible to restore its integrity if the damage is minor. Additionally, after treatment with a soldering iron, the damaged area of the BO can be covered with cold welding.
Photo gallery “Removal and repair of the container”
1. Unscrewing the container fastenings
2. Disconnecting the motor power connector
3. Treating damaged containers with sealant
Reanimating the washer system
How to replace the motor?
Unfortunately, this part is quite difficult to repair. And often replacing a windshield washer pump is even cheaper than fixing an old one. Therefore, it is better to immediately order a new part and not have to worry about repairs.
Replacing the washer pump:
Replacing the device is easy:
- Before you begin replacing, remove all remaining fluid from the reservoir.
- Locate the contact connecting the pump to the battery. Carefully disconnect the power.
- The next point is optional. You can disconnect the tank by unscrewing the bolts that secure it. However, if manual dexterity allows you to manipulate the fixed tank, you can do without dismantling it.
- Remove the electric pump from the tank and unscrew the tubes.
Attention! Remember where and which hose was screwed on. In the future, they will have to be placed clearly in their places.
- So, now we take out a new pump and connect it to the system.
- Screw the tubes back into place.
- If the tank has been dismantled, put it in place and tighten the bolts.
- We connect the contact from the battery so that the motor has something to power from.
- Fill the water back.
Then press the washer lever. If there is a buzzing sound, it means the motor is running.
How to clean injectors?
For washing, prepare a special caustic solution. To do this, take purified water without chlorine and add vinegar. The ingredients must be mixed in a one to one ratio. Stir the resulting liquid well.
Pour the solution into the tank. Press the washer lever. It's okay if no water gets on the glass. The main thing is that the liquid reaches the blockage. Leave the system in this state for two hours. After that, try pressing the lever again. If water appears, drain the caustic solution and rinse the tubes with distilled water.
If water does not flow, but you are sure that the cause of the problem lies in a blockage, press the lever again and leave the acidic liquid for another two hours, then check again.
Remove injectors
It would also be useful to talk about how to remove the windshield washers. This information will be useful to those who decide to clean the injectors separately or replace them altogether.
The injectors are removed with the hood open:
- See if the parts have plastic plugs. If so, they should be removed. Just be careful when handling the latches, as they may be made of cheap plastic.
- Take a flathead screwdriver and use it to unlock the spring fasteners. After this, the nozzle can be removed.
- The devices are installed using the same steps, but in reverse order.
Many people do not think about the importance of the washer system until they encounter problems with it. After all, hardly anyone would like to drive with dirty glass and have virtually no visibility.
To avoid such troubles, use high-quality non-chlorinated liquids to wash windows.
And if something does break, don’t be upset. Restoring the system is not a troublesome task and not even particularly expensive.
The main thing is not to close your eyes to such problems.
The windshield and rear window of the car must be kept clean; any contamination reduces visibility of the road and what is happening around, which can lead to an emergency. The windshield washer is designed specifically to keep it clean; the importance of such a device can be put on a par with the engine or chassis, therefore, as soon as deviations in its operation appear, the cause of the breakdown should be immediately determined and eliminated.
↑ Electronic relay 524.3747
The purifier has three operating modes, they are activated by the right steering column switch. Intermittent mode is provided by an electronic relay K2 type 524.3747 installed in the mounting block. This relay also turns on the wiper motor at low speed when the windshield washer is turned on. The relay must ensure that the electric motor is turned on with a frequency of 14±4 cycles per minute at a gearmotor shaft speed of at least 20 min -1, a temperature of 20±5°C and a supply voltage of 14±0.2 V.
When the cleaner operates at low speed in constant mode, the supply voltage is supplied to diametrically opposed brushes. When the cleaner operates at maximum speed, “+” power is supplied to the brush located on the side.
To relieve the load on the contacts of the ignition switch, the cleaner is connected through an additional relay K6 in the mounting block.
It is recommended to replace a faulty gearmotor with a new one (cleaning the commutator, limit switch contacts and replacing gears is possible). Bent levers are straightened. When the hinges wear out, they are replaced.