Optimal connection of the radio to the car battery directly
A radio is an indispensable attribute of any modern car. As a rule, more functional equipment is purchased instead of a standard device. In any case, the radio must be connected correctly. Note that there are several options for solving this problem. In this article we will list the main methods for connecting a car radio.
Almost all devices of this type today are equipped with a universal connector, thanks to which even a novice car enthusiast can handle the connection. There are also various adapters on sale that can make the task easier. Another option is to connect the wires according to a color scheme (usually it comes with the radio).
Car radio installation
How to connect a 220 car radio with your own hands through the ignition switch? First, you will need a car radio connection diagram, which should come with the system. You will also receive installation instructions along with the device; you need to study them thoroughly. In addition, first you should check whether the kit includes all the fasteners that will be required during installation.
In general, you can easily connect all the cables for the system with your own hands, no matter how many there are, if you correctly follow the steps noted in the instructions. Installing the device into the instrument panel should not cause problems, but during installation, please note that it is necessary to avoid the formation of large gaps and cracks. Over time, dust will enter the openings, which will settle on the system and can lead to its failure. In addition, these cracks will contribute to the appearance of vibration, and this, in turn, can also affect the operation of the audio system as a whole.
Please note: if your car already had a radio installed, then when dismantling the old device you should also get rid of the frame. Connecting a new system with your own hands into an old frame is impractical, as this may cause incomplete installation of the device. Only those frames that come with the kit are used, otherwise vibrations cannot be avoided.
By observing all the nuances described in this article, you will be able to install any multimedia device. The brand of the car radio is absolutely not important here; you just need to study the diagram and connect all the wires correctly. If you want to do everything yourself, study the video, which describes this process in detail.
Most car enthusiasts cope with this process on their own, but sometimes cases occur when incorrect connection of contacts leads to failure of the media system. To avoid this, you can try using the services of a specialist. Moreover, if you evaluate it objectively, the cost of such a service today is not particularly high, but you can be sure that the radio will be connected correctly.
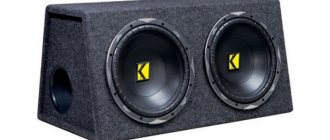
Connection to battery
Many motorists tend to connect the radio to the battery directly. In this case, you can provide the device with optimal power. This will also allow you to listen to music without having to turn on the ignition or a special button (we’ll look at these methods below).
Power is supplied through three main wires - yellow, red and black.
Important! Don't forget the fuse to avoid short circuit.
The disadvantage of directly connecting the radio from the battery is that when idle, the radio often consumes energy (especially Chinese products from little-known brands). As a result, one fine day your car’s engine may simply not start due to a completely discharged battery. That is why we recommend connecting using one of the methods below.
Optimal options for connecting a car radio:
Separate button
One of the most suitable connection options is to output a separate button that will turn off/on the power to the car radio. In this case, the red wire should be soldered not to the ignition switch wire, but to one of the button terminals. The second pin of the button is connected to the battery. Essentially, you can control the power supply yourself. Before parking overnight, you just need to press a button. You will no longer be dependent on the position of the key in the ignition switch.
The option of connecting via an alarm system also has a right to exist. The bottom line is to use contact relays and a diode. This scheme is not very common, so we will not dwell on it in detail.
Other connection options
Another option for switching the radio is to supply power through an additional security alarm channel. A 5-pin relay is used as a switching device. The disadvantage of the circuit is the increase in current consumption in idle mode, so additional diodes are introduced into the circuit. The denomination and number of elements depend on the type of head unit and security system.
To supply power to the contacts of the radio connector, a cigarette lighter or socket is also used, intended for connecting additional equipment. A positive power pulse is supplied to the red wire, the yellow cable is output to the battery. On some cars, power is supplied to the cigarette lighter regardless of the presence and position of the key in the ignition, which allows you to turn on the player at any time.
It is possible to switch the radio through diodes, which are installed in the circuit of the red wire (going through the ignition switch).
When you turn the key, a positive voltage is applied to the player, allowing you to turn on the equipment. When turning the key back, no voltage is supplied to the ignition switch. The second diode is used to limit the supply of current to the turned off radio when the power unit is running.
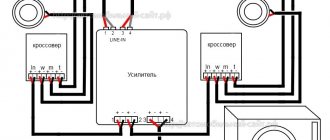
On minibuses and minivans, it is common practice to install an additional radio tape recorder located in the rear of the cabin. To switch the player, additional plugs are required; sound is reproduced through separate speakers, since sharing nodes is unacceptable.
It is possible to use a separate switch that switches the acoustics to various sound sources.
The head unit is mounted in boxes for small items or niches, which are modified to fit the dimensions of the product. It is possible to manufacture an individual podium in which the radio and speakers are placed.
Which radios are suitable for use not only in the car, but also at home. Three ways to connect a radio at home via a step-down transformer, a stationary power supply or a power supply, usually a computer.
Instructions on how to connect the radio to the battery
Car players that exist today have a huge selection in their functional qualities, appearance, cost and other technical, quality and social parameters. But no matter how much this device costs, what functions and options it has, how well the radio will perform its direct duties. Namely, the playback of sound and video recordings from various media of such information largely depends on how the said head unit is correctly connected to the power supply system of your car - the battery.
Scheme
Setting up the radio
The main settings of the head unit include:
- menu language selection;
- disabling the demo screensaver;
- programming radio frequencies;
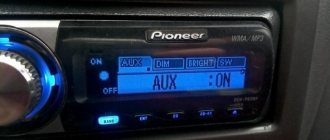
- setting the operating parameters of external players switched through the AUX port;
- adjusting the balance between speakers;
- setting frequency cutoff parameters (not available for all radios).
If an additional amplifier is used in the design of the car's speaker system, then you need to disable a similar device in the radio. Such manipulation is not required for all devices. Then the parameters of the external device are separately configured (in accordance with the instructions). Do-it-yourself settings and installation do not require special knowledge, but if the user is not confident in his own abilities, then it is recommended to visit a service center that installs speaker systems in cars.
- How to solder USB into a car radio
- How to properly connect a radio to a VAZ 2110
- Setting up an amplifier for speakers
- How to remove the standard radio on a Priora
Possible troubles if the radio is connected incorrectly to the battery
The most disastrous result obtained from an incorrect connection of the battery to the car player is the occurrence of a short circuit. Which can not only completely damage the entire audio system, but also damage other electrical circuits of the car.
Also, if the connection is incorrect, the energy battery may be partially or completely discharged. Poor performance of the player's direct functions—sound failures in playback, extraneous noise, wheezing, and similar disturbances.
Connecting a car player via the ignition switch or button
These connections are recommended as an answer to the question of how to connect the radio so as not to drain the battery.
This is done through the ignition switch as follows:
This connection is considered the most common and is recommended by experts. The positive and negative sides of this connection method are mutual. That is, the battery does not discharge while in a standby state when the car is parked. But you can listen to music only when the ignition is on.
Connection via a special button.
The wires are connected according to the diagram described above (ignition), with one exception. The red power wire is not connected to the ignition switch, but to the intermediate button. With a cable leading from it to the positive terminal of the battery. Thus, the player can be used without turning on the ignition, and also completely disconnected from the energy carrier (battery).
Connection methods
The most optimal way is to connect the radio directly to the battery, which reduces the voltage drop and protects the power circuits using a built-in fuse. But the downside is the accelerated battery discharge, which occurs even when the head unit is turned off.
The standard connector to the radio contains 3 cables responsible for supplying power; the insulation colors are unified for all manufacturers. The red and yellow wires connected from the battery together make it possible to listen to music without turning on the ignition. The black wire connects to the point that provides negative power. There are special bolts welded on car bodies that are used to connect negative cables of electrical equipment.
We feed plus to the radio
Before connecting the cable to the battery terminal, you should install a tip that will ensure reliable contact at the junction. The tip is attached to the battery terminal using a standard bolt. A fuse rated for a current of 10-16 A is installed on the cable; the element is placed at a distance of 200-250 mm from the voltage source. The wire is then routed through the engine compartment and then fed into the vehicle's interior through a stock conduit designed for wiring or alarm harnesses.
If the additional cable is assembled from several parts, then the elements are connected by terminals, which are covered with an insulator on top.
To protect the harness from damage, it is recommended to use a corrugated plastic sleeve, which is attached with clamps to the standard electrical lines.
Contact of cables with hot or moving elements of the vehicle structure should be avoided. The cable brought into the cabin is equipped with a metal plug, which is used to connect the electrical wiring of the radio.
Through the ignition
To avoid draining the battery, the radio is connected via the ignition switch. When the ignition is turned off, it is impossible to use the head unit. For switching, a supply wire protected with red insulation is used. An additional yellow cable leads directly to the battery terminal.
If you cross both wires into a single circuit activated through the lock, then the settings will be reset every time you turn off the ignition.
Via button
The use of a separate switch to interrupt power to the car radio is used on vehicles equipped with an ignition switch without an ACC position. The power wire with a red sheath coming from the head unit is soldered to one of the terminals of the button, the other terminal is equipped with a cable going to the battery.
The push-button switch is located on the instrument panel or center console. To start working with the player, you need to press the selector; you do not need to insert the key into the ignition switch.
To dimensions
In this case, the cable with yellow insulation is led to the positive terminal of the battery, and the red positive harness is connected to the side lighting circuit. The closest place for switching is the illumination lamp of the additional socket or glove box.
When the external lighting is activated, voltage is supplied to the radio, but if the light is turned off, it will not be possible to turn on the equipment. The advantage of the technique is the ability to listen to the radio without turning on the ignition, but the side lamps additionally drain the battery.
Connecting the radio to batteries via side lights
An interesting, but not very clear (at least for the author of the article) connection method. The connection is made through the red terminal of the player to the power cable for the side signals running under the front panel (torpedo). Or to a lamp illuminating the interior of the glove box (glove compartment). With this connection, the yellow cable goes through a fuse to the positive terminal of the battery. With this connection, the radio only works when the lights are on?!
How to connect a radio to a battery at home
Since a car player is a mobile device, its scope of application does not end with the car interior. And throwing away a working receiver when replacing it with a new MMC is quite a shame. In such cases, an excellent solution would be to connect the radio to a household electrical outlet or an old but working battery, at the dacha or in a garage workshop. As a connection diagram, you can select the connection option via a button (toggle switch). If a suitable battery is not available, it can be replaced with a network adapter that converts standard 220 volts into the 12V required to power the radio. Or an uninterruptible power supply with a built-in 12 V battery. With this connection, the radio is not only provided with energy, but is also reliably protected from possible power surges.
Video instructions on how to connect the radio directly to a 12V battery.
Source
Direct battery connection
To connect the device to a car battery, you need to connect the red (control) and yellow (power) cables of the radio to the positive terminal of the car battery, and connect the black negative power wire to the body or connect it to any cable with an identical charge.
Experts recommend not to forget about safety measures and connect the wires to the battery only through a 10-20 A fuse. This inexpensive protection device will save the electrical wiring from a short circuit, and the car itself from a fire.
If the positive cables are of the same thickness, they can be combined and connected to the battery through a common fuse.
When choosing this method, it is recommended not to forget that a turned off radio also consumes energy. Therefore, for owners of old batteries and for those who drive occasionally, such connection methods are not suitable. This issue becomes especially relevant in winter, when it is recommended to remove excess load from the battery.
For forgetful music lovers, a radio that has been running at night can completely consume the battery charge, even in the warm season. So don't forget to check your electrical appliances before you leave the salon. It wouldn’t hurt to check the low beam headlights and headlights at the same time.
Some car owners supplement the circuit with a button to turn off the audio system, thereby minimizing energy costs.
How to connect the radio directly to the battery
You can connect the radio directly to the battery yourself if you study the connection diagram. To connect the player, you must use universal ISO connectors if the device has standard inputs, or adapters if the player has a custom interface.
Why connect directly?
Sometimes, after installing additional speakers in the cabin, the quality of the sound reproduced by the radio deteriorates. The problem is especially noticeable at high volumes and low frequencies. Connecting the radio to the battery helps solve this problem.
In addition, this method minimizes current leakage, which can drain the battery in a few hours.
Often, motorists connect the head unit incorrectly - through the cigarette lighter. This switching method does not allow you to use all the functions of the car radio. In addition, problems may arise when playing music: the display blinks and the sound quality deteriorates. Therefore, experts recommend connecting “+” to the head unit from the battery, which allows you to get the best performance of its power supply.
How to connect correctly
Car radios have 2 positive wires:
Both cables are connected to the battery. They are combined near the interface output to facilitate connection to the fuse circuit. It is important to consider that the equipment will consume current in standby mode. If the indicators are left high, the battery will be discharged after 6-8 hours of “sleep”.
Another important aspect of proper connection is safety. Switching is done through a fuse, which helps to avoid short circuits. In addition, it is necessary to ensure that the wires used have the same diameter.
Pros and cons of the method
The advantages of the method are the simplicity of the operations, as well as the ability to listen to music even with the ignition off.
The main disadvantage of connecting the radio directly is that the player will drain the battery even when turned off, because in standby mode it consumes 0.2-1 A/h depending on the model. Therefore, this method of connecting the head unit is not suitable for owners of old batteries.
How to connect a car radio in a car with your own hands? (photo - video instructions)
Good afternoon. In today's article I will tell you how to connect a car radio in a car and analyze typical errors in connecting radios. Traditionally for our site, the article is equipped with detailed photos and video instructions.
If, when connecting, you arrange the so-called. A short circuit can lead to melted wires, burns and, in extreme cases, a fire. Please, when connecting the car radio, be careful, carefully insulate all wire connections and do not forget about the fuse...
To connect the radio we need:
- The car radio itself, the speakers and their wires
- Stationery knife or special knife. tool for removing insulation from wires.
- Insulating tape.
- Fuse (10a-15a) and its connector.
- Multimeter or test light.
- Crown battery
The simplest option is that the car has audio preparation.
Audio preparation – i.e. Special connectors, an antenna are installed in the car's wiring, and speakers are fixed in standard places. For many models, audio preparation is an option, and many owners refuse it in order to reduce the cost of the car when purchasing, but this should not be done, since radio installers will ask for much more money for it.
With factory audio preparation, installing a radio comes down to purchasing an adapter between the wiring connectors and your radio.
Adapters are freely sold in most stores that sell radio tape recorders, but if you want to save money, you can order them on AliExpress.
The adapters look like this:
The second most difficult option is that the car does not have audio preparation, but a radio tape recorder was previously installed (for example, a cassette).
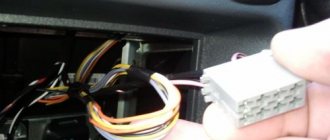
In this case, you need to replace the radio connector with a new connector (or maybe you’ll be lucky and they will match).
The diagram for connecting a car radio looks like this:
Most likely after you cut off the old radio connector (it’s better to do this with the battery terminal removed). You will have several wires and you need to determine where they are coming from, usually you need to find the permanent positive, positive from the ignition, ground and speakers.
How it's done?
— We expose the wires using a utility knife and arrange them so that they do not short-circuit.
— We put the terminal on the battery.
— We connect one terminal of the test lamp (or multimeter) to the car body (ground) and with the second terminal, sequentially, we touch each of the exposed wires. When the light comes on or the multimeter shows voltage, congratulations, you have found a permanent positive.
— It’s better to immediately twist it with the radio connector (usually the wire is yellow and BAT +12v is written on it) and insulate it with heat shrink or electrical tape. A fuse with a rating of 10-15 amperes must be installed on this wire.
— We are looking for the plus from the ignition switch, to do this we open the lock to the “ignition on” position and similarly, using a multimeter or a light bulb, we look for the required wire. The found wire must be connected to the red wire of the radio connector (usually ACC+ is written on the wire); we do not isolate it yet!
Note (sometimes this wire is connected to a permanent positive, but in this case the radio will drain the battery, since it will not have a standby mode)
— We are looking for ground, to do this we disconnect the control lamp from the body and connect it to the last twist we just made and connect the second terminal of the control (multimeter) in series with the remaining wires. Once the light comes on (or the multimeter shows voltage), you have found ground. We connect it with a twist to the black wire of the radio connector (usually it is labeled gnd, ground)
Alternative connection schemes
Many drivers are interested in the question of whether it is possible to connect the radio so that it does not drain the battery. The connection that satisfies this requirement is made through the ignition. It is necessary to connect the positive wires of the equipment to the terminal responsible for power supply of the contact group. This method is inconvenient because if you need to listen to the radio you will have to turn on the engine.
Connection to the battery via the “On/Off” key is carried out by a wire going to “+”, which is connected through a key with 2 positions. This method is optimal for managing the power supply of equipment. If you need to leave the car overnight or for a longer period, you need to turn off the power supply to the head unit by pressing the key. It is most often placed on a panel near the player. This switching scheme makes it possible to turn on the player regardless of whether the ignition is on.
For the next method, you need to select a cable under the dashboard that is powered through the side lights. On most models, it is easier to connect through the glove compartment light bulb. To do this, the red cable of the player is connected to it through a relay. The yellow terminal is connected through a fuse to the power source. If the connection was made using this method, the player will only function when the headlights are on. When the lights are turned off, the current memory of the radio is not erased. In order to save energy, LEDs should be installed.
Source
Installation in the car
Installation of the radio begins with the removal of the decorative plugs covering the mounting socket in the center console. To mount the head unit, metal clips are used, which are held in the instrument panel by bendable antennae. If the car was equipped with a 1 Din-format radio, and you plan to install equipment with increased dimensions, then a box for small items is removed from the console. It is not possible to install a 2 Din standard player on some machines, or the installation of a new console will be required to accommodate the unit.
To install a radio instead of the original equipment, it is necessary to install adapter brackets that allow you to attach the tape recorder to the power frame of the dashboard. Installing a non-standard radio requires the use of a decorative frame that allows you to fit a rectangular front panel into a hole with beveled edges or rounded corners (depending on the type of car). The additional element is installed by hand and does not require modification of standard parts from the machine.
Connecting speakers
Connecting the radio to a car equipped with standard acoustics does not require laying patch cables. The owner will need to directly connect the plugs to the mating connectors on the head unit or use an adapter. If speakers are installed simultaneously with the installation of multimedia equipment, then signal cables will need to be laid. Depending on the design of the car, acoustics are installed in the doors, instrument panel or shelf located behind the back of the rear row of seats.
To connect the acoustics to the head unit, a special-purpose stranded copper wire coated with an elastic insulator is used. On the speaker body there are positive and negative contacts with symbols. The connection diagram for the car radio provides for connecting loudspeakers in compliance with polarity; connecting negative cables into a common bus is prohibited. Since the wires come without a chip, it is necessary to provide a plug that will ensure a reliable connection.
Antenna connection
Once the power cables and speaker patch cords have been connected, the antenna plug should be reinstalled. On some cars, the cable with the connector is folded deep into the instrument panel; the owner needs to pull the cord to the installation site himself. Standard antennas are equipped with frequency filters that eliminate interference and increase the range of signal reception from repeaters. The factory unit is connected using a plug that is installed in the mating socket on the back of the car radio.
If the car is not equipped with an antenna, then many owners connect an active type device that is mounted on the windshield. The built-in amplifier requires power, which is provided by the output in the player's jack, marked AMP or REM. After connection, the junction point is protected with insulating tape. At this stage, the procedure for installing the radio in the car ends; the owner can test the operation of the equipment.