Removing the instrument panel and disassembling the center console on a Ford Focus 2
The content of the article:
Removing the instrument panel on a Ford Focus 2
The need to remove the instrument panel (speedometer, tachometer, etc.) occurs quite rarely. The reason may be the need to replace light bulbs or solder contacts, or when one of the devices described above needs to be replaced. This article shows how to do this correctly and quickly, without harm to the panel and the devices themselves.
Step-by-step instructions for removing the instrument panel for Ford Focus 2
To remove the instrument panel on a Ford Focus 2 you need:
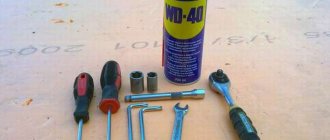
1. TORX T25 key.
2. Medium sized screwdriver.
Progress of work on removing the instrument panel on a Ford Focus 2
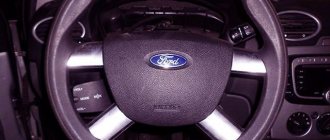
1. Pull the steering wheel towards you as far as possible.
2. Then pull the plastic decorative cover towards you, it is marked in red in the photo.
3. After this, you will have access to the panel mounting screws. To unscrew them we use a TORX T25 key.
4. Take a screwdriver and center it between the dashboard and the visor until it touches the latch, then pull up until the latch is disengaged.
5. Pull the Ford Focus dashboard towards you, not too much, so as not to break anything. If it doesn’t work, grab the connector latch with your fingers and try again in the direction of the arrow.
6. When the latch is turned, the connector should come out of the mating part.
7. Now you can remove the glass. Unfasten the latches marked in red in the photo.
8. As a result, you will get two different parts, which can now be disassembled further.
9. Now you need to remove the arrows. To ensure that nothing goes astray and that after assembly the instruments show accurately, take a pencil and mark with it the position of the arrow in the lowest position.
10. Remove the caps from the arrows; mine are silver.
11. Using gentle movements so as not to break anything, remove the arrows. To do this, use a wide knife, place it at the base and pry the arrow up.
12. Remove the scales.
13. Unfasten the back cover from the panel.
14. Remove the board by bending the latches.
15. You can clean the on-board computer display if necessary.
After carrying out the work you need, you can assemble the Focus instrument panel; assembly is performed in the reverse order.
Well, now you know how to remove the dashboard of a Ford Focus 2, and if necessary, you can do it yourself.
How to disassemble the center console of a Ford Focus 2 down to the armrest
Firstly, we must immediately make a reservation that there are many different interior options for Focuses, depending on the year and configuration. I am only describing my version, namely FF2, 2008, Spanish, Ghia SE equipment, square radio.
The order doesn't have to be this way. We'll go from top to bottom. 1. Remove the frame that is around the radio. First, we take out the radio and see this picture.
To unscrew these bolts you will need a screwdriver or a torx bit of the appropriate diameter. Here it is, if anyone doesn’t know
Direction indicators
The Ford Focus 2 instrument panel is equipped with turn signal switch controls:
- Position “I” – the right turn signal is permanently turned on.
- Mode “II” is a similar indicator for a left turn.
When moving in a straight line, the lever is in its original position. To activate the right turn signal, also called left, you just need to turn the lever until it reaches a certain point of resistance. Here the indicators will blink three times and the warning light will come on.
Installation and repair instructions
Repairing the dashboard in a Ford Focus 1 or 2 does not happen very often in practice. As a rule, removing the instrument panel of a Ford Focus 2 or 1 and replacing the instrument panel as a whole is carried out either if it is necessary to repair the tachometer and speedometer, or if the dashboard completely fails. In addition, the Ford Focus 2 restyling dashboard is dismantled to replace light bulbs if the latter burn out. To complete this process, you only need a screwdriver and a T25 Torx wrench. In the video below you can see the repair of the control panel using the example of a Ford Fusion car (video author - Volodymyr Zagryvyi / Vladimir Zagryvyi).
Algorithm of actions
- To repair the instrument panel on the first or second Focus, first of all you need to pull the steering wheel towards you as far as possible. After this, you should pull the plastic facing cover of the torpedo under the control panel towards you.
- Having done this, you will gain access to the control panel fixing bolts. To unscrew these bolts, use a pre-prepared star wrench.
- Next, you need to take a screwdriver and place it in the middle between the control panel and the visor, pressing the stop itself into the latch. After this, pull up - this way the latch can disengage.
- The instrument panel of a Ford Focus 3 or any other model needs to be pulled towards you, but only without unnecessary effort, so as not to damage the device. If you cannot pull out the shield, try grasping the connector latch with your fingers and pulling it towards you. When you turn the latch, the connector should come out without any problems.
- After this, you can dismantle the glass. To do this you will need to unfasten the fasteners. In the end, you will have two different parts on your hands, you can begin to further analyze them.
- Next, you can dismantle the arrows. In order not to disturb the configuration of the control panel and after assembly all devices work correctly, use a pencil or marker to fix the corresponding position of the arrows in the lowest position. After this, you can remove the caps using the arrow; in this case they are silver, but the color may vary depending on the vehicle model.
- Carefully, without much effort, remove the arrows so as not to break them. For dismantling, you can use a stationery knife; it must be placed at the base, after which the arrow can be pryed up.
- Remove the scales from the instrument panel, then disconnect the back cover from the control panel.
- Now you can remove the board itself, after first bending the latches. If the problem lies in the operation of the board, then it is necessary to solder it. In order for the device to work normally in the future, it is better to entrust the soldering procedure to professionals. If the on-board computer screen is dirty, you need to clean it. When all steps to repair the device are completed, reassemble the device in the reverse order.
Automatic locking
This feature is quite useful, and it is very easy to activate. Its essence is that when the car starts to drive, the door locks automatically close and it is impossible to open the doors.
The function is activated by performing the following actions:
- insert the key into the lock and turn on the ignition;
- Close and open the doors 3 times in a row using the corresponding button;
- turn off the ignition;
- open and close the doors again the same number of times;
- turn on the ignition, after which a short beep should sound;
- open and close the doors, after which a long beep should sound;
- turn off the ignition.
After performing these manipulations, the Focus doors will automatically close after the start of movement.
Oh, how long ago I wanted to write this article) And why? Because FORD has a lot of surprises that you notice immediately after purchase (for example, a hood lock). Having delved deeper into this topic for the sake of interest, I found a lot of features that were equipped with this car, you just need to activate them. I don’t know why PMK puts certain functionality into a car, but doesn’t include it. So, let's go) 1. Automatic locking. Its essence is that when the car starts to drive, the door locks automatically close and it is impossible to open the doors. Many brands have it already programmed, but I personally didn’t have it. The function is activated by performing the following actions: insert the key into the lock and turn on the ignition; Close and open the doors 3 times in a row using the corresponding button; turn off the ignition; open and close the doors again the same number of times; turn on the ignition, after which a short beep should sound; open and close the doors, after which a long beep should sound; turn off the ignition.
Scandinavian light. As you know, many modern cars have such an option as automatic headlights. This is very convenient, but the second generation Focuses are not equipped with this function from the factory. So, in order to implement this function on the Ford Focus 2 (including restyling
), we will need a standard set of tools (wrenches, pliers), wires, fuses (10 and 20 A) and connectors. In addition, you need to purchase a 4-pin relay. The relay from VAZ is excellent, it is very cheap and allows you to activate Ford secrets. When all the parts are ready, you can start working. First you need to unscrew the terminals from the battery. After this, open the fuse box, which is located under the glove compartment. We attach the connectors to the wire and install everything into the block, not forgetting about the relay. The installation diagram can be found on the Internet. We also install fuses. After this, close the unit and connect the terminals to the battery. That's all, and now the second Focus has a Scandinavian light.
3. If a passenger in the back seat turned on the light, fell asleep, got out, etc., in short, and forgot to turn it off, then the driver does not have to reach for the rear switch to turn it off. Just press the button on the front lamp and then first the light goes out, and if you press it again, the light turns on in the entire cabin. #128578; For me, this is very convenient.
4.Test mode. 1) Turn the ignition key to position I 2) Press and hold the “SET/RESET” button on the left steering column stalk. 3) Without releasing the “SET/RESET” button, turn the ignition key to position II 4) When “TEST” appears on the BC screen, release the “SET/RESET” button 5) The test mode values are scrolled through the “SET/RESET” button 6) To exit the “TEST” mode, turn off the ignition. The following parameters are currently known:
1 GAUGE SWEEP (all arrows reach the maximum and return back) 2 LCD TEST (checking the display, all pixels are painted over) 3.LED TEST (all indicators light up) 4.ROM LEVEL (computer firmware version)
9.DTC #01 (last fault code) 10.ROAD SPEED (speed, probably miles per hour) 11.ROAD SPEED (speed, probably miles per hour) 12.SPEEDO GAUGE (position of the speedometer needle (HEX)) 13.ENGINE SPEED (tachometer speed) 14.TACHO GAUGE (tachometer needle position (HEX)) 15.ODO ROLL COUNT (daily mileage)
18.FUEL FLOW (fuel consumption) 19.FUEL PERCENT (percentage of tank full) 20.ENGINE TEMP (engine temperature in degrees Celsius) 21.TEMP GAUGE (temperature level arrow position) 22.BATTERY (battery voltage, V) 23.DIST TO EMPTY (mileage to empty tank, most likely in miles)
You can use this function in different ways. For example, I am more interested in item 9 “DTS#”. If something is written there, you can immediately find out the cause of the malfunction.
Quite often, disputes arise about disabling the rear wiper, which turns on automatically. Some Focus owners note that they managed to do this. Most people say that it is impossible to deactivate this function on their own without making changes to the settings of the car control system. Who knows anything about this? In general, it seems to me that sometimes he lives his own life.
Adjusting the Electro-Hydraulic Power Steering (EHPAS) Note: When the vehicle is stationary, for each of these three adjustments, the system sets the optimal power steering ratio (which varies slightly). Standard: Standard adjustment parameters are suitable for any driving style. Sport: Reduced steering assistance. This adjustment is suitable for sporty driving as it improves the car's steering response. "Sport" adjustment also provides benefits when driving on icy or snow-covered road surfaces. Comfort: Increased steering assistance. The driver can apply less force to the steering wheel. Well, this is for those who don’t like to read instructions. Although, as they say, when a Russian opened the instructions, it means that he has already broken something.
The idea of Scandinavian light does not leave me indifferent. I made stationary dimensions for myself at a VAZ, it was very convenient. That's all for now. If anyone knows more tricks, write, it’s very interesting.
Sources:
https://auto-park24.ru/uhod/kak-snyat-panel-priborov-FORD-fokus-2.html https://auto-park24.ru/FORD-FOCUS/FORD-fokus-2-restajling-kak -snyat-panel-priborov.html https://motyk.ru/info/skrytye-vozmozhnosti-FORD-fokus-2-restajling-2008/
Ford Focus dashboard repair
Without a magnifying glass you can’t work without seeing anything!
I immediately examined the double row of contacts and saw nothing without a magnifying glass. There are no cracks and that's it. I carefully examined the entire board and again in vain. I decided to solder the entire double row so that I would never have to return to this stupid problem. Successfully soldered, be careful not to short-circuit the adjacent contacts with solder, I think it will not be easy to remove it.
Reassembly did not cause any problems, the main thing is to seat the hands correctly. I got it right the first time, the device doesn’t lie. The problem is solved, more than a month has passed and everything is normal.
Ford Focus 2 can-bus error.
Ford Focus II lighting elements
On the dashboard of the second Focus, you can rotate the controller handle, which will allow you to control the tilt of the light beam of the headlights. You can adjust the position at which you will not blind oncoming cars. This characteristic is adjusted based on vehicle load.
By aligning the mark on the handle with the digital position of the scale, you can adjust the tilt. In this case, you need to take into account the following machine load options:
- 0 - the driver is in the car alone or there is one passenger in front;
- 1 – the entire cabin is loaded;
- 2 – driver and filled luggage compartment;
- 3 – the trunk and all seats in the cabin are full;
- 4 – the machine is fully loaded, there is also a trailer (in this situation you will need to move the regulator one more position higher.
Other lamp control options
Turning on the high beam in combination with other devices is accompanied by the lighting of the control indicator. To signal with headlights, move the controller lever one position towards the steering wheel and immediately release it. Switching the lever one position to the steering wheel and then releasing it, with the ignition off, activates the option to delay turning off the light elements (the low beam will turn on, which will turn off half an hour after closing the last door). To turn off the headlights, move the lever one more time in the same way.
Designation of icons on the instrument panel Ford Focus 1
- 1 – engine needs to be checked;
- 2 – indicator of oil overheating in automatic transmission;
- 3 – malfunction in the airbag control module;
- 4 – storage room intended for additional equipment;
- 5 – one or more doors are not closed;
- 6/10 – turn signal lamps;
- 8 – the head optics long-range lighting mode is turned on;
- 11 – display of ESP/TCS operation, depends on the configuration;
- 12 – critical battery discharge;
- 13 – red watering can, indicator of a critical drop in the lubricant level in the engine crankcase;
- 14 – refueling required;
- 15 – the brake system is faulty, the pads may be worn out;
- 17 – malfunction of the ABS system, or a tire puncture was detected (similar to the TPMS system);
- 21 – backup lamp.
Removing the trim from the front door of a Ford Focus3
The third generation Focus was produced for seven years, until 2021. The generation was modernized in 2014. In 2021, the fourth generation of cars entered the market, the lines received updated body shapes and new engines.
Removing the driver's door card on the Ford Focus 3 model is quite simple. As with previous generations, repairs can be carried out in 15–20 minutes. The main tool for working on Focus 3 remains a plastic ruler and a thin flat-blade screwdriver.
- Use a ruler or screwdriver to pry off the corner of the decorative trim near the front pillar.
- Remove the panel from the door handle, unscrew the two screws.
- At the end, remove the plug and reflector, unscrew the screws hidden under the protective covers.
- Pull out the plug in the handle.
The driver's door trim is installed on 6 pistons. It is necessary to carefully pry up the casing, starting from the bottom corner, applying force, and carefully snap the clips out of their places. Under the casing, the door is protected by a steel sheet in which there are technological holes for clamps with an exposed block of electrical cables.
Removal Tools
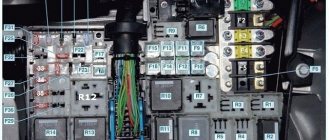
The set of tools for removing the head unit from Focus 2 depends on the year of manufacture of the car. When performing work, you may need a plastic card, a Phillips screwdriver, a special spatula for removing plastic panels and scissors. On some cars, the radio is secured with screws with a head designed for a Torx T25 key. No additional special tools are used.
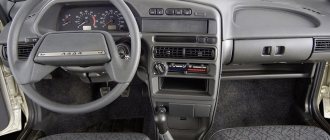
Ford Focus 2 instrument panel designations
Below is a dashboard with symbols and their explanation.
- External lighting controller.
- Electric headlight level control.
- Turn signal switch.
- Heating and ventilation unit nozzles.
- Steering wheel.
- Sound signal activation button.
- Devices.
- Egnition lock.
- Windshield washer controller.
- Central heater nozzles.
- Socket for radio tape recorder.
- Emergency light switch.
- Heating and ventilation system control unit.
- Glovebox.
- Seat heating controllers.
- Rear window heating switch.
- Cigarette lighter.
- Gearbox lever.
- Handbrake handle.
- Windshield defroster controller.
- ESP switch.
- 23. 24 – accelerator, brake, clutch pedals.
In addition, there is a steering column lock lever (25), a shelf (26), and an emergency fuel shutdown key (27).
Egnition lock
This unit is combined with an anti-theft device and is located to the right of the steering wheel. The key operates in four positions:
- “0” – the ignition is deactivated, after the key is removed, the “anti-theft” is activated.
- “I” - additional equipment - the ignition is turned off, the steering wheel is unlocked, the power supply circuits for the sound signal, external lighting, cigarette lighter, radio and other additional functionality are activated.
- “II” – the ignition is activated along with the starter, the steering is unlocked, all circuits and instruments are turned on.
- “III” – all working elements are included, the position is not fixed, when the key is released, it returns to mode “II”.
Never remove the key or turn off the ignition while driving, otherwise the steering will lock and the vehicle will become uncontrollable.
- “1” – the mechanism is turned off.
- “2” – the wiper blades perform one working cycle.
- “3” – the windshield wiper operates in intermittent mode. The delay period is adjusted by a switch.
Alternatively, an automatic switch can be installed. In this case, the sensitivity of the rain sensor is adjusted using the handle. The vehicle may be equipped with a windshield wiper with pauses between cycles, depending on the speed of the vehicle.