| To remove the interior lamp, you need a pull hook, for example, 3370 or HAZET 2520-1. For this purpose, you can also use a plastic wedge, for example, HAZET 1965-20 (refer to the illustration below). |
| EXECUTION ORDER |
|
Front dome light/reading light
| EXECUTION ORDER |
|
|
|
Replacing the reading light bulb
| EXECUTION ORDER |
|
Replacing the ceiling light bulb
| EXECUTION ORDER |
|
|
Rear reading light
| EXECUTION ORDER |
|
Replacing an incandescent lamp
| EXECUTION ORDER |
|
Glove box light
| Some lamps, such as the door signal lamp, entrance lamp, front footwell lamp and trunk lamp (sedan), are removed in the same way as the glove compartment lamp. |
| EXECUTION ORDER |
|
|
|
Replacing an incandescent lamp
| EXECUTION ORDER |
|
|
Cargo compartment light (Station wagon)
| EXECUTION ORDER |
|
|
|
Replacing an incandescent lamp
| EXECUTION ORDER |
|
|
We recommend: Antifreeze or antifreeze, which is better to fill and what is the difference?
Tailgate light (Station wagon)
| EXECUTION ORDER |
|
|
|
Replacing an incandescent lamp
| EXECUTION ORDER |
|
Rear footwell lamp
| EXECUTION ORDER |
|
|
Replacing an incandescent lamp
| EXECUTION ORDER |
|
|
Vanity mirror lighting
| EXECUTION ORDER |
|
Replacing an incandescent lamp
| EXECUTION ORDER |
|
Door handle lighting
| EXECUTION ORDER |
|
| Follow the instructions in Section Replacing the battery. |
- Remove the door trim, refer to the Section Removing and installing the front door trim.
- Remove the lamp (1) from the holder on the door trim.
- Disconnect the lamp connector (2).
- Installation is performed in the reverse order of removal. At the same time, insert the lamp into the installation opening and secure it.
Spare parts and accessories for FORD cars
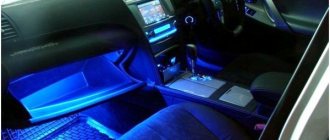
How to install LED interior lighting for a Ford Focus 2 with your own hands.
The standard interior lamp of the Ford Focus 2 is made of one light bulb and very dimly illuminates the front part of the cabin at night.
It is impossible to use the navigation light function with such light intensity. I ordered accessories for a Ford Focus car from the online store - LED panels with a set of adapters for connectors: T10, BA9s and a universal spring-loaded contact for lampshades. The dimensions of the LED panels exactly correspond to the dimensions of the Ford Focus 2 interior lamp.
Appearance of LED panels.
LED interior lighting for Ford Focus 2.
Each panel contains 24 SMD LEDs. The panel is fastened using double-sided 3D tape.
A set of adapters for connectors – T10, BA9s and a universal spring-loaded contact for lampshades.
To install LED panels, remove the interior lamp. To do this, insert a thin feeler gauge (credit card type) into the middle of the front of the lampshade to depress the retaining spring and pull the front of the lampshade down.
After removing the lampshade from the ceiling panel, you need to remove the glass of the lampshade. To do this, using a thin screwdriver, carefully, one by one, press the side of the glass in four places, opposite the fixing protrusions, while simultaneously pressing the glass down.
For convenient work on installing LED panels, we place the lampshade without glass in place, in the ceiling panel. Remove the standard dome light bulb.
Trying out LED panels. We find the places of greatest contact of the panels with the body of the lampshade. It is necessary to remove the protective film from the panels, wipe the lamp body in the glued areas with alcohol and glue the panels into the lamp body.
We insert the adapter into the lamp socket and check the functionality of the LED lamp.
After making sure that the lampshade is working, remove it, snap the glass into place and put the lampshade in place.
At this point, the DIY work on the LED interior lighting of the Ford Focus 2 is completed. Fifteen minutes of work and you get full interior lighting. If you have any questions, write to us by email
Related Posts
You can also read on this topic:
Types of standard radios
In the Ford Focus 2 car, two types of Sony 6000 CD radios were installed. Externally, they differ in the shape of the front panel. Before restyling, the standard car radio had a rectangular shape. Later, cars began to be equipped with second-generation head audio units. The “muzzle” looks more like an irregular oval. To dismantle car radios of the first and second generations, different tools are needed.
The standard radio for the first generation Ford Focus 2 has a rectangular shape
The 'face' of the second generation Sony 6000 CD radio has the shape of an irregular oval
How to remove the interior lamp on a Ford Focus 2
And the illumination of the feet of the rear passengers is your work. This can also be done using LED strips. Trunk As mentioned above, the trunk lighting of the Ford Focus 2 is represented by one lamp with a weak incandescent lamp.
A tall bag can easily cover it. But even an uncovered lamp will not be able to illuminate such a spacious trunk. Using a plastic spatula, pry up the latch. We take out the lampshade. We disconnect the block of wires and the lampshade is completely removed.
Remove the lamp above the rear seat. We snap off three latches on one side, and then two on the other, and remove the product. Now we remove the lampshade from its seat.
Interior and trunk lighting
We snap off three latches on one side... ...and two on the other. The lampshade has now been removed. We dismantle the lamp above the center console.
We pry up the latch and carefully remove the glass diffuser. After this, you can press the latches of the main part of the lampshade and take it out. And accordingly on the other: We pull carefully with our fingers and here is the result: Part 1.
Removing the lampshade It is better, of course, to do this by completely removing the lampshade. In the place marked with a red square there is a groove, there, again using a flat screwdriver, we squeeze out the metal tab and pull it down: As a result, the entire lampshade is removed:
Power supply of the DVR from the interior lighting of the Ford Focus 2
After recent events with a blown cigarette lighter fuse, I decided to implement an idea that had been in my head for a long time. Power the Karkam Q2 video recorder from the interior lighting in a Ford Focus 2. I put off the implementation of the idea for a very long time due to unclear issues, such as:
How to convert 12V lamp light to 5V for the recorder?
How to remove the lampshade
and is there any free space near it for wires?
READ Where is the fuel pump fuse for VAZ 2110
I managed to find some questions using Google on forums, but I had to figure out the last one myself. As a result, everything worked out, I am very pleased with the result. Next I’ll tell you and show you how I did it...
Power off the DVR
I was tormented for a long time by the question of turning off the power, because... the adapter is soldered to the lamp board and cannot simply be disconnected. But I really don’t want the upgraded DVR power supply to be constantly on. I even considered the option of soldering a switch to this circuit and placing it under the glass to open the circuit.
The solution turned out to be very simple. It turns out that all the electrical wiring of the Ford Focus 2 is de-energized 30 minutes after arming (alarm). A great option for those who don’t record a video recorder at all. I arrived, got out of the car, set the alarm and after 30 minutes the DVR would turn itself off. In the morning I approached the focus, disarmed it and the DVR immediately started recording.
Accessories you will need
Car charger with USB output. You can take the original charger, but I decided to leave it as a reserve in the glove compartment. Suddenly you will have to drive another car.
Tools (various screwdrivers, knife, screwdriver with small drill)
Ford Focus 2: LED lighting for the interior
Assembly
I ran the USB-miniUSB cable between the windshield and the trim. I left a reserve of 5-10 cm under the cable free play casing so that the wire could be pulled out and put back without disassembling the lampshade. I hid the retrofitted car adapter between the roof and trim, connected the adapter to the cable, and installed the dome light in place.
The result is worth your time. Even from an aesthetic point of view it has become much better. There is no dangling wire in the middle of the windshield, the cigarette lighter is free and not loaded. You can easily connect other electrical appliances (car gadgets) to it. Everything took 2-3 hours, not counting Google. And this article can be completed in an hour.
Soldering
The lamp comes with a constant plus and two minuses (-). In the middle there is a minus (-), which closes the circuit only when the doors are opened, is not suitable for powering the DVR. And the second one, which is in the picture above, is permanent, and we will use it.
I had to take a screwdriver with a small drill and drill two holes for the minus and plus. I inserted the wires into the new holes, twisted them, and soldered them for reliability. Be sure to maintain polarity, minus to minus, plus to plus. It turned out like this:
How to remove the interior light in a Ford Focus 2
The diffuser of the lampshade is mounted on 4 clamps. We pry it off from the side of the windshield with a flat screwdriver and carefully remove it.
We press another lock and remove the interior lamp completely
We disconnect the wires from the lampshade and go home to the soldering iron.
The process of dismantling the interior lamp on a Ford Focus 2
General view of interior lighting.
Replacing the lampshades in the Ford Focus II interior is carried out in several stages. So, the removal process itself will take 10-15 minutes. After this, the remaining operations can be carried out.
So, to carry out the process you will need a flathead screwdriver or it is best to use a plastic spatula with a sharp end. Before proceeding directly to the operations, it is worth noting that all actions must be carried out carefully and calculate the force so as not to break the fragile latches of the lampshades.
Withdrawal algorithm
Now, let's move on directly to performing operations to remove the interior lamps of Ford Focus 2:
- First, we dismantle the lampshade for lighting the cosmetic mirrors . Use a spatula to pry up the area indicated in the photo and remove the lampshade. This is where the fastening groove is located. Next, you can pull out the power supply wire block and you can carry out other operations on the removed lampshade.
Using a plastic spatula, pry up the latch.
We take out the lampshade. We disconnect the block of wires and the lampshade is completely removed.
Remove the lamp above the rear seat . We snap off three latches on one side, and then two on the other, and remove the product. Now we remove the lampshade from its seat.
Conclusion
Removing the lampshade with your own hands is quite simple. On Ford Focus 2, this is done in several stages, so you should be patient.
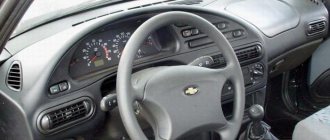
Ford Focus 2Car repairElectrical equipment > Removing interior lamps, replacing lamps. Cars in different versions are equipped with two interior lamps - in the front and rear parts of the cabin, or only the front interior lamp. A three-button lamp with a general lighting lamp and two directional lamps is located in the headliner in the front part of the cabin in the middle.
Before performing work, you must disconnect the wire terminal from the negative terminal of the battery or turn off the interior lighting.
To remove the lampshade, use a slotted screwdriver to pry up the retaining spring in its front part (from the windshield side).
We move the lamp down by the front part, overcoming the resistance of the fixing spring.
Use a slotted screwdriver to pry up the lampshade by its back.
We remove the lampshade from the hole in the ceiling upholstery.
Turn the socket with the burnt out lamp counterclockwise until it stops.
We take out the lampshade with the lamp.
Remove the lamp from the socket. Interior lamps use W5W lamps with a power of 5 W. To remove the lampshade, disconnect the wire blocks from the lampshade connector.
On some vehicle versions, a one-button courtesy lamp with one general lighting lamp can be installed in the front part of the cabin. Replacing the lamp in such a lampshade is done in the same way.
To remove the lamp installed in the rear of the cabin...
... use a slotted screwdriver to pry up the retaining spring from the front.
Use a slotted screwdriver to pry up the lampshade by its back part....
None
Dismantling process
Replacing the lampshades in the Ford Focus II interior is carried out in several stages. So, the removal process itself will take 10-15 minutes. After this, the remaining operations can be carried out.
To carry out the process, you will need a flathead screwdriver or it is best to use a plastic spatula with a sharp end. Before proceeding directly to the operations, it is worth understanding that all actions must be carried out carefully and calculate the force so as not to break the fragile latches of the lampshades.
Let's move on to the process of removing the Ford Focus 2 lampshade:
- First, we dismantle the lampshade for lighting the cosmetic mirrors. Use a spatula to pry up the area indicated in the photo and remove the lampshade. This is where the fastening groove is located. Next, you can pull out the power supply wire block and you can carry out other operations on the removed lampshade.
- Remove the lamp above the rear seat. We snap off three latches on one side, and then two on the other, and remove the product. Now we remove the lampshade from its seat.
- We dismantle the lamp above the center console. We pry up the latch and carefully remove the glass diffuser. After this, you can press the latches of the main part of the lampshade and take it out.
- We change the light bulb in the central lamp. The main lamp pulls out easily, but the side lamps are located in additional side latches. The side lamp must be disconnected from the on-board circuit and then rotated 45 degrees.
The process of installing parts is carried out in reverse order.
Disassembly and replacement of headlights
Disassembly and repair of a car headlight is required if it is necessary to clean the internal surface, replace the glass or reflector, as well as if you intend to alter the optics, for example, to install lensed elements.
Removing the headlight correctly
How to remove a Ford Focus 2 headlight was stated above. Fastening is carried out with one bolt to the cross member of the engine compartment and two plastic latches. In this it is no different from the headlights of the pre-restyling model.
No assistants are needed to dismantle the optics; all work is easy to do alone.
We disassemble the headlight
Before disassembling a dismantled headlight, you need to find an assistant in advance, since this is very difficult to do without outside help. You can damage the case or glass; this procedure will take a lot of time.
To disassemble the headlight, you will need the following tools:
- installation hair dryer with temperature control;
- scalpel or sharp knife;
- flat screwdrivers with a thin blade.
The glass is attached to the body in a U-shaped groove. The groove is completely filled with sealant. To soften the adhesive element, you need to set the temperature on a hairdryer to 250-350 degrees. An assistant should hold the heater over the joint at a distance of several centimeters. After heating the seam, use a scalpel to trim the sealant, while simultaneously moving the hair dryer to the next area. After trimming, continuing to heat, insert a screwdriver into the gap between the glass and the body and carefully push them apart.
After dismantling, traces of glue are carefully removed from the glass and from the groove cavity.
Gluing is done using high-temperature sealant. The curing time is indicated by the material manufacturer. All this time, the glass and body must be secured against shifting.
Ford Focus headlight wiring
If the power connector or lamp sockets are damaged (broken wires, melting), they must be replaced. The blocks are available for sale either empty, without terminals, or with built-in terminals and wire sections. The procedure for installing new items varies.
In the first case, the wires from the old block are cut off. Then the terminals are attached with a special crimp and secured in the connector. In order not to get confused in the position and order of the wires, it is better to rewire one at a time, installing it from the old connector to the new one in a similar place.
To install a new block with wires instead of the old one, you need to clear the ends of the insulation and connect them by twisting. It is advisable to solder it to increase reliability. The junction is insulated with tape. It is more practical, instead of electrical tape, to use pieces of heat-shrinkable tubing, which is placed on the wires before connecting them. After heating with a hot air jet using a hair dryer, the joint will be reliably insulated.
Just as in the first case, it is better to change the wires one by one.
Fuses and relays
In the Ford Focus 2, the relay and fuse box is located in the passenger compartment under the glove compartment (glove box). To remove it, you need to turn one or two retaining clips.
In cars before restyling, the following fuses are responsible for lighting:
| № | Current, A | Purpose |
| 37 | 10 | Far left |
| 38 | 10 | Far right |
| 45 | 10 | Running lights, DRL |
| 48 | 20 | Low beam, DRL |
| 60 | 15 | Middle right |
| 61 | 15 | Middle left |
| 69 | 20 | Fog lights |
| 71 | 10 | DRL |
Relay K5 is responsible for turning on the DRL.
After restyling, the lighting fuses have a different location:
| № | Current, A | Purpose |
| 110 | 10 | DRL |
| 113 | 10 | DRL |
| 116 | 20 | Fog lights |
| 135 | 20 | DRL |
| 139 | 10 | Far right |
| 140 | 10 | Far left |
| 142 | 15 | Middle right |
| 143 | 15 | Middle left |
Relays P1 and P2, located on the inside of the fuse box, are responsible for turning on the low and high beams, respectively.
What kind of lamps are installed in the interior lamp?
The lamp itself consists of 3 sections - a central one and two side ones for the driver and passenger. C5W lamp (AC12-5-1) is installed in the center . On the sides there is a T4W lamp (A12-4-1) with a power of 4V.
Instead of conventional incandescent lamps, you can install LED lamps with exactly the same bases. In addition to the usual lamp, you can install universal interior lighting in the center; we will talk about it below.
There should be no problems with the c5w lamp; there are a lot of LED analogues, which one you choose depends only on you. If you suddenly find yourself in a professional car lighting store, it is better to buy lamps with 5730 diodes, they will shine brighter than others.
In addition to a regular lamp, you can install universal interior lighting in the central lamp. It comes in different sizes, so you can choose it according to the size of the lampshade. The kit includes 3 different adapters for lamps: c5w, w5w and t4w.
or simple lamps with c5w socket
LED lamps have polarity, so when installing, pay attention to the + contact. If the lamp does not work during installation, simply turn it over.
The side lighting lamps have a different polarity. When installing LED lamps, they will not work and you will not be able to turn the lamp over. Therefore, you will have to remove the lampshade and rearrange the wires directly on the lampshade itself. Swap + and - places. Everything should work.
When choosing t4w LED lamps, pay attention to their size; the width of the lamp may not fit into some lampshades.
First model
In the 1st generation Focus, only halogen headlights are installed from the factory. They are easy to self-adjust.
Before starting work, you need to wash the headlights, fill the tank, and clean the trunk. Adjustment is carried out at a distance of 3 m from the wall on a flat surface. Unlike the second generation FF, the height of the cut-off line should be 5 mm lower from the height of the low beam lamp to the ground line. The reflector changes position using 2 screws.
Correctly setting the headlights will not only ensure good visibility while driving, but will also not cause inconvenience to drivers in oncoming traffic. The Focus light beam must be checked at least once a year during maintenance.
Finalization
Quite often, drivers complain about dim lighting in the glove compartment and interior. This is especially true for the simplest versions of the model. In this case, the best option would be to install an LED. To do this, it is enough to select a diode that matches the base; no other requirements are imposed on it. Installation is carried out in the same way as replacement. There are no special features here. After this, your glove compartment will be well lit. At the same time, the load on the vehicle's energy system will be significantly reduced.
Required Tools
Considering the fact that on some car models the ceiling lamps are secured with spring clips, removal will require a thin slotted screwdriver.
If you have regular plastic clips, just grab the lampshade with your fingers and pull it down.
Dismantling the interior lamps of a Ford Focus 2 is simple and only takes a few minutes. It is worth recalling that the fastening grooves are quite fragile, so the operation should be carried out carefully.
New car and new winter tires
15 November 2013, 14:54
Winter is coming, it's time to buy winter tires for my new car - Skoda Octavia A5. The last time I did this was 4 years ago, after purchasing a Ford Focus. I had already forgotten that the process of choosing tires is very complicated. There are a lot of offers to suit any budget; all you have to do is understand the features of each tire and choose the right one. On the Focus I had Nokian Hakkapeliitta 4 tires, I have no complaints about it, in 4 years I only lost about 5 studs from all 4 wheels. I thought about taking the same one, but they don’t sell it anymore, and the technology has changed over these 4 years, I hope for the better. You need to choose something from the 2012-2013 model range.
I set myself a psychological barrier, I need to meet 20,000 rubles for tires + tire fitting. The older Nokian Hakkapeliitta 5-8 models were not suitable for the price, but we managed to select several suitable options from other manufacturers, and began calling stores. It turns out that finding a store that has the necessary wheels in stock, has a tire service, is not far from home and you can pay with a bank card is not an easy task.
After several hours of searching, I settled on Gislaved Nord Frost 100 205/55 R16 94T tires; they are in the store, which suits all my needs. I had never heard of Gislaved before, but a friend highly recommended them. I also found an article in some auto magazine where they compared tires, so Gislaved was in 2nd or 3rd place in the rating. The price is right; one tire costs a little more than 4,000 rubles.
At first I wanted to take stamped wheels with hubcaps and R15 tires for the winter, and leave the summer tires on the original R16 alloy wheels. I calculated that there would be no economic benefit only if I transferred the wheels myself between seasons and did not go to a tire shop. I abandoned this idea and bought Gislaved 16th radius.
After the tire service, I walk up to the car and don’t see my summer tires. I asked the workers, and they looked sideways at me and said that everything was in the trunk. I open the trunk, and there are all four of my tires and there is room left. I still can’t get used to the fact that I now have a huge trunk. On the Focus, you had to lower the rear seat to fit all the wheels.
I drove out onto the road and caught myself thinking that I couldn’t hear the rustling of spikes on the asphalt. I was even a little scared, maybe they gave me Velcro instead of studded tires? I didn’t look at the tires before the tire service. I opened the window slightly, all doubts immediately evaporated, the tires were studded. So the tires are quiet and the Octavia has good sound insulation. It will be possible to judge the driving performance only after the winter; we’ll check the tires on a New Year’s trip to Estonia. I will definitely write about tires and travel on the blog.
First model
In the 1st generation Focus, only halogen headlights are installed from the factory. They are easy to self-adjust.
Before starting work, you need to wash the headlights, fill the tank, and clean the trunk. Adjustment is carried out at a distance of 3 m from the wall on a flat surface. Unlike the second generation FF, the height of the cut-off line should be 5 mm lower from the height of the low beam lamp to the ground line. The reflector changes position using 2 screws.
Correctly setting the headlights will not only ensure good visibility while driving, but will also not cause inconvenience to drivers in oncoming traffic. The Focus light beam must be checked at least once a year during maintenance.