Why do you need additional lighting?
The feeling of comfort inside a car largely depends on the quality of interior lighting.
The need for a soft, non-irritating backlight is especially important when traveling at night, when you need to check a map, write something in a notebook, remove important small items from the glove compartment, or find objects that have fallen on the floor. Additional lighting is of great aesthetic importance. It creates a unique design for the interior of the car and makes it stand out among similar vehicles. Such lighting can be synchronized with a subwoofer, as a result of which the LEDs will pulsate and change colors to the beat of the music. Despite the important role played by car interior lighting, the standard lighting system in some car models leaves much to be desired, so you have to redo it yourself.
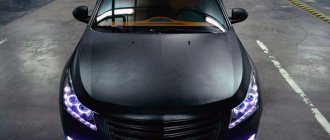
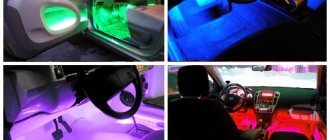
Car interior lighting
Interior decoration using additional lighting is one of the most effective ways to change the appearance of a car, which especially attracts attention in the evening. Our tuning studio Fat Tony offers its clients a wide range of services to improve the car interior using LED bulbs and strips - order installation of car interior lighting from us in Moscow .
When deciding to change your car using lighting design, you should contact experienced craftsmen who will help you perform tuning taking into account existing traffic regulations, since external lighting devices must comply with the standards - traffic rules and vehicle design requirements.
Backlight options
Previously, neon lighting was used to tune the car interior. It is bright enough, thanks to which even one lamp illuminates a rather large space. However, neon is quite expensive, is very susceptible to mechanical damage, often burns out when turned on and off, and is also more difficult to install.
In recent years, LED lighting has become increasingly popular. It has a lot of advantages compared to the previous version. It is quite easy to install and small in size. This makes it possible to illuminate the interior handles, steering wheel, cigarette lighter and other small elements. In addition, it is less afraid of any mechanical damage and burns out less often. In addition, with the help of LEDs you can achieve various lighting effects: from a smooth switching on of the interior lights to the possibility of periodic color changes when using RGB LEDs.
Both installation options are possible separately. Although it is possible to make a complex version, part of the interior is illuminated with neon, part with LEDs.
How to make original lighting in a car with your own hands?
As soon as you choose the option for illuminating the car interior, start selecting the tools and materials without which you will not be able to realize your plans.
- fuse;
- switch in the form of a button;
- screwdrivers of various types;
- insulating material for electrical wires;
- heads and keys for dismantling panels.
Instructions
Do-it-yourself LED interior lighting is performed according to a specific algorithm:
- First you need to remove the terminal from the battery.
- Next, we determine the location of the LED backlight. It can be installed above the torpedo.
- It is necessary to prepare two wires that will connect to the battery, select a switch and fuse.
- Place a special protective tube on the electrical wire. Solder the wire, then place a protective tube at the soldering site.
- The second wire needs to be brought out to the body and connected to the battery. Using the controller, you can change the color options of the LED backlight; on average, you can use 17 million different shades. The controller helps you choose colors and adjust the intensity of the glow. Using an LED strip mounted inside the cabin, you can illuminate the space at five speeds, with changing effects and colors.
- Next, we proceed to calculate the length of the wires. You also need to decide on the location of the switch. The location of the fuse near the battery allows you to protect the lamp from voltage surges and switching errors.
Tuning
Achieving this effect is quite simple - you need to make minor changes to the electrical lighting circuit.
To do this, you need resistors of a certain resistance - from 1 to 220 K (this is an imported standard, choosing domestic analogues is not difficult), a capacitor
(capacitance ranging from 50 to 100 microfarads, voltage 16V), stranded wire length
no more than a meter
; diode conforming to SR5100 standard. In addition, of course, you will need the usual tools - an electric soldering iron, tin and rosin.
The parts are connected in a certain order - you can see the electrical diagram at the examples at the bottom of this article.
Such a scheme is not presented here due to its availability - only the achieved effect is important
. It consists of the above-described gradual “fading” of lighting. Moreover, the delay time is directly related to the capacitance of the capacitor used (the higher the capacitance, the longer the effect).
The essence of the supplement
The proposed addition is that the built-in lamps (for interior lighting) do not immediately respond to the closing of the doors. As you know, the interior lighting is supposed to automatically turn off immediately after closing the doors. But – some delay (i.e. the lamps do not go out immediately, but after a few seconds) creates additional opportunities:
- in the dark
, you can use the “delay” to insert the ignition key into the slot; - do not have problems finding seat belts;
- turn on the music on the radio (press the desired button without error);
- have time to put things in the glove compartment, etc.
Simply put, such a delay can give the driver and passengers additional comfort.
As you can see, polite interior lighting with your own hands allows you to solve the issue both in aesthetic and practical terms, which will perfectly become an element of car tuning.
On some foreign cars, the manufacturer installed so-called polite interior lighting, which emphasizes the thoughtfulness of the car and increases its level of comfort. Unfortunately, this function is not included in the basic configuration of most cars. Every car enthusiast can correct the situation and acquire a system for smoothly turning on (off) lights. To do this, you need to assemble a small electronic device on the popular ATtiny13 microcontroller.
Car interior lighting with LED strips
This project should appeal to most car owners. Everyone must have tried to find shoes under the seats and knows that the light bulbs in the cabin are so dim that it is quite difficult to do this. So why don’t you make LED lighting for your car’s interior with your own hands, and thus make it stand out from others?
Necessary note: I didn't want to risk the integrity of my wiring so I didn't cut anything, just threw the wires on top. Well, now let's get down to business from talking.
What do we need for lighting? So:
— LED strips. I prefer to use RGB strips, which allow me to choose from a number of colors rather than being stuck with just one color. — RGB LED strip controller with remote control. — Four-wire wire. Typically, the LED strip comes with V+ (white), R (red), G (green) and B (blue) wires. - Connectors. - Soldering iron. — Silicone glue. You will also need brains and patience. Because as soon as you make this LED lighting for the car interior, you will start begging the sun for sunset so you can take a ride in your pumped-up car))).
Once the plan is clear, we begin designing the wiring, taking into account the connectors. Why connectors? They play an important role in both connecting and protecting the connection. Let's say several LEDs fail. No one wants to rip out all the wiring. When using connectors, you will only need to remove the faulty section of the tape, repair or replace them and insert them into place.
In the next image we see four connectors arranged in pairs at the back and front. Thus, the wire to each tape passes between them. The LED controller is connected to a 12V power source. Now, since I don’t want to cut the wiring and include additional fuses in the circuit, I will power it from the cigarette lighter or charger, which will be very simple to do. Also in this case, when you remove the ignition key, the lighting will go out.
Now that everything is planned, the next very important step awaits us - measurements. The importance of this stage is to further position the elements in the right places without tension on the wires. We take the first measurements for the section of interior lighting that is located under the dashboard, determining the total length of the two front LED strips. Secondly, we take measurements for the tapes located at the back, under the seats. After this part of the work is done, we proceed to determine the length of the wires, keeping in mind that we need to have a margin of length to be able to adjust them to the place where they are attached to the tapes. To determine the length of the wires, we measure the following areas: - from the controller to the front left connector; — from the front left connector to the front right connector; — from the front left connector to the rear left connector; - from the rear left connector to the rear right connector. When connecting the lighting circuit under the chairs, leave extra length of wires so that the connections do not break when the chair moves forward or backward.
After taking measurements, it’s time to cut the LED strips to length.
Our project requires four pieces of LED strip. All LED strips have cut lines every three LEDs. Keep in mind that it is better to make the segment shorter than longer, since the extra “tail” of the tape will dangle, and this will give the appearance of an unfinished design and spoil the impression.
After soldering, it is best to check its quality by lighting all the colors of the LEDs in sequence. So, in the images we see that the three primary colors are checked - red, green, blue.
If they light up without any problems, you need to ensure the safety of the soldering points. One way is to apply silicone glue, which will prevent the wires from contacting each other and ensure a rigid connection.
ready for installation in the car. In the same way, we will make three more, which in total will give us four sections of car interior lighting. Now is the time to get into the car and start connecting the circuit.
As you can see, first of all we attach the LED strip located under the instrument panel with glue. Then we attach the connector to it. Pay attention to the photographs - they clearly show what is being said here.
After the job is done, let's hide our wires. It is enough to insert the wires inside the panels and stretch them to the seats, to where the next section of LED lighting for the car interior will be installed.
Under the chairs, pieces of LED strip should not be glued with glue or adhesive tape, but passed between the springs and strings and tied at the ends. It should be noted that I left a sufficient margin of wire length so that moving the chair forward or backward would not affect the integrity of the connections. When this step is completed, we proceed to remaking the charger.
There are several different ways to power our interior lighting: - from unused fuses from the fuse box, using jumpers; — through the door panel. In this case, the backlight will shine when the doors are open and go out when they close; - from the headlights (either from the main fuse box or from the cut wiring supplying the headlights). But we will use a charger. Why? The reason for redesigning the charger is that I don't use the cigarette lighter for anything other than charging my phone. So why not modify the "charger" if it is used frequently and thus make it easier to use it for two tasks at the same time. Most phone chargers provide 4V output (which is not enough for our LED light). That is, they lower the voltage of the car battery from 12 V to 4 V. All we need is to run the wires past the voltage stabilizer.
When we open the charger, we will see a fuse (protects against overloads) and a stabilizer circuit (which lowers the voltage). We solder our wires to the fuse and to the ground, bypassing the stabilizer. This way we will get the 12 V we need! This is how we power our LED interior lighting. Once all connections are made, we will begin checking our work.
Using the remote control you can: — turn on/off the backlight; - change colors; - adjust the intensity; - use fading effects. Now all we have to do is wait for the sun to set, and we can roll our pumped-up car out of the garage!
Testing interior lighting in the morning.
Testing interior lighting at night.
Now let's pay a little attention to troubleshooting.
LEDs do not light up. Check the connections of wires and connectors. If this does not work, check the power source. Be sure to insert the key into the ignition to make the cigarette lighter work.
The LEDs light up, but some sections of the LED strip glow a different color than the rest. The reason is an error when connecting the wires. Make sure red is connected to red and so on.
What should I do if in some sections of the LED strip some colors do not light up? To check the connection of the car interior LED lighting, turn on white. If all sections glow white, the connection is correct. If not, check the red, green and blue colors separately. Accordingly, the color for which there are problems in connecting or soldering wires will not burn.
Source www.instructables.com
Become the author of the site, publish your own articles, descriptions of homemade products and pay for the text. Read more here.
Foot lights in a car
At first, illumination of the lower tier of the car interior was carried out only on premium cars. However, quite soon this option began to be used on simpler models, and some car enthusiasts began installing footlights with their own hands. There are special kits on sale that simplify the installation of this type of lighting design to a minimum. They are a set of 4 lamps and a control panel. A plug from the cigarette lighter is used for power, and the elements are fixed using pieces of double-sided tape. The wires are laid under the edges of the floor mats so that no one accidentally tears them off. There are less complex kits, consisting only of lamps of a simpler design, without a remote control. They give less effect, but are much cheaper. Among the most complex models, we can highlight sets with the ability to control via a Wi-Fi module.
Contour lighting
This type of lighting in a car is one of the most expensive and serves a purely decorative function. It is used mainly in premium cars to emphasize the luxury of the interior. Contour lighting can be installed in the following areas of the car interior:
- Front Panel;
- speed switching unit;
- dashboard;
- door trim;
- edge lines of other interior elements.
Luminous lines zone the interior, separate sections of the dashboard and other departments. The modern market offers a large selection of kits of varying prices. Standard equipment includes:
- light guide;
- powerful LED;
- driver for connecting to the network;
- set of wires
Installing contour lighting is simple and can be done by any car owner. It is possible to select the color of the LEDs. The price of the set depends on a number of design features and ranges from 400-2000 rubles.
There are many car showroom lighting kits available today. They have different design features and prices. A wide selection of lighting allows you to choose the appropriate option for any car model. And even if the light costs about 1500-2000 rubles, independent tuning will cost less than the implemented standard option.
Underbody lighting – flight effect
Among all the options for additional external lighting of a car, the most common is underbody lighting using LEDs. It’s worth saying right away that this is a very expensive pleasure, but on the other hand, this is exactly the case when money is spent on creating a car that is recognizable from afar. Thoughtful placement of LEDs on the bottom can create the effect of a car flying above the road surface, and this is very impressive and beautiful.
The work of creating underbody lighting is fraught with a number of difficulties that are associated with the constant mechanical impact of the environment (sand, stones, debris, chemicals, water) on this area of the machine. So it is necessary to pay increased attention to the quality and professionalism of installation. The condition of the entire car depends on this, because damaged wiring can lead to a fire.
Printed circuit board
The design development of the product is presented in the form of a printed circuit board podsvetka.lay, which is available for Layout versions 5.0 and 6.0. The courtesy backlight board is made in a single-sided version and, despite its compact dimensions (18*28 mm), is easy to assemble with your own hands. Resistors, capacitors and diodes are SMD components of standard sizes 0805 and 1206. The transistor AP60T03AH (Imax=45 A, Uс=30 V) is installed in a TO-252 housing with a drain on the radiator. The ATtiny13 MCU is used in an 8-pin SOIC package.
LED headlights – a sophisticated look
In order to create a full-fledged image of a car, in addition to the original body painting, headlight decoration is often used (due to additional lighting). Moreover, with the correct construction of such a system, LED lighting can also be used from a practical point of view, as a source of DRLs (daytime running lights). Considering the energy savings of LEDs, this is a significant unloading of the power supply system, which will contribute to its longer and more reliable operation, as well as reduced fuel consumption.
You can get high-quality headlight illumination at a tuning studio or yourself by purchasing special kits. It is not difficult, but beautiful and unusual.
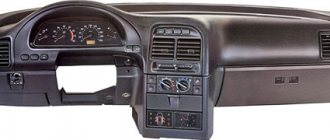
Instrument panel lighting
The instrument panel is equipped with lighting, but for those who like to install additional lighting elements in the car interior, this is not enough. Owners increase the brightness of the backlight, change the color of each device, make the speedometer area in the high-value zone red, etc. There is a lot of room for imagination in this matter, especially since the installation of lamps does not pose any problems. You just need to purchase a set of 40 multi-colored LED lamps that have the same base as the stock bulbs. The user is only required to replace the “original” devices with diode lamps, selecting a color for each element to his liking. The procedure is extremely simple and does not require the use of a soldering iron or other tools. You just need to check the functionality of the LEDs before installation.
Main components
All flashing lighting is assembled from individual LEDs and LED strips and control units for them. A microphone is installed in the control unit, which picks up the sounds of music and transmits them through an amplifier to a signal level stabilizer. A stabilizer is needed for equally smooth operation of color music, despite the volume level. The signal then passes through frequency filters (usually three, high, medium and low) and is fed to groups of LEDs, divided by color or line, and causes the LEDs to flash to the rhythm of the music.
Put the soldering iron aside, control units for LED strips are sold in the same place as the strips, so you don’t have to assemble the printed circuit boards yourself. LED strips are available in different colors, sizes, glow intensity, ask for a catalog in the store and select the desired characteristics.
Installing different lighting options
Point diodes
A resistor is soldered to one of the legs of the diode. Next, solder the wires and wrap the exposed wiring with electrical tape. A terminal connection is made at a distance of about 20 cm. LEDs are ready for installation.
Now the installation site is being prepared. If we are talking about interior handles, then you will need to remove the trim and make a small hole at the installation site. The hole should be of such a diameter that the diode fits quite tightly in it. If desired, you can glue the diode with Moment glue.
The wiring is pulled under the trim into the interior so that it can be connected later. In the same way, point diodes are installed anywhere in the cabin.
LED Strip Light
Installing LED lighting in the car interior is not difficult. The location of the intended installation is measured and the tape is cut to the appropriate length. Incisions are made using scissors along special membranes.
ATTENTION! If you take more tape than necessary, it will not fasten well and will sag in the future. Therefore, it is better to cut a little less tape than planned.
Wiring is soldered to the edges of the prepared sections, the functionality of the structure is checked by connecting it to power, and then proceed to installation. For the best adhesion of the tape to the plastic surface, the place where the tape is attached is degreased. To do this, apply the degreaser to a rag, wipe the desired area and leave it for 3-5 minutes until completely dry. After this, remove the protective film from the LED strip and glue the strip in the right place. If the tape does not have a protective film and a sticky surface, then “Moment” glue is required for its installation.
The algorithm described above is suitable for installing lighting on straight surfaces. If you need to install the backlight in an area with a bend, you will have to tinker. The fact is that it is not advisable to bend the LED strip even at an angle of 90 degrees. Therefore, you will need to cut two pieces of the required length, clean the edges and solder them at the folds. Place a heat-shrinkable tube over the soldering area and heat it up. Wiring is soldered to the outer edge of the LED strip, they are insulated and the strip is installed in the right place.
Neon lamps
Neon lamps should be installed in places where the risk of mechanical damage is reduced to zero. For example, to illuminate the engine compartment. For installation you will need the following tools and materials:
- neon lamps;
- aluminum corner;
- nylon clamps for fastening;
- self-tapping screws
If the lamp has a connector for connecting to the cigarette lighter, cut it off and clean the contacts. A piece is cut off from the aluminum corner, which matches the length of the lamp. The corner is screwed under the dashboard, and neon lamps are attached to it using clamps. In the same way, the lamps are mounted under the glove compartment and under the rear seats. The wiring is hidden under the car's skin and pulled to the dashboard.
Installation of diode strip
Do-it-yourself car interior lighting with LED strip is also quite simple. Decide on the installation location, take the necessary measurements, cut a piece of the required length from the tape. Please note that you can only cut where the soldering spots are marked. You can see them on the tape. And also, it’s better to cut off a slightly smaller piece than vice versa, otherwise there may be sagging and the tape will not stick well. After everything is cut, solder the wires to the edges of the tape. You check the functionality of the diodes by connecting them to the power supply, and after that you can proceed with installation. If you have an LED strip with a sticky edge, then remove the protective film and stick everything in the right place. If not, then you will need glue here. This way you can install lighting only on straight areas.
If you need to highlight areas with folds, then everything is done a little differently. After all, bending the tape even at an angle of 90 degrees is undesirable. Then, to begin with, also take measurements, cut off pieces of the required length, clean the edges and solder them at the folds. After this, insulate the soldering area using a heat-shrinkable tube (to do this, put it on the desired area and heat it up). To the edges through which the LED strip will be connected to the power supply, solder the wires, insulate them and then install everything in the right place.
Some design features
When implementing LED interior lighting with your own hands, you must first decide what and how to illuminate.
Regarding the placement of the tape in the interior of the VAZ-2110, lighting can be done everywhere, but it will bring the greatest benefit in the glove box and in the footwell area, and its benefit for the rear seat is much greater. This also includes the illumination of door handles.
As a decorative element, such tuning is best done on air duct grilles; it looks good as illumination of doors with a logo, as well as illumination of car doors along their perimeter.
The type of inclusion of individual lighting elements, including those in the foot area, is set. The simplest option is to permanently connect it to the on-board electrical network. However, the most functional will be a separate, easily accessible switch, which will turn on the decorative lighting of the door illumination with a logo, or the illumination of the foot area, exclusively at night.
It is impossible to give general recommendations for choosing the color of the glow, except for the obvious provision that it should be in harmony with the color scheme of the illuminated components of the VAZ-2110 interior.
Article on the topic: Acid soil for a car
Light sources in the car interior
Interior tuning is the least widespread, as it concerns only the interior design of the car. As a rule, the driver adjusts his car “to suit himself” and, first of all, this applies to the interior. Some change the position of the buttons, others introduce some innovations into electrical equipment. Our task is to transform the interior with new colors, namely to make LED lighting, which will not only be a decorative element, but also a rather practical addition to the interior, which will help you see better in the dark.
First of all, you need to purchase all the essentials. This word refers to a set of LEDs with specially built-in glass lenses. It’s worth noting right away that saving on them is highly not recommended - this will help you avoid many problems with their operation. The best are considered to be moisture-resistant, which adequately respond to changes in air temperature and the presence of moisture in it.
Not the least important is the length of the wire through which the power will be supplied. After all, it’s not yet clear exactly where the LED will be located, so a spare wire obviously won’t hurt. The most relevant today is a strip of LEDs, which will not be difficult to attach and connect.
The advantage of LEDs is their good light output and good efficiency, which will preserve the life of the battery and will not force you to charge it or push the car every now and then.
What are the dangers of incorrectly installing the backlight?
Interior lighting has virtually no effect on the traffic situation - in most cases it is used only in parking lots, and contour lighting is not so bright as to disturb the driver or dazzle oncoming cars. Therefore, such registration is usually not a violation for traffic police officers.
Important! A different attitude to the installation of external lighting devices - illumination of the underbody, wheel arches, etc. In these cases, one must be guided by the requirements of the Rules, which define the composition of the vehicle's light alarm system.
If the underbody lighting is directed under the car and does not extend beyond its limits, and the nature of the glow does not irritate the eye and does not attract attention, distracting from the situation on the road, then the traffic police officer may not pay attention to its presence. However, being overly enthusiastic about car design can result in deprivation of your license for six months or a year. It is important to remember that only white, yellow and orange lamps are allowed in the front, and red, yellow or orange in the rear.
What do you need to know about car interior lighting with cold neon?
You can add individuality to your car and make it stand out from the general flow of traffic using cold neon, which looks original and is very effective. Today, neon lighting is one of the most common methods of interior tuning. This option has the following advantages:
- minimal energy consumption. Neon is considered a practical option due to its long service life. Transparent material does not lose its original characteristics and does not fade. Despite its strength, it bends easily and cuts well when creating different light combinations;
- neon thread can be mounted in different parts of the car interior: on pedals, dashboard, door handles and/or glove compartment;
- cold neon does not distract the driver from monitoring the road situation and is considered a safe material for our vision;
- the light of flexible cold neon is distributed, evenly saturating the interior, which is very convenient in the dark and at night;
- When operating, do not turn on additional lighting devices, including standard equipment.
Do-it-yourself car interior lighting using cold neon is not only beautiful, but also practical. Such tuning allows you to protect you and your passengers, and provides a huge field for imagination. By making lighting in the car interior with your own hands, you can get a single-color light, or in different colors, using different patterns, colors and combining their quantities. Installation with neon material is a minimum cost and minor interference in the electrical system of the car, which does not affect the stable operation of other (standard) vehicle systems.
Backlight design options
The motorist himself must choose which lighting option, based on its operating principle, is best installed on the bottom of his own vehicle.
In total, the following options can be distinguished:
- Direct connection. This is the simplest and most elementary connection. Here, additional lighting fixtures are directly connected to the machine’s electrical network.
- On remote control. The control element can be a button installed on the dashboard, or a remote control.
- Flashing backlight. Here you will need a special controller with the appropriate function.
- Autonomous work. The point is that the backlight will not depend on the machine's electrical network. The lamps have their own power source.
Systems can be complicated and simplified by choosing only one option, or combining them.
The backlight can have only one color, or several lamps of different colors. If you wish, you can even make a system that will adjust and work to the beat of the music you turn on. A kind of light show under the car. Looks impressive.
Connecting the backlight
There may be several connection options. Most often, LED lighting is connected to the cigarette lighter or to the interior light.
To connect to the interior lighting, you will need to remove the lampshade and connect the wires: positive is connected to white, negative is connected to red. If the connection is made through the cigarette lighter, then for this you will need to connect the plus to the plus of the cigarette lighter, and the minus to any place in the car body.
If you need to create a smooth ignition and switch-off effect for the LEDs, you will additionally need to connect a dimmer.
Neon lighting is connected a little differently. As a rule, it is powered from a battery through a specially installed transformer.
Equalizer for rear window
One of the simplest, but at the same time the most effective types is the installation of color music in the car on the rear window. The line in the form of an equalizer indicator, pulsating in time with the music from the speakers, looks beautiful and elegant. There are many ready-made types of such color music; when choosing, be guided by your own taste. Color music for the rear window is bought as a set; you don’t need to combine and select anything, the kit should include:
- self-adhesive LED panel on the rear window;
- electrical wiring for interconnecting components and connecting power;
- LED panel control unit;
- power adapter for connection via the cigarette lighter socket;
- user manual with detailed instructions in Russian.
Connecting such color music to a car begins with sticking the panel to the rear window. You need to glue it from the inside onto clean, grease-free glass. There are no special subtleties here, the main thing is to glue the panel evenly and not damage it. Next, we connect the panel to the control unit, and the unit itself to the cigarette lighter socket. Ready!
It is advisable to conduct the wiring secretly, under the upholstery of the car floor. In order not to occupy the cigarette lighter, you can connect the power of the graphic equalizer directly to the car’s on-board network at home, if you have the necessary skills, or in a car service center. Color music in the car on the glass is easy to install and looks original, giving the car visibility at night, which contributes to safety on the road.
Ceiling lamps
If we talk about lighting in the car interior, the first thing that comes to mind is ceiling lamps. The standard equipment of a passenger vehicle in most cases includes W5W halogen lamps, which are the main source of light at night. But many people replace their usual incandescent lamps with LED lamps to increase brightness.
LED lamps provide a very bright glow. And at the same time, electricity is consumed several times less than with conventional lighting. This type of light can stay on all night without needing to recharge the battery. Before purchasing, you need to decide on the shade of the lighting color, since during operation it may be difficult to replace them.
Today you can also purchase RGB panels that allow you to change not only the color, but also the intensity of the glow. Parameters are set using the control panel. Installation of such panels is carried out in several stages:
- Remove the cap from the lampshade and remove the halogen lamp.
- Insert a special adapter with a plug inside.
- Attach the LED panel, which is then secured to the bottom of the lampshade with double-sided tape.
- Return the cap to its place.
The advantage of ceiling lights is that there is no need for soldering or twisting of wires, as well as an affordable cost.