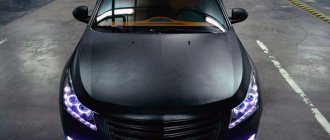
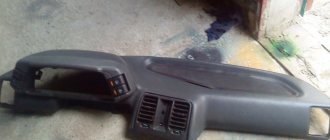
Installation of a “euro” torpedo
The owners of the “twelfth” vases, which were produced after 2006, are very lucky - since from this year the cars will be produced with a “Euro” panel, as well as a Kalinovsky (from the Kalina fret) steering wheel and power steering. What remains for owners of cars equipped with an old panel? Either use what you have or install a “euro” panel if the car was manufactured before 2006:
"Euro" torpedo VAZ
- The main question is whether it is advisable to change the standard panel in an old car to a “euro” one, as in the photo above
- Since the existing so-called “euro” panel contains many indicators and buttons not used in the old generation VAZ2112
- And its old steering column does not fit well with the design of the modern “Euro” panel
To install the “euro” panel with your own hands, you need to purchase additionally:
- Overlay for "euro" panel
- Special inserts for buttons,
- The buttons themselves, pads for them, plugs instead of unused buttons
- New air ducts
- Fuse box
- Wiring harness
- New brackets for the instrument panel
- Matching door trim panels
At the same time, keep in mind that standard connectors for the “brains” do not fit, so you will have to tinker to make adapters; you will also need a steering wheel from Kalina, and power steering for that matter. Of course, if you tinker a lot (the price for such tuning is high), but the result will justify itself, since the advantages of the “euro” panel are many:
- Firstly, modern design
- Secondly, ergonomics are at a high level
- Thirdly, VDO devices are already illuminated from the inside
- Built-in digital odometer, very original warning lights
- Its plastic is much softer and more pleasant to the touch.
- The “Euro” torpedo has a more precise fit of all plastic parts
Another option is that you can install a panel from a Priora, but you will also have to purchase it complete with the door trim; this is also quite expensive. Therefore, tuning VAZ 2112 tuning devices will help you avoid unnecessary emotions and solve the problem at low cost:
- Replacing the instrument cluster with a modern model
- Performing sizing of the instrument panel in order to eliminate squeaks that are unpleasant to the ear
A simple example, a PRO-SPORT type instrument panel is suitable for a VAZ 2112, the number of instruments and their combination remain the same, but it is made in the style of a Lexus car, so it looks very expressive and very individual
Modernization of coupe interior - painting plastic parts
Having finally decided to repaint some elements of the car’s interior, its owner can go in two ways: to do all the work simply and quickly, or to perform the tuning slowly but efficiently. Which option to choose depends on the amount of money and the result the driver expects to see. Since you and I are used to doing the job conscientiously, it will be best if we consider the second painting method. Yes, we will spend more money, but the end result is worth all the effort, time and expense. In order to paint the car interior, we will need:
- dye;
- two-component urethane varnish;
- degreaser;
- primer;
- plasticizer;
- fine-grained sandpaper or sanding machine;
- spray.
When choosing a coloring composition, you should be very careful. As practice shows, the most popular colors today are anthracite or titanium. If you want something brighter, you can always use blue, red or green paint. Another must-have product is varnish, which contributes to the durability of the shade of the painted element. You can use regular acetone as a degreaser. As a primer, you need to choose a material that will not bubble when applied to an outdated paintwork coating.
Painting of VAZ 2112 interior parts
It is not necessary to buy a plasticizer, but with it the quality of painting will improve significantly. The grain size of this substance must match the texture of the parts that can be painted. A sprayer is necessary if the paint you purchased is not in cans. We will need sandpaper to clean the surface of the interior parts. After preparing the materials, you need to disconnect all the elements to be painted. After this, we transfer them to a warm, ventilated, dust-free room. Carefully wash and dry each of the elements.
If among the latter there are metal parts, then they should be cleaned to a shine to prevent the appearance of rust. Then we grind the metal parts and apply a primer to their surfaces. Plastic elements need to be degreased and lubricated with a plasticizer. After the parts have completely dried, you can begin painting. To do this, you need to apply several layers of paint, allowing each layer to dry completely. We strongly advise against drying surfaces with a hairdryer; a draft in a warm room is an ideal option.
After the last layer of paint has dried, you can apply varnish. Moreover, the more often a person comes into contact with a part, the more layers of varnish need to be applied to it.
Removing and installing the instrument panel on VAZ 2110, 2111 and 2112
Before you begin this repair, you must do the following:
- Disconnect the “-” terminal from the vehicle’s battery.
- Remove the steering wheel.
- Remove the steering column switches.
- Remove the floor tunnel.
After this, you can proceed to further actions. We immediately remove and remove all the elements of the panel, such as: the standard clock, the heater control unit, the display unit, as well as the central deflector, and do not forget about the buttons with the radio. As a result, we get approximately the following picture:
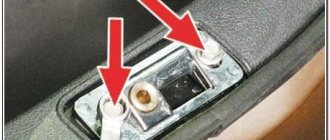
Next, using a screwdriver, pry up and remove the plugs at the upper corners of the instrument panel mounting. In reality it looks like this.
On the other side, we do the same, after which, using a socket and an extension, we unscrew the nuts securing the instrument panel in the upper part.
Now let's move on to the remaining attachment points. At the bottom, in the left and right parts of the panel - in the corners, there is also one screw that needs to be unscrewed. The first one is shown below.
The second one is located on the right side of the panel in the same place - at the bottom in the corner. Also, immediately unscrew the self-tapping screw that secures the diagnostic block:
Now we move on to the side fastening points of the frame, which are located in the center on each side - the photo below shows the left side:
On the right everything will be the same. Next we move on to the internal frame fastenings, which are located in the following places. The first one is under the fuse mounting block, to get there we open the cover and look inside the panel:
The second one on the right is visible when the glove compartment lid is open:
Of course, the mounting block will also have to be removed so that it remains intact with the sub-panel wiring.
We thread it inside with the instrument panel pulled back; you will also have to cut off some of the wiring fastening clamps, for example, in this place, which is shown in the photo:
Now we are trying to remove the VAZ 2110 panel, moving it to the side on both sides, evenly, without much effort or sudden movements.
In the photo above you can see that the headlight hydraulic corrector tubes were cut off, since in my case they were simply not needed. If you need to save them, do everything carefully and remove them by pulling the control unit out of the instrument panel. Next, we finally remove the panel, of course, after first disconnecting all the wires that will interfere with this.
Installation occurs in the reverse order, connecting all wires and connectors to their places, blocks and switches, as well as other elements that were removed as a result of this procedure.
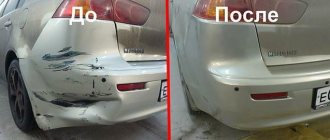
Self-tuning with foam
Foam is an excellent material for modifying the rear and front bumpers on a VAZ 2110. It can be easily adjusted with a knife. There are 2 ways of tuning with foam: “blinding” a new part or making an old one more massive. Let's consider the second option, it is less labor-intensive and does not require special skills. Unlike installing a purchased bumper, when tuning yourself, the product does not need to be removed from the car.
First, we draw on paper a sketch of the part that you want to get in the end. We put down the dimensions, and we will carry out all further work based on this drawing. Since you are working with the bumper without removing it, the front of the body should be covered with something - after all, foam is an aggressive substance and can damage the coating. We apply enough polyurethane foam to the old protection to form a large volume of material.
Next, we cut out the future contour of the bumper according to the sketch. Be careful to cut symmetrically and precisely. It is undesirable to cut off excess material, because it will not be possible to restore it. Once cut, you need to apply resin and fiberglass. The latter material can be replaced with putty. Then we sand to get a perfectly flat and smooth surface. Apply another layer of putty and wait for it to dry.
At this point, do-it-yourself VAZ 2110 bumper tuning is almost complete. All that remains is to prime and paint. We carry out similar actions with the rear bumper.
Basic tuning of VAZ 2111 with your own hands
Having purchased a domestic station wagon VAZ 2111 (the optimal combination of price and quality), the owners sooner or later come to the need to improve the characteristics of the car, i.e. to tuning. And the question is how to tune a VAZ 2111 with your own hands. thereby reducing costs is one of the most pressing.
Therefore, first, let’s decide what can be done independently during the tuning process, and what needs to be transferred to the shoulders of a technical service.
Chip tuning of VAZ 2111 engine
implies a change in the serial program of the control unit. This event allows you to quickly and significantly increase engine power, improve its dynamic characteristics, and reduce fuel consumption. But the owner cannot carry out the chip tuning procedure on his own. This requires complex bench equipment for testing systems, obtaining characteristics, setting up, etc.
All other activities for basic technical tuning of the VAZ 2111 are available for carrying out in garage conditions.
Installing a larger throttle
Together with the installation of
a zero-resistance air filter,
it improves the air performance of the intake system. Every driver knows that the higher the performance of the above-mentioned system, the greater the increase in power. On average, engine power can be increased by 8% as a result of comprehensive air tuning of the intake system. If, at the same time, the camshaft is replaced, then the increase in power will be 10-12%.
Tuning the exhaust system
also has a positive effect on engine performance with optimal selection and installation of all its parts. Both the passage of gas through the exhaust pipes and the propagation of sound waves in the gas environment affect the efficiency of the engine. The length of the pipes, their diameter, the settings of the resonator (pre-muffler) and the final muffler are areas for modification and improvement.
Gearbox tuning
- inevitable. For intense acceleration, it is necessary to keep the speed at the “golden” mean between maximum power and maximum torque, which is achieved by bringing the gear ratios of each gear closer together (installation of an additional 6th gear is possible in any row). Depending on the driving style, operating conditions and engine condition, a number of gears and the main pair are selected individually.
Installing a self-locking differential will also improve the transmission of torque to the wheels, which in turn will increase the traction properties of the car.
Having improved dynamics and power, you will definitely face the need to improve the braking system
. For the front brakes, it is advisable to install a “Sport” vacuum booster (reducing the force on the brake pedal, reducing the reaction time of the brake system to pressing the pedal, etc., and a high braking coefficient - 5.1 - versus the standard 3.7).
An effective measure in tuning the front brakes would be to replace the brake discs with ventilated, perforated ATE with a diameter of 260 mm (for VAZ cars with 14-inch wheel rims) or 284 mm (for VAZ with 15-inch wheel rims) with larger brake pads.
The set of rear drum brakes will also have to be replaced with a set of disc brakes, which will avoid such an unpleasant situation as overbraking the rear axle and improve the uniformity of braking of the wheels.
Suspension tuning
will add stability and controllability to your VAZ 2111 station wagon. As part of the work to improve the suspension characteristics, it is necessary to replace the shock absorbers (KONI companies are quite suitable), standard springs - with Eibach springs (they are of high quality and reliability), install SS20 Sport strut supports (one of the most hardy and durable).
The above measures are not a complete list of possible improvements (the issue of tuning the interior was not raised at all). But these are basic jobs that are not too expensive and can be done independently.
Chip tuning
The most affordable method for increasing engine power, which does not involve making changes to the hardware, but working exclusively with electronics.
In most cases, the standard version of the software is replaced with a program for the racing characteristics of VAZ cars.
Results after chip tuning.
Changing these parameters is best left to specialized companies, since this work requires certain skills. If you own one, you can easily cope with this task. And after flashing the controller, you will immediately see an increase in dynamics and overclocking (about overclocking the stock version to 100). However, your consumption will definitely increase (about consumption rates here) and the level of emissions into the atmosphere will decrease.
In addition, you can consider online firmware of the system without fundamentally changing the program, but only making changes with minor adjustments to the operation of the engine.
How to replace dashboard lights
- The steering wheel lowers to the down position.
- The two upper screws are unscrewed and the decorative trim is pulled out.
- Unscrew the three screws securing the dashboard.
Tip: The speedometer cable prevents you from pulling out the dash. To turn it off, it is first unfastened from the box, the locking ring is pulled to the side and the cable chip is pulled up, which is then pushed into the cabin. Part of the tidy is pulled out towards you, and the cable is conveniently unfastened from the speedometer.
- The cable remains in place, the device is pulled out, all electrical connectors are disconnected.
- The socket is rotated counterclockwise and removed along with the lamp. Baseless light bulbs.
- After replacing the light bulbs in the instrument panel of the VAZ 2110, assembly of the unit is performed in the reverse order.
How to replace the center console light bulbs
When operating the vehicle, the lamps located on the center console of the VAZ 2110 may fail. In this case, replacing the lamps on the instrument panel of the VAZ 2110 is easy to do with your own hands. The cost of the work is low. For this you will need:
- The screwdriver is flat.
- Phillips screwdriver.
- New light bulb.
Work instructions:
- The negative terminals are disconnected from the battery and from the speedometer cable drive to the gearbox.
- The outdoor lighting switch is pulled out. To do this, you need to pry off the element with a flat screwdriver. The connector is disconnected from the switch and pushed inside the dashboard trim.
- Replacing the VAZ 2110 dashboard light bulb to illuminate it is done by squeezing the socket antenna with a screwdriver, which is then removed from the switch. The lamp is pulled out of the socket and replaced with a new one.
- Use a flat screwdriver to pry up the hazard warning switch, which is then pulled out. The connector is disconnected from the switch and pushed into the panel trim.
- Unscrew the two self-tapping screws with a Phillips screwdriver, which secure the dashboard console trim, and the trim is removed. The heating element and ashtray are pulled out of the socket.
- The car radio is pulled out of the socket. The spring brackets securing the panel to the cover are pressed out with a screwdriver, and the shield is pulled towards itself. Use a screwdriver to release two plastic antennae from the lower fixation of the shield to the dashboard. The shield is raised and the third spring bracket for its fastening is pressed out.
Removing the panel on the center console
- The connectors for connecting the cigarette lighter (see VAZ 2110: replacing the cigarette lighter yourself), the backlight for it, and the lamp for the hazard warning switch are disconnected. The instrument panel panel is removed.
- Replacing the VAZ 2110 instrument panel light to illuminate the hazard warning switch on the inside of the instrument panel is done after removing it with its socket. To do this, they are rotated in the holder.
- The antennae of the cartridge holder are compressed and the element is removed from the cigarette lighter. The cigarette lighter blades are compressed, the part is pulled out, the light bulb is removed from the dashboard trim and changed if necessary.
- Use a Phillips screwdriver to unscrew the two screws that secure the instrument cluster to the panel. The instrument cluster is moved to the side. The union nut of the speedometer cable is unscrewed from the speed sensor. The cable is disconnected from the speedometer, then removed and routed through the hole in the front panel.
- The connectors are disconnected and the instrument cluster is removed. To replace the instrument panel bulbs on a VAZ 2110, the socket must be turned counterclockwise and the instrument cluster removed from the device. New lamps are being installed. Assembling and installing the combination is carried out in the reverse order.
- The battery is connected.
- The operation of the light bulbs on the instrument panel is checked.
How to replace light bulbs in buttons
- To replace the backlight bulb of the hazard warning light button, the panel with deflectors is removed, after which the hazard warning light button is pulled out of it.
- The deflectors are directed as high as possible.
- On the left and right below them there are mounting ears. Using a slotted screwdriver, they are pulled down and the panel is pulled towards itself.
- The hazard warning button is pulled out.
- There is a socket with a lamp on the side. You need to turn it counterclockwise with tweezers and pull it out.
- The contacts on the light bulbs are wrapped around the sides of the socket. The light bulbs are the same size as a matchbox.
- In order to replace the lamps in the instrument panel of the VAZ 2110 fog lamp, you need to carefully pry the panel with the button with a screwdriver and pull it towards you.
- The remaining operations are performed similarly to the same actions as replacing the instrument panel bulbs of a VAZ 2110 emergency system.
Improvement of standard backlight
The next step in changing the coupe will be to improve the interior lighting.
Considering the principle of factory assembly of the shield, the best option for tuning would be to make backlighting from neon lamps located along the contours of the devices. To ensure stable operation of the backlight, an uninterrupted voltage of 12V is required. It is best to select the color of the tape taking into account the shade of the backlight of the sensors, or based on the color of the radio. Disassembling the coupe's instrument panel should not cause any difficulties: unscrew the upper and lower fasteners, and then carefully remove the shield. After this you will need to remove the standard light guide. The latter must be replaced with a plate of the same shape made of plastic. You also need to drill holes in it for attaching the tape. For effective lighting, we use 8 blue and 3 red diodes with 1.2 and 1.4 Ohm resistors soldered to them, respectively. The diodes must be placed in the same way as the light guide in the decorative panel. We insert the light bulbs into the appropriate places in the light guide.
Coupe instrument panel illumination
In order not to forget, it is best to immediately cover the latter with a thin layer of foil, which will help to evenly distribute the light from the bulbs. In addition, we will also need to make small partitions, which we will glue near the red light bulbs.
Having finished inserting the diodes, you will need to solder all the tracks and connect them to the power supply. To do this, you can use a standard lamp socket. After this, you need to secure the light guide, check it for serviceability and reassemble the unit. If everything works, we fix the finished part, after which we mount the instrument panel of the car.
Panel painting
You can update the appearance of the car interior by painting the plastic, the look will be tuning, and the costs will be minimal:
- And since first you will need to “get your teeth into”, we will start this work with the simplest part - the air duct
- Before painting, of course, it will be necessary to dismantle these parts
- To remove the deflectors you will need a flathead screwdriver because they are secured with special plastic latches
- However, you should act very carefully, the latches break easily, then you will have to buy new ones in the store
- Immediately after removing the necessary plastic elements, do not rush to paint them immediately
- In this case, the paint will not last very long, and you will have to repaint them again very soon
- Therefore, first you need to thoroughly wipe the surface of the plastic from dust and dirt, then degrease it using white spirit or another solvent that does not corrode the plastic.
Removed air ducts and door plastic panels
- For painting we use paint exclusively in cans; it must be painted in several layers
- And after painting, we dry the parts, and only after that we can start varnishing
- It is advisable to apply the varnish in several layers from a can or sprayer.
- In about a day you can install the painted and varnished elements in their places
- In addition, it is worth knowing that the paint for such work should be chosen that is heat-resistant, since otherwise exposure to direct sunlight can significantly damage it; harmful fumes negatively affect the health of passengers and the driver of the car.
- After that it's time to paint the torpedo
- Painting the dashboard inside the cabin will be very problematic, so we recommend dismantling it first
- We remove the dashboard, clean it of dust and dirt, then carefully degrease it
- After this we apply black paint, also several layers, but there is no need to varnish the panel
- And after drying, you can install your dashboard back into the interior.
- Well, if you are too lazy to dismantle the panel, and still decide to paint it directly inside the car, then you should try very hard
- First, you should cover the entire interior with film, then move the seats back and then start painting
- And don’t forget to use personal protective equipment, be sure to wear a respirator and rubber gloves on your hands
- After painting, it is necessary to drive the car into a dark garage to protect it from direct sunlight.
- Open all doors and windows
- The final drying of the paint will occur in about a week, but if you have a strong desire to try out a car with a self-updated dashboard, then you can do this no earlier than in a day
CEILING COVERING
The material from which the ceiling covering in the VAZ 2112 is made gets dirty very quickly. Over time, a dark spot appears on the ceiling, directly above the driver's seat. Similar spots appear above the heads of passengers (but, as a rule, later). Re-upholstering the ceiling covering on your own is not an easy task. But finding a reupholstery specialist is not easy, plus his services are not cheap. So VAZ 2112 owners do it simpler and simply paint the ceilings of their cars using universal paint in spray cans (to paint the ceiling of a “two-wheeler” you need 6 of them).
SEQUENCE OF OPERATION
Painting the ceiling directly in the salon is not an option. First, the coating must be dismantled.
- The ceiling covering in the VAZ 2112 is held on by 10 screws and 13 plastic latches located around the perimeter. To remove the screws, use a Phillips screwdriver. The latches are opened manually.
The material of the ceiling covering on the VAZ 2112 gets dirty very quickly - The removed covering is removed from the passenger compartment through one of the rear doors (to do this, the covering will have to be slightly bent).
- The selected paint is sprayed from a can onto the ceiling covering (no preliminary primer is required - the universal paint is well absorbed into the material).
- After painting, the ceiling needs to be dried. It takes 6-8 days for the smell to completely disappear. Drying is carried out only in the open air.
The coating needs to be dried in the open air for 6–7 days. - The dried coating is installed back into the interior.
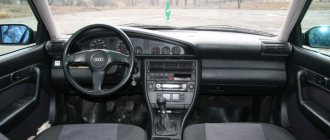
Installation of Europanel instead of the usual one on VAZ 2110, 2111 and 2112
Many owners who have owned a VAZ 2110 for a long time would like to change the boring panel to a more modern one. In this case, you can install a new type of panel from cars manufactured after 2006, or from the “Bogdan” versions, which are analogues of the tenth family, except that they were assembled in Ukraine.
With such alterations, basically you won’t have to change anything, but it’s worth considering that in this case you need to buy a complete Europanel:
- instrument panel frame assembly with trim;
- instrument panel (combination);
- buttons and switches;
- heater deflectors;
- new type heater control unit;
- sub-panel electrical wiring;
- steering wheel, cover and switches.
Only in this case everything becomes without any problems with minimal labor costs.
How to choose tuning for VAZ-2111
To simplify the task of the owner of a VAZ-2111, we suggest studying some rules that will allow you to update your car quickly and beautifully:
Pay attention to the details of the car, especially the body, which immediately catch your eye. The front and rear bumpers definitely need to be replaced. How to do it? First, visit a store that sells auto parts. You can replace the air intake mounted by default - instead of the boring part, install a stylish branded version; a sporty model is more suitable for a guy. Use your imagination and buy the best suspensions for your iron horse, don’t go cheap - inexpensive models cannot boast of good dynamism and streamlined shapes. Add tinted deflectors
They will allow you to further stylize the VAZ-2111 and provide the necessary comfort to the driver and passengers. Many beginners do not know that a properly selected deflector can redirect air in the right direction, as well as improve ventilation in the car interior; road dust and small stones will not get inside the vehicle. Appreciate the color of the body as if from the outside. What would you like to add? It is not necessary to radically change the color of the vehicle, you can at least change the hue, add saturation or, conversely, blur, it all depends on the wishes of the car owner. Contrast will provide depth. It wouldn't hurt to install a camera in the cabin that shows the picture from behind. This camera adds an unusual charm to the VAZ-2111, and in case of an accident the camera will become an indispensable assistant.
Flocking the interior of a VAZ 2112
Another popular option for upgrading a coupe is flocking.
Flock is a soft and pleasant to the touch fabric, somewhat similar to velvet. In addition to its visual effect, flock is also able to reduce extraneous noise in the cabin and absorb sunlight, which often interfere with the normal operation of the car. Many drivers claim that the flock attracts dust and is very difficult to clean. Actually this is not true. To completely clean the material, just vacuum it. This should be done no more often than once every 2-3 weeks. If you are still in doubt, you can treat the material with an antistatic agent. To tune a car, you need to purchase a special flocking kit. It is best to give preference to an inexpensive, but not the cheapest set at a price of about 3-4 thousand rubles.
In addition, you need to buy the flock itself and glue for it. After purchasing the equipment, you can start working. The first thing you need to do is remove from the interior those parts that will be amenable to pasting. After dismantling, we carefully clean the elements from dirt and polish and sand their surfaces. Next, apply glue evenly and immediately apply flock to the part. After this, the interior elements should be completely dry. At the end, you will need to remove excess pieces of material, and you can install the parts in place.
Removal and disassembly
Do-it-yourself removal of the instrument board is carried out according to the following algorithm:
- First of all, remove the casing;
- Use a Phillips screwdriver to unscrew the fastening bolts;
- We find and unlatch the latches. It is better to snap off the ones at the bottom first, and then push up. This way it can be easily removed;
- Before tuning, you need to remove the arrows. At first, just pull them lightly. If they don’t give in, start turning them from right to left, while slightly tightening them – they will definitely come off.
Installing tweeters in the dashboard of a VAZ 2110
A great addition to a panel device would be a tweeter (tweeter). During its installation, the main problem that may arise is related to drilling holes, since the windshield does not allow this to be done at a right angle. Considering that there is a durable metal plate under the plastic shell, you can’t do without a drill in this case. Therefore, it is necessary to prepare a paper template or stencil in advance. Now take a drill and drill in the marked area. We can correct uneven edges of holes by using a special drill attachment.
It is important to consider that the hole must be made at a sufficient distance from the panel instruments. It is also important to note that there are wires and brackets underneath the metal plate.
We install the tweeter; it should fit tightly into the resulting hole. If it is slightly larger, the free area can be sealed using sealant. We will fasten the wires from the device being installed along the edges of the air duct. This element of the acoustic system will provide high-quality and complete sound.
Replacing the steering wheel
Here's what's required to replace the steering wheel on a VAZ 2112:
- large flat screwdriver;
- socket head 22;
- new steering wheel.
Sequence of work
The first step is to get rid of the decorative trim on the steering wheel. It is most convenient to pry it off with a thin knife.
- The horn switch is attached to three self-tapping screws. They should be unscrewed using a large screwdriver.
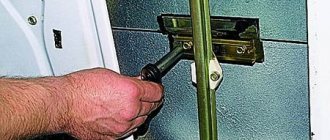
- There is a 22 nut under the panel. It is most convenient to unscrew it with a socket head on a long wrench.
It is convenient to unscrew the nut 22 using a socket head on a long wrench - The steering wheel can now be removed and replaced with a new one.
After unscrewing the central nut, the steering wheel can be easily removed
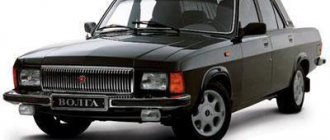
About replacing seats
The seats on the VAZ 2112 cannot be called comfortable. This is especially noticeable on long trips. So, at the first opportunity, drivers put seats from other cars on the “two-wheeler.” As a rule, Skoda Octavia acts as a “seat donor”.
Skoda Octavia is the most popular “seat donor” for the VAZ 2112
It is impossible to install the seats from this car on a VAZ 2112 in the garage, since serious adjustment of the fasteners and welding are required. There is only one option: use the services of specialists with the appropriate equipment.
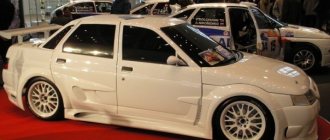
VAZ-21123 RRT. Coupe please...
A couple of months ago (see No. 4) we introduced you to AvtoVAZ’s new product - the three-door hatchback VAZ-21123. Now we present a customized version of the same car.
A couple of months ago (see No. 4) we introduced you to AvtoVAZ’s new product - the three-door hatchback VAZ-21123. Now we present a customized version of the same car.
There is nothing strange in the fact that the “reformers” took the new product into circulation almost from the assembly line - athletes and tuners really miss the basic car with three doors. In Germany, for example, the basis for creating the most interesting projects is precisely cars with reduced door content.
Design and Exterior
The VAZ-2112 coupe was created on the basis of the popular and well-known VAZ-2112 model, which has established itself as a powerful and dynamic car of domestic production. The automaker's designers claim that the technical component of the car has absorbed all the advantages of previous models.
Compared to the prototype, the VAZ-2112 coupe has a more severe and dynamic character. The main difference between the body is the presence of three rather than five doors. It was this nuance that influenced some of the features of the car and became decisive for the changes made to the body design. The leather trim of the VAZ-2112 coupe interior and elegant, stylish side lines gave the car design respectability and originality.
The updated design has become more rapid and elegant. The spoiler installed on the VAZ-2112 coupe gave the car a sporty look, which was missing in the base model.
The doors became heavier and acquired cast hinges. The changes made to the design affected the dimensions of the car: the overall width and door openings increased significantly, which appealed to car enthusiasts with an impressive build.
Errors displayed on the dashboard of the VAZ 2110 and how to eliminate them.
As an example, I will take a screenshot of the dashboard indicators, which I have already shown in this article.
Errors and methods for eliminating them displayed on the dashboard of the VAZ 2110
- If the oil in fuel indicator lights up, we recommend that you check it. To do this, open the hood of the car and look at the horn. If it is in the oil level, then most likely a chip has come off in the instrument panel itself.
- Your parking brake indicator (manual) has come on, most likely the problem is a broken cable.
- The battery charging indicator shows you errors associated with the generator. If it catches fire, I recommend checking your alternator belt (for a break). In general, this icon on the instrument panel indicates a malfunction in the vehicle's electrical system circuit.
- An engine malfunction (Check Engine) tells you that the engine is unstable.
- Additional engine health indicator
- Turning on left turn - information indicator
- Activation of right turn – information indicator
- High beam indicator - information indicator
- This indicator shows the brake fluid level. If a malfunction occurs, check for the presence of a fuel tank in your vehicle.
- This indicator shows the presence of fuel. If it catches fire, you have approximately 5 liters of gasoline left in the tank. I recommend you refuel.