Cars with leather interiors are considered a sign of presentability and solidity. This material is used to create luxury foreign cars, which allow you to emphasize the individual style of the vehicle.
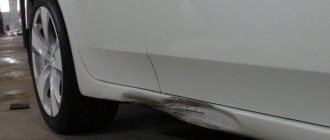
Regular use provokes the appearance of defects on the surface of decorative upholstery. Small cracks, abrasions and defects of varying sizes appear on leather seats. Interior restoration requires large financial investments and certain knowledge. Some motorists are in no hurry to seek help from special workshops.
They prefer to get rid of minor defects in garage conditions. How to repair a leather interior with your own hands?
Pros and cons of leather upholstery
The following characteristics are considered to be the advantages of this material. These include:
- Tolerates sudden changes in temperature;
- Tolerates high humidity;
- Attractive appearance;
- Excellent cleaning from visible contaminants.
To prevent leather upholstery from losing its original appearance, it is necessary to regularly care for it. To do this, it is enough to remove various contaminants and treat the joints with wax compounds.
The disadvantages include the following criteria:
- The leather interior heats up quickly in the summer;
- Solar insolation leads to the appearance of deep cracks and destroys the decorative base;
- Genuine leather does not withstand the effects of acid and alkali.
The cost of restoration work is calculated based on the area of damage to the upholstery structure.
Defects in car seats
A car seat is subject to stress, so over time the upholstery and parts wear out. Defects often appear in the interiors of new cars. This is due to pets, children, and the drivers themselves. Any car dealership employee, without hesitation, will name problems that require restoration of car seats.
| Upholstery type | Defect | Description |
| Leather | Spot | The most common stains from denim, markers, pens, belts, food |
| Attrition | Appear if the driver's seat is not lubricated with protective cream, accelerate the appearance - sun, wet clothes | |
| Cracks | Appear as a result of natural wear and tear, under the influence of high, low temperatures, wet clothes, when there are many cracks, a wrinkle forms on the car seat | |
| Hole, scuff, scratch | From pet claws, rivets, fittings | |
| Burn-through | From a cigarette | |
| Gap | Appears at the site of abrasions, cracks or in places of “broken” foam rubber; it breaks along the seam if the threads are rotten | |
| Broken side support | The driver slides out of the seat | |
| Textile | Seasoned foam rubber | The chair loses its shape if it is not inserted correctly into the cabin due to the drying of the foam |
| Torn seam | From old age | |
| Burn-through | From cigarettes | |
| Salinity | Contact with outer clothing, poor care | |
| Stains | Organic, inorganic, mold |
Comment! If the abrasion is not restored in time, repair of the leather seat upholstery is inevitable. Dirt caught in exposed fibers will cause cracks, tears, and paint to fall off.
Car seats often require complex repairs after an accident. In a side collision, restoration requires lateral support, seams are torn, and the filler is damaged.
Preparatory work
Restoring leather upholstery in a car requires proper preparation.
To do this, you need to prepare the following tools and materials:
- Liquid skin. It is a composition that accurately imitates the natural or artificial structure of the coating. You can purchase this material in automobile stores;
- Tint composition. The shade must accurately imitate the color of the upholstery;
- Set of tools. To do this, you will need scissors, special spatulas, thin tweezers and a container for the chemical composition;
- Dry glue. Experts call it thermal powder;
- Acid-free degreaser;
- Plastic mesh. It is used to create small patches. They help get rid of small cracks and minor damage;
- Fine-grained sandpaper. It will help you quickly and efficiently get rid of uneven surfaces on leather;
- A hair dryer or a small iron. These devices are used for quick fixation of finishing material.
Restoration of plastic parts
The manipulation of plastic renewal inside vehicles consists of a certain sequence that must be strictly adhered to. Plastic with damage is filled with an additional polymer mixture, which can be purchased at a special store. It is worth making a unique pattern for the damaged part. This is done quite simply - a gel solution is applied to the surface nearby and after polymerization of the solution, a dummy of the design will be ready. This texture needs to be re-applied to the damaged area before the special mixture dries completely. Cover the restored part with paint.
Torpedo restoration
A torpedo is considered to be a panel with control instruments. The torpedo is made of high-strength plastic and, due to defects, can be repainted or covered with PVC film, the advantage of which is considered to be excellent wear resistance.
Restoration of plastic doors
Plastic for door upholstery is the most common because, compared to leather and material, it can be easily cleaned and serves its owner for a long time. To restore the plastic on the doors, a plasticizer gel is required to fill the depressions and cracks in the door trim.
The process of restoring leather upholstery
Restoration of leather seats of any car brand is carried out in several stages. If the procedure is carried out in a garage, then an alternative solution would be to watch a special video on the Internet. This will allow you to have a clear understanding of the workflow.
The recovery process includes the following manipulations:
- We dismantle the damaged seat;
- Next, use sharp scissors or a knife to smooth out the boundaries of the damage. For example, a trace from a smoldering cigarette. In this case, the hole has clear boundaries, which may subsequently increase;
- Using a degreaser, we treat the edges. This composition will allow you to get rid of deep contaminants and increase the area of adhesion of the elements to each other;
- We process the borders with sandpaper;
- We cut out a small patch from a plastic mesh, taking into account the area of damage.
Vehicle seat reupholstery
When changing car upholstery, it is important to consider the type of coating and working tools used. The complexity of the process itself and the quality of the final result depend on this. In order for the car interior to look harmonious after reupholstering the seats, the color scheme of the upholstery must be precisely matched to its main shade and not stand out from the overall picture.
Secrets! You can purchase most materials for reupholstery in China on Aliexpress! For example, artificial horse leather https://ali.pub/2jm5ix or alligator leather https://ali.pub/2jm6ii
Painting the damaged area
The next stage of the restoration process is staining.
To do this, just follow the following sequence of actions:
- Re-degrease the plastic patch;
- After this, we use a small spatula, with which we apply thermal powder. Distribute it evenly over the entire area;
- We heat the damaged area with a hair dryer to 100 degrees. When heated, the powder begins to melt and act as a binder;
- Getting rid of visible boundaries. We use sandpaper;
- We apply liquid skin to the restoration site and dry it with a hairdryer. We apply the paint until the upholstery acquires a uniform structure.
How to properly remove the seat
Removal of seats is carried out when completely replacing the old upholstery or its individual parts, as well as for the convenience of eliminating defects.
The general procedure will be as follows:
- move the seats all the way forward;
- unscrew the bolts securing the seats to the floor;
- disconnect the electrical power and heating wires;
- bend the fasteners on the back of the seats.
It should be borne in mind that after turning off the electrical system of the heated seats, the car computer settings will be lost, so you will have to contact the dealership to set it up.
Advice from professionals
- Before you begin restoring leather upholstery in a car, it is recommended to practice on an old jacket or shoes. It is very difficult for a beginner to create a perfectly even coating the first time.
- Leather upholstery needs to be repaired from the lower parts. These places are not always visible to the human eye. After numerous preparations, many manage to efficiently restore natural leather.
- Don't worry if the color after application is slightly different from the original shade. After complete drying, the palette will become uniform. It is recommended to choose paint in the manufacturer's catalogs. This booklet contains all acceptable shades. They are signed with special codes, the ratio of coloring pigments and proportions.
- Regular viewing of special videos will help you cope with the task. These materials contain the entire workflow sequence and methods for mixing tint pigments.
- Restoring leather upholstery to its original appearance is quite simple. To do this, it is enough to be careful and show maximum patience. The advantage of restoring leather upholstery yourself is minimal financial costs.
- To maintain the ideal appearance of the leather interior, it is necessary to carry out regular cleaning and cleaning of the coating. Alcohol-based compounds are used for cleaning. To moisturize leather seats, use beeswax or a special aerosol, which is then thoroughly polished with a soft cloth.
How to repair car upholstery with your own hands. With glue
When operating a car, no matter how carefully you use your car, it may happen that the upholstery gets damaged.
For example, such a nuisance may arise as a result of the actions of small children or animals. In this case, you will certainly begin to constantly pay attention to the damage caused, and this is annoying. Therefore, if your car has suffered such a misfortune, then you should immediately repair the damage caused to the upholstery, especially since it is not at all necessary to go to a car service center; any car enthusiast can repair the upholstery. Let's look at how to do this correctly.
Do-it-yourself car upholstery repair
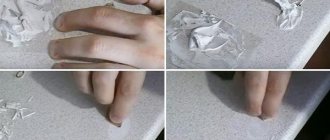
1. In order to repair the upholstery with your own hands, we will need BF-6 glue, fabric similar in color and texture to the upholstery, and a little neatness. Before proceeding directly to sealing the damaged area, this area must be prepared for work.
2. To do this, carefully cut off the torn pieces of upholstery, after which we clean and degrease the surface of the upholstery in the area where the repair is being carried out. Next, you need to moisten the upholstery and let it dry to the state of wrung-out fabric, and while the upholstery is drying, we begin to prepare a piece of fabric with which we will seal the damaged area of the upholstery. The piece of fabric must be clean and free of any foreign particles such as dust or dirt.
3. Using a previously made pattern, cut out a piece of the desired configuration, then moisten the fabric with water, just as before we moistened the upholstery in the car, let it dry a little, and soak it with glue. We leave the piece of fabric alone and return to the upholstery, which in the gluing area is also impregnated with BF-6 glue.
4. One point is important here, you probably want the sealed piece of the car interior to be no different from the rest of the interior, and for this you need to apply the glue as carefully as possible. The glue should not extend beyond the boundaries of the glued areas by more than one millimeter, otherwise it will be noticeable that this part of the upholstery has been repaired. Achieving such accuracy is quite simple.
It is enough to take the pattern according to which you previously cut off a piece of fabric of the required size and, placing this pattern on the upholstery, use chalk to outline the outline of the future gluing area. After this, you will not have any difficulty applying the glue.
5. When the glue on the upholstery and piece of fabric has dried, it is necessary to apply another thin layer of glue to the surface and after that you can directly glue the parts of the upholstery and fabric.
You may wonder why it was necessary to apply two layers of glue, now it will become clear. After you glue the parts of the upholstery, the gluing area must be ironed with a hot iron at a temperature of 120 degrees. The ironing itself is done through a damp cloth - this is mandatory.
During ironing, adhesion will begin to occur, and since you have impregnated the glued areas with a homogeneous adhesive composition, adhesion will occur fully, while tightening the glued area. That is, after the repair is completed, traces of the fact that gluing operations were carried out on this area of the upholstery will not be noticeable. Here it should be clarified that to carry out this work, it is better to remove the damaged upholstery.
6. In order to glue upholstery that has come off the cardboard or was removed during repairs, you can use 88NP glue, which is applied to the surfaces to be glued with a small brush, left for 15 minutes and the surfaces to be glued are joined, it is advisable to keep them under pressure.
7. And to repair cuts in the upholstery, you need to use not an insert, but a simple overlay made of ribbon 2 cm wide; this repair is carried out with an overlay made of the same material. Treatment is performed at positive temperatures, also with exposure under pressure for 1 hour.
Here we look at proven adhesives for upholstery repair; now the stores are full of all sorts of new products, of which there is something to choose for a specific case.
As you can see, there is nothing complicated in such repairs to car interior trim. You just have to take it and do it. Good luck!
Source
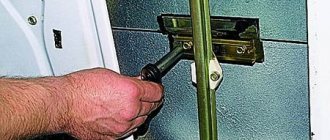
Restoring the tilt mechanism
During intensive use, the moving parts of the mechanisms that are responsible for the position of the back of the car seat often wear out.
This tilting mechanism directly affects the comfort and health of the driver, so its condition must be kept under control by periodically lubricating it and cleaning it from dust.
If this device still fails, then you need to proceed as follows:
- remove the trim at the base of the seat cushion;
- unscrew the fastening bolts, pull out the axle and dismantle the backrest;
- cut off the upper link of the hinges at the base of the back frame by welding, fix the new mechanism at the bottom of the pillow;
- align the new top link with all mounting holes;
- use an axle to connect the cushion and the back of the car seat;
- secure all components by welding.