Comments: no Published: 03/02/2016
Rating:
Tags:Dents on carsReplacement of thresholds
Among all car components, sills are, of course, one of the most susceptible to all kinds of damage. Considering the state of modern Russian roads, dents on car sills, unfortunately, are a fairly common occurrence.
Very often, even minor damage to the car threshold disrupts the structure of its coating and contributes to the rapid spread of rust. Therefore, if the threshold of your vehicle is damaged, pulling or leveling must be done as quickly as possible.
Many motorists believe that this kind of work can only be done in a specialized workshop, but this is not true - almost anyone can pull out a dent on the threshold of a car.
Removing a dent on the threshold
How to remove a dent on a car doorstep
Dents on cars Replacement of thresholds
Among all car components, sills are, of course, one of the most susceptible to all kinds of damage. Considering the state of modern Russian roads, dents on car sills, unfortunately, are a fairly common occurrence.
Very often, even minor damage to the car threshold disrupts the structure of its coating and contributes to the rapid spread of rust. Therefore, if the threshold of your vehicle is damaged, pulling or leveling must be done as quickly as possible.
Many motorists believe that this kind of work can only be done in a specialized workshop, but this is not true - almost anyone can pull out a dent on the threshold of a car.
Removing a dent on the threshold
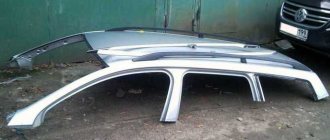
Types of car thresholds
Before you begin repairing the threshold, you need to clearly understand what you are faced with and what leveling method you will need to use. This directly depends on the type of part installed on your car. All car thresholds can be divided into two main categories:
- Removable. Such a part can be easily removed at any time, because it is attached to the body and bottom using ordinary bolts.
- Cast. They are welded to the vehicle body at the factory and cannot be removed. Such a threshold can only be removed by cutting it out. So repairs are usually carried out without separating the part from the car.
Leveling out dents on a removable threshold
Repairing damage to a removable threshold is much easier. For this type of work you will need:
- a workbench or flat base plate on which straightening will be done;
- set of tools for straightening. It includes all kinds of hammers (soft and hard), planes and chisels for straightening;
- grinder and welding machine or pneumatic chisel.
To level out a dent on a car's removable threshold, proceed as follows:
- disconnect the damaged part of the car. To do this, you just need to screw in all the fastening bolts that held it in place and carefully pull out the part;
- install the damaged threshold on the workbench;
- using hammers and other tools for straightening metal products, carefully bend all the irregularities in the opposite direction;
- treat the entire threshold with a good anti-corrosion agent;
- put the car sill in place.
Removing dents on a removable car threshold
It’s worth remembering that this method of pulling out dents on a car’s removable threshold is not universal. It is relevant only in cases where the threshold is not too damaged and can be returned to its original state with hammer blows.
However, if the dent cannot be repaired, or if rust has already affected it, it is better to throw away such a part and put another one in its place. The advantage of this method of leveling dents is that there is no need to paint the damaged fragment - it will retain its original color.
Leveling out dents on a cast threshold
It is usually much more difficult to pull out a dent on a cast car sill than on a removable one. You will need more time and tools, but this work is quite doable at home. The method used to remove a dent usually depends on its size and complexity. The most popular methods are :
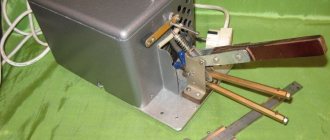
- Straightening using a reverse hammer. It is used to pull out small and uncomplicated dents. The principle of operation of the device is as follows: one end of the reverse hammer is not welded too tightly to the center of the dent. As the weight hits the handle, the dent will gradually level out.
Removing a dent using a reverse hammer
- If you don’t have a reverse hammer at hand, you can do the following: weld a steel plate to the dent site, then use an ice cube or with your own hands to pull it out along with the damaged part of the threshold. However, in this case, after successful completion of the repair, you will need to cut off this plate and treat the surfaces of the former dent accordingly.
- If the damage is exclusively point-like in nature, they can be corrected as follows: drill small holes in the threshold near the dent, thread special fittings with angled ends through them, and, pulling towards yourself, level out the damage. However, this method is relevant only in cases where the defects in the threshold are not large in size, and you have everything you need to immediately eliminate the holes in the threshold.
- Pulling using a vacuum suction cup. This type of damage repair is quite relevant due to the fact that it preserves the integrity of the paintwork of the car part. But it is not possible to use a vacuum suction cup in all cases. The size of the dent and its shape should approximately correspond to the dimensions of the suction cup itself - only then can it be used successfully.
The principle of operation of this unit is extremely simple: a suction cup is applied to the problem area of the threshold surface, all the air is pumped out of it, providing a reliable and soft grip.
Pulling out dents with a vacuum suction cup
After this, the unit is pulled out along with the surface of the threshold. These devices can be of different types, but their operating principle is always the same.
- You can also use an anvil and various hydraulic devices to pull out dents. The essence of this method is that a small rectangular window is cut out in the threshold, through which an anvil is inserted and installed opposite the dent. Then, using hydraulics, the dent can be straightened outward. In some situations, you may not need to cut a rectangular hole, but rather make cuts to the right and left of the defect. After the dent has been pulled out, all holes must be welded, treated with an anti-corrosion solution and painted (the use of paints and varnishes when implementing this method is inevitable).
Cutting out the entire threshold
If the damage to the cast part is too severe and cannot be repaired by any of the methods described above, then the only thing you can do is cut it out entirely.
To do this, it is necessary to dismantle the vehicle doors and floor coverings.
After this, you have two options for solving the problem: straighten all the defects using straightening on a workbench, as is done with removable thresholds, or throw away the damaged part and weld a new one in its place.
Whatever method of removing dents on cast car parts you choose, you should never forget about anti-corrosion surface treatment. Thresholds are a very sensitive part and therefore extremely vulnerable to rust.
If you install a new threshold without protecting it from corrosion, most likely you will have to change it again in the near future - moisture will quickly penetrate into all the smallest defects on the surface and trigger the formation of rust.
If we are talking about repainting the threshold of a car, then you need to try to choose a color shade so that it matches the old paint as closely as possible. The same goes for varnish.
The easiest way
There is a way out for self-repair of rotten machine parts - this is the use of fiberglass, which, after applying putty, becomes dense and hard, like a metal surface. Areas treated with fiberglass can withstand the force of a jack.
Restoration work must be carried out sequentially and in stages:
- Clean the surface from traces of corrosion. The rust is completely removed, even if a hole forms in its place. To do this, you can use a grinder with a disc. The metal must be cleaned to a shiny surface.
- Degrease the cleaned part with solvent. To work at this stage, you must wear protective gloves.
- Mix epoxy and hardener until smooth. To prevent the epoxy from hardening immediately, you need to add aluminum powder to it.
- Apply epoxy mixture to the metal. Place a piece of fiberglass on it and press it slightly onto the glue. After fixing the fiberglass to the part, excess epoxy must be removed. The polymerization process lasts 12 hours.
- After polymerization, apply putty to the surface and let it dry. If irregularities appear, it is necessary to treat the putty area with emery cloth.
- After the putty has dried well, the threshold is primed and painted. After the paint layer has completely dried, the car can be driven.
Auto mechanics recommend another method of restoring thresholds:
- Buy fiberglass, putty, sandpaper, solvent and paint at an auto store.
- The surface of the threshold is thoroughly cleaned from traces of rust and degreased with a solvent.
- Cut a piece of fiberglass that matches the size of the corrosion.
- Apply putty to the fiberglass and apply to the metal surface.
- After 10 minutes, you need to apply a thin layer of putty over the fiberglass.
- After all putty layers have completely dried, they must be treated with sandpaper.
- Apply primer and paint.
Car sills are the most vulnerable part of the body, so when the first signs of corrosion are detected, it is necessary to take action. Restoration methods are simple and any car enthusiast can do it on their own.
Source
How to straighten the threshold?
Repairing the threshold is complicated by the fact that access to the reverse side of the damage is closed. In addition, the metal of the threshold, due to its design, has high rigidity and significant effort is required to straighten it.
In this article, we will look at several ways to repair damage to a doorstep. Special equipment will be required to professionally repair significant damage. If the dent is small, then you can get by with improvised means.
How do professionals straighten thresholds?
In modern body repair, when straightening deformed sills, a spotter and various pulling devices are used (for more information about these devices, see the article “Spotter”).
First, the protective coating is removed from the threshold to bare metal.
Then, using a spotter, pulling elements are welded to the threshold, after which the dents are gradually pulled out and simultaneous tapping of protruding places and folds around the deformation, if necessary.
The pulling sequence is carried out depending on the structure of the damage. If the threshold flange (the lowest part where the threshold connects to the bottom) is damaged, then it must be returned to its place first.
Next, you need to straighten the corners of the threshold if they are jammed. Thus, the main shape of the threshold needs to be restored first, and minor irregularities are corrected last.
Shallow dents can be straightened with a reverse hammer, which is included with the spotter.
Repair if you have a welding machine
- If you don’t have a spotter, but have a semi-automatic welding machine, then you can also use a reverse action hammer (which you can buy separately or make yourself) to straighten the threshold. The principle of its operation and a simplified diagram are described in the article “How to straighten a dent with your own hands.”
- The following method does not require pulling devices. You can cut the dent with a cross (as shown in the photographs below) and put each of the dent segments in place, for example, using a screwdriver. Next you need to weld all the cut areas.
- If it is possible to attach the chain to the garage floor or other lower part (weld the loop to a metal corner, for example, that frames the inspection hole), then you can use the following method. You can weld metal loops or plates with loops to the deformed places, attach a chain to them and to the bottom of the garage and lift the car with a jack. The dent will straighten out as the jack is raised. In this way, you can straighten a jammed threshold flange, which is very rigid and not pliable when straightened.
- If it is not possible to secure the chain to the bottom of the garage, then you can do everything in the same way as in the previous point, but pass some kind of long lever (pipe or crowbar) through the chain. One end of it can be rested against the rigid part of the bottom of the car (spar along the bottom) by placing a board or block of the required thickness. The other end needs to be gradually pressed down. This way you can correct the lower deformation of the threshold. In a similar way, you can correct lateral deformation, you just need to come up with a lateral stop for the lever. For example, you can pass a board of the required length under the car, rest it against the wall of the garage, and rest the lever against its edge.
- After using welding, the inside of the threshold must be treated with an anti-corrosion agent through the technological holes in it, which are closed with rubber bands. You can spray epoxy primer through a special tube with a nozzle that sprays 360 degrees. Such a tube is usually included with Movil. If the inside of the threshold is not treated after welding, the metal will rust from the inside quite quickly.
- Before puttying, the front part can also be first coated with epoxy primer for better anti-corrosion protection. You just need to use it correctly (see the article “Using epoxy primer”).
- Next you need to putty the threshold, level the putty by sanding and prime with acrylic primer, then prepare for painting and paint.
Straightening the threshold using hot glue and a homemade pulling device
A smooth dent that does not contain sharp folds can be straightened out using a pulling device and hot glue. A similar principle is used in the adhesive system of the PDR paintless dent repair technology.
You can make a pulling device yourself from wooden blocks and a long bolt with a nut and washers (see photo).
The block with the bolt is glued to the deepest part of the dent, after which the bolt gradually twists and pulls the glued block along with it.
The bars that will rest against the entire part of the threshold (on both sides of the dent) must be made large enough in area so that the force is dissipated and the entire part of the threshold is not deformed.
It is better to make the block that will be glued from durable wood so that it does not crack or delaminate during stretching. You can use birch. The head of the bolt, which will be on the glued side of the block, must be recessed by drilling a hole of the required diameter.
This way the bolt will not interfere and will not turn while straightening the dent.
To apply hot glue, you can use either a special gun or a hair dryer. A hair dryer can also be used to heat up the glue if it has time to harden while being applied to a large area of the bar. Before gluing the block, the threshold must be thoroughly cleaned, dried and degreased.
You need to pull it out slowly, pausing after tightening the bolt several times. If the glue peels off prematurely, before it is completely pulled out, then you may need to re-glue and repeat pulling out several times.
You can gently tap the raised areas around the dent while pulling (if there are any).
On convex body panels, when a dent forms, the metal not only moves inward, but also forms raised areas around the indentation that must be gently tapped when straightening the panel, helping the metal return to its place. In the illustration, the large arrow shows the direction of impact, the small arrows indicate the raised metal around the recess (shown by the dotted line).
To remove any remaining frozen glue, you can carefully pry it off with a spatula and use isopropyl alcohol.
In this way, it is impossible to straighten any damaged threshold, but it is quite possible to reduce or completely straighten a smooth dent formed by a mild impact. I repeat once again that it may not be possible to reduce the dent in one go. You need to monitor the changes and if the dent has decreased a little, then you need to slowly repeat the pulling process.
[adsp-pro‑4]
Print article
What are the defects?
According to the nature of their origin, all defects are classified as natural, mechanical. In the first category:
- erasing the coating from corrosion, paint;
- the appearance of rust from exposure to external factors;
- metal wear.
Mechanical damage means:
- dents after hitting an obstacle, from impacts with gravel;
- factory defects in paintwork, lack of corrosion protection.
The repair procedure is selected depending on the degree of damage; if corrosion has covered more than 70%, the part is completely replaced. In case of deformation, if the metal does not require cutting, it is enough to straighten it. If the outer layer of anti-corrosion is damaged without damaging the outer and inner parts of the metal, then clean it and apply protection.
Typically, drivers have to repair a part after hitting an obstacle; you can straighten the threshold on a car with your own hands if there is no internal wear of the metal.
A dent on the threshold of a car is not a death sentence, but only an annoying nuisance
Issues discussed in the material:
- What are the classic methods for repairing dents on a car doorstep?
- How to remove a dent on a car doorstep without welding or painting
- How much does it cost to repair a dent on a car door?
The threshold is the element of the car that is most susceptible to external mechanical influence. Since the condition of roads in Russia is not very good, dents on car sills have become a common problem for car enthusiasts.
How to fix a dent on a car doorstep using a reverse hammer
The use of a reverse hammer when leveling dents in a car threshold is advisable in cases where it is difficult to get to the place of damage or the part cannot be removed. Such repairs usually cannot be done without painting. To remove a dent, you must follow these steps:
- Clean, dry and degrease the area to be restored. Remove traces of corrosion.
- Attach a reverse hammer to the center of the damage. For this, a special suction cup or applicator is used.
- By intensifying blows of the weight on the handle of the hammer, straightening is carried out
- After restoring the outside of the body, the hammer is disconnected.
It makes sense to use an applicator or suction cup only for minor damage. Deeper and more complex dents are eliminated by welding a hammer to the surface or a hook to the technological holes with special hooks.
Other options for repairing dents in car sills without welding
In some cases, when pulling out dents on thresholds without painting, instead of rings and pins, you can use a vacuum suction cup. The required vacuum is created in it by a vacuum pump. But its use is not always possible, since the shape of the dent may be such that the device will not hold securely.
The bracket with suction cups and guide rod is also used for pulling out dents on thresholds without painting. The rod in the center of the dent is fixed at its base using special glue. It serves as the base on which the bracket is installed, and is connected to the edge of the bend with suction cups.
Leveling out dents in the car threshold occurs by twisting the rod. Dismantling after straightening is completed is carried out using a special adhesive solvent that does not damage the paintwork of the threshold.
Next, the rod is installed at another point, and the work is performed using the same technology.
Pulling out dents on car sills without painting is not always possible due to a number of reasons. The listed methods allow you not to resort to painting only in cases where the paintwork is not damaged. Undoubtedly, this approach saves time and money. So before you resort to welding, consider these methods for fixing dents on car door sills.
“Restoring a car after an accident: stages, choosing a service station, nuances” Read more
What to do if the dent on the car sill is too deep
If the damage is so complex that none of the above methods can be used, then all that remains is to cut out the entire threshold. To do this, the car doors and the floor covering under the seats are completely removed. After this, you can try to straighten the removed part by straightening it on a workbench, as is the case with removable thresholds, or install a new part to replace the old one.
Whatever method you choose to remove dents, never forget to treat the parts with anti-corrosion substances. Thresholds are very susceptible to rust.
By installing a new threshold without anti-corrosion treatment, you risk encountering the same problem again in the next few years, since moisture will quickly penetrate into the smallest cracks and lead to the formation of rust.
To paint the threshold, you need to choose the shade that is most compatible with the old paint. The same thing with varnish.
Minor body defects (chips, scratches, dents) of your car can be repaired with your own hands.
It is possible to restore those parts that have never been damaged and, accordingly, have not previously been repaired. If cracked paint, breaks and kinks are visible, then repairs cannot be completed without painting.
“Hydraulic engine mount: features and advantages” Read more
Anti-corrosion treatment after repairing a dent on a car doorstep
Processing can be done in two ways.
The first involves the use of auto chemicals (mastic, special varnish or impregnation).
This method is best suited when the work is being done in a garage. But one of the disadvantages of such work is that it will require expensive materials.
Sometimes you can use cheaper materials, but they are not suitable for every foreign-made car.
The second method is electrochemical protection. It must be carried out in a car workshop, where all work is covered by a guarantee.
This protection is notable for the fact that special electrodes are installed on the threshold, to which direct current is supplied.
These elements, made of a more active metal, corrode first, and the body surfaces in contact with them (in particular, the thresholds) are restored. This protection is valid for one year. At low temperatures, the service life of the electrodes is reduced to 3 months.
There are services that install plastic threshold covers, the cost of which is low, and they are easy to change.
Such overlays perfectly protect the thresholds from dirt and stones, but not from corrosion, since it develops under them.
It is worth installing such an overlay only after the threshold has undergone anti-corrosion treatment.
Types of thresholds
Today there are two main types of thresholds - welded to the base or removable.
Removable thresholds are attached to the side and outside of the side members. Their main purpose is to protect the lower part of the car from small stones flying out from under the wheels.
Welded thresholds are more common. In fact, they blend into the underbody, giving it an extra level of rigidity.
Repair of removable thresholds
Most often, removable thresholds are made of metal (less often plastic). Fastening is carried out using self-tapping screws.
They are very easy to repair. It is necessary to carefully remove the product by unscrewing the screws and restore the threshold using a small hammer (if we are talking about a metal product).
After this, the threshold must be coated with a special anti-corrosion compound to prevent rust.
There are situations when repairing removable thresholds is useless (for example, when the material has already completely rotted).
It is better to completely replace the old threshold with a new one. This will end up being much cheaper.
Repair of a welded threshold
Such a threshold is part of the structure, so repairs must be carried out according to a different scenario.
If the damage is minor, then straightening is done from the outside. If there are small dents, you need to drill a small hole in the threshold and straighten the problem area using special tools.
Dent pulling tool.
Another option is to carefully close the damaged area using small steel patches. Any competent tinsmith can easily cope with such work.
Dents in sills can be repaired using a steel rod that is welded to the damaged part and then pulled out using manual force or a special winch. Once the work is completed, the rod can be cut.
For moderate damage, the seats and doors will have to be removed. Otherwise, the latter will interfere with high-quality repairs.
Areas with the most extensive damage should be replaced. These include:
- Through holes;
- Deep dents;
- Torn parts and so on.
This area can be cut out with a grinder and a metal structure of the appropriate dimensions can be welded.
Car thresholds: basic repair methods
Today, there are two main methods for straightening car sills.
First way.
In the first method, a rectangular window is cut out into which the anvil is inserted.
This method allows you to tighten the affected area using hydraulic or mechanical devices.
Once the problem area has been corrected, the cut window can be carefully sealed. You can use tin solder to straighten the seam.
Second way.
In the second method, so-called transverse cuts are used, which are made in the surface of the threshold.
The weld points are separated, an anvil (preferably small) is inserted and the damaged area is straightened.
Welding is carried out only after straightening the surface. If the area directly under the door is damaged, it must be cut out and replaced with a similar one.
Changing the pillar and threshold
If the threshold and the pillar are damaged, then it is necessary to replace the threshold and the pillar at the same time. You need to follow a simple procedure.
POPULAR WITH READERS: How to replace windshields yourself
First, the B-pillar spar must be cut out. Before straightening the spar, you need to make sure that the car body is strong.
After this, the installation site must be cleaned, and all excess metal must be removed.
Next, the surface of the spar must be leveled and adjusted. After this, fastening, installation and welding are carried out. That's all. All that remains is to put the doors in place and adjust the gaps.
Simple manual
How much does it cost to collect your own auto kart?
DIY karting: detailed description Shaped metal parts cost a lot of money. Even more than corrugated sheeting or metal tiles, therefore it makes sense to make a simple machine for bending sheet metal, and with its help make as many corners, ebbs and other similar parts as you need, and exclusively to your own dimensions.
If you're worried about appearance, you shouldn't be. On sale today there is sheet metal not only galvanized, but also painted. In all designs, the sheet is fixed tightly, so that when working it does not slide on the table, which means that the paint does not rub off or get scratched. It is also not damaged in places of bending. So the products will look quite decent. If you try, they will look even better than what they sell on the market.
Powerful sheet bending machine from brands
This sheet bending machine will require a flat surface (table), preferably metal, three corners with a shelf width of at least 45 mm, and a metal thickness of at least 3 mm. If you plan to bend long workpieces (more than a meter), it is advisable to take wider shelves and thicker metal. You can use brands, but this is for bending metal sheets of large thickness and length.
You will also need metal door hinges (two pieces), two large diameter screws (10-20 mm), wings on them, and a spring. You will also need a welding machine - weld the hinges and make holes (or a drill with a metal drill bit).
For a homemade sheet bender, a 70 mm brand was used - three pieces of 2.5 m each, two bolts of 20 mm in diameter, a small piece of metal 5 mm thick (for cutting jibs), a spring. Here's the procedure:
- Two brands are folded, and grooves are cut into them at both ends for hinges. The edges of the recesses are beveled at 45°. The third tee is cut in the same way, only the depth of the recess is made a little larger - this will be the clamping bar, so it should move freely.
Cutting notches for hinges
Boil the loops well
Weld pieces of reinforcement to the bolt head
Homemade sheet bender in progress
This option is very powerful - you can bend long workpieces and sheets of considerable thickness. Such scales are not always in demand, but they can always be reduced. The video suggests a similar design of a smaller size, but with a different fastening of the clamping bar. By the way, no one bothers you to also install a spring on the screw - it will be easier to raise the bar. What’s interesting about this design is that you can make beading on it, something that such devices usually cannot do.
From a corner with a different type of clamping bar
This model is welded from a thick-walled angle, the frame is made like an ordinary construction sawhorse, which is welded from the same angle. The handle is from a luggage trolley. The design of the screws is interesting - they are long, the handle is curved in the shape of the letter “L”. Convenient to unscrew/screw.
Fiberglass and mesh
To repair more extensive damage, an aluminum patch mesh is used. A piece slightly larger than the hole is cut out of it and attached with masking tape. Next, sealing holes in the car body without welding is carried out in the following sequence:
- a thin layer of fiberglass putty is applied without touching the tape;
- after drying, the tape is removed;
- subsequent layers of putty are applied after the previous one has dried;
- the surface of the car is treated with sandpaper or a grinding machine until smooth;
- To strengthen the mesh, several layers of putty are applied to the back of the body.
Long-term auto patches are made from fiberglass and epoxy resin. Several overlays are cut from it, the first of which should cover the hole with a margin of 2 cm. The size of each subsequent piece is made larger than the previous one. The last overlay should cover all the metal stripped during the preparation process.
The cut pieces are impregnated with resin and placed on the hole in a sequence of increasing sizes. If you need to seal large holes on the back of the body, use linings to prevent the fabric from sagging. After laying all layers of fiberglass, wait for the resin to completely harden. The time required for this is indicated in the instructions.
Read more: Ford Explorer 4 photos
Common Mistakes
If you have no experience in body repair, you can make mistakes even when correcting minor damage. To prevent them, it is useful to familiarize yourself with the mistakes that beginners and non-professionals make most often.
Common mistakes when repairing thresholds:
- When repairing metal thresholds, the surface is not cleaned properly. The entire outer part and connector must be carefully treated to remove all traces of rust.
- Metal patches welded to thresholds are not treated with anti-corrosion compounds. To prevent the metal from becoming leaky, it must be cleaned and an anti-corrosion compound applied on top. They also need to process the insides of removable thresholds.
- I don't treat the underbody of the car. When repairing, it is necessary to apply protective mastic to it.
- They forget to check the drainage holes. They need to be cleaned and Movil or another preservative must be poured into the cavity of the thresholds.
Every car enthusiast will be able to eliminate minor defects in thresholds, having the necessary tools and materials at hand. If everything is done correctly, you can postpone contacting the service for a couple of years. Complex damage requires the use of welding and certain skills, and if they are not available, it is better to turn to professionals.
- How to change the fluid in a car air conditioner yourself: sequence of work
- Where is the front wheel hub located, its structure and purpose
British port is turning into a giant car park
Repair of the VAZ-2110 underbody without welding
With any body repair, first of all, it is necessary to carry out an external inspection of the hardware, identify and note for yourself which areas are in poor condition and need repair or replacement. The condition of the bottom metal is determined in different ways:
- using a hammer and a core - if you think that there is rust in a certain area, you need to lightly hit the metal, check if there is rotten iron under the anti-corrosion coating;
- try to jack up the car on each side - if the thrust pads are rotten, this will be noticeable when you try to jack up the car;
- press in different places on the floor of the car - weak, rotten iron will bend under your feet;
- try to move the front seats back and forth in the cabin - problematic movement of the seats also often indicates the poor condition of the metal.
Any repair of sills and underbody using a non-welding method is not professional, and craftsmen consider it only a temporary measure to properly restore the condition of the body; a welding machine is indispensable. When repairing the bottom without welding, patches and new body elements are not welded, but installed on rivets or self-tapping screws (bolts), preparation and all other work is carried out in the same way as during traditional body repair using a welding machine.
Replacing a car wheel arch with your own hands
If the surface of your car's wheel arches is hopelessly corroded by rust and cannot be repaired, you will need a replacement - this operation will not be difficult to perform on your own.
Let's consider step by step how to replace the wheel arches of a car with your own hands:
Replacing a car arch with your own hands
At this point we can consider the work completed if you have the skills to handle a welding machine . It won't cause you any particular difficulties.
The arch is welded over the wing with an overlap