Sometimes even an experienced driver is stumped when asked how to find a seat heating fuse on a Hyundai Solaris or any other of the several dozen installed on a Korean car. The placement diagram is in the technical documentation, but sometimes you need to quickly remember and find an element without asking for help.
Simply replacing one small part can prevent major repairs to the unit. Replacement takes no more than 10-15 minutes, even when working with the power fuse block.
What is a fuse?
The fuse protects the vehicle's electrical circuits from excess voltage, which could melt the wires and cause a fire in the cabin. If the permissible voltage is exceeded, the fuse blows and melts, and current stops flowing through the wires.
Therefore, failure of any device, from heated seats to air conditioning, can only be caused by its failure. A simple replacement of a small element will completely restore normal operation.
It is impossible to unequivocally answer the question, which Hyundai Solaris fuses are most important? Some of them are responsible for peripheral and service systems, some for the operation of core systems, but none should be allowed to fail.
Regular checking of each and timely replacement will help avoid problems. Sometimes a blown fuse indicates the presence of serious problems with the power supply, so the failure of several in a row may be the reason for an extraordinary vehicle inspection.
Fuses are sold in blocks of 10 pieces, this is convenient, they can be immediately purchased in a set, which will be used for a long time.
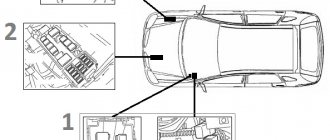
Where are the fuses located in the passenger compartment and in the hood?
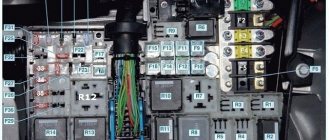
The interior fuse box is located in the vehicle interior, on the driver's side, to the left of the steering wheel. The unit is closed with a plastic cover that can be easily opened by hand. To see the diagram, you need to open the compartment cover.
The diagram is a table in which devices are depicted in pictograms and instructions are given on their ratings; almost all of them have a current strength of 10-15 A. For convenience, they are also equipped with alphanumeric symbols that will help the car owner navigate by determining the relationship between the designation on the diagram and decoding given in the technical documentation.
Please note that the yellow clip in the middle of the block contains 2 fuses at the same time.
Thus, the F2 symbol hides the protection of the electronic key system, F5 controls all electrical equipment of the body, F7 controls the air conditioning, F17 controls the heated front seats. The diagram will indicate its location on the block.
Thus, on the block, the seat heating fuse will be located in the top row, second from the right. Their numbers are not written on the fuses themselves, only the rating; you will have to navigate according to the proposed diagram. The red ones are rated at 10 A, the blue ones are 15 A, the yellow (one) is 20 A and the whites are 25 A.
If the car owner has several already purchased parts of different denominations, if they burn out, the driver will be able to replace them himself, without wasting time going to the store. The burnt-out part simply melts from a small plastic plate on the side and top, which can be determined by visual inspection.
In addition to the main ones, there are also redundant, spare relays, they are hidden under the numbers F3,13,36. Also located in the cabin are fuses for long-term parking; they are significantly larger in size and yellow in color.
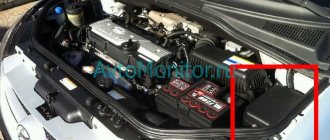
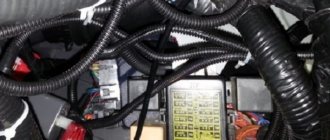
The electrics of the hood and trunk depend on the unit, which is located in the engine compartment. It is a small plastic box, on the lid of which there will be a diagram of the location of the protective devices.
It is less clear, some details are marked larger, some less clearly. The rating of the elements ranges from 10 to 125 A; accordingly, the sizes of the parts are also different.
In total, there are 41 fuses in the block in the hood, among them:
- F1 – control of the electric power steering wheel;
- F3 – heated rear window;
- F7 – wiper operation mechanism;
- F9 – oil supply valve;
- F13-14 – headlights;
- F28 – main relay of the engine compartment.
The 2021 models also have another small block in which fuses are located that are responsible for heating the wipers. A small plastic box is located to the left of the center of the hood.
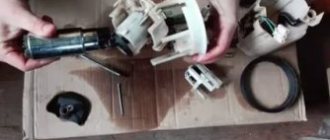
Replacing fuses located in the engine compartment
The replacement operation is carried out in the event of a failure of the fuse or relay located in the engine compartment block. The car owner will need a new part of the appropriate value, gloves and tweezers to remove it.
Work algorithm:
- disconnect the negative terminal from the battery, wait at least 10 minutes;
- release access to the block by squeezing two plastic latches;
- remove the black plastic cover of the unit;
- find the desired element by first determining its location on the diagram, and then finding it on the block. It will be possible to detect a burnt-out one by the melted jumper;
- carefully remove the part with tweezers;
- Insert a new one to replace the burnt one.
As standard, the block is equipped with fuses with short contacts, but if it was not possible to purchase one, it can be replaced with a more popular part with long contacts.
Larger fuses in the motor block may also fail; depending on their rating, they are blue or white. This element can be easily removed with your fingers – you just have to pull the plastic casing. A new one is also installed manually.
Failed relays are also replaced in the same way. It is important that, simultaneously with replacement, it is necessary to establish the cause of the malfunction by checking all the wires of the system for which the element is responsible.
All work with the block located in the hood must be carried out in the garage or in clear weather; rain water, of course, will not damage the contacts, but it is better not to risk it.
How to remove the fuse box on a Hyundai Solaris?
The technical process of removal and replacement is not complicated; it can be examined in detail in the video, in which mechanics will cover all the intricacies of operation and safety precautions. Changing power fuses is somewhat more difficult than regular or salon fuses.
Their unit can only be replaced as a whole; to do this, it must first be dismantled. To carry out work on removing the main fuse block in the hood of the Hyundai Solaris, you must:
- unscrew the nut securing the block with a 10mm head;
- Carefully remove the ends of both wires from the studs;
- The power fuse block is removed from the mounting block by hand and replaced with a new one.
AVTORIN.com
Fuses for 2021, 2021, 2021 Hyundai Solaris.
Where are the fuses and relays located in the Hyundai Solaris 2 (from 2017).
The fuses and relays are located in the passenger compartment (driver's side), you need to remove the cover, as shown in the diagram, on the back there will be a designation of the fuses.
| Fuse no. | Fuse name | Fuse rating | Protected circuit |
| F1 | STOP LAMP | 15 A | Electronic brake light unit (instrument panel junction box) |
| F2 | SMART KEY | 25 A | Smart Key system control unit (electronic key, keyless entry) |
| F3 | SPARE1 | 10 A | Spare |
| F4 | E-CALL | 10 A | E-Call block (emergency call block) |
| F5 | TURN LAMP | 15 A | BCM (Body Control Module), SLM (Seat Belt Reminder and Lighting Module) |
| F6 | FRT FOG | 15 A | Front Fog Light Relay (Dashboard Junction Box) |
| F7 | A/CON2 | 10 A | Air conditioner control unit |
| F8 | P/OUTLET2 | 20 A | Power socket ( cigarette lighter ) No. 1 ( Solaris 2 cigarette lighter fuse |
| F9 | P/OUTLET3 | 20 A | Power socket ( cigarette lighter ) No. 2 (Solaris 2 cigarette lighter fuse) |
| F10 | ACC | 10 A | Rear power socket (cigarette lighter) relay (instrument panel junction box), door mirror adjustment switch |
| E-Call unit, BCM, SLM unit, audio system (radio), multimedia navigation system | |||
| Smart Key system control unit (electronic key, keyless entry) | |||
| F11 | S/ROOF | 15 A | Hatch (top hatch electric motor) |
| F12 | IMMO | 10 A | Immobilizer module |
| F13 | SPARE2 | 15 A | Spare |
| F14 | WIPER | 25 A | Multifunction (steering column) switch, wiper motor, engine compartment junction box (Relay 6) |
| F15 | RR FOG | 10 A | Rear Fog Light Relay (Dashboard Junction Box) |
| F16 | DRL | 10 A | DRL (Daytime Running Light) Relay (Dashboard Junction Box) |
| F17 | MODULE6 | 10 A | Power Window Relay (without BCM) (Instrument Panel Junction Box), Heated Windshield Washer Nozzles |
| Driver/front passenger seat heating control unit | |||
| Rear seat heating control unit | |||
| Defroster Relays 1 and 2 (Front Defroster Junction Box), Sunroof Motor | |||
| F18 | WASHER | 15 A | Steering column switch (washer) |
| F19 | MODULE7 | 10 A | BCM (Body Control Module) |
| F20 | 10 A | Interior light auto-off relay (instrument panel fuse box, version with auto-off relay) | |
| Navigation lamps (roof light) (without auto-off relay), interior lighting (ceiling light) (without auto-off relay), luggage compartment light | |||
| Instrument cluster (instrument cluster), OBD diagnostic connector, BCM, SLM unit, air conditioning control unit | |||
| F21 | AUDIO | 20 A | Head unit of an audio system or multimedia navigation system (radio, GU) |
| F22 | DR LOCK | 20 A | Door unlock relay, Door lock relay, Trunk release relay (central locking) |
| F23 | BRAKE SWITCH | 10 A | Smart Key system control unit (electronic key, keyless entry), brake light switch (limit switch) |
| F24 | RR HTD | 10 A | Driver's side power outside mirror, air conditioning control unit |
| Passenger side power outside mirror | |||
| F25 | MODULE5 | 10 A | SLM unit, BCM, Smart Key system control unit (electronic key, keyless entry) |
| F26 | A/CON1 | 7.5 A | A/C Fan, Engine Junction Box (Relay 2), A/C Control Module |
| F27 | ENG T | 15 A | Automatic transmission selector lever position indicator (automatic transmission): Sport mode switch, transmission mode switch, brake light switch |
| Manual Transmission: Engine Compartment Relay and Fuse Box, Brake Light Switch | |||
| F28 | TAIL RH | 7.5 A | Right headlight, audio system (radio, power steering), instrument panel switch, heated steering wheel, instrument cluster (instrument panel) |
| Head unit of multimedia navigation system (radio, GU), AUX/USB socket, automatic transmission selector lever position indicator | |||
| Main power window switch, front passenger power window switch | |||
| Rear power window switches, center panel switch, air conditioning control unit | |||
| Rear right combination light (in/out) | |||
| F29 | ABS3 | 10 A | ABS control unit (ABS, anti-lock braking system), ESP control unit (dynamic stabilization system) |
| F30 | MODULE3 | 10 A | Switch on the left side of the front panel, BCM |
| F31 | NTO STRG | 15 A | Heated steering wheel |
| F32 | FRT S/HTR | 20 A | Driver/front passenger seat heating control unit |
| F33 | SAFETY WDW | 25 A | Driver's door power window assembly with anti-pinch protection |
| F34 | RR S/FITR | 20 A | Rear seat heating control unit |
| F35 | TAIL LH | 7.5 A | Left rear combination light (in/out), left/right license plate light, left headlight |
| F36 | SPARE3 | 10 A | Spare |
| F37 | MODULE2 | 10 A | Air conditioning control unit, left/right headlights, head unit of audio system or multimedia navigation system (radio, power steering) |
| Control unit for heated driver/front passenger seats, heated steering wheel, E-Call unit | |||
| Control unit for heated rear seats, automatic transmission selector lever position (sport mode switch) | |||
| F38 | MODULE1 | 10 A | BCM (Body Control Module), SLM (Seat Belt Reminder and Lighting Module) |
| F39 | A/BAG | 10 A | SRS control unit (airbag system) |
| F40 | P/WDW RH | 25 A | Main power window switch, front passenger power window switch |
| F41 | P/WDW LH | 25 A | Power window main switch |
| F42 | START | 10 A | Automatic transmission (automatic transmission): transmission mode switch (range switch) |
| Manual Transmission: ECM/PCM, Engine Compartment Junction Box (Relay 1), Smart Key Control Module (Keyless Entry) | |||
| F43 | ENG E4 | 10 A | ECM/PCM, Immobilizer Module, Smart Key System Control Module (electronic key, keyless entry) |
| F44 | CLUSTER | 10 A | Instrument cluster |
| F45 | A/BAG IND | 7.5 A | Instrument cluster |
| F46 | MDPS1 | 7.5 A | MDPS unit (EUR control unit (electric power steering)) |
The fuses and relays are located under the hood (in the engine compartment), you need to remove the cover, as shown in the diagram, on the back of the cover there will be a fuse designation.
Hyundai Solaris Removal installation replacement repair fuses and relays Hyundai Solaris instructions
Hyundai Solaris manual > Electrical equipment > Replacing fuses and relays Hyundai Solaris
Hyundai Solaris Replacing fuses and relays
- We carry out work when fuses and relays fail.
- When removing fuses and relays, be sure to disconnect the wire terminal from the negative terminal of the battery.
- To access fuses and relays located in the engine compartment block...
...pressing two plastic latches...
...remove the cover of the mounting block.
On the reverse side of the cover there are spare fuses and a diagram of the location of fuses and relays and their purpose is indicated. A faulty fuse is identified by a blown jumper.
Replacing the mounting block assembly
If replacing the fuses did not help, and the diagnostics indicated a malfunction of the mounting block, you can make the replacement yourself. To do this you need:
- Remove the negative terminal of the battery.
- Remove the fasteners.
- Disconnect all wiring harnesses from the mounting block.
- Disconnect and remove the vehicle diagnostic port.
- Disconnect the relay from the walls of the block.
- Unscrew the nuts securing the block.
- Lightly remove the unit and disconnect the rear wire terminals.
- Installing a new one is carried out in the reverse order.
The cigarette lighter does not work on the Hyundai Solaris: repair
Cigarette lighters in modern cars are needed not only for their intended purpose. The presence of various gadgets, for example, requires additional power sources for recharging. This need can be satisfied by just such a device available on the Hyundai Solaris.
Since one socket is not enough, you have to experiment with splitters, adapters, and sophisticated devices . Which sometimes leads to device failure, just when it is so needed. If someone has not used this attribute at all before, they may encounter it malfunctioning at the most inopportune moment.
Causes of cigarette lighter failure and their solutions
The design of the device is such that it always works in conjunction with a 12V outlet . They are located on one panel, separated by USB and AUX , in front of the gearbox gear shift knob. The non-working state of one indicates a lack of power in the other.
The cigarette lighter is connected to the same circuit as the 12V socket.
If, when connected to the cigarette lighter socket, the gadget does not charge, it means that electric current is not supplied.
The electronic device may only respond when the ignition is turned on, when the key is turned to the ACC mark at a certain level. When the problem does not disappear even if the necessary conditions are met, then you need to start repairing.
Cigarette lighter and 12 Volt socket.
Now it will be easier to determine the reason. If there is no power at the cigarette lighter outlet, it is possible :
- The fuse has burned out (in the car interior);
- Electrical wiring is damaged;
- One of the sockets needs to be replaced with a new one.
Replacing the fuse
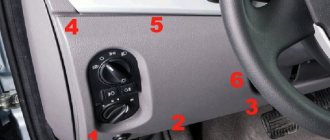
A simple procedure that involves determining the exact location of the failed element. On the left side of the dashboard on the driver's side, just below the headlight adjustment buttons, there is a rectangular plastic plug . Gently pull it towards you and slightly up the lid by the recess for your hand.
Below the headlight control buttons is the interior fuse box.
Pull the lid towards you and slightly up.
There is a fuse box built into the niche, one of which is what we need. According to the location diagram, the burnt out element is located in the bottom row, third from the left. The fuse is blue, with a current strength of 15A .
The fuse that controls the cigarette lighter and socket is located in the bottom row, third from the left.
To dismantle, use special plastic tweezers , which are located along with the spare fuses under the hood, to the left of the battery along with the fuse box.
Replacement must be carried out only with an element of the same power. Otherwise, a spare part with a higher current may cause a short circuit and even a fire in the wiring.
Repairing the first type of fault will usually be enough to restore the functionality of the cigarette lighter.
Video about replacing the fuse with a socket and cigarette lighter in a Hyundai Solaris
Repairing the wiring supplying the cigarette lighter
In order to carry out this procedure, you need to go to a service station or find a suitable electrician. You won't be able to deal with this on your own. The only nuance that you can solve yourself is to check the presence of power at the terminals and open connections available for testing . You will need some equipment:
- tester;
- voltmeter;
- multimeter
Having even a little knowledge in the field of physics or electrical engineering at the school level, you can conduct a superficial diagnosis of the electrical component of the system . If all the wiring turns out to be in perfect order, then the third and only problem needs to be solved.
Replacing the mechanism of a damaged device
It is necessary to purchase a new seat for the plug of our cigarette lighter, which costs about $10. To dismantle a spare part that has become unusable, you must first open the cover of the 12V socket .
The outlet panel can be removed without special tools or much effort.
Using two fingers, the index and middle of either working hand, remove the panel by inserting your fingers into these two holes. The lid will give in easily with a little applied force and move outward . We make a replacement by first removing the terminals from the socket plug, disconnecting the burnt-out part, and installing a new one in its place.
Disconnect the terminals.
We connect the connectors at the end of the wires back and, lightly pressing the socket, fix it in its original position. The renovation is complete.