Share
Even the most reliable car models have weaknesses. Among the many topics discussed by owners of Mitsubishi cars, repairing the Lancer 9 throttle body is one of the most discussed. We will try to deal with the problem that worries motorists.
You need to decide on the following things:
- characteristics of malfunctions and the reasons for their occurrence;
- preventive measures to increase the resource of the node;
- various repair methods, using which it is possible to restore the functionality of the part.
And at the same time, along the way, we will dispel some characteristic misconceptions that exist among both novice car enthusiasts and seasoned professionals.
Node device
The design of the Mitsubishi Lancer 9 throttle valve is not original. It is fundamentally similar to similar parts used by many equipment manufacturers as part of the fuel mixture preparation systems of modern internal combustion engines. The main components of the node are these components.
- Cast aluminum alloy housing with diffuser and channels for additional air supply.
- A damper nickel mounted on a rotating axis inside the diffuser.
- Throttle position sensor, which is a regular potentiometer with specified parameters.
- Idle speed regulator, dosing the amount of air entering the intake manifold when the engine operates in different modes.
- Sector with return spring. Through it, force is transferred from the cable to the remote control axis when you press the gas pedal.
- A removable platform with pipes for connecting hoses, through which additional air is supplied to the internal channels of the throttle or, on the contrary, the vacuum necessary for the operation of the unit is created.
However, such a part is expensive. For an original from Mitsubishi, if we are talking about a new spare part, you will have to pay at least 30 thousand rubles. Buying a Chinese analogue will cost significantly less, however, purchasing such substitutes is a waste of money. Knowing this, companies that repair Lancer 9 throttle valves are in no hurry to reduce prices for their services. Therefore, thrifty car owners take all necessary measures to increase the service life of the vehicle. But before moving on to this topic, you should list the main symptoms of malfunctions, as well as mention the most common breakdowns and the causes of their occurrence.
Review of the throttle valve for Lancer 9 and approximate cost of the unit
The original throttle valve for Mitsubishi Lancer 9 has the article number MD 615660. The price of a new unit is high and often exceeds 20-25 thousand rubles. For this reason, many car owners, if possible, avoid replacing the damper by cleaning, repairing, or adapting it.
One way to solve problems with the throttle assembly is to purchase a product from third-party manufacturers. The most popular options, according to reviews from experienced car owners, are shown in the table below.
Table - List of analogues of the original throttle valve for Mitsubishi Lancer 9
Throttle assemblies from third-party manufacturers are not always the optimal replacement for a failed damper. For this reason, many Mitsubishi Lancer 9 car owners resort to purchasing products from car dismantling yards.
The cost for such a unit starts from 4-6 thousand rubles. The remaining life of the throttle is unknown in most cases, so purchasing a used throttle is always accompanied by risk. For this reason, repairs are more expedient than buying a unit from a wrecking yard.
Symptom of malfunction
Even if the owner of the Mitsubishi Lancer does not pay due attention to the car, deviations from the norm associated with the operation of the throttle assembly arise only after the odometer measures the first 120 thousand kilometers traveled. In 99 cases out of 100, floating idle speed (ID) begins to cause concern. As a result, fuel consumption increases and driving becomes problematic. To minimize repair costs, measures to detect and correct problems should be taken promptly.
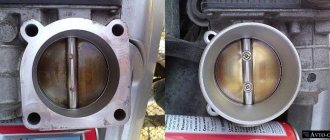
Throttle valve Mitsubishi Lancer 9
The supply of air necessary to create a combustible mixture entering the working chamber depends on the state of the throttle valve.
Therefore, any deviations in the operation of the unit lead to unstable crankshaft speeds, increased fuel consumption, decreased vehicle dynamics and can cause failure of the power plant.
The car owner should regularly clean the throttle valve and, if necessary, repair or adapt it. This will allow the driver to be confident in the reliability of his car.
Typical breakdowns and causes of their occurrence
There is only one symptom, but the reasons for its appearance may be different. The culprits of the disaster may be:
- dirt trapped in the gap between the heel and the diffuser, or inside the channels through which air flows;
- backlash and jamming resulting from mechanical wear of moving parts.
- failed electronic components - throttle position sensor (TPS) and idle air control (IAC).
There are not so many problems that cause XX floating. But the most difficult to detect and eliminate are faults that arise at the interface of mechanical and electronic components.
Dirt
Solid particles of different compositions, which not only block the normal operation of the unit, but also significantly reduce its resource, have two sources of origin. It could be:
- ordinary atmospheric dust that has penetrated through the atmospheric air filtration system from the intake manifold;
- soot formed during incomplete combustion of fuel or lubricants and entering the diffuser through the crankcase ventilation or exhaust gas recirculation valve.
These faults are not directly related to the operation of the throttle itself. However, if you want your car to function properly, they must be eliminated.
Backlash and jamming
The throttle body cast from aluminum alloy gradually collapses under the influence of loads that are insignificant at first glance. Well, dirt getting on parts only accelerates wear. As a result, the adjustment gaps set by the equipment manufacturer are:
- increase, and then an excess amount of air enters the intake manifold;
- decrease, which leads to the nickel sticking in the closed position.
In both cases, the TPS transmits incorrect data to the electronic control unit (ECU), and the IAC is not able to respond correctly to changes in idle speed.
Electronic component failure
Even the most reliable electronics fail from time to time. And then all that remains is to replace the used parts. Despite the significant cost of original spare parts, saving on their purchase is strictly not recommended. Externally similar to real ones, Chinese analogues, in most cases, have a very small resource, and are even capable of performing only decorative functions.
Vehicle operation specialists unanimously claim that if the Lancer 9 throttle is properly maintained, repairs may not be required for a very long time.
Throttle valve adaptation
After replacing or cleaning the throttle assembly, it may need to be adjusted. Adaptation is carried out according to the instructions below:
- Disconnect any battery terminal.
- Wait 15 minutes.
- Return the terminal to its place.
- Disconnect all loads.
- Start the car and let it run for 10 minutes.
- Shut down the power plant.
- Pause for 10 seconds.
- Restart the engine.
- Warm up the power plant.
- Check the speed. The norm is 750-800 rpm. Otherwise, repeat the adaptation.
Preventive measures
As has been proven many times, prevention costs are always lower than repair costs. The key to extending the service life of a critical component is regular cleaning of the Lancer 9 throttle valve. It is advisable to do it at each regular maintenance, at least every 15 thousand kilometers. The easiest way to do this is to purchase an aerosol can of carburetor cleaner. Such products dissolve accumulated contaminants well without damaging elastic gaskets and seals, as well as corrosion-sensitive alloys. To achieve the best results you must:
- warm up the engine to operating temperature;
- disconnect the air duct pipe from the throttle;
- remove excess dirt using a soft cloth soaked in cleaner;
- Spray generously into the diffuser.
Then install the air duct in place and, starting the engine, let it run for several minutes at idle and in transient modes. If the dirt is strongly embedded in the surface of the parts, the last procedure can be repeated.
There is no point in cleaning the throttle valve with household chemicals! Such compounds can cause more harm than good.
After cleaning is completed, you need to apply a small amount of lubricant to the axle, where it passes through the body, as well as to the edge of the nickel. This should be done strictly in measured portions, removing excess, and not generously, as some sources recommend. For these purposes, it is recommended to use lubricants containing molybdenum disulfide or other lubricants that meet the requirements of the NLGI-2 standard. It is also advisable to regularly lubricate the throttle cable with them.
From time to time you should make sure that there are no wear on the body and diffuser, and check the throttle valve clearances. The check is carried out with a flat probe 0.05 mm thick.
It is also advisable to monitor the condition of the electrical wiring contacts in the connectors for connecting to the IAC and TPS. Detected oxidation should be eliminated using special means.
Replacing the throttle valve on Lancer 9
To remove and install the throttle assembly, it is recommended to use the instructions below.
- Open the hood.
- Remove the negative terminal from the battery.
- Remove the air pipe. Halve the air filter housing. This will give access to the throttle valve.
- Remove the idle speed sensor connector.
- Remove the vacuum tubes.
- Disconnect the throttle heating hose. This operation is the most labor-intensive. Before dismantling the hose, it is necessary to pull the clamp down. Due to limited access, there is a risk of damage to the tube. After removing the hose, a small amount of antifreeze will flow out.
- Using a wrench or socket 12, unscrew the four fasteners. To avoid complications when installing the throttle body, it is recommended to remember the location of the long and short bolts.
- Replace the throttle body gaskets.
- Install the throttle valve into its seat. Secure with bolts.
- Reassemble everything in reverse order.
Repair
And yet, no matter how carefully you care for your car, sooner or later there may come a time when you have to think about repairing the Lancer 9 throttle body yourself. Such maintenance involves performing a number of procedures, only some of which can be handled by the average car enthusiast on his own, without any special professional skills or special equipment.
Replacing electronic components
Installing new TPS or IAC is quite possible for anyone who knows how to use plumbing tools. For this all you need is:
- disconnect the negative terminal from the battery;
- disconnect the electrical wiring connector from the sensor;
- using a screwdriver, unscrew the screws securing the part to the remote control body;
- remove the faulty component;
- install a new spare part in the vacant space;
- reassemble in reverse order.
You should remember the nuances so as not to get into trouble:
- The Lancer 9 throttle position sensor should be installed in a strictly defined position, having previously remembered how the part to be removed was positioned;
- no matter what the diagnostics show, the real culprit of the problems may not be the idle air regulator itself, but the o-ring seal placed on it or dirt accumulated on the valve stem - in these cases, it is enough to install a new gasket or remove dirt so that engine operation returns to normal .
Remember that installing/dismantling parts without first disconnecting the battery will cause the computer to malfunction.
Throttle position adjustment
Despite the fact that preliminary adjustments were made by the manufacturer of the equipment, the design of the unit provides for the possibility of changing the gap between the walls of the diffuser and the heel. This can be done using the same 0.05 mm thick probe, an 8 key and a hexagon (see photo below).
However, if there are wearouts in the throttle body or the Lancer 9 damper has mechanical damage, such actions will not give the desired effect.
You should not try to stabilize the idle speed by decreasing or increasing the gap. In the first case, this will cause the damper to jam, and in the second - malfunctions in the operation of the IAC and TPS. Simply put, you will not eliminate the problem, but will only make it worse.
Setting the idle speed
When externally examining the unit body, you can find two more adjustment positions on it. One hexagon screw is located openly.
With its help, you can configure the temperature corrector, which changes the idle speed depending on the degree of engine warming up. The other screw, a flathead screwdriver, is hidden under a plastic plug.
Exposure to it changes the speed of rotation of the crankshaft, regardless of temperature.
Practice shows that it is impossible to correctly adjust the idle speed on Lancer 9 based on the readings of the tachometer and on-board temperature sensor. This can be done only by connecting the MUT II/III device (standard Mitsubishi device) to the diagnostic connector and focusing on its readings.
Throttle adaptation for Mitsubishi Lancer 9
Good afternoon everyone.
On the above car they asked to clean the throttle valve. There was a lot of dirt, it looks like it had never been cleaned during the 202 thousand mileage. After that, we set the idle speed to 1600.. I tried to remove the terminal, I thought about learning how to do it. I stood at idle for about 15 minutes. I only achieved that the h.x was 1100, but it’s worth driving a little again to 1600. The voltage at the TPS is 0.446 Volts. The valve closes tightly. The adjusting screw is screwed in completely. There are no air leaks. Before cleaning the throttle the revs were normal. Now I'm off for a ride. Maybe they will recover on their own. And if it doesn’t recover and the car comes back tomorrow, I don’t even know what to do with it. This problem was discussed on the Lancer Club forum, I’ve encountered it myself more than once. There the problem is in the valve itself, you need to disassemble the throttle and flatten the valve with a hammer on one side to remove the wear. Good luck!
That is, not a tight fit. It turns out that you need to remove it and fill it like a valve. And make sure that the liquid does not leak?? Did I understand correctly??
When you take the picture, look at the light, you will understand everything. There is a working on the left side, it needs to be removed.
There have been such cases on three cars already. As the engine warms up, the bowden of the throttle cable lengthens and the speed rises; loosen the cable.
There is no need to rivet, lengthen or adjust anything. On these engines, the damper area is coated with varnish. It is washed off when washed with chemicals. Nail polish is in your hands.
In front of the throttle there is a black strip, as if made in a triangle, in it you drill a hole opposite the throttle drive bolt (the black plastic cable is stretched across it), insert the bolt into this hole and secure it with two nuts so that you don’t go back and forth pressing the throttle valve, but not too much the throttle could move freely along its axis! And all your problems are solved 100%.
Just when the mileage is under 200 it starts, a new one costs a lot, it’s also a bit expensive from disassembly.
Lately I’ve been trying not to wash the chokes at all after a couple of similar hits, unless it’s really necessary.
Either use a hammer, as Alexter wrote, or simply cover this hole with sealant (after degreasing), but a hammer is more reliable. 200 thousand is a lot, starting from 70,000 km such a jamb is present
Yes, I've already done everything
Well, share how you do it.
I removed the flap, there really is a gap for light. We started covering it with varnish to remove the cracks. Then, as in the upper post, I also inserted a bolt.. As a result, 800 revolutions
Thank you all, your advice helped. I'll add a photo of this gap on the left. Varnish, a bolt and some kind of mother helped. photos are not added car mileage 103t.km (if not wound up) engine 4G18
Somehow these buckets have been such a disaster, according to statistics, varnish treatment lasts for 2-4 weeks, so with a clear conscience I charge people both for diagnostics (and free of charge for eliminating the defect) without a guarantee, with an explanation of the reasons and the only correct advice change the damper. To be honest, I'm crazy - I've been using cars since 1988 (
no older ones came) this never happened, it was flooded with Lancers9
Have there been any attempts to make new throttle “washers”? Or maybe where can I get something ready-made in Ukraine?
And now, no matter how new a car is, everything from the city is made unlike the old releases, so you noticed everything correctly. I don’t varnish the throttles, but I force the client to make several short trips and adjust the initial position of the damper, it’s a tedious ride for a long time, but until it fills the ditch again, it will be possible to ride, it’s already been tested on several different Japs (but the fit is really crap). Today I set up one of these (after six test runs) and asked the client to come next time with a new throttle :-).
good afternoon, on this car, you absolutely cannot wash the throttle body; it almost always has a groove in the damper and in the body; this gap is filled by the dirt that has accumulated there for years, so you wash it and problems begin; I am repairing the throttle valve in the Krasnodar region, Labinsk; the price is 2000 rubles; this includes removal and installation; adjustment removing errors if any. I can meet you by bus or by Russian post, 3 year warranty, in fact 5 years normal flight
And the Cossack (newbie) was sent! (c) From the first post - and advertising!
Hello everyone, when I encountered a similar situation, I thought for a long time and solved the problem with tin, that is, I removed the throttle and tinned the damper from the inside around the edges with a large soldering iron - the second year the flight was normal
This technique has been known since the days of carburetors, then the valves were made of brass and the best effect was achieved by soldering wire along the edge of the valve close to the wall of the throttle channel, but the trouble is that the valves are now mostly made of duralumin.
Since the topic has been raised and is still relevant, I am still interested in the contacts of the person who installs the damper on bearings and overhauls it, because I, like most people, make lotions with varnish and tinning. I would like it professionally, on bearings and without leaks through the throttle
From experience, repairing with a primer from a kit for gluing glass into place of varnish is more effective, I’ve been using it for several years now!
Andryukh, with your varnish, errors do not appear later on the throttle or incorrect operation of the regulator [xx]
It is being repaired in several stages. Naturally, with the throttle removed, first we wash it with a cleaner, adjust the damper so that it does not bite (if someone tried to get out of the position by adjusting the limiter bolt fixed with paint, ERRORAL DECISION
) then carefully apply oil to the damper blade without leaking onto the body, apply a primer (primer for glass glue), the first layer (with the damper closed) in the place of the gaps on the sides near the axis and dry, preferably with a hairdryer, then carefully open (this is what the damper blade is for need to be lubricated with oil) we repeat the entire procedure until the gaps are eliminated. We install it on the machine and adjust it as prescribed in the manual STEP 9-15 at idle without load with a warm engine. And finally, do not let ANYONE wash the damper after this restoration; if this happens, then we repeat everything! For reference, the repair time takes from 2 hours, it all depends on the layers.
Elimination of mechanical damage
If there is a groove on the inner surface of the throttle at the place of movement, grinding of the diffuser is allowed to increase the internal diameter to 50.5 mm (standard size - 50 mm). This will require making another nickel with a diameter of 50.5 mm.
The installation of bearings recommended by some craftsmen makes it possible to get rid of play in the throttle axis. However, this is an extremely expensive operation. It, as well as the groove of the body, can only be performed on high-precision machines. It will not be possible to do this work at home.
Faced with such problems, it makes sense to use the services of companies that restore parts and are ready, for a reasonable fee, to sell a working throttle to the car owner. Often such enterprises accept faulty components for exchange, taking into account their cost. However, in this case, try not to overpay too much, remembering that repairing the Lancer 9 1.6 throttle valve is technologically no different from servicing a unit removed from cars with engines with a displacement of 1.3 or 2.0 liters. Well, of course, demand at least some guarantees!
Throttle adaptation for Mitsubishi Lancer 9
Gender: husband Lancer 2.0
Good evening forum members. Car: Mitsubishi Lancer 9 2.0 (4G63) 2005.
I decided to clean the throttle valve. I completely removed it and washed it with intake manifold cleaner. When I removed the terminals from the battery, I did not remove it. I put everything back. I started it and drove off. When I stopped near the house I realized that there were very few revolutions. about 400 in total and the car tries to stall. I started to park and stalled. You have to play with the gas pedal.
I tried to train the throttle valve according to the following scheme: 1. Turn off all current consumers (lamps, air conditioner, radio, etc.) 2. Turn on the ignition for 5 seconds - turn off the ignition 3. Wait a minute, start the car, don’t touch anything. 4. Let the machine run for 10 minutes, during this time it is better to be outside the car so as not to accidentally press anything. 5. Turn off the engine for 10 seconds. 6. Turn on the ignition for 10 seconds. 7. Turn off the ignition, wait a minute, start the engine.
Nothing succeeded. The car tried to stall and continues to do so.
What do you advise? who came across?
Gender: husband IX 1.6 MT 2005
Gender: husband Lancer 2.0
Yes, I blew everything out with a compressor after washing. I don't have a manual. Can you send me a link where the procedure is described?
Gender: husband IX 1.6 MT 2005
Gender: husband Mitsibishi Lancer 9
Gender: husband LANCER 9 AT
Gender: husband Lancer IX 1.6MT
Sometimes it also applies to 2.0, although much less often than to 1.6. But not in this case (idle speed is reduced). Viktor should be contacted for throttle repairs in case of consistently increased idle speeds.