07/18/2021 6,482 VAZ 2109
Author: Ivan Baranov
Many owners of Russian-made cars are faced with the problem of the inability to start the car, and the reasons may be different. And quite often it happens that the VAZ 2109 does not start due to the fact that the car’s starter does not turn. You can learn more about this malfunction, as well as options for solving the problem, from this material.
[Hide]
Checking with the starter removed using a multimeter
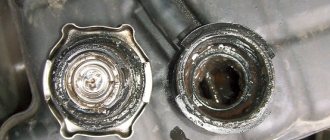
This test of the solenoid relay allows you to very accurately perform internal diagnostics and determine the condition of the windings and contacts. Dismantling the starter, depending on the make of the car, is carried out in various ways. For VAZ 2110, this procedure is carried out from below from the pit. Before unscrewing the fasteners, remove the wires (it is better to mark the terminals so as not to confuse them during assembly); you may need to remove the crankcase protection.
To begin with, voltage is applied from the battery to the body and terminals of the relay; operation is accompanied by a characteristic click and visible movement of the rod. Further checks are carried out using a multimeter, which is switched to resistance measurement mode and the range of 200 Ohms is selected.
Video: Checking the starter removed from the car
First, check the serviceability of the retractor and retention coils. To do this, one of the probes is connected to ground, the second touches the contacts in succession. The device readings are 2 ohms. Deviation of the device readings from the specified value is a sign of a break or short circuit. To check the power contacts, remove the core from the relay body and remove the return spring, after which the core is inserted back. The core rod is pressed against the table with a certain force and the resistance between the contacts is replaced. The resistance is approximately 1.5 ohms.
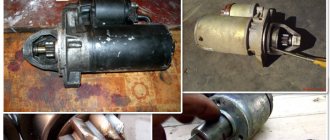
How to disassemble the VAZ 2109 starter (step by step)
Work order:
- We remove the starter from the car.
- At the starter, unscrew the nut of the lower contact bolt of the relay.
- Remove the washer and disconnect the stator winding terminal tip.
- Unscrew the two relay mounting screws.
- We remove the relay by disconnecting the armature from the lever by lifting the starter relay.
- Remove the armature and spring from the relay.
- Remove the sealing ring.
- Using a tube of suitable diameter, we knock the restrictive ring off the retaining ring.
- Remove the retaining ring and then the restrictor ring.
- Unscrew the two mounting screws and remove the starter protective cover.
- Remove the retaining ring.
- Remove the adjusting washers.
- Unscrew the tie rod nuts.
- From the collector side, remove the starter cover.
- Using a screwdriver, press out the springs of the insulated brushes and remove the brushes from the brush holder.
- Remove the brush holder.
- Remove the starter housing with the stator.
- Remove the plastic lever stop.
- On the drive side, remove the armature from the starter cover.
- Remove the intermediate support from the armature shaft.
- Remove the retaining ring from the starter drive.
- Remove the Belleville washer.
- Remove the thrust washer.
- Remove the clutch with the lever.
- Remove the thrust ring.
- Unscrew the two fastening screws of the relay cover.
- Unscrew the nuts from the relay contact bolts.
- Using a soldering iron, disconnect both winding terminals from the relay terminals.
- Remove the relay cover.
- Remove the sealing ring.
- We take out the contact plate with the rod.
- Remove the return spring from the rod.
- Remove the retaining ring.
- Remove the insulating washer.
- Remove the contact plate.
- Remove the insulating sleeve.
- We remove the washer.
- Remove the damping spring.
- Remove the contact bolts from the relay cover.
Causes and troubleshooting
Let's look at the reasons why the starter on a VAZ-2114 does not turn.
The causes of the malfunction may lie not only in it, but also in other elements involved in the circuit.
POPULAR WITH READERS: Repair of Lada Priora – electrical equipment
Moreover, the behavior of the circuit itself when closed can tell you where to look for a breakdown.
The key is in the “start” position and the starter does not start.
If, after turning the key to the “start” position, the starter does not turn, but the solenoid relays are activated (a distinct click is heard, indicating that the armature has moved), and the lamps on the dashboard have noticeably dimmed, then the reason may be:
Similar articles
Self-repair of VAZ-2109 starter
- In a discharged battery
. Electric consumers left turned on at night drain the battery and the amount of its energy is not enough to power the electric motor. Severe frosts can also affect the battery (exposure to sub-zero temperatures leads to an increase in resistance in the battery). To start a car you need to either charge the battery or “light” it from another car; - In severe oxidation of contacts
. Or insufficient contact at the battery terminals and the solenoid relay terminals, including ground. This causes an increase in resistance at the connection points, so the energy from the battery will not be enough to turn the electric motor. In order for the starter to start turning, it is necessary to check all the connections between the battery and the starter, clean and tighten them if necessary. To prevent oxidation, it is necessary to lubricate the battery terminals; - In the burning of contacts inside the retractor relay (nickels)
. For this reason, when the circuit is closed by an armature, strong voltage losses occur at the contact points. To fix the problem, you will have to remove the starter, disassemble the solenoid relay to clean the nickels, or simply replace it;
- The contact brushes of the electric motor are heavily worn
. Due to this malfunction, the contact between the brush block and the rotor is broken and the electric motor will not rotate. This can all be “cured” by replacing the brushes; - There is a short circuit in the motor windings
. The only way to restore functionality is to rewind the windings or replace the burnt-out starter with a new one.
When you turn the key, all warning lights come on.
If, when you turn the key, all the warning lights are on, but even the relay does not work, this may indicate:
- Blown fuse of the power circuit leading to the ignition switch or insufficient contact at the connection points. In this case, the voltage from the battery will not flow to the lock, and, accordingly, to the coil of the solenoid relay. Therefore, first of all, you should check the condition of the fuse and, if necessary, replace it, and also check all connection points;
- Burning of the ignition switch contact group. For this reason, the circuit will not close and the relay will not work. You can check this quite simply - you need to use a screwdriver to connect the terminals on the solenoid relay (in essence, apply voltage to the electric motor, bypassing the relay). If at the same time the starter starts to turn, then the reason is in the lock. Additionally, you can check by disconnecting the wires from the lock and short-circuiting those that lead to the relay (but for this you need to know where which wire is). If the short circuit causes the starter to turn on, then the fault definitely lies in the lock and can be eliminated by replacing the burnt element with a new one;
- Closing the coil of the solenoid relay. As a result, the latter ceases to perform its functions. You can check this by closing the contacts on it with a screwdriver. If it is determined that the relay does not work, then the latter is replaced.
- Anchor jamming. The magnetic field cannot draw it in and the circuit does not close. The test is done as usual - by shorting the terminals. Everything can be eliminated by disassembling the relay and cleaning it.
These are the main reasons why the starter does not turn. If you sequentially check all the elements of the circuit, the fault can be identified very quickly.
Important to read: Do-it-yourself starter repair
The starter clicks but does not turn, what is the reason?
Good afternoon. Many car enthusiasts are familiar with the situation when the starter clicks but does not turn. As luck would have it, such situations happen at the most inconvenient moments, for example, at gas stations or when leaving for work.
In today's article, we will tell you how to determine the malfunction and, if possible, start the car to get to the repair site.
Before telling the troubleshooting algorithm, let's look at the starter device. For clarity, watch this video:
As you can see, the starter is a regular DC motor and relay. When you turn the key in the ignition and hear a click, it is the solenoid relay that clicks (the coil and contacts at the top of the screen in the video). If the starter does not rotate, but clicks, the following options are possible:
- The battery is dead.
- starter relay failed
- The contact coins in the solenoid relay are burnt.
- The starter brushes are worn.
- the starter armature is jammed.
- power plus is not supplied to the starter (because if there is no mass there will not even be retractor clicks)
Improvement of the starter blocking relay and contact protection in VAZ 2110, 2111, 2112
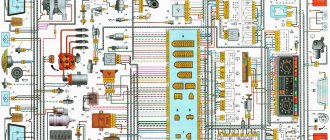
Based on the operating experience of VAZ (first the classic 21011, then 2111), it has long been noticed that very often the ignition switch contacts (ISC) that control the starter solenoid relay burn out and become unusable. The current through these contacts reaches 20A. We have to replace the entire contact group. So I decided to fix this problem immediately on a new machine, without waiting for it to appear. A common option is to install an additional relay in the power circuit and control it with 3Z contacts. Everything is simple, but as it turned out, this is not at all necessary, because... you can use an existing starter interlock relay, retaining its original functions completely. As analysis of the circuit showed, the starter lock relay is powered from +12V from the main relay of the ECU, and the minus is supplied from pin 50 of the ECU (January 7.2), and is controlled by an “open collector” key in the ECU. When the ignition is turned on, the ECU sets the “low level” (shorts to ground) on contact 86 of the locking relay. The relay is activated, completing the circuit between the ignition switch and the starter solenoid relay. When you turn the key ZZ from pin “50”, 12V is supplied to the starter solenoid relay. As soon as the engine starts, the ECU removes the signal from pin 86 of the relay, it is de-energized, breaking the circuit, and thereby blocking the starter. The blocking works! Fig. 1 shows a fragment of the circuit in the basic version, and Fig. 2 - after modification. As you can see, the changes are minimal: 1. The pink-black wire is disconnected from the pin. "85" and isolated; 2. The power wire from the ignition switch is connected to pin. “85” relay 3. Added a power wire (30 cm) from the connector from which the CB is powered (2-pin connector to the front harness) - with a cross-section of at least 4 mm2, connected to the pin. 87 relays. Now the power circuit is controlled through a relay, and the current through the 3Z contacts does not exceed 0.2A. The modification was completed in 2009. Pros: minimal alterations, no need for another relay, saving space in the control unit Cons: not found in 6 years.
Below is a fragment of the diagram.
Well, the final option. Starter relay and additional relay for “unloading” the ignition switch contacts
Similar articles
Lada Kalina fuel pump relay where is the photo
The final diagram with unloading of the lock contacts along the ignition circuit
But that's not all! The next weak point: the power contacts of the starter solenoid relay. Due to high currents, they receive an even greater electrical load, and as a result, erosion. You can protect them from sparking, especially when opening, by connecting one powerful diode in parallel with the starter and the control winding of the solenoid relay. The essence of the modification is to suppress the “self-induced emf” - the main cause of contact burnout. I used fairly common diodes, KD2998 - high pulsed and direct current, and they had sufficient quantities on hand. You can use rectifier diodes from computer power supplies rated for a forward current of at least 30A. The diodes are placed in 2 layers of heat shrink and connected directly to the starter on short wires. The connection diagram is shown.
Elimination of voltage drop in VAZ 2110, 2111, 2112
Much has been written about the rather unsuccessful and dim rear lights of the VAZ-2111. This problem becomes especially relevant
VAZ starter malfunction, what applies to them.
Malfunctions of the VAZ starter include loss of power, rotation of the starter armature without rotation of the crankshaft, lack of rotation of the armature shaft when the starter is turned on, the starter does not turn off after turning off the power to the solenoid relay, as well as a crackling sound in the area of the starter when turned on.
The VAZ starter malfunctions, causing a loss of power. That is, when the battery is charged and the crankshaft speed is low, the following malfunctions are possible: 1) Poor contact at the battery terminals, 2) Discharged battery 3) Poor contact in the wire connections on the solenoid relay, 4) Poor connection to vehicle ground, 5) Burning contacts of the retractor relay 6) Loosening of the starter 7) Wear of the bushings, destruction of the starter armature bearings 8) Wear or hanging of the commutator brushes 9) Breakdown of the stator or armature insulation 10) Break or turn short circuit of the armature winding.
This is interesting: The amount of freon in the car air conditioner - we refuel
Dismantling and replacement
If one or another equipment fails, you must first check the condition of the fuse responsible for it.
In practice, removing and removing an unusable fuse or relay is not difficult. To do this you need:
- Raise the hood and disconnect the minus from the battery. Since you are working with the fuse box responsible for electrical equipment, the car should not be energized at this moment;
- Find the mounting block. It is located in the engine compartment opposite the driver's seat directly under the windshield. The top of the block is covered with a plastic cover. To remove it, simply press the latches on the sides;
- Remove the cover and look at the back side. There is an electrical diagram showing the location of one or another fuse or relay. Just find the element that is responsible for the failed equipment according to the tables above;
- Remove the fuse. All mounting blocks are equipped with special pliers. Manually removing fuses is not recommended. The relays are removed by gently rocking up and down;
- Replace the failed component.
Similar articles
The starter spins at idle: possible causes, methods for solving the problem and expert advice
Fuse failure is determined by the melted filament. These are fusible elements that melt and make contacts, preventing equipment from being damaged by excessive voltage.
That's it, all that remains is to replace the fuse block element, close the cover, replace the battery terminal and check the functionality of the equipment.
Loading …
How to fix starter malfunctions with your own hands
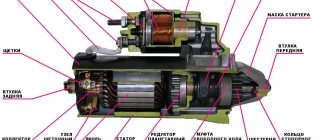
The electronic component of the starter consists of the following structural parts:
- Winding;
- Brush unit;
- Solenoid relay.
When checking the solenoid relay, skip the starter operation and bypass its switching. The relay has 3 terminals, one of which is the control terminal. The remaining 2 large terminals, located at the input to the battery and at the output of the starter, are closed using a screwdriver or wrench. It is enough to short circuit NOT a short period of time, the main thing is that the tool you use does not touch the metal housing directly under the hood.
Remember that starting the engine using this method is prohibited, because the main gear of the device does not engage.
Most likely, the contact planes on the inner plane simply burned out, and later a dielectric layer of metal oxides formed on top. To burn the contacts, you need to make enormous efforts; the first start of the VAZ-2109 engine is enough.
It is possible to repair the VAZ-2109 solenoid relay using 2 methods:
- Dismantle the device and disassemble it into components, clean the contacts.
- If there is a real possibility, it is better to change the relay one hundred percent. Practice indicates that if a relay has failed, the contacts will have to be cleaned more often to restore its operation. If you want the repaired relay to last for a long time, give preference to this option for repairing the starter if the device does NOT turn or click.
VAZ 2109: starter malfunctions - looking for reasons
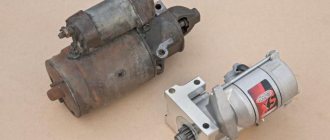
Starter for VAZ 2109
A starter, without it you can’t start the car, which means you won’t go far. The success of the trip depends on its performance. Therefore, you need to figure out how to prevent its failure, or fix an existing breakdown. Let’s consider in more detail:
- Alarm Signals
- Malfunctions
Alarm Signals
The starter is the highest-loaded electrical consumer in a car. If, when starting the car, an extraneous sound, noise, crackling appears, or it becomes clear that changes have occurred in the operation of the starter, you must take action without delay. On the VAZ 2109, problems with the starter can be different, some of them can be eliminated with your own hands by reading , how to do it or by watching the video. Here is a small instruction on malfunctions.
Malfunctions
So:
- If the starter on a VAZ 2109 does not start, first you need to do a basic check
- Check if the battery is dead.
- Check the fuse in the fuse box for the starter.
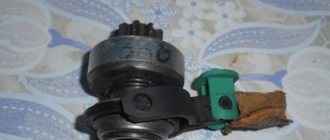
- Check the relay responsible for the starter, it is located in the engine compartment (photo 2).
Changing the relay (Photo 2)
If, however, the starter does not work on the VAZ 2109 and the problem is different, you need to contact a specialist.
- On VAZ 2109 the starter barely turns
- you need to make sure that the battery charge is normal
- Is the alternator belt too tight?
Advice! If the problem is different, you need to contact a specialist; perhaps the starter bushings are worn out or another reason. More often on a VAZ 2109, the starter turns poorly due to wear of the front bushing installed in the engine crankcase.
- On a VAZ 2109, the starter sticks (by turning the key to the “engine start” mode, the starter is activated for 1-2 seconds, which is not enough to start the engine and stops)
- you need to make sure that the terminals on the battery are not heating up, and that the positive wire leading to the starter is not heating up. If it gets hot, it means there is a bad connection.
- The armature bushings may need to be replaced.
- On a VAZ 2109 the starter sticks, in other words on a VAZ 2109 the starter does not turn off (releasing the key after starting the engine, the starter continues to work)
- The additional starter relay (not the solenoid relay) may have failed.
- It is possible that the contacts (nickels) of the starter solenoid relay are sticking.
- Or there is a malfunction in the contact group of the ignition switch - the contacts have fused.
- On a VAZ 2109, the starter does not turn in the cold (the starter turns a little, but with a lot of tension, or does not turn at all)
- Most likely, in the cold, the chemical processes in the battery have stopped. You need to turn on the light for a few minutes; this will help accelerate the battery.
- Another option involves heating the battery in a warm room (do not make the temperature difference too large, for example, placing it in hot water)
- You can also start the car by throwing power from another car
- If the previous options did not help, the battery needs to be replaced.
- On a VAZ 2109, the starter does not turn, the relay clicks (when you hold the key in the “engine start” mode, the relay automatically turns on and off)
- Dead battery
This happens because there is enough battery charge for the solenoid relay to operate. When the contacts close, the starter consumes a lot of current, but this current is not enough for it to work. The voltage on the battery drops, and the solenoid relay returns to its original position. There is no more load, again there is enough current for the retractor to work. The actions are repeated. So:
- On a VAZ 2109 the starter does not turn on (the solenoid relay turned on, but the starter did not turn on)
- Starter brushes are worn out (photo 3)
- The starter may have burned out
- starter jammed
Advice! If the starter is burned out, sometimes it is more advisable to buy a new starter; the price of the starter varies from manufacturer to manufacturer.
The brushes are worn out and do not reach the anchor (photo 3)
- On VAZ 2109 the starter is cracking
- Flywheel teeth are broken or worn. (photo 4)
- The bendix (the mechanism that engages with the flywheel) is worn out.
This is where the starter is cracking (Photo 4)
Advice! One of the most common starter malfunctions is armature play. How to eliminate play in the VAZ 2109 starter armature. The sliding bushings need to be replaced. The greatest difficulty for some is replacing the front bushing located in the crankcase (photo 5). Namely, how to get this bushing?
Solutions
So:
- We select a suitable tap, screw it into the bushing and pull it out.
- Or cut the bushing with a sharp object (screwdriver, small chisel, etc.)
Bushing in the body (photo 5)
At first glance, there are a lot of starter malfunctions, but nothing is impossible. What is made by human hands can definitely be repaired, and with the necessary knowledge and skills, this can be done much faster and with better quality. Good repair.
masteravaza.ru
How to charge the battery in a VAZ-2109
If the starter malfunction is due to lack of battery charge, start charging the device. To properly charge the battery, carry out the procedure in a ventilated room. It is not necessary to remove the unit from the car; the process can take place directly in the VAZ-2109. When charging the battery, follow these requirements:
- Disconnect all electrical cables.
- Immediately before charging, carefully clean the terminals from adhering dirt and dust, paying special attention to oxidized areas.
- It is advisable to completely discharge the battery before charging - to do this, turn on all electrically powered devices.
- Observe the movements of the ammeter needle; it should approach the zero mark.
- Monitor the temperature of the electrolyte - it will increase during charging. For example, the temperature of the electrolyte has increased to 40 degrees, then the current should be halved. If within 2 hours the density of the electrolyte and the battery voltage in the VAZ-2109 remain unchanged, it means that the battery is fully charged.
Typically, 10-12 hours are enough to charge the battery. Please note that in the summer the electrolyte in the VAZ-2109 heats up at an accelerated pace, so the car owner’s task is to regularly check the density and level of the material.
Differences between starter and relay failure
In order not to confuse what exactly has failed - the starter or the solenoid relay, there is an excellent method for recognizing the “culprit”.
- Remove the starter, connect the negative terminal of the battery to ground;
- The design of the device has copper bolts and a tongue-shaped element;
- The positive wire from the battery is connected to this “tongue”;
- If there is contact, the solenoid relay clicks and starts working;
- If not, then you will have to go to the store for a new relay.
The performance of the starter can be checked differently. To do this, the negative wire from the battery is attached to the starter ground, and the positive wire is attached to a bolt (contact goes from it to the solenoid relay). If the starter starts turning, then everything is fine. Your hypothesis about the problem relay was once again confirmed. Just before checking, make sure that the contacts themselves are in good condition and not damaged. Many people forget about this, which leads to incorrect conclusions regarding the performance of the two elements.
But there is one more very important point. Even if all the facts indicate that the starter or retractor relay is not working, another unit - the ignition switch - may still be the cause of ignition problems. Take the time to check its serviceability before buying new parts.
VAZ 2109 starter clicks but does not turn.
#1 [email protected]
- User+
- 457 messages
- Top
I was driving along the highway and heard an extraneous hum, stopped, turned it off, and the hum did not go away. I opened the hood, saw that the thick + wire had unscrewed and shorted the second large terminal, the starter spun for a couple of minutes. I turned everything on, started it up and drove off. This morning I tried to start the car, I heard a click and silence. I cleaned the small and large terminals - no result. I measured the small wire to the retractor with a tester, voltage is supplied.
I tried on the large terminal and it is also served. I use a screwdriver to tighten 2 bolts. starts normally. Where to look next?
#2 1headhunter1
Look again respectfully! To restore respect to the prisoner, as everything is good, then turn over the lock itself! Take all the darts from the starter, and then three of them go to the tester! Using the key, we made a couple of wraps and with this stitch on testers change voltage !If you can’t change it, then press the start button again or buy a new lock! Everything is brilliantly simple!
Post edited by 1headhunter1: 08 January 2014 - 22:05
- Top
#3 phozzy
I was driving along the highway and heard an extraneous hum, stopped, turned it off, and the hum did not go away. I opened the hood, saw that the thick + wire had unscrewed and shorted the second large terminal, the starter spun for a couple of minutes. I turned everything on, started it up and drove off. This morning I tried to start the car, I heard a click and silence. I cleaned the small and large terminals - no result. I measured the small wire to the retractor with a tester, voltage is supplied.
I tried on the large terminal and it is also served. I use a screwdriver to tighten 2 bolts. starts normally. Where to look next?
I had the same problem, when starting the car there was a click and that was it, but it wasn’t always like this, but very often, the problem was solved by replacing the retractor and brushes. I went to my electrician, he did it for me in 40 minutes)
- Top
#4 Brain
I had the same problem - I changed the bushings, the retractor, and finally the starter. And then I charged the battery and everything went away. By the way, if you need a starter (I have 2 of them) or a retractor, I’ll sell it if that happens)
- Top
#5 Demyan-ogly
Repair of walk-behind tractors, lawn mowers, chainsaws, brush cutters and other small motorized equipment. Quality. Guarantee. Low prices.
- Top
#6 Brain
I forgot about one more thing - in your case, maybe a simple starter relay. It is not located on the fuse panel, but in the engine compartment where the main brake is in the center.
- Top
#7 serj
it happened on a penny, they checked everything the same way as you, in the end they found that it was the ignition switch that had been tampered with, they brought the button into the interior to the starter and voila
- Top
#8 Carpe Diem
- Top
#9 Gadyukin
I was driving along the highway and heard an extraneous hum, stopped, turned it off, and the hum did not go away. I opened the hood, saw that the thick + wire had unscrewed and shorted the second large terminal, the starter spun for a couple of minutes. I turned everything on, started it up and drove off. This morning I tried to start the car, I heard a click and silence. I cleaned the small and large terminals - no result. I measured the small wire to the retractor with a tester, voltage is supplied.
Element Role
All VAZ cars, including model 2109, have a standard engine starting system, which is based on an electric starter. Here's what you need to know about him.
- A starter is a small electric motor that is connected to the flywheel of the motor via a coupling (Bendix) for a short period of time to start the rotation of the flywheel.
- Despite its small dimensions, the starter passes through itself enormous currents.
- If the starter circuit were closed directly in the ignition switch, then not a single component of the system would be able to withstand such current loads. As a result, they would burn out.
- Therefore, for these purposes, the starter is connected remotely to the battery via a relay. Its contacts are designed for high currents.
- The starter operates briefly and must be turned off after the engine starts. Otherwise, its active destruction will begin due to the influence of motor power.
- Relyushka performs these tasks perfectly. Actually, it is precisely to ensure the functioning of the system and protection against current, timely shutdown of the starter, a retractor relay is included in the design.
Element diagram
Typical faults
It is better to start diagnosing the starter even before you remove it.
After dismantling, some signs of failure, by which the source of the problems can be determined, can no longer be determined.
Signs of a faulty element include:
- An unusual noise occurs when the engine starts;
- Complete absence or slow rotation of the starter;
- Rotation occurs, but there is no gear engagement with the Bendix ring;
- The unit rotates with the bendix, but then the clutch breaks;
- Turning the key in the ignition, there is silence.
Checking the dismantled unit
Before blaming the starter for everything, take the time to look under the hood and check the condition of the terminal contacts and connectors. Also pay attention to whether everything is ok with the battery. Only after this can you start working on the starter.
Starter 2109 device and principle of operation
On all cars, without exception, the starter is responsible for starting the engine, or more precisely, for spinning the crankshaft. In essence, it is a small electric motor. The starter device includes: bendix with brushes, two windings, and a movable rotor. How does it all work? Magnetic fields are created around the rotor and stator windings, which have opposite values, which drives the moving element. Applying voltage to the starter is quite simple, but the rotor needs an intermediary - brushes, which consist of copper and graphite.
As for the starter bendix, this component transmits rotation to the flywheel. The part consists of the following parts: a fork that connects the mechanism to the retractor relay, a gear and an overrunning clutch. Many car owners have encountered a situation where this element is erased. If the Bendix is slipping, you can clearly hear it. In this case, installation of a new kit is inevitable. And although the cause is often contamination of the mechanism, it is not recommended to clean it. Due to soot and dust, the Bendix wears out, often unevenly, and even after cleaning it will not be able to perform its functions at the proper level.
How to assemble and install a VAZ 2109 starter
Reassembling the starter is done in reverse order. When assembling, do the following:
- The winding leads must be securely soldered to the relay terminals.
- Lubricate the journals and splines of the starter armature shaft with engine oil.
- Next, lubricate the bushings of the intermediate support and the rear cover of the starter.
- Then lubricate the relay armature tip...
- ...and the splines of the overrunning clutch.
- By selecting adjusting washers, we adjust the axial clearance of the armature shaft of the starter device. It should be no more than 0.5 mm.
- The support on the lever is mounted with the protrusion towards the anchor.
- It is necessary that the tie rods pass through the insulating tubes.
- When you connect the arm to the armature end, it is important that the tab on the armature end faces down.
Repair
In some cases (namely, when a collapsible type relay is installed on the starter), you can try to repair it. To do this, you need to remove the starter and dismantle the relay in the same way as mentioned above. After this, carefully halve the device by unscrewing the end mounting nuts.
The old core (which most often causes the relay to jam) will need to be removed, replacing it with a new one, after which all that remains is to assemble the relay and mount it on the starter.
The cost of such a repair (with replacement of the core alone) will be much less than replacing the entire relay. True, when separating one half from the other, as well as assembling the relay back, you should be very careful, since if you act carelessly, either the core or its return spring may fly out and get lost.
Popular causes of malfunction
More common prerequisites account for about 95%! All cases when the starter does not turn. After first we pay attention to them.
The starter does not turn differently in different situations. It is important to take this into account and correctly monitor all accompanying symptoms. So, even without the help of professionals, you will be able to return the unit to operation and resume normal operation of the ignition system
Situation
Possible prerequisites
There is one click, after which the starter goes silent.
Several successive clicks occur
There are absolutely no clicks, as well as other signs of starter life.
Occasionally, routine disassembly and cleaning of the internal components of the starter allows you to remove problems with its functionality. After removing the device and NOT finding damaged parts inside it, try to painstakingly clean everything, assemble it and put it back in place. It is entirely possible that the starter will start turning.
Where is the speed sensor located?
The speed sensor (DS) on front-wheel drive VAZ cars reads pulses depending on wheel speed and transmits the data to the electronic control unit (ECU). When braking the engine, the fuel supply is turned off with the help of the diesel engine and the computer, thus achieving more economical operation of the internal combustion engine. If the sensor is faulty, an error code is recorded, gasoline consumption increases slightly, and idle speed decreases, especially during heavy braking. It is difficult to immediately detect where the speed sensor is located, since it is hidden under the air filter housing (AFC).
We find the part we need as follows:
- open the hood of the car;
- Using a 10mm wrench, unscrew the two KVF fastening bolts;
- loosen the clamp of the air “corrugation”, disconnect the “chip” with the wires;
- we take out the KVF, now the sensor has already appeared in the field of view, it is located on the gearbox (gearbox) housing, wires are connected to it, connected using a connector.
The DS can be easily unscrewed by hand, and the plug with wires can be pulled out even after the sensor has been unscrewed (but carefully so as not to damage the wiring during rotation).
How to repair the retractor?
To carry out repairs, the car enthusiast will need to disassemble the mechanism, guided by the following diagram:
- first remove the nut holding the wire connecting the lower contact of the retractor with the starter winding;
- then the housing is disconnected from the starter (this is easy to do using a regular screwdriver).
The back cover is screwed to the relay body. It needs to be removed (unscrew the bolt) in order to be able to clean the contacts using a needle file. This solves the problem of soot formation.
After disassembling and repairing the mechanism, it is recommended (as they say, “in passing”) to check it for a break or short circuit. To do this, connect an ohmmeter between the bolt that sends voltage to the starter and the control contact (checking the winding) or between the housing and the control contact (checking the coil). If there are no faults, the device should show the following values:
- 0.75 Ohm for holding coil;
- approximately 0.55 Ohm for the pull-in winding.
Home →
Device →
Electrical system →
Starter →
Repair of a collapsible solenoid relay
The manufacturer equips starters with a non-separable or collapsible retractor device. If a non-separable relay breaks down, it must be replaced, but a dismountable relay can be repaired. The described method allows you to check the solenoid relay of all VAZ models: 2101, 2102, 2103, 2104, 2105, 2106, 2107, 2108, 2109, 21099, 2110, 2111, 2112, 2113, 2114, Niva, Lada Priora, Kalina, Granta, Vesta and most foreign cars. Disassembly and repair of the relay is carried out in the following order:
- Unscrew the nuts securing the housing cover.
- If necessary, the ends of the windings are additionally soldered.
- After removing the cover, inspect the power contacts:
- If they burn, the damaged part is cleaned with sandpaper;
- When worn out, replace.
- The device is assembled in the reverse order and tested for functionality.
- The repaired relay is installed back on the starter.
Every driver wants to drive a car that behaves predictably from the moment the key is turned in the ignition. But sometimes it is at this moment that troubles happen with the car. One of the culprits for this event may be the relay in the starter.
Before checking the starter solenoid relay, it is advisable to make sure that the diagnosis is unambiguous. To do this, a superficial check of the participating elements in the vehicle starting system is carried out.
Diagnosis of engine starting problems
The driver must make sure that the problem is solely a relay malfunction. To do this, you can conduct a visual inspection of the electrical wiring and measure the battery charge. If this circuit and all parameters are normal, then with a high degree of probability the breakdown lies in the starter relay.
The absence of clicking sounds from the starter indicates that the solenoid relay is not working. If switching on/off is heard, then the fault is outside the relay.
First you need to try again by turning the key in the ignition. Silence of the motor in response to these actions will lead to disassembly of the starter. But, before disassembling the starter solenoid relay, it must be removed from the engine compartment.
Why does the starter click but not turn?
Components of a starter using the example of a VAZ 2114
Novice drivers are often mistaken, thinking that the clicking noise is caused by the starter relay. But in fact, the source of the sounds is the retractor device, which engages the Bendix operating gear with the engine flywheel crown and ensures its starting.
Note: the sound produced by the solenoid relay is practically inaudible. The mistake of many novice car enthusiasts is that they blame this particular device. If the relay is faulty, then the car starter will not work.
If you hear several clicks
Experienced drivers can determine by the nature of the clicks exactly where there is a malfunction. If you hear several clicks when you turn the ignition key, you should look for a problem in:
- traction relay that supplies voltage to the starter;
- poor contact between relay and starter;
- insufficient contact of mass;
- other starter contacts that do not fit well together.
The proper operation of the engine starting system depends on the normal functioning of each component. And it doesn’t matter what car you drive: Priora or Kalina, Ford, Nexia or another foreign car. Therefore, you first need to check the electrical connections, starting from the car battery terminals to the starter contacts. This often helps to start the engine, get to the nearest service station and conduct more detailed diagnostics of the starting system.
One click is heard
A powerful click and the engine not starting indicates a problem in the starter. The sound itself indicates that the traction device is working and electric current is flowing to it. But the charge force supplied to the retractor is insufficient to start the engine.
You should try to start the engine several times (2-3) with an interval of 10-20 seconds. If attempts are unsuccessful, then the following reasons are possible:
- the bushings and internal brushes of the starter are heavily worn and must be replaced;
- there is a short circuit or break in the winding inside the unit;
- burnt contacts of the power cable;
- the retractor device has failed and is blocking the start;
- problems with bendix.
Faulty bendix is one of the problems
Bendix teeth may be damaged and prevent the starter from starting properly.
Bendix plays an important role in starting the internal combustion engine (ICE). It is part of the starting system and is located in the starter. If the bendix is deformed, then starting the engine will be difficult. Here are two common Bendix malfunctions: damage to the teeth of the working gear, failure of the drive fork.
The retractor and bendix are connected to each other by a fork. If full retraction does not occur at the moment of switching on, the teeth will not engage the flywheel. In this case, the engine does not start.
When the engine starts the second or third time, you should not put off visiting a car mechanic to service your vehicle. One day you will not be able to start your car, you will have to look for other ways to start the engine.
Check and replacement
If the car shows signs of malfunction, there are signs of breakdown of elements of the ignition system, do not rush to immediately blame the starter or module for everything. Often the culprit may be an element that is insignificant in size and cost - the relay.
Dismantling works
To check the relay you need:
- Arm yourself with an ohmmeter or a multimeter more suitable for a motorist, which has all the necessary modes;
- Check resistance indicators;
- We check the holding coil by connecting one terminal of the tester to the relay connection terminal, and the second to ground, that is, the housing;
- Next, the pull-in winding is checked. Here the terminals are connected to the starter motor field winding connection bolt and the control wire connection bolt;
- If there is no resistance, there is only one output - failure.
Checking with a multimeter
Repairing the ignition switch does not make any sense. The element can only be replaced. Plus, it costs pennies.
To replace, you will need to perform a few simple steps. You don't have to be a car repairman here.
- Disconnect the battery by removing the negative terminal.
- Using a slotted screwdriver, unscrew the four screws on the steering column housing. This will allow you to easily remove the element.
- Using a Phillips screwdriver, unscrew another screw that holds the bottom of the casing in place.
- Remove the steering column protective cover.
- At the bottom there is a block of the harness with wires where the ignition relay is connected.
- To replace the relay, you simply need to disconnect the device from the block and install a new element in its place.
- Check the performance of the car with a new transmission.
As you can see, there is nothing difficult about checking and replacing the device. It does not fail very often, but it is worth monitoring the condition of the ignition relay.
Loading …
Repair work when disassembling the VAZ 2109 starter
Work order:
- We clean all elements of the starter from contamination.
- We check the stator winding, for which we should turn on a test light with a voltage of 220 V in the alternating current circuit and connect the wire to one terminal of the stator winding, and short the other end of the circuit to the housing. If the light is on, the winding insulation is damaged. We change the stator or winding. In the same way we check the second stator winding.
- Inspect the starter armature. If the collector has scratches, scratches or is dirty, sand it with glass sandpaper (fine). If the commutator is significantly rough or if there are mica protrusions between the plates, you need to grind the commutator on a lathe and sand it with glass sandpaper (fine).
- If there is a yellow deposit on the armature shaft from the bearing, it must be removed with fine sandpaper, otherwise this will lead to the gear jamming. If there are nicks or scuff marks on the surfaces of the splines and shaft journals, replace the starter armature.
- We check the reliability of soldering of the armature winding leads to the collector plates. We inspect the armature winding at the ends of the armature. It is important that the diameter of the winding is smaller than the armature iron package. If it is larger, the anchor must be replaced.
- Check the armature winding with a 220 V test lamp in the AC circuit. We connect the wires to the armature core, as well as to the commutator plate. If the light comes on, it means that the collector plate or armature winding is shorted to ground. In this case, we change the anchor.
- While holding the overrunning clutch, rotate the gear in different directions. It is worth noting that the starter gear should rotate freely only clockwise. If the gear rotates in both directions, the starter drive must be replaced.
- We put the starter drive on the armature shaft. It is important that the starter drive moves freely along the shaft splines.
- If the starter drive elements are worn or significantly damaged, the drive should be replaced. If there are nicks on the leading part of the gear teeth, they should be sanded with fine-grained sandpaper of small diameter.
- We inspect the intermediate support and the starter cover from the commutator side. If cracks appear on the intermediate support and starter cover, they should be replaced. Also inspect the bushings in the starter cap and intermediate bearing where the armature shaft rotates. If you find severe wear or mechanical damage, replace the intermediate support or starter cover with defective bushings.
- Inspect the clutch housing bushing. If there are burrs, holes or signs of wear on the bushing, replace the bushing.
- Starter brushes that are worn to a height of less than 12 mm must be replaced.
- We check how the brushes move in the holders. They should move easily, without jamming. We also check the fastening of the brush holders. It is important that they are fastened firmly and securely.
- It is important that the brush holders are not shorted to ground. This can be checked with a test lamp.
- Using a dynamometer, we check the force of the springs that press the starter brushes. To do this, insert the armature into the cover of the starter device on the drive side, mount the housing and brush holder. We insert the brushes into the brush holders. At the moment when the spring comes off the brush, the force should be 9.0-11.0 N.
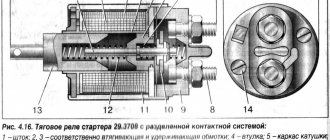
- Using an ohmmeter, check the resistance of the solenoid relay windings. The resistance of the holding winding should be 0.725-0.795 Ohm, and the retracting winding - 0.52-0.59 Ohm at an air temperature of +15 - +25 degrees. The relay armature should move easily in the housing.
- Inspect the contact bolts of the relay cover. Clean burnt bolt heads with fine sandpaper. If the heads are badly burned, turn the bolts 180 degrees so that they are pressed against the plate with the unburnt side. If the surface of the contact plate is heavily worn, it can be turned to the contact bolts with the other side.
The main relay of the VAZ 2110 does not turn on
Three reasons why the car's main relay does not turn on.
In this material we are talking about a car with an injection engine. Let's say the following happens: you turn on the ignition, as a result, electric current begins to flow to the controller output connected to it. At the same time, the main relay should turn on, after which power will begin to flow according to the electrical circuit to other objects consuming it. But the main relay does not turn on... The consequences of this malfunction are always noticeable. The engine simply won’t start in such a situation because there is no power supplied to either its injectors, the ignition system, or the relay that ensures the operation of the fuel pump, and so on.
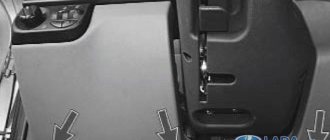
Typically, for most modifications of VAZ cars, the main relay is located approximately in the same place where the fuses and relays for the radiator cooling fan and fuel pump are located, that is, in the cabin, on a shelf located on the right under the control panel, closer to the passenger seat. To find the main relay in a GAZ car, you will have to open the hood and look down at the front stack of the cabin opposite the passenger seat.
So, let's consider a situation in which you turned on the ignition, but did not hear the sound that accompanies the relay turning on. This means that the first thing you need to do is make sure that electric current is present at the contacts corresponding to this relay - Nos. 85 - 86. To do this, you need to use a test lamp that consumes no more than 0.25A, connected to the negative which should light up when the ignition is turned on. If, as a result of testing, you find that there is no light in the control lamp, this means that no electric current is supplied to the main relay.
The causes of the malfunction may be the following: Firstly, the contact between the main relay and its well is broken. Secondly, the integrity of the wiring in the area between the controller and the relay or between the “minus” and the motor housing is broken. If the wiring is in order, then look for the third reason. Thirdly, the controller failed. For GAZ cars, this is a very typical malfunction when, as a result of moisture or a break in the negative wire, the controller stops working. Now let's consider another situation in which you turned on the ignition and heard a characteristic sound that accompanies the activation of the relay, but this in fact does not happen. In this case, check for power supply at pins No. 30 and No. 87.
The causes of the malfunction may be the following: Firstly, if after testing with a test lamp, one terminal of which is connected to the minus, and the second touches connector No. 87, the light in the lamp does not light up, then the cause of the failure may be an outdated fuse or leaky wiring . Secondly, if the contact of the lamp terminal with connector No. 87 lights the light bulb, but with connector No. 30 it does not, then the cause of the malfunction is in the relay itself. Perhaps its contacts have already burned out and it needs to be replaced. In various modifications of the VAZ, the old relay can be replaced with any other one available on the mounting block, be it a turn signal relay or other light signals.
There is another reason why the main relay may not work when the ignition is turned on, but this has nothing to do with the breakdown. The point, in this case, lies in the connection diagram of the anti-theft system, which provides for blocking the electrical circuit in many situations that are suspicious, according to the security program installed. Perhaps there was a malfunction in the system, or perhaps during your absence, someone disturbed the system and it turned on the lock, so the main relay did not work.
2011-2016 - Information agency pokatim.ru - car news, car market news, car accessories, foreign and Russian cars, photos and videos of cars, car tuning. Reproduction of materials from the news agency’s website is permitted only with the condition of installing an active hyperlink to pokatim.ru
VAZ starter relay diagram
Do you hear clicks or are there no traces of them? The driver releases the key and joy: the fan picks up speed. We take the sword and install it in the chuck of a hand drill: let's try to make a thread in the sleeve.
The owner turns the key to the third position, but again there is silence: the starter does not turn at all. The starter relay is located under the hood on the front panel. The VAZ-2108 and VAZ-2109 cars use a single-wire electrical system with a rated operating voltage of 12 V. This is truly a masterpiece of futurism! Plug connector for connecting to the lamp for individual interior lighting; I. It is pressed into the cover 14. Dear visitor, you have entered the site as an unregistered user. A small problem is enough for the starter shaft to become slightly misaligned: the narrow gap disappears completely. Answer 1: Change the bridge and charging relay, which comes with the brushes. These consumers are connected directly to the generator-battery line.
Starting currents are not protected by specific fuses. Yes, here it is: right on the frame, looking at you with four contacts to the left of the vacuum seal. Relay for turning on headlight cleaners contacts. Remember the starter connection diagram; a similar plan will be useful to you more than once when you do your own car repairs. It's time to change the solenoid relay.
He turns the ignition key, and the STOP lights and oil pressure gauge come on, but the battery light doesn’t want to light up. Question: what about the battery charge indicator lamp? Headlight high beam relay; KB. Site information is collected online or sent by visitors. Relay for low beam headlights. Proceed to unscrew the lower bolt of the device and remove the remaining fasteners from the starter.
For those who are not yet in the subject, here is a photo. A marksman is like a girl: the object is fragile. Such consumers include: emergency alarm, sound signal, brake light lamps in the rear lights, 16-pin socket for a portable lamp, interior lamp. Carry out the following actions at low speeds. Volts with wires and using this diagram, you can independently find and fix minor problems in electrical equipment.
Approximately at the level of the mounting block connector, somewhere under the hood. Relay-breaker for direction indicators and hazard warning lights; KZ. The supply voltage is supplied to most consumers through the ignition switch. How can you get it out yourself? The rotation of the rear end of the armature shaft occurs in a cermet bushing. This operation can be performed several times. In the instrument panel wiring harness, the second ends of the white wires are brought together to one point, which is connected to the instrument lighting switch. Before examining specific cases, watch a video about repairing starters in a specialized service center. While you are enjoying the smell of iron, your significant other will buy a magazine where they will read an article about the history of the VAZ 2109 brand and regret that they purchased a non-domestic unit at a lower price. And we encountered the following difficulty: the starter does not turn when you turn the key, but at the same time you hear clicks, which means the retractor relay is working.
Rear window cleaner motor. Get ready for a shopping trip. The installation dimensions of the above starters are almost the same - the only differences are in the design of the drive and the collector assembly.
Diagram of the contactless ignition system for VAZ 2108, VAZ 2109, VAZ 21099 Fig. Excessive force or slight misalignment can break it. Where is the starter relay for the BAZ 2110? The front end is placed in a bushing that is pressed into the clutch housing.