Airbrush for beginners is about the same as painting lessons at an art school. There are many, many similarities in creating a drawing and a huge gap for those who want to master an airbrush, after a pencil and a brush. Thus, for those who have just decided to learn airbrushing, the entire subject can be divided into three basic components:
AIR BRUSH!! THE BASICS OF WORK AND CARE
In this video I will tell you how to use and care for an airbrush, and what you need to get started. Great.
- Car painting technology (paints and solvents, surface preparation, tools, etc.).
- Specifics related to the use of an airbrush (the ability to quickly and accurately create the intended composition).
- The artistic component (creating a drawing on paper, finalizing it in practice).
A mistake many people make when trying to airbrush is mixing all three together. Airbrushing is local or complete painting of a car. All requirements for painting must be strictly observed, i.e. you need to have a correct understanding of painting technology and use it in practice.
The artistic component may not be useful at all, but if we consider it as a separate practice, then it is worth looking for lessons on the pages of the relevant books. That leaves... If you don't know how to learn airbrush, just take an airbrush and follow the exercises below one by one. To do this, you will need any available surface and well-diluted paint. It’s better not to stop at an expensive tool and take a mid-range compressor and a cheap Soviet A4 airbrush from an auction (the quality is comparable to Chinese ones, but it breaks less often).
There are special paints for airbrushing, but in order to learn how to paint, you can take any paints, including acrylic ones, and dilute them to the desired state.
Usually it is enough to dilute a third of its volume into a can of paint, i.e. 3/4 of the paint requires 1/4 of a suitable solvent (see instructions for the paint). The first tests will prompt further adjustment of the thickness: properly diluted enamel should not block the nozzle, but should cover the surface without running off it. During and before work, it is advisable to pay attention to the following nuances:
- Before you start painting, you need to run the airbrush along a route without spraying paint - to rehearse the movement.
- Hold the airbrush strictly perpendicular to the surface of the car or canvas.
- Correct defects only after the paint layer has dried, including smudges.
- Do not spray two layers onto one spot in one go, i.e. The path and the airbrush spray should not intersect.
- Clean the airbrush with a solvent before and after finishing work (running the solvent without disassembling the tool).
Lessons for mastering the airbrush
Any, even the most complex drawing, consists of individual parts. The simplest of elementary particles are line and point. Is Jas a specialized compressor for working with an airbrush?
Accordingly, you need to start with this exercise – lines and dots. Airbrush for beginners is a boring and monotonous drawing of lines of different thicknesses, lines parallel or in a certain combination with each other, for example, at an equal angle to adjacent lines.
Dozens of sheets are painted in this way, and automatic movement is developed. It is important to learn how to maintain the intended proportions, and this requires a way to measure these proportions. Therefore, those who want to learn airbrushing are often advised to draw parallel lines - in such a combination it is easy to track hand fluctuations, changes in thickness, etc.
However, you don’t have to limit yourself to this: you can draw circles, squares, and complex combinations of lines.
You need to hold the instrument with both hands (leading and supporting), while the upper body is relaxed. The hands remain motionless relative to the instrument - movement is carried out by the elbows and shoulder muscles. Uniformity of movement and a constant distance to the surface are important (thin lines - 3-4 cm).
During these exercises, you will have to learn to control the pressure on the trigger: its movement affects the nature of the spray. But it may turn out that in the selected airbrush model, adjustment is only possible by replacing the nozzle - the tool will be suitable for the first experiments, but in the future it is better to purchase a double-action airbrush.
In order to learn how to create a smooth transition (light gradation), you can use the following exercise. Draw two lines, each of which has its own shade, and by spraying from different distances and gradually overlapping these sprays, try to create a transition between these lines. What pressure is needed to work with an airbrush?
A light shadow is an airbrush far from the surface, a dark shadow is close.
Most people who have just become acquainted with airbrushing try to create volume by darkening that part of the depicted object that is further away. This technique can be used to image objects that do not reflect light, but in reality the path of light is much more complicated. Information about the reflection of light can be found in a reference book on still lifes or in the engravings of medieval engravers, who painstakingly depicted the transitions of light and shadow on real and abstract objects.
After the gradations begin to turn out reasonably well, you can try to transfer a simple image onto paper. For the first experiments, it is better to choose images of geometrically correct objects, the proportions of which are easier to understand. In reality, the transfer of basic proportions is carried out using stencils, but a well-developed eye is important for those who want to understand how to learn airbrushing and not give up after some offensive mistake.
What pressure is needed for an airbrush?
When working with an airbrush, it is important to select the correct pressure. Its working value is from 1 to 3 atmospheres. The choice depends on the type of paint and its thickness - if the paint is thick, the pressure must be increased, and vice versa. When the pressure is reduced, the paint sprays out into larger particles and the paint looks rough. With increased pressure, the paint is sprayed more finely, but the painting process is more difficult to control - drips form.
In addition, damage to the airbrush components is possible. The best results are obtained by painting at an air pressure of 1.2-1.5 atmospheres.
To obtain optimal pressure when working with an airbrush, a compressor or cans of compressed air are usually used. They are connected to the device with a flexible hose. If the surface to be painted is large enough, or airbrushing has turned from a hobby into a job, it is best to purchase a compressor complete with a pressure gauge and reducer, this will allow you to easily regulate the air pressure. There are dozens of models on the market of varying performance and cost.
First serious work
It takes a long time before a novice artist begins to correctly transfer lighting, shadows and highlights onto paper. In order to try your hand at a real car, you need to have examples of well-executed airbrushing on paper. It is necessary to constantly stir up your own interest in the matter, study your mistakes and photos of good works.
Videos on the topic of airbrushing for cars and motorcycles provide a good base, but you should only take equipment from such sources. There are few good artists, even among professional airbrush artists (which does not prevent them from earning a living), so the basics of drawing (space, light, composition) need to be studied using special manuals or drawing with a pencil. How to use an airbrush video for beginners? Another way is to focus entirely on the craft, i.e. owning an airbrush.
Criterias of choice
The choice of tool depends on what types of airbrushing will be performed. Typically, inexpensive airbrushes with a thin nozzle and needle are used. Even beginners can work with such a device. But those who want to engage in airbrushing at a professional level should consider the following points when choosing:
- Volume of the dye tank. It is best if it is from 2 ml;
- Sealing the needle and nozzle - drawing will be more comfortable if the seals are made of Teflon;
- The nozzle diameter in high-quality airbrushes should be at least 2 mm;
- The device should be easy to replace the main components such as the reservoir, trigger and nozzle;
- Protection of seals from the effects of used reagents;
- Possibility of adjusting pressure and paint supply.
Purchasing a tool taking into account all the criteria will allow you to perform high-quality and beautiful painting of any surface.
Which airbrush for nails is better to choose?
There are many models of airbrushes for nails in specialty stores. First of all, when purchasing, you need to pay attention to the manufacturer. Famous brands include:
- Sparmax;
- Iwata;
- Jas;
- Hansa;
- Evolution;
- Fengda;
- Air Nails.
The cost of professional airbrushes starts at an average of 3,000 rubles. Expensive models are the most convenient to use and allow you to achieve better results.
When choosing a device, you should take a closer look at its characteristics. To create a design on your nails, it is recommended to purchase airbrushes:
- with an air flow rate of 10 liters per minute and a pressure of 1.5-3 atm.;
- with a tank for 2 ml of paint or more;
- with a nozzle diameter of about 0.2 mm;
- with a compressor of 12 W and above.
Such devices will ensure the most uniform and smooth distribution of paint over the working surface.
In modern models, the compressor is activated automatically when the trigger lever is pressed. In budget outdated devices, it starts separately, and airbrushes make a lot of noise and vibrate, even if the working part is turned off.
What paint should I use?
What do you need for airbrushing? Special paints are used for painting on surfaces, which make airbrushing a comfortable and simple task. When choosing them, it is necessary to take into account the type of surface and the pressure with which they will be applied. The most popular types of paints are:
- Polyurethane. Such airbrush compositions must be water-based. They allow you to apply a durable, quick-drying pattern that can withstand different temperatures. There is no need to use protective equipment when painting with this mixture; the work can be done both outside and inside the room.
- Water soluble acrylic. Such mixtures in the form of a liquid allow you to work on any surface. Airbrush painting will help you decorate the walls inside a building, or draw patterns on a facade or car. Acrylic paints are suitable for beginner artists as they are easy to use, dry quickly, are environmentally friendly and, when used correctly, can create a good piece of art.
- Acrylic solvent. How to airbrush with this mixture? Before use, the composition will need to be diluted with a special solvent, which is usually included in the kit. When using this type of paint, be sure to wear protective clothing, as the mixture is toxic. It is not recommended for beginners to paint with an airbrush with a solvent solution; as a rule, this type of composition is used in professional workshops.
How to Create a Masterpiece Using an Airbrush
Airbrushing has become a very fashionable trend, be it makeup, nails, fake tanning, modeling, car coating, etc. The younger generation has caught it like a flame and now it is also the latest trend in cake decorating.
Airbrushing takes away all the hassle associated with buying multi-colored fondants. You can buy white fondant, cover the cakes with it, and quickly apply a different color to them in just a few seconds using an airbrush.
So what is airbrushing, you ask? and how will learning this technique help in cake decorating?
Cake by Tamara
Let's not put it off and find out what it is.
What is an airbrush?
To better explain this and give you an idea about this particular decorating technique, we will tell you how cars are painted in auto body shops using an airbrush gun.
This is often a small hand-held sprayer (much like what hairdressers or manicurists use) attached to a compressor. The painter places some liquid paint in a small container on the gun and then sprays slowly, lightly at first, to give an overall first coat. He then repaints again and again to paint the entire car. This painting technique is called airbrushing
.
Photo by popularmechanics.com
So now that you have some mental images, we can tell you that airbrushing a car is the same technique that can be applied to a cake. It's more convenient and faster than drawing by hand.
When decorating cakes, various airbrush spray systems are used: single and double action.
Now we will show you how to create airbrushed cake art masterpieces.
Airbrush kits
Before you can do any airbrushing, you will need to buy a special kit used for cakes.
A good edible airbrush kit should contain the following:
- At least one airbrush gun (we prefer the dual action system for better control and doesn't cause paint to drip or spit out). However, single action airbrushes are most often used. If you have two pistols in the kit, one for each, it will be even better!
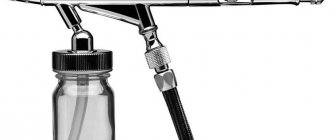
- Color container - should be attached to the airbrush gun or removable in the form of a small bottle at the bottom.
- High performance air compressor with air filter and pressure regulator.
- Hose (at least two meters)
- Airbrush holder
- Airbrush Cleaning Tools - Helps prevent paint from clogging the inside of the airbrush needle.
Other necessary items
- Proper food coloring (not to be confused with regular food coloring used with frosting/baking). Choose ethanol-based or water-based food coloring.
- A splash wall, large box, or actual air spray chamber to protect surroundings from unwanted color splashes.
- Food stencils for decorating fondant.
- A small knife to easily remove the colored fondant from the board and place it on the cake.
- Lots of paper towels.
Safety Notes
- Always use safety precautions when using any motorized device and follow the instructions in the owner's manual.
- Do not mix paints for different types of coloring, using only FDA approved food coloring or kosher food coloring used only for airbrushing.
- Clean your airbrush with suitable chemicals.
- Wear appropriate protective clothing, such as glasses, if your eyes are sensitive to paint splashes.
Tips for a newbie
- When purchasing a pastry airbrush, try to purchase a kit that includes the entire set (including a nice, large compressor). You can still use small compressors for things like touch-ups or small jobs. However, smaller compressors tend to overheat faster and you should give them time to cool down between uses. The larger the compressor, the fewer interruptions in operation.
- It is advisable to purchase a dual-action airbrush - it will help you better control the pressure required for certain actions. A single action airbrush system only has a pressure system for paint, not air control. A dual action airbrush will slow down or speed up the air pressure depending on how you want to spray the dye.
- We recommend that before you start airbrushing cakes, practice, practice, practice—use medium-sized cookies or fondant-covered cupcakes as a practice ground.
- If you are using a cake board that will be slightly larger than your cake, cover it with fondant as well and then airbrush paint in the same color for a much prettier presentation (it's all about the presentation! You're already tasting the cake with your eyes before you taste it ).
- For beginners, we recommend using a stencil for your patterns/designs until you feel comfortable enough to start free-form painting.
- Spray in thin layers to give the paint time to dry quickly and avoid staining.
- Keep rubbing alcohol nearby (we prefer vodka as it can be used in other ways when stressed
 ).
).
Here are some common problems you may encounter when using an airbrush.
- The airbrush sometimes splatters and leaves unwanted stains.
- Airbrushing on the wrong side or part of the cake or simply painting outside the outline lines of the design.
- The stencil does not stay in place and the spray areas are not clearly defined.
- Accidental paint bleeding, which often happens when you do not hold the airbrush in the correct position.
- The hose gets tangled when moving the airbrush gun.
- Paint does not spray - paint can harden and clog the airbrush nozzle and needle if the airbrush is not cleaned after use.
- Your hand is unsteady and your design is ruined because you forgot to turn off your phone while working.
- You're in a hurry and left everything until the last minute, which means your decoration will most likely be incomplete.
Error correction
If you've used the wrong colors or just want to start over because things actually look bad, then just take some paper towels, dampen them with a little vodka, and then slowly wipe down the areas that need fixing. If they start to run, don't worry, keep rubbing with vodka until all the colors are gone. Grab your airbrush and start again. So simple.
Four Easy Steps to Assembling a New Airbrush
- Remove the compressor, hose and airbrush system from the box along with the instructions.
- Attach the hose to the compressor, making sure it is screwed on tightly.
- Remove the ring and hose connector from the airbrush. Connect the hose from the compressor to the airbrush.
- Make sure that the clean pan (jar) is also ready for use (we will describe below why it is needed and what it consists of).
- Turn on the compressor and start working its magic.
Using an airbrush
Before we dive into what you can do with an airbrush, we need to understand how to handle it. There is a certain way to hold it and how to control the pressure.
Once you have installed the kit, turn on the power and point the airbrush gun at your palm to test the airflow. If you feel it, then it is ready to use.
The next step is to add food coloring. This is easy to do by holding the airbrush at a slight angle and adding 4-5 drops of paint into the airbrush container. 4-5 drops at a time are enough.
Once you've added color, use a piece of white paper to draw a few designs to make sure the air flow and paint come out correctly. Use the lever to check the functions of the dual/single system. Another good reason to do a test is to see if the color turns out exactly the way you want or not.
The three important aspects of airbrushing are speed, pressure and angle. All three of these components are also the most important components in almost any other cake decorating technique.
First, practice pressing the lever, drawing several lines of different colors using different pressures.
Photo by artthoucakes.com
After a few practice sessions, you can start airbrushing the cake. We suggest that you spray a few samples on the paper each time before applying the paint directly to your cakes so that you can spot any problems with pressure, clogging or incorrect color in advance.
Use your other hand to guide or support the airbrush gun while spraying. If you don't have clean utensils, use something like a plastic bowl (like a large empty yogurt container with a lid) and make a small hole large enough for the tip of the airbrush gun to fit through the center of the lid.
Place a pack of paper towels inside and close the lid again. You'll have a homemade alternative cleaning bowl that you can spray into when you want to change colors or clean up leftover colors at the end of a job.
Photo by artthoucakes.com
Airbrush Painting Ideas
The airbrush decorating technique is very easy to use. Giving you examples of what amazing jewelry can be created would be too long to list. Here are just a few listed below:
- Space/Galaxy Design
- Shapes from stencils to form outlines/shadows - fairies, butterflies, people, wedding couples
- Colors of the ocean, sunset
- Sky or clouds
- Nature - leaves, thickets of roses or flowers
- Metal Cakes – Gold, Silver, Rose Gold, Bronze
- Emotions - emoticons, hearts
- Seasonal theme - stenciled pumpkins
- Tattoos on cakes
- Shades of the rainbow
- Halloween figurines, etc.
In fact, there are thousands more ideas that could be added here, and it would take a whole album to house the many images of beautiful airbrushed cake designs.
Conclusion
If you want to challenge yourself beyond being "regular" and "like everyone else" in your cake decorating techniques, we suggest you invest in not only learning from the pros, but also purchasing tools that will help you create cake masterpieces . One of the best ways to do this is to use an airbrush. We hope you were inspired by our post and can create amazing and beautiful creations on your cakes. You can read what an airbrush is made of and what they are like in our article “Choosing an airbrush for decorating a cake.”
You can buy airbrushes, compressors, airbrush kits with a compressor, turntables, brushes, airbrush paints and much more in our online store.
Preparation for painting
Before starting the creative process, it is necessary to complete a number of preparatory activities:
- Select a sketch. You need to think about how to draw the pattern and what the final result should be. Sketches are created on papers and the desired option is selected from all the drawings.
- Surface preparation. The area that will be painted must be cleaned of dirt, dust and rust. If you plan to create a pattern on the car body, then you cannot do without the degreasing procedure; to do this, use alcohol, white spirit or a universal degreaser.
- Selection of materials. The coloring solution that will be used in the work must be suitable for application to a specific surface.
- Tool setup. Before setting up the airbrush, read the instructions in the instructions that come with the kit. The settings can vary quite a lot, depending on the type of device.
Disassembling and cleaning the airbrush after use
Most problems that arise when working with an airbrush are due to poor, irregular or improper cleaning of the device. Even after working with it for a short time or when changing the dye, the device should be washed with water (in the case of using water-based paints). If special dyes are used, then cleaning the airbrush consists of washing it with solvents or cleaning solutions. Do not leave any type of paint in the tank for long periods of time.
Disassembling the device
You can properly clean the airbrush from paint after completely disassembling it.
- Unscrew the cap installed on the back of the device.
- Loosen the collet clamp that secures the needle.
- Remove the needle from the device.
- Unscrew the needle feed mechanism along with the collet clamp. You will see the main rubbing parts of the airbrush that need to be lubricated after cleaning. Lithol can be used as a lubricant.
- Next, you should remove the lever, being careful not to lose the bracket, which will fall out of the case if you turn it with the hole for the button down. The lever also needs to be lubricated with lithol.ch
- Remove the needle protection cap located on the front of the device.
- Remove the cap protecting the nozzle.
- If the nozzle needs to be cleaned, it can be unscrewed with the key included with the tool.
- Next, you should remove the lid from the paint container.
Important! You will have to completely disassemble the airbrush only in case of interruptions in its operation or to lubricate the rubbing elements. Typically, lubrication of the device elements is required if the lever no longer presses smoothly or it moves with difficulty.
Cleaning the instrument
You can clean the airbrush after finishing work or changing the dye in a simpler way, without completely disassembling the device.
- Remove any remaining paint from the device.
- Remove the needle from the tool body and wipe it in the direction from the blunt end to the sharp end. Be careful not to damage the sharpened end of the needle.
- Pour a small amount of water or solvent into the device container. Rinse the container and wipe it with a cloth.
- Blow the device with air while the container is filled with cleaning agent.
- Unscrew the protective cap of the needle and wipe it with solvent, then put the cap back.
- Insert the needle into the device and secure it with a collet.
- Blow air through the airbrush again.
Advice! If solvents are used to clean the device, then in order not to spray them in the work area, it is recommended to use an airbrush cleaner, which you can purchase or make yourself.
This washing station is made in the form of a container with a hole for inserting an airbrush. The cleaner is convenient in that it protects the user from inhaling harmful solvent vapors, since it is sprayed inside the container.
How to clean acrylic paint
It is quite difficult to wash an airbrush after acrylic if it has dried, since the paint contains film-forming substances. Methods for cleaning acrylic from an airbrush vary depending on how long the paint has been in the tool.
- If you need to wash off acrylic dye that has not yet dried, then plain water will do. Cleaning the device will be faster if the water is warm.
- Leaving the paint in the tool for more than an hour (up to a day) causes it to harden. In this case, it is not too late to soften and remove the acrylic using regular vodka, alcohol or alcohol-containing liquids.
- In the worst case, if acrylic has been in the device for several days, then it can only be removed with gasoline, acetone, white spirit or kerosene.
Under the influence of the substances listed above, the softening of the film-forming agent of acrylic paint occurs in approximately 30 minutes. You should pour some solvent into the tank several times and moisten the rest of the airbrush elements clogged with acrylic with it.
Important! Do not soak the device in solvent, as rubber and plastic seals may fail. To remove softened paint, special brushes are usually used.
Rules for working with an airbrush
Even inexperienced craftsmen use an airbrush because it is easy to work with. Of course, first you should study the principle of operation of the airbrush and its features, but this will not take much time. How to use such a tool correctly? To achieve a good result when drawing, you will need to follow the following rules:
- When working with an airbrush, it is better to start painting on a test area. In some cases, if workers have not adjusted the device correctly, it can shoot out clumps of paint, and this will ruin the composition. Therefore, it will be better if the procedure begins on cardboard or paper.
- The spray of paint should be applied with gentle, even movements, this will avoid the formation of drips or other defects during painting.
- It is not recommended to hold the tool too close to the surface, as the paint layer will lie unevenly, which will lead to the formation of drips.
- After completing the work, the tool must be washed off the dye, the needle and nozzle must also be cleaned with a solvent. It is selected based on the composition of the paint used.
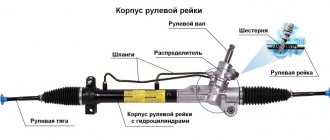
How does an airbrush work?
The paint is stored in a reservoir located on the top, bottom or side, depending on the type of airbrush. It goes through the channel to the needle and stops at the point where the needle fits tightly to the outlet. The needle seal prevents paint from getting into a part of the airbrush where it shouldn't be. When you pull the trigger, the air valve opens and lets air flow through its dedicated channel before exiting the nozzle. Moving the needle back and forth changes the nozzle outlet gap, which controls the amount of paint sprayed. Depending on the type of airbrush, the needle may be moved by pulling the trigger back while spraying, or only by a regulator on the rear of the airbrush, which is adjusted before spraying. We will look at the types of airbrushes and their design features in this article below.
Passing through the constricted part of the nozzle, the air behind it creates a local decrease in pressure (Venturi effect, a consequence of Bernoulli's law, or suction), which attracts paint. It can be mixed with air inside the nozzle or outside, depending on the type of airbrush. Next, the paint, using compressed air, is crushed into very small drops and sprayed, forming a torch.
Airbrushes can have different needles and nozzles. Different sizes are used depending on the viscosity of the paint being sprayed. Airbrushes with different needle and nozzle sizes (from 0.1 mm to 1.5 mm) are usually divided into three groups: fine, medium and heavy. Fine (small nozzle size) - best suited for spraying thinner paints such as waterborne paints, inks, dyes and gouache. Medium (medium nozzle size) is the most popular choice; Suitable for spraying ready-made airbrush paints and properly diluted acrylic paints. Heavy (large nozzle size) - suitable for paints with a high content of pigments or more viscous paints, such as enamel, varnish, diluted glazes.
Depending on the type, airbrushes may have different designs. Let's look at the types of airbrushes and the features of their design.
Additional recommendations
Once you figure out how the tool works, you can decorate various surfaces beautifully. The following recommendations will make using an airbrush easier for beginners:
- When we paint, it is better to hold the tool perpendicular to the surface being treated. In order for the dye to be distributed evenly, the angle of application of the dye must be greater than 45°, the optimal one being 90°.
- The intensity of the applied tone, the thickness of the layer and the overall result depend on the distance between the tool and the coating being processed. When a worker draws, he can change this distance, but this should be done carefully and smoothly.
- When we draw, small drips may form, but it is not necessary to remove them immediately. The drawings need to be given time to dry, after which the excess is carefully sanded off with sandpaper.
- To speed up the drawing process, you need an additional paint tank with a different color, then changing the palette will not take much time. There is no need to clean the container; just rinse the tool and attach another container with dye to it.
As you can see, airbrushing is not very complicated, but it allows you to create amazing paintings. Professionals who have been working with such a tool for many years can create 3D images. But a beginner who has recently mastered the principle of airbrush painting will also be able to decorate a facade, fence, car and other surfaces without any problems.
Airbrush setup and care tips (2 videos)
There are many ways to create a non-trivial manicure. Among modern methods is airbrush painting. This technique is popular in interior design, for creating makeup, and painting on nails. Thanks to this tool, you can draw amazingly precise lines and even entire pictures on your nails.
The tool is very convenient and has many advantages over brushes.
How to choose an airbrush for manicure
To choose a tool, you first need to understand how it works. It works on the principle of spraying a liquid emulsion under pressure. Airbrush for nails is available in two models:
Basic airbrush exercise for beginners from the Art-Technika airbrush school
Download templates: https://art-tehnika.ru/atlines In this video, artist and head of the airbrushing school Alina Tarasenko.
A simple device during operation can control the flow of paint. This produces clear and rich drawings; often this tool is used to work with stencils. The double-action device allows you to control not only the supply of dye, but also the amount of air. Adjustment is done manually using a valve. Dual action nail airbrushes will help you create designs with greater precision, with finer and finer details.
By adjusting the air supply, you can change the thickness and clarity of the lines. The kit includes:
Kits are often sold that also include base paints specifically for the device, a rubber hose, solvent and cleaning fluid. How to use an airbrush video for beginners? Important: you need to use only special varnishes to achieve the desired result and not break the device.
If you are new to the field of nail art, then first it is better to buy a simple airbrush to work with a template in order to understand how the device works. Tools from Jas and Fengda are popular.
Airbrush tools
The airbrush for nails itself is accompanied by the necessary kit for work, which includes:
- special airbrush paints,
- stencils;
- training tips;
- tweezers.
Airbrush tools are sold in specialized stores; it is better to purchase from trusted manufacturers so as not to harm the equipment with low-quality components and paints. The kit includes special paints, stencils, cleaners and a compressor. Tools are sold separately or in sets for nail art. The price of components is almost equal to the price of the tool itself.
In online stores, you can select a product in a catalog where there is a description of the characteristics and advantages.
Stencils
Stencils are designed to create a given design using simple-action nail airbrushes. But, even when using templates, each drawing is carefully planned to make a quality painting:
- paints are selected and mixed;
- the flow (quantity) of the supplied dye is adjusted;
- the distance from which the paint .
How and how to wash your nail airbrush
From time to time, your airbrush needs to be washed, especially if it is used infrequently. The paint has time to harden inside the nozzle and in the tank, which reduces the functionality of the tool. You can tell that the system is dirty by the appearance of drops or characteristic “snow”—sticky pigment particles.
If you do a manicure with an airbrush for yourself occasionally, you need to clean it after each use before storing it. In a salon or home office, washing is carried out at the end of the day; with a dense flow of clients, the internal parts of the device do not have time to clog.
The choice of cleaning agent depends on the type of paint. If your airbrush uses acrylic pigment, you can wash the device with plain water. For silicone paint you need to take a special cleaner, for example, TEMPTU.
To clean the nozzle, simply unscrew its tip, moisten a brush in water or washing liquid and treat the area around the needle. Then the device is dried with a stream of air and the nozzle is fixed back.
Cleaning at the end of the working day is carried out more thoroughly. The procedure looks like this:
- blow the remaining pigment out of the nozzle onto a napkin or cotton pad until the air flow becomes clear;
- wipe the walls of the container with a small napkin;
- a few drops of water or a special liquid are poured inside;
- the nozzle is aimed at the napkin and the trigger is pressed several times in a row;
- pour a little more cleaner or water into the tank and turn on the compressor;
- press the trigger, after closing the nozzle with your finger, so that the liquid inside the tank bubbles.
It is better to clean the airbrush with disposable gloves.
Then you need to drain the water or cleaner, blow the remaining air out of the nozzle and repeat the entire procedure. At the last stage, remove the tip, pull the trigger so that the needle is completely hidden, and use a cotton swab to wipe the walls of the outlet hole.
Regular washing of the device allows you to maintain it in working condition. If the airbrush does not become clogged with paint, then it will not have to be completely disassembled to clean the dried pigment.
How to use an airbrush
A manicure created with this tool looks completely different from one painted with varnish or gel. Smooth transitions, playing with colors and techniques create a design that will please even the most demanding people. But, despite all the advantages, as in all other techniques, the main thing remains the skill of the person creating the drawing.
How to work with an airbrush for models? So how do you paint with a nail airbrush?
- First, the nail plate is covered with the main background. It can be single color or using multiple colors. It depends on the master's idea.
- Apply the stencil after the base layer has dried. Spray paint.
- To create accents and draw contours, thin nozzles and brushes are used.
- For an additional decorative effect use:
- rhinestones;
- stickers;
- threads;
- sparkles.
As after any manicure, apply a fixing layer. The procedure time depends on the complexity of the intended design. Do-it-yourself putty on walls for painting for beginners video? A simple drawing can be created within half an hour.
When you use the device for the first time, it is better to practice on tips to get used to it and understand how to regulate the supply of paint and air, at what distance to work.
What is a nail airbrush and airbrush?
An airbrush is a special device that allows you to apply paint to your nails by spraying under air pressure. Using the device helps to achieve a very clear picture with smooth transitions between dark and light shades.
Airbrush nail designs are very popular. Using a paint sprayer, craftsmen create real miniature masterpieces. The device makes it possible to perform gradient and ombre, smoky halos or continuous painting.
Using an airbrush to create a manicure on your nails provides the following advantages:
- You can apply a drawing even without artistic skills, just choose a stencil;
- the procedure for creating a manicure takes little time, usually about half an hour;
- the paint applies evenly to the nails, without smudges or clots;
- The color rendering quality is very high.
Important! Airbrushing can be combined with sparkles, rhinestones and painting, they will make the manicure even more impressive.
Reviews
If you want an airbrush for use at home, then this is a very expensive pleasure. You need to use special paints and no others, and they cost more than regular ones. But those who know how to work with it work wonders.
Drawings created using this technology look much more natural. Airbrush spraying can be immediately distinguished from conventional varnishes: the pictures are realistic, the colors are rich, and even the smallest details are well drawn.
I’ve been working with this wonderful device for about 5 years now. I like the fact that it’s very quick to create a design. But it wasn’t me who bought the airbrush, but the owner of the salon where I work, so I didn’t bother about the cost. It’s very easy to learn how to use it; it took me a couple of days.
I'm wondering whether to buy an airbrush . I’m going to try to work with him, I’ve heard a lot of positive feedback from different masters. My clients often ask and I want to please them. I looked at designs with airbrushing on nails and was delighted. No matter how hard you try, you can’t paint this with a regular brush.
I think I'll decide to buy.
How to replace airbrush for nails
An airbrush is a rather expensive device. If you don’t have the money to purchase one, but still want to get a high-quality manicure, you can design a homemade coloring device.
The easiest way is to create an airbrush machine for nails using a ballpoint pen, a wine cork and a container for pigment. The diagram looks like this:
- the pen rod is removed and blown through, removing the writing part;
- make a corner from a wine cork and drill a hole in it;
- insert the plastic body of the handle into the prepared cork stand, and attach the rod to the bottom;
- the excess length is cut off with a knife, and a hole of a suitable diameter is drilled in the lid of the paint container;
- the rod is inserted into the bottle and the cork stand is secured with glue.
The entire structure can be assembled in just a few minutes. When using it, you don’t even need to connect a compressor; you just need to blow hard into the plastic tube.
This DIY alternative to a store-bought airbrush is good for creating a simple manicure.
Attention! Any homemade tool will be noticeably inferior in capabilities to a purchased device.