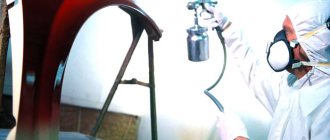
An airbrush (spray gun) is a hand-made tool whose main purpose is to spray liquid paint under the influence of compressed air. In fact, the airbrush can be powered by a very ordinary car pump or similar device. Using an airbrush, you can apply images to the surface of paper, fabric or metal products, which is often used by car owners.
This pneumatic tool makes it possible to draw thin and clear lines of almost any complexity and does not require special skills from the master - you get used to working with the device in a short time.
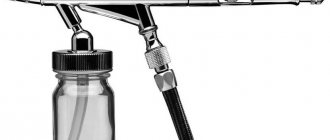
The airbrush looks like an ordinary fountain pen, to which a special container of paint is attached to the bottom or side, into which air is supplied under pressure using a pump or similar unit. Most vehicle owners who are keen on painting their iron horses prefer to purchase airbrushes in specialized stores.
However, few people know that assembling such a device with your own hands at home is also a completely feasible process.
Types of airbrushes
If you decide to make an airbrush with your own hands at home, you need, first of all, to decide what exactly you want from the tool. Its type and, accordingly, the materials that will be useful for its creation will depend on this. So, according to the type of mixing of air and paint flow inside the device. There are these types of airbrushes:
- with external mixing. This is the easiest type of airbrush to assemble and operate. It is precisely such devices that, as a rule, are assembled by hand (in this case, a part of an old vacuum cleaner or an ordinary ballpoint pen can be taken as a basis). This type of airbrush is intended mainly for painting large surfaces and is perfect for creating a background pattern on a car;
Airbrush with external mix
- with internal mixing . This is a more complex type of airbrush. Its peculiarity lies in the fact that the mixing of air with paint occurs directly inside the tool, the body of which is represented by a special spray head.
Airbrush with internal mixing
Based on the principle of controllability, all airbrushes are classified into the following categories:
- single action airbrushes. In such units, the paint pressure is controlled either through the air or through the paint channel. However, the most effective and economical are those airbrushes where control is carried out through an air channel;
Single action airbrush
- dependent double action airbrushes . They are also called automatic airbrushes. In them, control is carried out simultaneously through two channels (air and ink), but in most cases it is carried out automatically;
Double action airbrush, dependent
- independent double action airbrushes. In the vast majority of cases, this type of model is used exclusively by professionals, because during amateur painting of a vehicle, the function of full manual control over both flows, as a rule, is not needed.
Airbrush independent, double action
Based on the principle of paint supply, all airbrushes are classified as follows:
- devices on which the container with the coloring liquid is located on the side, top or bottom;
- devices into which paint is supplied under pressure.
Airbrush (spray gun) with different paint flow
Additional detail
A useful addition to an airbrush is always a stand. It can also be done at home.
It is good to use a regular office clip as a stand. There is always the opportunity to modify it or make a new one yourself.
There are different options for improvement. For example, attach aluminum wire, springs and stoppers from medical bottles to the clamp. The wire must be thick and strong, since the axis of the device is made from it, which is fixed with a nut, a special rocker arm for the airbrush is attached to it on top, and tubes from the dropper are attached to the points of contact with it. This is a fairly durable device that securely holds even a large device.
One of the most affordable options for making a stand from scratch:
- take brackets from an old meat grinder;
- drill holes in them (2);
- bend knitting needles or from bicycle wheels (it is important that there are threads at the ends);
- tighten the nuts to the end of each thread and solder;
- insert the knitting needles into the drilled holes and screw them with nuts, screw the stand to the table.
It is possible to use lining as the main material:
- cut off a piece (length about 17 cm);
- saw along;
- make holes for bolts and nuts;
- pull the wire, clamp it with pieces of the slats;
- To prevent it from scratching the airbrush, prime and tighten the hose from the dropper.
A self-made or purchased stand must meet certain requirements:
- firmly attached to the table;
- Installation is simple and quick, does not take time away from the painting process itself;
- be low so that you can add paint at any time;
- The airbrush should be easy to install and remove, so that these actions eventually become automatic.
In practice, a homemade airbrush turns out to be no worse than one bought in a store. In addition, there is almost no need to spend money on materials, and the result is almost complete cost savings.
What is needed to make an airbrush?
If you want to assemble a homemade airbrush with your own hands, you will need the following materials. They are cheap and easy to find in the regular market. So, you should have prepared:
- standard ballpoint pen with a refill inside;
- classic wine bottle stopper;
- medical syringe with a volume of 10 to 20 cubic millimeters;
- lighter;
- a marker of any catchy color, a stationery ruler;
- paper knife;
- drill;
- an awl or similar tool;
- glass bottle with lid;
- fine-grained sandpaper;
- hot melt adhesive.
When you have all of the above materials, you can safely begin assembling the airbrush with your own hands.
Assembling a homemade airbrush
If you want to properly assemble a homemade airbrush with your own hands. You need to follow the following algorithm:
- Remove the core (paste) and completely clean it of the ink paste, the remains of which are certainly retained inside, even when the pen stops writing. First you need to remove the pen tip from the rod, on which the writing ball is located.
- Rinse the pen shaft thoroughly with warm water, solvent and alcohol-containing liquid. It should become absolutely transparent and clean.
- Take a 20-30 cc medical syringe and soften its tip (into which the needle is usually inserted) using heat treatment. This is where a lighter comes in handy (however, you should not overheat the syringe so that the plastic does not leak). This can also be done using any other heat source.
- While the nose of the syringe remains heated, it must be expanded with an awl to such a size that the removed ballpoint pen refill can fit into it.
- Make a small hole about 15 millimeters deep in the wine bottle cork. In this case, its horizontal and vertical walls should form a right angle. The width of the notch should be approximately two centimeters, and the height - one and a half.
- Mark the cork using a marker and cut out unused pieces using a utility knife. In this case, the height of the plug should be reduced so that a distance of 1 centimeter remains from its bottom wall to the horizontal edge of the previously made recess.
DIY airbrush
- After this, you need to make a couple of through holes with different diameters in the remaining part of the plug. The rod of the ballpoint pen will pass through the vertical one, and its body will pass through the horizontal one. It is better to first make these holes using an awl, and then drill them with a previously prepared drill with a drill of the appropriate diameter.
- The hole at the bottom of the outer body of a ballpoint pen is usually narrower than necessary, so it will need to be made a little wider. To do this you will need sandpaper. You need to rub until the diameter increases to 3 millimeters.
- Insert the body of the ballpoint pen through the horizontal hole in the cork. In this case, the tip should only peek out a little.
- Pass the pen shaft through the vertical hole and bring its upper end to the hole in the pen (it should only overlap it slightly).
- In fact, now the main working unit of your homemade airbrush can be considered completely ready. You just need to adjust the length of the rod so that it matches the height of the container in which the paint will be stored. It is necessary to ensure that the rod under no circumstances comes into contact with the bottom of the container. If it is a little longer than the bottle of paint itself, it’s not a problem. It can be cut with a knife at any time.
- Make a hole in the plastic lid of the prepared glass bottle, which will be the same diameter as the pen refill.
Selecting a device design
Before you start making the device at home, you should decide what kind of airbrush design is needed - with external or internal paint mixing.
External mixing airbrushes have a tank with a tube coming out of it. The latter is located opposite the tube through which air is supplied. As a result, the paint flowing from the tank tube is blown away by the air flow.
In devices without a spray gun, the dye is mixed with air inside the housing and blown out through a nozzle.
Components and principle of operation
This device works on the principle of pneumatic spraying: an air stream passes through a narrow hole under high pressure, forms a jet and thus sprays the paint. It consists of the following parts:
- containers for paint;
- receiver - a container designed to accumulate air necessary for spraying;
- compressor - an element that increases the air pressure entering the receiver;
- control valve and lever responsible for the movement of paint and air;
- nozzle – paint jet volume regulator;
- needle - regulator of its supply;
- an air valve, which is responsible for the movement of air into the nozzle;
- pens.
An optional but important addition is a stand.
A hand-held airbrush device is similar in appearance to a fountain pen attached to a can. Its mechanism is simple, making it at home is quite possible.
A homemade airbrush can be with or without a spray gun (in this case, you need to blow into the nozzle to spray).
When thinking about the question of how to make an airbrush with your own hands, it is important to remember that the option without a sprayer is easier to make, but with a sprayer it is easier to work with.
Airbrush from a syringe and pen with internal paint mixing
To make your own airbrush, you will need items such as a syringe, a ballpoint pen (with an empty refill), a blood transfusion system and a glue gun. The manufacturing process of the device without an external paint sprayer is as follows.
- Take a ballpoint pen and remove the refill from it.
- It is necessary to remove the ball from the writing part (tip) of the refill. To do this, just make a few movements with the tip on the sandpaper, after which the ball will fall out of it. If there is ink in the rod, you first need to disconnect the writing part and blow it out of the tube. It is also recommended to flush the tube with water or solvent using a syringe.
- After curing the ball, the tip should be well polished and burrs should be removed, both from the outside and inside the hole, by clamping the rod in a vice.
- After polishing, remove the tip from the plastic tube using pliers.
- The next step will require making a hole in the side of the tip. This is easy to do with a triangular file.
- After making a hole, remove any burrs around the hole and remove any small shavings from the inside of the element that formed during the grinding process.
- Insert the tip into the plastic rod.
- Next, you should cut off a small part of the handle body 35 mm long. Make a mark in the desired location and cut off part of the tube using a hacksaw.
- Clamp the sawn-off part of the handle body in a vice in a vertical position.
- Using a triangular file, make a cut in the end of the tube, as shown in the following photo.
- Insert the rod into the tube and make sure the cut is deep enough. The hole in the side of the tip should be open.
- Now the rod can be shortened so that it, together with the tip, has a length of about 40 mm.
- After shortening the rod to the required length, you will need to insert a needle into its writing part.
- Since the syringe needle is too long, it needs to be shortened. This can be done using wire cutters. But after shortening, the cut area needs to be ground down a little so that the hole in the needle opens.
- Next, the shortened needle must be inserted into the side hole of the writing part of the rod.
- In order for the needle to pass through the entire tip, it must be slightly bent.
- Insert the bent needle into the side hole so that it extends 1 mm from the tip (nozzle) and is located strictly along its src=»https://tehnika.expert/wp-content/uploads/2018/06/image014-2. png" class="aligncenter" width="600″ height="449″[/img]
- Next, you should take the tube from the IV and connect it to the rod.
- Place the clamp on the dropper, moving it all the way to the handle body.
- To continue, you will need to make a small part from the top of the handle body. Cut the tube where the thread is. The part should be about 20 mm long.
- A hole must be made in the cap, which has an internal thread.
- Screw the cap onto the tube.
- Place the assembled elements on the dropper and push them all the way.
- At the next stage, all elements must be fixed with a glue gun, that is, the airbrush must be completely assembled.
- After the glue has hardened, connect the syringe to the needle. In this case, it will serve as a container for paint. This concludes the production of the airbrush.
Fill the syringe with paint and place it on the resulting mini airbrush. Move the clamp wheel in the opposite direction relative to the syringe (all the way), thereby squeezing the dropper tube. Connect the free end of the dropper to the compressor hose and perform a test spray of paint. To start spraying, just turn the clamp wheel forward a little so that air flows through the dropper in the direction of the nozzle. After simple experiments with the pressure in the system and the thickness of the paint, your homemade airbrush will be ready for use.
You need to make cutouts in the plastic bottle that match the shape of the airbrush.
Manufacturing with sprayer
Many lovers of homemade devices are wondering how to make an airbrush with a paint sprayer, since it is more convenient. This is somewhat more complicated, but also quite possible. For it you will need:
- 3 ballpoint and 2 gel pens;
- pencil;
- deodorant can;
- wire;
- nipple;
- 2 bolts with a diameter of 3 mm;
- the same number of needles;
- glue.
Making an airbrush of this type includes several stages.
Assembling the cartridge and needle clamp:
- Remove the piston from the automatic pen rod and lower the spring.
- Drill a hole in the pen shaft (gel) and insert a small bolt at a 90° angle.
- Make 2 holes in a ballpoint pen.
- Bend the wire until it stops at the trigger and insert it into the body.
- Heat a needle of the same diameter and insert it there.
- Use four pieces of wire (6 cm each), bent at 90°, to secure the structure.
- Insert the housing with the needle into the spray gun (the length of the rod used for this should be such that it rests against the bent wire and the spring is compressed).
- Glue the parts together.
The next stage is making an air valve: using an empty syringe (from which the piston has been removed), a needle, a spring from a pen, a piece of tubing from an air freshener bottle, a nipple. Glue everything together.
For the sprayer, the same parts are taken, but instead of a spring, tube and nipple, the front part of the rod (with a tip) and a hose through which air will be supplied are used. All this should also be firmly connected.
Another option is to do it using a vinyl tube and a compressor:
- Cut the tube and place it on the syringe close to its base, leaving room for pressing the balloon valve.
- Take the paint and attach the cut tube to the container, which will be used as a spray gun.
To avoid getting dirty, you should wear gloves.
To successfully design the device, you need to focus on the drawing.
Airbrush with external paint mixing from cork and ballpoint pen
The easiest way is to make an airbrush yourself if its design involves the presence of an external paint sprayer, that is, during operation of the device, external mixing of air with paint will occur. Below is a drawing according to which you can make a device for spraying paint in just a few minutes.
The airbrush is made as follows.
- Remove the refill from the ballpoint pen and blow the ink out of it, after first removing the writing part.
- Take a wine cork and draw a line through its center.
- You should also draw 2 segments, starting from the previous line, on both sides of the cork. The length of the segments should be 15 mm.
- Connect 2 vertical lines and cut out the outlined part of the cork to make a corner.
- Next, cut off the excess part of the cork so that you get a stand 8-10 mm high.
- Drill or pierce a hole in the stand with a sharp object into which the rod will be inserted.
- Also drill a hole of a suitable diameter for the body of the ballpoint pen.
- Cut a small part of the stand as shown in the following photo.
- Since the hole in the pen body through which the writing part of the rod comes out has a small diameter, it needs to be widened to 2-3 mm using sandpaper.
- Insert the prepared handle body into the corner made of cork.
- Also insert a rod into the bottom of the stand.
- Place the rod on the paint container and determine its length (it should reach the bottom, but not touch it).
- Cut off the excess part of the rod with a utility knife.
- In the lid of the paint container, drill a hole of a size corresponding to the diameter of the ballpoint pen refill.
- Apply glue to the lid using a glue gun, insert the rod into the hole and fix the stand in the desired position.
How to assemble a device without a sprayer
- a disposable syringe from which you need to remove the needle and piston and attach its top to the bottle;
- gel pen refill;
- bottle (capacity 0.5 l);
- the thread is as strong as possible;
- clip;
- scotch.
You need to make it according to the following scheme:
- straighten the paperclip to a straight line and then bend it at an angle of 90°;
- tie one side of a paper clip to a needle;
- tape the second side to the body near the hole for the needle;
- install its tip in the center of the nozzle (mandatory condition).
To use such an airbrush, you need to dilute the paint, lower the needle into a container with it and blow (preferably with great force).
There is another version of such a device (with and without a stand). To make it, you need to additionally take a piece of a ballpoint pen refill cut into a cone and glue. Steps to make this model:
- cut off the end of the needle, and dip the remaining part in glue and stick it into the rod, only making sure that the tip sticks out;
- make holes in the lid to allow air to flow in.
A homemade airbrush can be made using one pen, a wine bottle cap, a small jar or bottle and glue:
- clear the ink from the pen;
- make two cuts in the cork in opposite directions;
- drill a hole for the rod, which will be located there in the center, and another perpendicular one;
- make a nozzle: insert the rod into one hole, the body into the second, make a hole in the lid of the jar along the diameter of the rod and insert the part into it;
- fix with glue or sealant.
To make it automatic, it is recommended to connect the tubes from the dropper to the compressor. For more convenient work, you can get a stand.