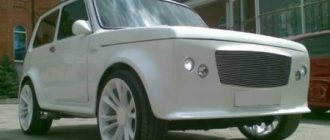
Why have I been repairing bodies with rivets and not welding for many years (with an example)
In general, this topic is “seditious” and causes incredible turmoil among the popular (and not only) masses. But still, based on the experience of both myself and my colleagues in the workshop, I will try to reasonably describe the pros and cons of an alternative to a welding seam. Namely, a regular blind rivet
. By the way, using this method, although it takes longer, is much simpler - you don’t need a welder’s qualifications or appropriate equipment. But first, let's find out why a rivet is worse.
First, a little about the disadvantages of rivets
First of all, this is the complexity of repairs. Before fastening the parts must be drilled in the riveting areas
.
And it’s even better to pre-coat them with a layer of sealant
, because the fit of two riveted sheets of metal, no matter how you look at them, will not be perfectly sealed. Secondly, crawling with a riveter is often less convenient than using an electrode or wire. I. Yes, perhaps, this is where the obvious disadvantages end. What are the advantages?
And there are many more advantages!
First of all, this is the lack of mandatory welding skill
.
This completely
overcome all the arguments “against”. In addition, if there is no welding, the question arises where to even rent one. Further. All the “welders of the 80th level” from the typical comments, who only yesterday learned how to weld a fence in the country, love to talk about the corrosion of rivets. But I have a question for them.
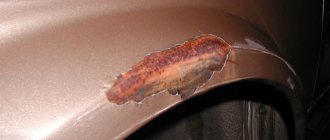
Gentlemen, “welders”, have you never seen a weld that has rotted after two or three years?
.
Which was made by the same incompetents as you, and which already needs to be digested again. Personally, I’ve seen enough of this kind of “repair.” In addition, there are rivets on the market today that do not create a galvanic couple with the metal (although they are not cheap) - they definitely will not rust. Well, you also need to understand that any place of repair (welding, riveting, gluing - whatever) must be thoroughly coated with liquid anticorrosive
. And at least once every couple of years, refresh this anticorrosive agent.
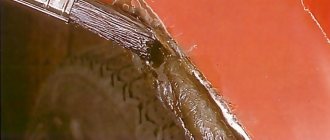
And level 80 experts also love the “argument” about the strength of the connection. And here they carry the same heresy as in the examples above - having never tried to rivet in person
. I suggest that such comrades rivet normally (with high-quality auto glass sealant) and then try to tear these two sheets of metal. I'll be happy to see it.
Well, in conclusion, a short video example where I showed one of the options for the simplest threshold repair without welding. With normal structural reinforcement, normal sealing and normal anticorrosive properties. It's been going for three years without any changes.
Did you like the article? Support with a like!
Source
Posts 1 page 24 of 24
Share11/130/2013 22:30
- Author: Basilius
- Active participant
- From: Odessa
- Registered: 11/24/2011
- Posts: 443
- Respect: +29
- Gender: Male
- Time spent on the forum: 7 days 10 hours
- Last visit: 03/23/2016 23:09
- Car data: Volkswagen Passat B2 Variant 1.6d (jk)
Classics of the genre. The bottom had rotted away from the sills, and while I was jacking up the front on a slope, the jack slipped and the passenger's bottom fell through. There is a piece of smooth metal from the body of some kind of car, rivets, riveter, Movil. Why not install patches and rivet them to the threshold while finishing the seams? What will be your thoughts? There are very contradictory opinions on the Internet... Ash stump is easier (better?) by welding. But you won’t be able to cook until spring, but you have to travel.
Share208.10.2014 12:56
- Author: PASSABEST
- Active participant
- From: Peter
- Registered: 02/19/2012
- Posts: 354
- Respect: +20
- Gender: Male
- Time spent on the forum: 9 days 12 hours
- Last visit: 07/31/2019 15:15
- Car data: 1987, 1.8, red edition
Nobody commented on the repair of body parts with rivets (maybe not even temporary)? Who did it?
Share308.10.2014 13:16
- Author: eremite
- Old timer
- From: Tambov
- Registered: 06/21/2013
- Posts: 4626
- Respect: +633
- Gender: Male
- Age: 32 [1987-05-14]
- Skype: jeremite
- Time spent on the forum: 4 months 13 days
- Last seen: Today 13:25
- Car data: Passat B2 1981 hatchback YN1.6=>PM1.8; Passat B3 1988 sedan RF1.6 + NE camshaft
I would not make sills with rivets - after all, these are elements of body rigidity, good bending/torsional strength is required. But it is possible to seal small round holes on flat surfaces that are not stiffeners (doors, fenders, bottom troughs). This topic, by the way, has already been discussed here (starting from the middle of the first page): Body restoration ‡taken from passat-kartei.de
Share408.10.2014 13:52
- Author: Bashir
- Old timer
- From: r. Kalmykia Yashalta
- Registered: 12/17/2013
- Posts: 1685
- Respect: +73
- Gender: Male
- Age: 29 [1990-06-16]
- Agent
- Spent on the forum: 21 days 0 hours
- Last visit: 05/24/2019 09:05
- Car data: passat b2 hatch 1.6WV 3M 2E3 passat b5+ 1.6 alz limuzin
You can argue for a long time on this issue. I have a friend who changed the boxes himself for 2112 and 2106, so on both cars the boxes were riveted with rivets and it’s been running like this for several years now; there are no complaints as such. do it and in the spring you will boil the solution to the problem
Share508.10.2014 14:16
- Author: Tycoon
- Guest
I would not make sills with rivets - after all, these are elements of body rigidity, good bending/torsional strength is required. But it is possible to seal small round holes on flat surfaces that are not stiffeners (doors, fenders, bottom troughs).
I support, I installed patches myself with rivets (the size of a pack of cigarettes) in the places under the wings where the rear ammo spring runs)
Edited by Tycoon (08.10.2014 14:18)
Share608.10.2014 18:36
- Author: Dgippo1
- Moderator
- From: Smolensk region.
- Registered: 11/12/2011
- Posts: 3144
- Respect: +386
- Gender: Male
- Age: 44 [1974-12-20]
- Spent on the forum: 1 month 23 days
- Last visit: 08/01/2019 09:26
- Car data: Hatch 1984, petrol, Solex, 1.6 75 hp DT
I’ll support Bashir and I also have a friend who has a 06. + I myself at one time installed a front strut on a pelvis-02 with rivets to which the upper arm is attached. Just like Magnat, the holes in the right rear fender have been repaired. Everything is fine.
Edited by Dgippo1 (08.10.2014 21:30)
Share708.10.2014 20:45
- Author: elektro
- Old timer
- From: Nalchik
- Registered: 10/07/2011
- Posts: 6761
- Respect: +900
- Gender: Male
- Time spent on the forum: 3 months 0 days
- Last seen: Today 00:12
- Car data: 84 DT 2e2 1Y
on the topic - mine are holding up too, recently I walked along the left corner of the floor/cornice reinforcement, otherwise the corner was completely dead (water was dripping from the hood cable, it was an infection))
Car body repair: why rivets are better than welding
We continue to break the mold (and not only) of citizens with our “wrong” topics and opinions. And they are wrong because, unlike, forgive me
, the “top content” of this resource, are based not on the desire to produce a maximum of jaundiced copy-paste in a minimum of time, but on the personal experience of the author. And as you know, what does not fit into the generally accepted theory of “correct” is a priori swept into the heap of “wrong”. But these are lyrics - I’m sure there are many sane people among my readers who share this postulate. So.
Why is riveting a car body repair in many ways better than welding?
But before describing the situation, it is necessary to make an important, I would even say fundamental, disclaimer. Today we will talk about self-repair
. Not in a professional body shop with equally professional workers and equipment (look at such a miracle.) And even more so, not about the technologies of the factory assembly line. Namely, about the case when you yourself, in a garage, repair a hole in the floor, arch, or any other place of the car body that is not visible from the outside.
Of course, there are also disadvantages
In general, a complete list of both advantages and disadvantages can be read in the same Wiki, but I’ll tell you about the main disadvantage of riveting at home (after all, we haven’t forgotten about such conditions.) And the fact is that this process is very dreary and time-consuming
. In the case of welding, you simply cut out a patch (reinforcer, spacer, extension - it doesn’t matter), apply it in place and make a seam. But if you decide to connect with rivets, then you first need to drill holes in both layers of metal, which in itself takes a lot of time and effort.
Final stage
Regardless of how the car body was repaired, they all end with putty. However, it absorbs moisture, which leads to rapid destruction. Therefore, it must be coated on top with an anti-corrosion or epoxy primer. Body repairs are completed without welding by painting. To do this, use a spray gun or aerosol cans, after covering the adjacent surface of the car with plastic film. You should not use a brush, as drips are possible.
The proposed methods will help to repair a car without welding in case of single damage. However, if a large area is affected by corrosion, it will be easier and more reliable to contact a car repair shop to replace the rusted area by welding. Most often this happens to the floor, so it is recommended to regularly check it from underneath the car using an inspection hole or lift.
Work technology
The rivet connection method is the fastening of two or more metal sheets using cylindrical rods with heads at the ends. Holes are pre-drilled in the parts to be joined. A rivet, with one head made in advance, is inserted into the hole and the second head is formed. The heads of the rivets pull the sheets together and prevent them from being torn off. The rod of this fastener prevents the lateral mutual displacement of parts and is subject to shearing forces.
Rivet joints are used in body production:
- for securing sheets (of light alloys most often);
- for securing parts made of plastic materials;
- when assembling frames.
During repairs, this method is most often used to replace corroded body cladding when welding is unreliable. Riveted joints are especially common when repairing floors - the damaged area is replaced with a new panel. A properly executed rivet seam is as strong as a welded seam.
Types of rivets
Made from malleable metals.
The most common are rivets made of aluminum and its light alloys, mild steel, brass, copper and others. There are different types: Simple ones have a solid core. The factory head can be cylindrical, round or countersunk (flat). These fasteners are used when there is good access to both surfaces of the sheets being fastened, because a pneumatic or hand hammer is used to form the second head.
Special rivets have a tubular rod and the factory head has a hole in the center. The second cap is obtained by pulling and then tearing off the mandrel (rod with a thickened end). The result is a head in the form of a thick shoulder. The second method is to push the cylindrical rod, as a result of which the inner shoulder expands and transforms into an outer one. Special ones are used in cases:
- the back surface of the joined sheets is inaccessible or difficult to access;
- for bonding metal to laminated plastic parts;
- for fastening decorative parts.
Drilling holes for rivets
The hole is drilled with a diameter slightly larger than that of the riveting rod. However, you should strive to obtain the smallest gap, since in this case:
- simple fastening elements have less bending potential;
- special ones roll better.
In practice, during repairs, the diameter of the hole is determined by the size of the available drills. For small diameter rivets used in tinsmithing, the total clearance should be within 0.5 mm. If possible, the hole should be processed - remove burrs from the inner surface that were formed during drilling.
Before drilling the sheets, select the length and diameter of the rivets. For example, for mounting a 1.0 mm sheet on the floor of a body with a metal thickness of 0.6 mm, the diameter of the fastening element will be approximately 4.0 mm. If special rivets are used, the sheets being joined may be thicker than is acceptable for simple ones. This applies if the fastening elements are subject to low forces. Body trim sheets are subject to vibration loads, torsional and bending stresses that arise when the vehicle moves on an uneven road. They make the fastener “play.” Since in the case of large forces it is necessary to take the diameter of the fastening element larger than the calculated one, then for the above example the diameter will be 5.0 mm.
The length of the rivets is selected depending on their type. In simple ones, it is determined by the length of the rod. Therefore, the length of the fastening element is calculated as the sum of the thicknesses of the parts being connected and the thickness of the metal required to fill the gap between the hole and the riveting and to form the head. When forming a round closing head, a rod length equal to 1.5 times the diameter is added to the total thickness of the sheets. To determine the dimensions of special fasteners, use tables supplied by manufacturers.
Removing dents from a body without painting
It is not at all necessary that body work include painting some elements. Restoration of a car body can be done without painting, for example, if some kind of dent needs to be removed from an element of the car body.
Removing dents without painting is a fairly popular method nowadays. Using this method, you can get rid of both small and medium-sized dents that could appear in any situation: dents from hands or feet, hail, contact with certain elements on the body, both while driving and while parking, and much more. . Damage of this kind can be removed easily and simply to such a state that it becomes completely invisible.
Rivet seam
Regardless of the type, when repairing, it is necessary to use rivets of the same material as the sheets being fastened. Aluminum fasteners will gradually deteriorate if they are used to rivet brass, copper, corrosion-resistant or ordinary steel. In a more humid atmosphere, this process will be more noticeable, since electrolytic pairs are formed.
Important parameters of rivet fastening are the distances from the edge of the sheet to the center of the rivets and the pitch size (the distance between the axial axes of adjacent fastening elements mounted along the same line - the seam). The pitch size is a multiple of the fastener diameter and depends on the purpose of the riveted part. For the example above, with a diameter of 4 mm, the length of the riveting rod is 8 mm. The step size is 40 mm. From the edge of the sheet to the axis of the seam - 8 mm. In some cases, when repairing a body, they focus on the spot welding step and mark the installation of fasteners using it.
Installation procedure for simple rivets:
- The sheets are fastened with bolts through 5 - 6 holes drilled for rivets. Mismatched holes are processed by re-drilling or by reaming.
- The fastener is installed with the head to a thinner sheet.
- The head of the fastener is mounted on a massive anvil. Use a riveting stand for round heads - this will protect the head from deformation.
- A mandrel is placed on the riveting rod and struck several times with a hammer. The sheets should be pressed towards the cap.
- The upsetting mandrel is removed and blows are made along the axis of the fastener rod. As a result, the fastening element, crumpling, first fills the hole and then forms a blank for the closing head.
- The edges of the stave are struck at an angle, forming a head.
- A riveting mandrel is installed on the head and the formation is completed. When riveting fasteners with countersunk heads, as a result of flattening with a hammer, the metal crumples and fills the countersink.
- The mounting bolts are removed and fasteners are installed in their place.
Installation of special rivets:
- Item 1 for simple fastening elements.
- The rivet is inserted into the hole, and a rolling rod is inserted into the broaching device.
- The head is pressed forcefully against the sheets, which are pressed together.
- The tensioning device is activated until the fastener rod comes off.
- P.8 for simple ones.
- In most cases, the piercing rod is driven in with a hammer. During operation, it is necessary to control the tightness of the sheets adhering to each other, applying force near the riveting head.
- The head is pressed against the sheets under the action of advancing the piercing rod (it is struck with a hammer).
Application for riveting the piercing rod:
Rivets provide the ability to effectively join two parts together without welding, glue or other tools or adhesives. They can be used in automotive and other applications, but in this article we are going to focus on automotive rivets. Automotive rivets can be used during structural repairs such as attaching rocker panels over existing ones, during the installation of plastic body kits and other accessories, or even during specialized body repairs. They are also great if you need to join two finished products that have already been painted. As you might imagine, there are a wide variety of types of rivets. The two most popular types are metal or nylon blind rivets.
Blind rivets have gained popularity because they are strong, reliable and require access to just one side of the part being worked on.
They also allow different types of materials, such as steel and aluminum, to be joined together easily and simply. Basic principles of operation of blind rivets
Rivets consist of two parts: the body (body) of the rivet and the rod.
To install it, it is necessary to place the body of the rivet into the hole made in the materials being joined, so that the protruding part is flush with the surface of the part. Once it is in place, place the rivet gun with the correct size nozzle over the rivet shank until the nozzle is flush with the surface of the piece. Press down on the hand rivet gun levers to push the shank through. The rounded end of the rod is pulled into the body of the rivet and thereby expands it. At the same time, a tight grip is formed in the load-bearing area on the back side of the product. When the strength limit of the rod is reached, it breaks off in the required place, forming a reliable and smooth surface. Some shanks leave quite a large portion inside the rivet body, providing a stronger connection. Materials for the manufacture of blind rivets
Automotive rivets are made from several types of materials and their combinations. A material combination is where one material is used for the rivet body and another for the shank. The types of materials you work with will help determine what your rivets should be made of. Below is a list of commonly encountered material combinations and their respective applications: • Aluminum/Aluminum: Used with aluminum or in environments where the materials are susceptible to rust and corrosion; • aluminum/steel: similar to the previous material combination, but in this case higher strength is provided; • copper: used when electrical conductivity is required; • nylon: used with plastic; • stainless steel/stainless steel: used with steel or aluminum for very high strength, these materials also resist rust and corrosion; • stainless steel/regular steel: also used with aluminum, characterized by resistance to rust; • steel/steel: Use only with steel to ensure high strength.
Types of rivets
The two main types of rivets are open end and closed end. Open end rivets are designed for use in a variety of applications and are the most commonly used type of rivet. The rod breaks off near the blind end of the rivet.
Closed end rivets have a cupped end that forms a tight joint compared to materials joined by welding.
Rivets with a closed end are stronger than those with an open end. Types of Rivet Heads
There are three main types of rivet heads: flathead, large flange and countersunk. Flat (standard) head rivets are the low profile and most commonly used type of rivet. The head size is twice the diameter of the rivet body and provides sufficient load-bearing surface for most workpieces, with the exception of soft and brittle materials. Large flange rivets are also low profile, but provide twice the load-bearing surface area under the head compared to flat rivets. These rivets are typically used to join soft and brittle materials to a hard surface.
Countersunk head rivets are designed in such a way that the head profile is at an angle of 120 degrees, which allows them to be used for hidden installation.
You should also use a countersunk drill bit to create the desired hole that will fit the countersunk rivet. How to determine the size of the rivet?
Selecting the right blind rivet for your application requires determining the rivet diameter, bond limit range, head varieties, flange size and corrosion resistance. We have already touched on the types of heads and corrosion resistance, therefore, next we need to understand the diameter of the rivet, the range of application and the dimensions of the flange. Rivet Diameter: Standard blind rivets are typically available in diameters ranging from 2.4 to 6.4 mm in 0.8 mm increments. The choice of diameter is based on area, strength and thickness of the material. The larger the diameter, the higher the shear and tensile strength, which is determined by the thickness and material of the rivet body. Rivet length: The length of the body of a standard blind rivet can be calculated using a very simple formula: rivet length = total thickness of the package of fastened materials + rivet diameter. Specialized rivets
Flap rivets: These rivets are designed to provide enhanced support for fragile or soft materials. The rivet shank is made in such a way that it breaks the end of the rivet body into 4 pieces, thereby creating a large bearing surface. The paws firmly press the material and distribute the load over the entire surface. This greatly reduces the risk of tearing brittle material or sinking into soft material. Flap rivets are best suited for joining plastic, rubber, wood and laminate.
Read the articles “All about blind rivets” and “How to use a blind rivet gun.”
04.02.2019
Car body repair without welding: do-it-yourself repair
Years of use of the car render the body unusable. Repairs are carried out in specialized centers. The use of welding becomes necessary.
An alternative is non-welding methods . The use of welding machines to restore a car body is often not economically feasible. The work requires special equipment and great skills.
Load-bearing elements must be welded, but when repairing body surfaces, you can do without welding. Such repairs can be done with your own hands in a garage. Even a beginner can cope with the task. A video from specialists will help.
Weldless auto repair options
Car body repairs without welding are considered unprofessional, since this is not the product of numerous scientific research. There are several ways.
If the problem is not with the body with the exhaust system, then we advise you to see how to seal the muffler using cement or sealant
General requirements: the damaged area is removed with a grinder or chisel. Anticorrosive and zinc are applied and degreased. Next, the holes are sealed with paint putty, creating a surface of a suitable shape, and painted.
Puttying a car
The material used is fiberglass with the structure:
The coarse fiber composition is suitable for repairing minor damage. Applicable when they are located near structural pockets. The composition of the lining is fixed, placed on the inside. Puttying is a budget option, but it is not very reliable.
A layer of putty is applied to the cleaned, primed metal surface. First inside, then the surface is worked. After the starting layer has hardened, the second layer comes on. Drying is done at room temperature.
The use of aluminum/brass mesh makes it possible to repair significant damage. The hole is covered with a mesh and secured with tape. After puttying and processing, the tape is removed.
If body corrosion is removed with mesh and putty, the service life of the patch is from one to two years.
Fiberglass + synthetic glue
Large damages are repaired with fiberglass. The adhesive is epoxy or polyester resin. Fiberglass fabric is applied in several layers, each overlapping the previous one by 2 cm .
Everything is coated with adhesive. Fabric sagging is eliminated by installing linings. Drying is in progress. This option is suitable for minor damage.
When treating your car with a chemical, strictly follow the instructions included with it!
Soldering
A method for removing significant body damage. The metal patch is pressed against the body and connected with solder. Flux will give strength. Solder and flux are selected based on metal alloys. They work with a high-power electric soldering iron.
Negative points:
- high cost of solder;
- low strength.
The metal patch should cover the hole without a gap. The initial stage is tinning the surface. The protruding overlay is hammered down. Next - puttying and painting.
Rivets
Option for repairing large damaged areas and replacing parts. The method is preferable to welding when repairing the bottom. The damaged area is removed and a new piece of metal or part is placed. They are riveted with steel rivets, diameter - 5 mm , for load-bearing elements - 6 mm .
Before placement, the rivets are treated with an anti-corrosion substance. A riveter is required.