Nuances when you need to change the filter
For any make of car, including Lacetti, it is recommended to change the cabin filter twice a year: in autumn and spring. Why is that?
Because it changes after the winter period, when dirt mixed with water has accumulated in it and it is forgotten and does not allow air to pass through well. Before winter, because in summer there is a lot of dust and dirt on the roads and the filter involuntarily gets clogged.
The cabin filter is changed because dust and foreign objects that enter the car interior are automatically inhaled by a person, and this can have a detrimental effect on health. This air can cause quite a lot of diseases, including cancer and pneumonia, so you shouldn’t skimp on your health and the health of your passengers.
Comparative analysis
As you might already guess, when comparing two filter elements for the car interior, the carbon design deservedly takes precedence. Its main distinguishing feature is the presence of an additional layer of activated carbon.
READ Where is the Immobilizer Niva Chevrolet located?
Some car enthusiasts who are thinking about which cabin filter is better: carbon or regular for summer or winter, may think that the first option is a cunning move by marketers in the name of enrichment. But this time it is a really reliable and necessary thing. It is due to activated carbon that harmful impurities in the air are retained. A regular paper structure simply can't do this. But, as you know, polluted air has a detrimental effect on the human body.
With a lack of oxygen, the circulatory and nervous systems are exposed to harmful effects. Due to nitric oxide, vision deteriorates, mucous membranes dry out, and on top of that, an allergic reaction may begin. Therefore, to protect your health, it makes sense to purchase a carbon filter .
In addition, the unsatisfactory condition of the driver, sooner or later, but inevitably, can lead to an emergency situation on the road.
Replacement procedure
We move on to the next stage - we are directly awaiting the replacement of the filter element. We remove the protective hatch and see the element we need in front of us. Carefully remove it outside, so that the dirt and dust accumulated in it do not spill into the interior. Using a vacuum cleaner, we clean the casing, for greater reliability, passing along the internal surfaces with a rag. We install the previously prepared new filter in its place, after which we reassemble all the dismantled elements in the reverse order
We pay special attention to the quality of fastenings - screws must be tightened tightly, distortions and breakdowns are unacceptable
Replacements needed
In addition to the listed routine replacements, there are consumables that need to be changed as they wear out. The Chevrolet manual does not provide a specific interval between replacements.
This applies to oil in gearboxes. According to the regulations, changing the lubricant in the gearbox is not provided at all during the entire operational period. But given the difficult operating conditions, as well as possible repair work, it is necessary to monitor the level and condition of the oil in the box.
According to the manual, the oil level in the box needs to be checked every 30 thousand kilometers. At the same time, an inspection is carried out for possible leaks.
Downloading a book
After successfully completing the payment (by any method) and returning to the KrutilVertel store from the payment system website, you will be taken to the successful payment page:
The book you purchased will be in your personal account, from where you can always download it.
Please note that after making the payment, you need to return back from the payment system website to the KrutilVertel website. If for some reason you did not return back to the site and closed the payment system tab with a message about the successful completion of the payment, please let us know - we will send you a letter indicating access to download the book
If for some reason you did not return back to the site and closed the payment system tab with a message about the successful completion of the payment, please let us know - we will send you a letter indicating access to download the book.
Replacing air duct panel trims in a hatchback/station wagon
Car: Chevrolet Lacetti Hatchback, SX, 1.6 MT, climate control.
I decided to turn the SX torpedo into a CDX type torpedo.
For this purpose the following spare parts were ordered:
- 96453709 – instrument cluster trim, aluminum look.
- 96554794 – right panel trim, aluminum look.
- 96554908 – air ducts, aluminum look, 4 pcs.
- I already had the central trim “look like aluminum”, so I didn’t order it.
The replacement took place in four stages: 1) removing the panel overlays, 2) removing the air ducts, 3) installing the air ducts, 4) installing the overlays.
But I had to tinker with removing the right pad. It turned out that it is attached to the panel not only using the already familiar clips, but also from the inside, using two self-tapping screws:
Rice. 1. Right panel trim. The arrows indicate clips and pegs for self-tapping screws.
Those. I just can't pull the cover off. I had to get inside the panel.
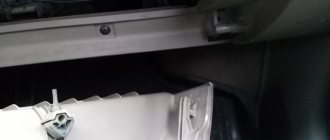
To do this, the glove compartment was removed. It is very easy to remove:
Rice. 2. The left hinge of the glove compartment and the left lower self-tapping screw of the panel wall.
Rice. 3. The right hinge of the glove compartment and the right lower self-tapping screw of the panel wall.
The cotter pins of the hinges are removed, the box is slightly compressed from the sides until the rubber dampers come out of the holes and pulled out towards itself.
Then unscrew the five screws holding the back wall and the bottom shelf (indicated by arrows 4,5,6 in the photo).
Cabin filter location
If you feel in your car that when you turn on the heater or air conditioner it smells of dust or fumes, then in all likelihood it is time to change the cabin filter. Typically, such elements of the purification system manufactured by the manufacturer can trap up to 95% of harmful substances contained in the air.
New filter
It is located in the interior of your Lacetti - its cover is located in front of the front passenger seat. It is almost impossible to see with the naked eye, since it is hidden by the glove compartment. Perhaps the main difficulty in the process of replacing this component is that it is not so easy to get to. To gain more comfortable access to the filter, you will need to remove the glove compartment.
Cabin filter for Chevrolet Lacetti 14 16 and 18
Getting started and preparing tools
Car tool kit
According to the manufacturer's recommendations, replacement should be carried out approximately once a year. With intensive driving - every 15 thousand kilometers. Ordinary drivers do not often drive such a distance in a year, so you can simply carry out seasonal inspections and replace parts in a timely manner.
No special tools are required to replace the filter. It is enough to prepare:
- Phillips screwdriver (set of screwdrivers).
- 10″ ratchet.
- Pliers.
- Various auxiliary materials.
After this, you can proceed directly to the procedure for removing the Chevrolet Lacetti cabin filter. The work shouldn’t take much time, so you don’t have to specifically schedule time for it.
Step-by-step technology for replacing the Chevrolet Lacetti cabin filter
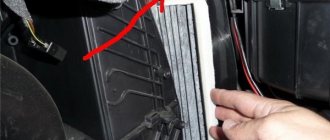
We unscrew the five screws that hold the glove box: The screws that secure the glove box are shown in the pictures below with red arrows. Green arrows indicate the hinges on which the glove compartment lid moves.
- Chevrolet Lacetti J200 Hatchback 1.4 16V 95 hp id18536
Engine: volume - 1.4 liters, power - 95 hp, type - petrol, model - F14D3. Drive: front. Year of manufacture: 2005-2009
Chevrolet Lacetti J200 Hatchback 1.6 109 hp id18537
Engine: volume - 1.6 liters, power - 109 hp, type - petrol, model - F16D3. Drive: front. Year of manufacture: 2005-2009
Chevrolet Lacetti J200 Hatchback 1.8 91 hp id106531
Engine: volume - 1.8 liters, power - 91 hp, type - petrol. Drive: front. Year of manufacture: 2005-2009
Chevrolet Lacetti J200 Hatchback 1.8 121 hp id19770
Engine: volume - 1.8 liters, power - 121 hp, type - petrol, model - F18D3. Drive: front. Year of manufacture: 2005-2009
Chevrolet Lacetti J200 Hatchback 1.8 122 hp id18538
Engine: volume - 1.8 liters, power - 122 hp, type - petrol, model - T18SED. Drive: front. Year of manufacture: 2005-2009
Chevrolet Lacetti J200 Hatchback 2.0 D 121 hp id24469
Engine: volume - 2 liters, power - 121 hp, type - diesel, model - Z 20 DM. Drive: front. Year of manufacture: 2007-2009
Filter Removal Procedure
The filter is located inside the car. Initially, it cannot be seen, since it is hidden by the glove compartment. Accordingly, the main difficulty is to get to it.
Unscrew the screw on the right
It should be noted right away that sometimes removing the glove compartment lid is quite difficult, so it will take some effort.
To complete the work, you need to take up the tools and follow the recommendations of manufacturers and specialists:
- using screwdrivers, carefully unscrew the fastenings on the screws;
- it is also necessary to unscrew the right and left hinges of the glove compartment;
- after unscrewing all the screws, you can remove the glove box;
- the special contact chips should be disconnected;
- the last step is to dismantle the small metal strip (it is held in place by four self-tapping screws).
If the glove compartment is removed, you can continue to remove the Chevrolet Lacetti cabin filter.
All previous operations are necessary in order to gain direct access directly to the cabin filter. After dismantling the glove compartment, access to a special hatch opens, which should also be carefully removed.
Replacement procedure
The next step is to inspect the filter and replace it. After removing the protective hatch, direct access to the filter itself opens.
How to remove the Chevrolet Lacetti cabin filter? You just need to pull it out of its grooves, keeping an eye on the fastenings. This is usually done without much difficulty, although if it has not been changed for a long time, it may get stuck.
Immediately after removing the filter, you should turn on the blowing fan to clear the grooves of debris. You can also take advantage of the situation and do a thorough cleaning. Thanks to this, it will subsequently work easier and more efficiently.
After installing the new spare part, all actions are carried out in the reverse order - closing the hatch, installing the protective strips and the glove compartment in their place.
Filter cost and replacement frequency
After this, all that remains is to enjoy clean air inside the cabin, which will be safe for both the driver and his passengers.
Summing up
Unambiguously answer the question “Which of the two filters is better to install ?” impossible. Mostly it all depends on the specific traffic conditions. Their analysis shows that paper filters are capable of providing mechanical cleaning of the air flow entering the vehicle interior. Coal analogs also prevent the penetration of volatile contaminants.
We have already become familiar with the main differences between a carbon cabin filter and a regular one. If the driver spends most of his time in the city, often has to deal with traffic jams, and sometimes there is smog in the air, then the option is clear - a carbon filter. We have already talked about its most important advantages.
As for suburban conditions, here you can limit yourself to the possibilities of the classic version.
When to change?
However, sometimes you have to change the filter more often, this will be persistently hinted at by unpleasant musty air from the air ducts.
Original article
The original cabin filter has catalog number J1340907.
The price of an original filter element is in the range of 700–800 rubles, a non-original one can be bought for 400–500 rubles, and a filter with a carbon filter element can cost 800–900 rubles. Good luck to everyone and clean air in the cabin!
Only new, out with old!
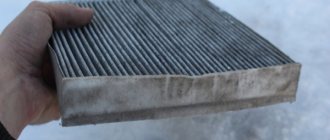
Out with the old filter. Do not clean it or put it back under any circumstances!
I would also like to warn against reusing an old filter.
Thrifty car enthusiasts simply clean the filter corrugation, and sometimes take it out too, leaving only the protective mesh.
Firstly, such cleaning will be of little use, and secondly, the dust that gets on the air conditioner evaporator will mix with condensate, forming a rather large layer of wet dirt on the surface of the evaporator.
It is clear that in such conditions the evaporator will not last long due to corrosion and will provide an additional portion of stale air in the cabin.
A torn cabin filter will allow dust and dirt into the cabin!
In addition to fresh air in the cabin, the new filter will give the fan an easier life, since it is not so easy for it to blow through dusty corrugations.
How to remove and change the fuel pump of a Chevrolet Lacetti
The fuel pump works under damn tough conditions. Besides the fact that our gasoline is not always pure, like the tear of a Japanese virgin, the electric motor of the pump must be lubricated with this gasoline and cooled with it. Therefore, we highly recommend not allowing the tank to be more than ¾ empty.
To replace and diagnose the fuel pump on a Lacetti, you will need a standard set of tools, a new pump, and a mesh filter, which is the first to receive sand and slag that has entered and accumulated in the tank. We'll also stock up on rags and work outdoors, at least in a well-ventilated garage. Gasoline doesn't like jokes.
How to relieve pressure in the Lacetti fuel system
First, let's relieve the pressure in the system. This is necessary so that when the fuel line from the module is disconnected, gasoline does not wash you and the entire interior. The pleasure is so-so. To relieve pressure in the Chevrolet Lacetti's power system, you can go in several ways:
- We remove the fuel pump fuse, it is marked according to the ef18 diagram.
The same fuse that is under the hood
- Remove the fuel pump relay.
- We remove the wiring harness block from the fuel module.
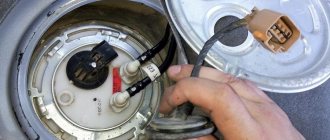
Whichever is more convenient for you. Since you will still have to remove the seat, it is better to remove the block from the pump. We remove the seat cushion, remove it from the passenger compartment, after which we see the hatch in the floor pan.
How to replace a Chevrolet Lacetti fuel pump
- We tear off the pump hatch from the sealant with a sharp knife around the perimeter and remove it.
- We see the connected fuel lines and terminal block. We remove it and start the engine. It will idle for about 10-30 seconds and die. The pressure has been released.
- Now we proceed to dismantling the fuel module.
- Remove the fuel line from the fittings by pressing the lock.
- Carefully rotate the locking washer, tapping the end of the cutout.
- Carefully remove the fuel module.
- We drain the remaining fuel from the pump.
- Remove the float and fuel level sensor by disconnecting all wires from the level warning lamp sensor.
- We squeeze out the plastic clips and retract the latches.
- We take out the pump with the mesh.
- Remove the mesh filter.
- The pump can be replaced. For installation, it is advisable to use the original fuel pump. Its catalog number is BOSCH F 000 TE1 440, the price is about 1300 hryvnia.
We install a new fuel pump and strainer (penny Arirang CT10).
We assemble and install the fuel module in the reverse order. Good luck to everyone and clean gasoline!
We replace the cabin filter in the Chevrolet Lacetti Sedan and Hatchback
If the time has come to replace a component of the Chevrolet Lacetti air system, then it is not necessary to go to a service station and pay money to specialists for it. All work can be done independently, having the necessary knowledge for this. Of course, a service station can do this much faster, but our manual for replacing the cabin filter will also help you do it quickly and correctly - it won’t take much effort.
Cabin filter location
If you feel in your car that when you turn on the heater or air conditioner it smells of dust or fumes, then in all likelihood it is time to change the cabin filter. Typically, such elements of the purification system manufactured by the manufacturer can trap up to 95% of harmful substances contained in the air.
New filter
It is located in the interior of your Lacetti - its cover is located in front of the front passenger seat. It is almost impossible to see with the naked eye, since it is hidden by the glove compartment. Perhaps the main difficulty in the process of replacing this component is that it is not so easy to get to. To gain more comfortable access to the filter, you will need to remove the glove compartment.
What do we need?
Replacing an element in a Chevrolet Lacetti is an activity that does not require any special requirements. You can simply perform this procedure on the side of the road. To do this you will need:
- a set of keys;
- Screwdriver Set;
- ratchet to “10”;
- pliers;
And of course, a new filter.
Tools
Step-by-step replacement instructions
The manufacturer of these cars advises replacing this component every 15 thousand kilometers. In conditions of increased dustiness or regular driving on dirty roads, this element needs to be changed a little more often - every 10 thousand km. When driving in dusty areas, its service life is reduced. It is also recommended to replace this component of the cleaning system if there is mechanical damage to any part of it. It is worth noting that changing filters for Chevrolet Lacheti Sedan and Hatchback models is carried out according to the same principle.
Old and new filters
Remember! Saving is not worth it!
Some car enthusiasts do not replace it, but only wash or clean this component, and then put it back. This makes no sense, since it is literally impossible to wash the microscopic holes of the element, which are clogged with dust and dirt, with water or other liquid. As a result, a dirty filter is placed in its old place, since washing does not help this matter. As a result, the air entering the cabin will not be cleaned.
So, you decided to change an element in your Lacetti:
- First of all, you need to remove the glove compartment. To do this, unscrew the five screws that secure it to the dashboard. In the photo below, the red arrows show the screws that secure the glove compartment, and the green arrows show its hinges:
Self-tapping screws for glove compartment
You need to disconnect the battery terminals - this is done because you will have to disconnect the wires from the glove compartment light bulb. You can also turn off the corresponding fuse on the unit. Attention! If this is not done, the fuse will most likely fail. And he is responsible not only for the light in the glove compartment, but also for the instrument panel and even the low beam headlights.
We remove the small metal plate from the air conditioner housing.
Metal plate of the glove compartment Then we move the glove compartment to the side and on the top left side we see four self-tapping screws that secure the interior element itself.
Component Attachment
Using a “7” wrench, unscrew the fastenings of the filter component. After that, pull our filter down to remove it. If it has never been replaced or was replaced a long time ago, it may get stuck, so use extra force to remove it.
Removing the filter
As soon as the component is removed, we turn on the battery (of course, without a fuse on the block) and turn on the stove to blow it out - this is done in order to clean the pipes from dust and dirt. We take a new filter and install everything in the reverse order, not forgetting the battery.
Chevrolet Lacetti 5D carino verdura › Logbook › Cleaning the air conditioner and replacing the cabin filter.
Having read on “the Internet” about cleaning the air conditioner, I decided to give myself such pleasure. I purchased an Avalanche AF734 cabin filter at Emex - 134 rubles. and Runway RW6122 air conditioner cleaner - 177 rubles.
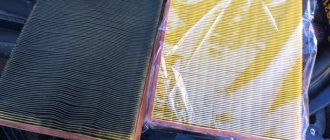
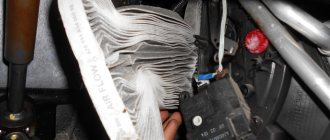
The filter has an interesting texture; I have come across paper filters before. And this one has a frame made of large plastic mesh and a material similar to cotton wool on top.
In general, the procedure is not complicated. I first removed the old cabin filter. To do this, we look under the glove compartment. We see there a plastic cover and 4 shiny screw heads (designated 1 in the picture). We unscrew them. I find it more convenient to use a 7-mm head and a ratchet, but you can also use a Phillips screwdriver.
Comparison of old and new filter. Considering that I change it every six months. Astrakhan is beloved, so dusty.
We look inside, the evaporator is in normal condition, there is no dirt or branches.
Follow the instructions below. We loosen the can, put on a plastic tube, insert the tube into the drainage hole (this is where the L-shaped pipe is put on). We press the sprayer, spray and slowly remove the tube so that the foam fills the maximum cavity of the air duct.
We wait 5-10 minutes, and after starting the engine, turn on the airflow to full, opening the windows for 10 minutes. I also poured foam into the air ducts in the cabin.
Now my salon smells pleasantly of Chinese chemicals. But judging by the reviews, the smell will soon disappear.
Next, I install a new cabin filter, replace the drain pipe and that’s it!
Problems when paying with bank cards
Sometimes difficulties may arise when paying with Visa/MasterCard bank cards. The most common of them:
- There is a restriction on the card for paying for online purchases
- A plastic card is not intended for making payments online.
- The plastic card is not activated for making payments online.
- There are not enough funds on the plastic card.
In order to solve these problems, you need to call or write to the technical support of the bank where you are served. Bank specialists will help you resolve them and make payments.
That's basically it. The entire process of paying for a book in PDF format on car repair on our website takes 1-2 minutes.
If you still have any questions, you can ask them using the feedback form, or write us an email at
Section 3. Driving a Chevrolet Lacetti Instructions
Information on driving the car in various conditions. The Chevrolet Lacetti manual provides important driving rules. Including:
- The starter should not operate continuously for more than 15 seconds; at least 10 seconds should pass between attempts to start the car, otherwise the starter will break.
- Do not allow the engine to idle at high speed for more than 5 minutes, this will damage the exhaust system.
- The diesel engine must be started after the spark plugs have warmed up and their indicator has disappeared from the dashboard.
Adjusting the driver's seat devices, starting the engine, operating the most important components of the car's structure.
Section 4. Microclimate and audio system Chevrolet Lacetti Operating instructions
Information on using air heating, ventilation, air conditioning systems, as well as an audio system.
Description of the dashboard, vehicle electronics controls, instructions for their operation and configuration principles.
Section 5. Damage repaired en route
In this chapter you will find all the necessary information and instructions for solving problems that arise when operating the vehicle.
This section of the Manual for the Chevrolet Lacetti describes minor repairs that the driver himself can carry out: replacing a wheel, “lighting” from an external battery, towing the car, actions in case of overheating and actions to pull a stuck car out of the mud.
Step-by-step instructions for replacing the cabin filter
To replace the cabin filter in a Lacetti with your own hands, you will need a minimum set of repair tools, which can be found in the driver’s basic arsenal. These include the following:
- positive screwdriver;
- ratchet wrench;
- pliers.
Before proceeding with the procedure, it is necessary to prevent the possibility of a short circuit and blown fuse. To do this, stop the current supply altogether by removing the terminals from the battery, or remove the F21 fan from the unit with a force of 15 A.
Replacing the Lacetti filter requires special resourcefulness compared to other cars, so it is recommended to remove the glove compartment drawer before starting work. It is enough to unscrew five bolts, open the lid and carefully lower the box.
The step-by-step instructions for installing a new air purifier include six key points. It is advisable to perform each of them with gloves:
- Disconnect the contact chips responsible for illuminating the glove compartment and switch.
- Remove the bar in the form of a metal plate.
- Using a screwdriver, unscrew the air filter cover, which is held on by four screws.
- Remove the old filter element from the grooves. If it hasn't been changed in a while, you may need to find a specific angle or break the housing to remove it.
- Resume the power supply to the car to blow out the accumulated dust and dirt from the pipes and air ducts at maximum speed. Then disconnect the battery again.
- Replace with a new air cleaner and assemble all parts in reverse order.
The cabin filter must be placed so that the handle is at the bottom, and the arrows indicated on the housing coincide with the direction of the air blowing system.
Chevrolet Lacetti cabin filter replacement technology
The glove compartment cannot be removed unless five screws are unscrewed. Their location is clearly shown in the photos below; you can find them by the red arrows. In turn, the hinges with which the glove compartment lid can move are indicated by green arrows.
Once you have the screws in your hands, you can pull out the glove compartment, but before that, do not forget to disconnect the wires for its lighting. There are only two of them in this car model.
Four self-tapping screws hold the metal plate in place; to get to the filter, they need to be unscrewed.
After this you will see the purifier seat. Remove the old filter, wipe its location well and install a new cleaner.
Rules for choosing new equipment
A high-quality air element can prevent about 90% of harmful substances and environmental pollutants from entering the cabin
It is important that the design of the air purifier and the framing frame fully correspond to the dimensions of the seat and do not have any damage to its integrity. In Chevrolet Lacetti station wagons, the standard filter size is 223x189x25 mm in length, width and height, respectively.
It is worth noting that in some models of the interior air cleaner there is a place for breaking the frame. This is necessary in cases where the element fits into the grooves only if force is applied. The holes in the Lacetti are small and cannot always accommodate the filter along with the plastic frame.
The filter element for any brand of car is selected based on two alternatives:
- conventional synthetic fiber filters;
- with carbon impregnation.
The first option allows the air purifier to perform basic functions - to protect against contamination in the form of dust, lint and gases. The second option has additional options that will please the driver. The activated carbon included in the composition absorbs harmful substances and unwanted odors from the outside.
During the summer season, it is recommended to install carbon air filters, since during this period various bacteria, foreign odors and contaminants most actively enter the cabin.
When purchasing, it is also important to pay attention to the production of consumables. Its cost does not exceed 1200 rubles, while the maximum price is set for original parts
Manufacturer: General Motors. The original code for the cabin filter is GM96554421. The advantage of the originals is ease of use - the parameters are designed for a specific car model.
However, when looking for budget options, you can pay attention to suitable analogues:
- AMDFC22, the average retail price of which is 150 rubles;
- PARTS-MALL PMC003 – 230 rubles;
- TSN 9718 (TSN Citron) – 120 rubles;
- Goodwill AG628CF – 165 rubles;
- MANN CU 1719 – 600 rubles.
The presented analogues, like the original model, are conventional air purifier options. The cost of carbon filters may exceed the listed prices.
Article number and cost of the original cabin filter and its analogues
The Chevrolet Lacetti, regardless of the size of the power unit, is equipped with the same cabin filter, article number 96554421. The price of General Motors branded products ranges from 600 to 1200 rubles.
ATTENTION! A completely simple way to reduce fuel consumption has been found! Don't believe me? An auto mechanic with 15 years of experience also didn’t believe it until he tried it. And now he saves 35,000 rubles a year on gasoline! Read more"
The GM filter element has a plastic frame along the contour and has a special protrusion that facilitates installation and removal of the product from its seat. Many drivers note that this feature has a drawback. Due to the protrusion over the edge of the filter, debris sometimes spills out. For this reason, drivers are forced to seal part of the filter with foam rubber.
Cabin filter Chevrolet Lacetti, from 2004
On a Chevrolet Lacetti car, the heating and air conditioning system filter is replaced every 15,000 km. If you often drive in dusty areas, the replacement interval should be reduced to 1.5-2 times. If you notice that the filter is deformed, then it must be replaced, regardless of mileage.
Where is the filter located and what will you need?
Access to the filter is located inside the car. It is located behind the glove compartment, at the feet of the front passenger. To replace, we will need a new filter element, a 7mm wrench or socket, or a Phillips screwdriver. Some car enthusiasts perform this procedure by removing the glove box, but today we will analyze the process without dismantling it.
Replacement procedure
- We look under the instrument panel, from the side of the front passenger's feet, where we see the filter cover of the air conditioning and heating system. It is attached to 4 bolts, which we need to unscrew.
- After we unscrew them, remove the cover and put it aside
- take out the filter element. It has special technological cuts, approximately in the middle, which are convenient because when pulled out of the grooves, it can be bent.
- After you have removed the filter, turn on the ventilation and heating system at full speed in order to simply blow out large debris and dust from the system. Also, when blowing, change the distribution of air flows.
- Installation is carried out in reverse order. You can also bend the new filter along the technological cut for easy installation of its grooves.
If your mileage per year is small, you can perform this operation once a year, for example, after the winter season.
First option
The cover is attached to the panel using a small bolt and sealant. Take a convenient screwdriver, unscrew the screw and cut off the sealant. The cover is easy to remove.
Lightly pry the filter with a screwdriver and then remove the element. Carefully remove from the grooves. Over a long period of operation, a lot of dust accumulates, which can easily scatter throughout the cabin and fly into the air duct.
Next, a new dirt barrier is installed. Read the installation instructions. It is important to place the paper part on the correct side, otherwise the replacement will be useless. For convenience, manufacturers mark their products with arrows.
Carefully remove any remaining old sealant. Degrease the surface, apply fresh sealant and return the cover to its place. After making sure that everything is level, you can screw in the self-tapping screw.
For most car enthusiasts, removing part of the frill seems to be the best option, because there is no need to bother with sealant. There is also no risk of damaging the cladding when removing the old sealant. For many, this option is the fastest.
Lift the hood and unscrew the screws securing the frill. The element has three screws, which are located at the top.
Lift the plastic panel and carefully remove the filter material. Replace with a new one and replace the plastic. Screw the fixing parts into place.
In the video below you can watch the entire replacement process. From all of the above, it is time to conclude that in a Chevrolet Niva you can replace the cabin filter yourself. There is no need to have special skills.
- When purchasing a new filter, pay attention to which vehicle it fits.
- Inspect the integrity of the packaging. Damaged material will be useless during operation.
- Purchase parts only from trusted stores to avoid purchasing low-quality goods.
There is no need to clean the filter frequently. It is safer for health to regularly replace the material.
How to replace the cabin filter on a Chevrolet Lacetti
The filter element is a very important part of the entire cabin air system. The degree of cleanliness of the air in the cabin and the operating time of components such as the radiator, evaporator and fan depend on it. After all, it is he who purifies the air entering the cabin. The manufacturer recommends changing the cabin filter after 15 thousand mileage, but it all depends on the operating conditions of the car. If the car is operated on dirt roads with high dust levels, then the cabin filter must be replaced at 7 thousand. This will prolong the operation of all parts of the heating system and allow the driver and passengers to breathe clean air even on dusty sections of roads. The Chevrolet Lacetti is equipped with a filter element made of corrugated paper, which traps dust particles and allows only air to pass through. Accordingly, all the dust and dirt remains on it. And with an increase in the amount of dirt on the ribs, the throughput of the entire system decreases. Because of this, both the heater and air conditioner work worse. Also, poor permeability of the system greatly affects the duration of the fan operation, because it has to blow air with increased load.
Why did it happen so?
Perhaps the automatic requests do not belong to you, but to another user accessing the network from the same IP address as you. You need to enter the characters into the form once, after which we will remember you and be able to distinguish you from other users exiting from this IP. In this case, the page with the captcha will not bother you for quite a long time.
You may have add-ons installed in your browser that can make automatic search requests. In this case, we recommend that you disable them.
It is also possible that your computer is infected with a virus program that is using it to collect information. Maybe you should check your system for viruses.
If you have any problems or would like our support team, please use the feedback form.
Clean air in your car is as important as clean gasoline in your tank. The air conditioner and cabin air filter are responsible for keeping the air clean and maintaining a comfortable microclimate in the cabin. The Chevrolet Lacetti filter element costs a penny, and you should not neglect replacing it. You should also not reuse the filter, since there is a possibility of damaging the air conditioner evaporator. Where it is, how to replace it and what not to do, we will figure it out right now.
Which filter to choose - article numbers of originals and analogues
The manufacturer recommends installing original production parts on the model. They are of the required quality and meet the requirements class=”aligncenter” width=”510″ height=”597″
You can find an original spare part in the store using the following article number:
| Manufacturer | vendor code | average price |
| General Motors | 96554421 | 1158 |
Not all users prefer original parts. This is due to the high price and average efficiency. Also, “original” consumables cannot always be purchased due to their absence in stores.
The article numbers of the most popular analogues are as follows:
| Manufacturer | vendor code | average price |
| ACDELCO | 19347483 | 323 |
| ACDELCO | 19347449 | 2284 |
| ACDELCO | 19347562 | 4682 |
| AIKO | AC0138 | 355 |
| ALCO FILTER | MS6398 | 556 |
| AMD | AMDFC22C | 276 |
| AMD | AMDSETF44 | 507 |
| AMIWA | 2001136 | 179 |
| ARRANG | ARG324422 | 181 |
| ASHIKA | 21DWW10 | 383 |
| BIG FILTER | GB9908 | 329 |
| BLUE PRINT | ADG02523 | 503 |
| BOSCH | 1987432223 | 736 |
| BOSCH | 986AF4178 | 688 |
| BOSCH | 986AF5548 | 397 |
| CHAMPION | N194609 | 854 |
| CORTECO | 80000804 | 525 |
| CORTECO | 80001185 | 621 |
| CORTECO | 80000783 | 959 |
| CORTECO | 21652338 | 595 |
| DELPHI | TSP0325326 | 763 |
| DELPHI | TSP0325305 | 655 |
| DENSO | DCF243P | 651 |
| FEBI | 30743 | 424 |
| FILTRON | K1223 | 381 |
| FILTRON | K1166 | 469 |
| FINWHALE | AS605C | 312 |
| FORTECH | FS007C | 561 |
| FORTECH | FS049C | 325 |
| FRAM | CF10774 | 539 |
| FRAM | CF10526 | 645 |
| FRAM | CF9395 | 510 |
| GOODWILL | AG628CF | 214 |
| GOODWILL | AG137CFC | 308 |
| HENGST FILTER | E2914LI | 579 |
| HERTHBUSS JAKOPARTS | J1340907 | 301 |
| JAPANPARTS | FAADDW11 | 294 |
| JAPANPARTS | FAADDW15 | 287 |
| JAPANPARTS | FAADDW10 | 308 |
| JAPANPARTS | FAADDW13 | 288 |
| JAPKO | 21W10 | 360 |
| JC PREMIUM | B40006PR | 347 |
| CORTEX | KC0002S | 266 |
| KROSS | KG0401321 | 140 |
| LYNX | LAC069C | 533 |
| MAHLE KNECHT | LA362 | 841 |
| MAHLE KNECHT | LA472 | 955 |
| MAHLE KNECHT | LAK157 | 1931 |
| MANDO | ECF00063M | 287 |
| MANN FILTER | CU2442 | 589 |
| MANN FILTER | CU1719 | 670 |
| MASUMA | MCA5003 | 306 |
| MEYLE | 29123190007 | 440 |
| MEYLE | 6123190013 | 654 |
| MILES | AFW1161 | 246 |
| NIPPARTS | J1341016 | 323 |
| NIPPARTS | J1340903 | 381 |
| NIPPARTS | J1340910 | 347 |
| ONNURI | GFCD005 | 267 |
| PARTS MALL | PMCC03 | 450 |
| PATRON | PF2129K0R | 377 |
| PROFIT | 15212103 | 361 |
| PURFLUX | AH226 | 625 |
| PURFLUX | AH286 | 489 |
| PURFLUX | AH305 | 862 |
| RU54 | CF1166C | 237 |
| SAKURA | CA65170 | 421 |
| SAT | ST96554378 | 206 |
| SCT | SA1141 | 262 |
| SWAG | 40930743 | 435 |
| TSN | 9718 | 149 |
| TSN | 9716 | 192 |
| VALEO | 715526 | 819 |
| VEMO VAICO | V51300003 | 762 |
| WIX FILTERS | WP9238 | 706 |
| ZEKKERT | IF3198K | 284 |
| ZEKKERT | IF3198 | 262 |
| NEVSKY FILTER | NF6155C | 327 |
Read more: Peugeot Partner rear beam pin
When to change or signs of a clogged filter
Otherwise - after 12 months of use.
However, the consumable element may wear out in a shorter period of time depending on operating conditions. Frequent travel on country roads, in megacities or industrial cities with a large amount of exhaust emissions negatively affects the condition of the cleaning element. Therefore, the consumable renewal period can be reduced to 5-7 thousand kilometers.
Signs of an air purifier malfunction may include the appearance of various problems that were not observed before. Each of them is associated with filling the filter with dirt and dust, small particles can be as small as 1 nanometer. As a result:
- air is not able to sufficiently pass through contaminated filter openings and enter the cabin;
- ventilation is poorly blown and does not provide cooling in hot weather;
- the stove does not heat well, its operation is accompanied by unpleasant noise;
- windows often fog up because the air duct is not able to maintain the desired atmosphere in the cabin;
- a persistent musty odor appears.
How to choose the right cabin filter - carbon or regular, which is better?
We understand that the better and more advanced the filter, the more expensive it is. However, if we live in Bukovel and the only threat to health from the air is dust and pine needles, it will be enough to buy a cabin filter of the simplest design, without a carbon layer. Such an element will last a year and a half in conditions of average dustiness, and its price is no more than $2-3.
For residents of megacities and areas with high dust levels, it is advisable to use carbon and bioactive cabin filters, which not only prevent the penetration of dust, but also reduce the likelihood of biological threats and kill unpleasant odors. The price of such cabin filters is $5-8, depending on the car model.