Necessary tool
Wear of the oil seal leads to oil leakage from the engine, which should not be allowed on any car. Replacing a part yourself is only possible if you have the tools and detailed instructions. Let's look at the tool needed for the job:
- Set of wrenches and ratchets with heads. You will need open-end wrenches for 10, 13, 19;
- New oil seal for installation;
- Socket wrench;
- Flat screwdriver;
- Container for draining old oil;
- New engine oil;
- Sealant for a secure fit;
- Oil pump gasket;
- Jacks;
- Hammer.
As you can see, for self-replacement you need a fairly extensive list of tools. Replacing the front crankshaft oil seal of a VAZ 2114 is similar to changing the rear element, so the set of tools to replace it will need the same.
Useful : Where is the DPKV located on the VAZ 2114?
In addition to jacks, you will need wheel chocks to lift the car. You should not use shifting into gear as a way to protect against the car rolling away. Understanding how to replace the crankshaft oil seal on a VAZ 2114 allows even an inexperienced car owner to carry out the work. First, let's look at the instructions with step-by-step actions for changing the front element.
What is needed to replace the crankshaft oil seal
Oil leakage from the front of the crankcase of an internal combustion engine does not yet indicate that the problem is located directly in the oil seal. First, any vehicle owner needs to make sure that the ventilation system is in full working order. But if contamination of the crankcase itself or the hoses is detected, it is still too early to change the crankshaft seal of the VAZ 2114. But if the ventilation system is fully working, and oil continues to leak, then the problem is clearly in the oil seal and it certainly needs to be replaced in the near future.
What tools are needed to replace the oil seal on a VAZ 2114 8 valves:
- Sealant;
- Unused internal combustion engine oil;
- Jacks - for lifting the car (2 pieces);
- A special lubricant component based on graphite;
- Flat screwdriver;
- Unnecessary container for subsequent draining of oil into it;
- Full set of open-end wrenches;
- Complete set of socket heads;
- Gasket for oil pump;
- Crankshaft oil seal;
- Recoil devices;
- Hammer.
Replacing the front oil seal
Useful video:
Having prepared the tools and spare parts, you can begin work on replacing the worn part. The step-by-step repair process looks like this:
- Remove the protective plastic cover from the timing belt.
- The next stage is setting the first cylinder of the engine to top dead center. This manipulation is carried out as follows: the camshaft and crankshaft are rotated until the marks on their pulleys coincide with the marks on the timing case cover.
- To remove the timing belt, the front right wheel is jacked up and the engine protection is removed. Before tightening the belt, you need to loosen the tension. To make work easier, you can remove the fender liner and remove the alternator belt. After this, the crankshaft pulley itself is removed and the timing belt tension roller is loosened.
- After removing the crankshaft pulley, drain the engine oil.
- Remove the engine sump, which is secured with 16 bolts.
- After removing the pan, you need to unscrew the oil receiver. After dismantling, check it for debris. Its channels can be cleaned with a compressor.
- The next step is to remove the oil pump. This element is secured with six bolts.
A gasket is placed where the oil pump is attached to the engine block. Over time, it loses its properties, and when the part is removed, it is completely destroyed. During the reassembly process, do not forget to change this gasket.
- Having completed dismantling the oil pump, you will have access to the front o-ring. You can pull it out with your fingers or a flat-head screwdriver.
- After removing the old element, clean the surface and seat from oil and dirt. To install the new rubber ring tightly, you can use a 32mm socket socket. Having rested it against the new oil seal, apply a couple of firm blows and insert the rubber ring into the seat. Do not make strong blows, because... The ring is made of soft material.
Helpful : Signs of a faulty crankshaft sensor (9 symptoms)
When completing the installation, reassemble everything in reverse order and fill in with new engine oil. As a recommendation, we note the need to lubricate the internal surface of the part before installation. It is enough to lubricate the surface with a few drops of motor oil. In addition to the front sealing ring, the VAZ 2114 engine also has a rear sealing element. Next, we will consider the step-by-step replacement of the rear crankshaft oil seal of the VAZ 2114 (8 valves).
Step-by-step replacement instructions for an 8 valve car
Replacing the front crankshaft oil seal on a VAZ 2114 8 valve consists of the following steps:
The video shows step by step how to change the rear cuff on a VAZ.
To remove the rear crankshaft seal, experience in repair work is required; it is better to do this with an assistant. The steps to replace it are as follows:
When buying oil seals, you should consider what kind of lubricant is used. For synthetic and mineral oil, cuffs made of different materials are used. After completing the procedure, you should start the VAZ 2124 engine and check the condition of the sealing rings to ensure that there are no oil leaks anywhere.
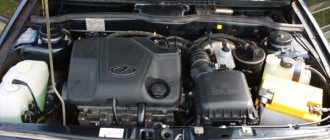
An engine oil leak is a pretty sad picture. In this case, the front part of the engine crankcase was heavily oiled. Having removed the timing protection, we inspect the oil pump cover - a rather inaccessible place, covered by the generator pulley. We see that oil is flowing heavily from the area near the front crankshaft oil seal.
The cause of the engine oil leak has been determined, and therefore, you can safely begin repairs.
Replacing the front crankshaft oil seal VAZ 2114
is done as follows: either quickly or correctly. In the first case, they simply pick out the cuff and install a new one, without removing the oil pump. In the second case, a complete and consistent disassembly is carried out - as prescribed in the repair manual.
Naturally, we preferred the second, correct option.
For spare parts, we will need the front crankshaft oil seal, as well as gaskets for the oil sump and oil pump. We carry out all the work either in a viewing hole, on an overpass, or on a lift. In this case, we don’t need special tools. First of all, we need to hang up the front right wheel and then remove it. Then you need to drain the oil from the engine crankcase.
Using wrench No. 10, unscrew the 4 bolts of the front timing protection, then remove it.
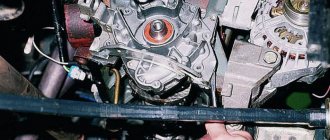
Using wrench No. 8, unscrew the bolts (6 pcs) that secure the right half of the lower engine protective casing. We remove the casing, then, using wrench No. 17, loosen the nut that secures the generator to the tension bar, and by sliding it, remove the drive belt.
We put the gear shift lever in first gear and use a wrench to unscrew the bolt No. 19 that secures the pulley to the crankshaft. Remove the pulley from the crankshaft.
Now we need to remove the timing belt, for which we first need to switch the lever to fifth speed and align the installation marks on the rear protective cover of the toothed belt and the camshaft pulley, while rotating the suspended wheel.
It doesn’t hurt to make sure that the mark on the flywheel visible in the hatch of the clutch housing is opposite the middle mark of the scale.
Using wrench No. 17, loosen the tension roller mounting bolt, then remove the timing belt.
Using wrench No. 10, unscrew the bolts that secure the lower clutch housing cover, then remove it.
Now, using a 10mm socket, unscrew the 16 bolts that secure the oil pan to the cylinder block. We remove the crankcase along with the gasket.
Using the same wrench, we unscrew the bolts that secure the oil receiver to the pump body, as well as to the cover of the 2nd main bearing, and remove the oil receiver.
We move the toothed pulley from the crankshaft using two screwdrivers.
Use a screwdriver to pry up the key, then remove it from the groove of the crankshaft. You should act very carefully in this case, since this key is very small, and therefore quite insidious - it’s easy to lose it, but it’s very difficult to find it.
Important!
Don't forget to remove the old oil pump gasket from the cylinder block (usually it sticks to the cylinder block).
At the end of the work, we inspected the old oil seal and made sure that the cause of the engine oil leak was correctly identified - the working edge of the oil seal had worn out by more than 2 millimeters, which was the cause of the oil leak.
Assembly should be done in the reverse order of disassembly.
The new oil seal must be lubricated with engine oil and pressed into the cover until it stops, using a mandrel of suitable diameter. We place a new gasket under the oil pump, having previously lubricated it with sealant on both sides.
When installing the oil pump, it is necessary to ensure that the two guide pins of the housing fit evenly into the holes of the cylinder block, and that the working edge of the oil seal is not crushed.
A new gasket should also be installed under the oil sump, also lubricating it with sealant on both sides. After installing and tensioning the timing belt, check whether the installation marks match. If everything is done correctly, all that remains is to fill the engine with engine oil.
4 years ago
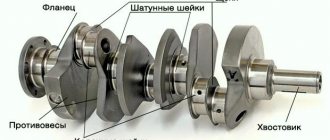
The car has two crankshaft oil seals located at opposite ends. It's easier to remove the front oil seal, but with the rear one you'll have to tinker a little more - remove the flywheel, then the oil seal holder, and only then knock it out and replace it with a new one. Few people decide to replace the rear oil seal - the process is quite labor-intensive and requires certain skills. In our article today we will talk about the front, where there are no particular difficulties, the main thing is to remove the crankshaft pulley and remove the oil seal from the oil pump cover.
Note!
You will need the following tools: screwdrivers, various kinds of wrenches, sockets, a wrench, and some motor oil poured into the engine of your car.
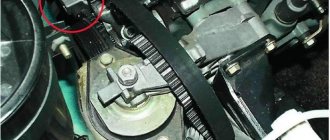
Front oil seal location
It is located behind the crankshaft pulley, and this pulley is hidden behind the generator pulley (indicated by the red arrow). Both pulleys are secured by one large and long bolt holding them in the center. After unscrewing this bolt and removing both pulleys, you can easily see the oil seal. In the small photo just below it is indicated by an arrow.
When is it necessary to change the oil seal?
The main and only reason for replacement was that the oil seal was leaking. Let's look at why taoke happens:
- the seal simply broke;
- Over time, rubber becomes unusable and begins to crack;
- squeezing the oil seal out of its seat.
The latter rarely happens, but keep in mind that in this case it is 100% subject to replacement with a new one, because after extrusion, it is severely deformed on the pulleys and cannot be reinstalled. Indentation occurs due to excess pressure in the lubrication system. Keep a close eye on the oil pressure lamp on the dashboard; do not operate the car with the light on (indicated in the bottom photo); it probably indicates excess or insufficient pressure in the lubrication system.
Note!
It is not easy to recognize a leak in the front oil seal; you will have to examine it by touch, especially at the location of the oil seal. Take a flashlight, start the car and look at the location of the oil seal to see if there are any traces of leaks. As a rule, a worn oil seal causes oil to leak while the engine is running; the main thing is to take a good look and notice the problem.
Replacing the rear oil seal
Useful video:
Changing this part is a little more difficult, because... Removal of the clutch kit and the entire gearbox assembly is required. For comfortable work you will need a lift or pit. The step-by-step replacement process looks like this:
- To begin, dismantle the gearbox and clutch assembly.
- Using the “17” head, unscrew the six bolts securing the flywheel.
- We note the position of the flywheel relative to the crankshaft.
- We remove the flywheel.
- We remove the element from the landing site using a flat-head screwdriver.
- Using the old oil seal as a mandrel, we insert the new element into the seating area with gentle blows of a hammer.
- We align the flywheel according to the marks.
- Lubricate the fastening bolts with sealant (their threaded part).
- We assemble everything in reverse order.
As you can see from the instructions, it is possible to replace these parts with your own hands, but you will need tools, a lift or a pit. At the service, worn-out elements can be replaced for 1,500-2,000 rubles, which for some 2114 owners is quite an impressive amount.
How to replace the rear crankshaft oil seal on a VAZ 2114 8 valve
In turn, changing the rear oil seal is much more difficult to perform than changing the front one. But if you carry out the work following the step-by-step instructions, all subsequent steps will become easy to complete and at the same time complement your personal experience in car repair.
- First, you need to disconnect the negative terminal from the car battery.
- It is imperative to make a note of the correct location of the flywheel in relation to the crankshaft. And then dismantle it.
- Then remove the rear shield of the clutch housing.
- Then you need to unscrew 8 bolts. They fix the oil seal itself. Having done this with ease, remove the holder.
- Then the oil seal is removed from its normal position (holder).
- In the future, you definitely need to install a new part instead of the worn one, until it stops. To perform this procedure correctly, you must use a frame. It should be pressed in so that the working edge is directed inward.
- The next step is to replace the gasket, which most likely became deformed during operation of the machine. But if at first glance it looks quite normal, then it is still worth replacing.
- A special lubricant, which has a thick consistency, is applied to it and glued. This will achieve a more airtight connection with the holder.
- The edge of the oil seal retainer should be treated with oil.
- The crankshaft flange is subjected to the same treatment.
- Next, you need to loosen the oil sump fasteners going to the cylinder block. To do this, make two to three turns on fourteen bolts. They hold the crankcase.
- During installation work, the oil seal working edge retainer is carefully and very carefully inserted onto the crankshaft flange.
- Then it is imperative to screw the fastener screws back.
- The next step is to tighten the mounting bolts of the internal combustion engine crankcase.
- The rear shield of the clutch housing is reinstalled.
- Then you should return the gearbox, flywheel and clutch. To improve the grip of the mounting bolts, apply a small amount of sealant to their threads and tighten them.
How to change the crankshaft oil seal on a VAZ 2114 video:
How much do crankshaft oil seals cost for a VAZ 2114?
Carrying out maintenance work on the clutch or timing device should be combined with replacing the specified oil seals. Both the front and rear o-rings wear out over time. The price for a new crankshaft oil seal (front) does not exceed 400-500 rubles . The article number of the original spare part from AvtoVAZ is 21081005034 . In addition to the factory manufacturer, there are parts from foreign companies of higher quality.
The price of the rear o-ring also does not exceed 500 rubles . The article number of the spare part has not changed since the release of model 2108. Domestic spare parts can be ordered under article number 2108-1005160 .
The prices indicated are valid for online spare parts stores. At some points of sale, the cost of parts can reach 700 rubles .