Troubleshooting wires
Some drivers, in search of a malfunction, are in a hurry to remove the starter, but such hasty actions should not be taken, since often the problem of the engine not starting is due to wires, poor contacts or their absence. Here are the most typical defects:
- low weight of the engine and body;
- unreliable connection of the starter wires (plus of the rotor winding, main plus, power supply contact from the ignition switch to the solenoid relay (SR)).
If there is a bad ground on the engine, a sign of a defect will be a slight click on the first attempt to start, then all the instruments may go out, and with the next turns of the key any signs of “life” will disappear altogether (but not necessarily). Checking the presence of mass is quite simple, but the check needs to be done by two people:
- one of the participants closes the mass terminal of the battery with the engine housing with a metal object (for example, a wrench or a cigarette wire);
- the second person, sitting behind the wheel of the car, turns the key all the way to the right;
- If there really was a bad ground, the starter will immediately start turning at normal speed.
You should also ensure the reliability of all fasteners on the starter; to do this, perform the following steps:
- unscrew all the nuts on the starter, having previously removed the terminals from the battery;
- wipe the joints and fasteners with a dry, clean rag;
- treat contacts with WD-40;
- tighten the nuts with the necessary force; do not overtighten, otherwise you may break the thread.
If the BP wire is connected using a connector, bend the tongue of the “chip”; here the connection should be tight.
When, after cleaning all contact parts, the engine starts, it means that the malfunction has been eliminated, and there is no need to find out what caused the defect. If nothing has changed for the better, then you should definitely check the starter; to do this, the unit will have to be dismantled.
How to start the engine if there is a problem with the starter and solenoid relay?
If the starter mechanism is not working, the car owner has the opportunity to start the power unit. There are several ways to start the engine.
Close the starter directly
An example of a launch is considered on a VAZ 2110 car:
- The transmission lever in the cabin is set to the neutral speed position. The parking brake lever is raised.
- The ignition system is activated by turning the key in the switch. The engine compartment of the car is opened, the following steps are performed under the hood.
- The air filter device is being dismantled. It is retracted to the side so that the driver can gain access to the contact elements of the starter assembly.
- The chip that goes to the contact component is turned off.
- Using any metal product, for example, a screwdriver, the contact components of the starter assembly terminals are short-circuited. You can use a piece of cable.
- After closing the contacts, the starter mechanism should begin to rotate, which will lead to the engine starting. It is important that the battery is charged when performing this task.
After completing the action, the chip is put back in place, and the filter device is mounted back. Such steps will allow you to start the power unit in the future. But since the problem remains, it will still have to be solved.
Sergey Tsapyuk spoke in detail about the procedure for starting the power unit by directly closing the starter unit.
Wheel spin
The implementation of this method is only possible on front-wheel drive vehicles equipped with a manual transmission:
- The car is placed on a jack, one of the front wheels must be suspended.
- The suspended wheel is turned outward until it stops. If it is the left wheel, then it turns to the left, the right wheel, respectively, to the right.
- A cable is wound around the surface of the tire, which is used for towing. If it is not available, a strong rope may be used. It is necessary to wind 3-4 layers, while at least one meter of rope or cable must remain free.
- The gearshift lever is moved to the third speed position.
- The key turns in the ignition switch.
- Then you need to strongly pull the end of the rope or cable, this is done to unwind the wheel. It is not recommended to perform this task while standing in one place; you should take a short run-up.
- If the vehicle's power unit starts, the neutral speed is activated. To do this, it is not necessary to depress the clutch pedal. You have to wait until the car wheel stops.
- Then the jack is loosened and the wheel is lowered to the surface of the ground.
From the pusher
The implementation of the “old-fashioned” method from the “pusher” is performed as follows:
- An assistant will be needed to complete the task. You can act on your own if the car is on a descent.
- The parking brake handle is lowered.
- The key is turned to the ignition mode, the transmission selector is set to the third gear position.
- Then the car must be pushed. If there is an assistant, the driver sits in the cabin and waits until the speed is at least 10-30 km/h. The clutch pedal on the car must be depressed.
- After increasing the speed, the pedal is carefully lowered, while the driver presses on the gas. When the engine starts, you can put the gear in neutral and stop to wait for it to warm up.
Content
The UAZ starter is a mechanism that is necessary to start the vehicle’s power unit.
Trouble-shooting
We begin repairing the starter by replacing the front bushing. Auto stores sell repair kits for repairs, but consider which starter you have installed, large, small or with a gearbox. However, stores are already moving away from such sales and most often you can buy the entire part assembled, in this case a mask (nose). Replacement is carried out after complete disassembly of the starter and will not cause any difficulties, just remove the old one and install a new one.
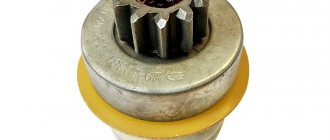
Next, look at the bendix, if the bushing is missing or broken (large play), then it is better to replace it. You can also replace the bushing itself.
When buying a Bendix, pay attention to what kind of bushing it is, it should be bronze or, in extreme cases, copper, since bronze is harder and can withstand the load better, but under no circumstances should you buy one with copper-graphite. Also pay attention to the size of the overrunning clutch; if it is small, then you can assume that it will not last long.
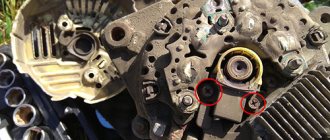
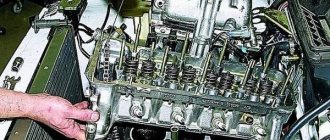
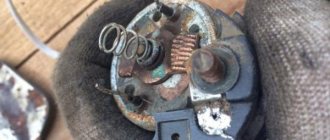
The brushes must be sharpened smoothly, without damage, and pressed tightly against the commutator. Otherwise, replace them. The collector must have a smooth, shiny surface with no signs of sparking (black soot) on the contacts. The photographs below show what they look like.
There will be information about anchor repair in another article. It seems that you yourself understand that if the starter turns slowly, then you can get into a situation where, having turned off the car, you will have to push it to start it, or tow it. And in winter conditions this can be difficult. So don’t delay and repair the starter in a timely manner.
Causes
The front bushing and bendix gear bushing are the most susceptible to wear. The gear bushing plays an indirect role here, since during starter operation it does not rotate relative to the rotor, however, when worn, it removes the gear from the flywheel, which leads to increased pressure on the front bushing and its rapid wear. Therefore, when repairing a UAZ starter, it is better to do it comprehensively.
The front hub especially affects the rotation speed of the starter. If it is severely worn, the armature (rotor) can touch the stator, which has a catastrophic effect on its rotation and will ultimately lead to overheating of the armature and, accordingly, a breakdown in contact (soldering) between the armature winding and the brushes. This can greatly increase the cost of repairs, since the rotor will have to be repaired or even replaced. If contact with the windings is broken, power loss also occurs and it turns slowly.
The starter may also turn slowly due to faulty brushes. If they wear out significantly, they do not press well against the commutator, which leads to an arc and burnout or melting of the commutator. Since its power is quite high, it will continue to rotate the engine until it becomes completely unusable. In this case, you will have to change not only the brushes, but also the anchor.
The anchor itself does not fail, unless it is a manufacturing defect. Most often, the breakdowns described above lead to its breakdown.
UAZ 469 starter does not turn
A car starter is a functional part of the engine's electrical systems, which is necessary to ensure trouble-free starting of the power unit, regardless of operating conditions and external factors.
It happens that when trying to ignite the engine, the starter stops working properly - in this case it is necessary to disassemble the part and carry out repairs or replacement.
ATTENTION! A completely simple way to reduce fuel consumption has been found! Don't believe me? An auto mechanic with 15 years of experience also didn’t believe it until he tried it. And now he saves 35,000 rubles a year on gasoline! Read more"
A car starter is a complex mechanism, the contraction of which is designed for repeated starting without loss of functionality, however, if there are problems with engine ignition in a UAZ 469, the problem probably lies in:
- The starter is locked - in fact, “the device clicks, but does not spin.” In this case, the cause of the malfunction is ground off flywheel teeth due to prolonged use of the device. When the teeth are ground down, the starter spins at idle for a long time, after which the mechanism connects with the remaining teeth of the flywheel and starts the engine;
- Wear of the starter bendix - failure of the bendix in the design of the starting device also leads to problematic engine starts. For example, when turning the key to the ignition position, the relay pushes the bendix forward, but the part itself rotates without engaging the flywheel - in this case, the engine starts and immediately stalls, since the flywheel stands still or is wedged by the shaft;
- The starter speed does not correspond to the norm - this malfunction can only be diagnosed after disassembling the device. The problem occurs when the starter rotation speed is insufficient, as a result of which the device does not set the required intensity of shaft rotation - to eliminate the situation, it is necessary to replace the rotor or stator;
- Open circuit - if, when you try to start the engine, clicks of the solenoid relay are clearly heard, but the engine does not start, then you should look for the fault in the winding of the device or check the functionality of the rotor or stator;
- After starting the engine, the device continues to function - this is an emergency mode that can harm the engine. In this case, the car must be turned off immediately and evacuated to a service station to solve the problem.
Note! Even if minor malfunctions in the operation of the starter are observed, it is necessary to urgently submit the car for diagnostics and, if necessary, replace inoperative components - otherwise the situation may result in expensive engine repairs or a sudden breakdown on the highway
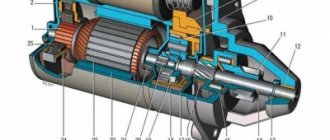
Design and principle of operation
Most overrunning clutches (let's call them the more popular word among motorists - bendix) consist of a driving race (or outer ring) containing rollers and pressure springs, as well as a driven race. The leading holder has wedge channels, which on one side have a significant width. It is in them that the spring-loaded rollers rotate. In the narrow part of the channel, the rollers are locked between the driving and driven clips. As is clear from the above, the role of the springs is to drive the rollers into the narrow part of the channels.
The principle of Bendix operation is the inertial effect on the gear coupling that is part of it until it engages with the engine flywheel. While the starter is inoperative (the engine is turned off or running in constant mode), the Bendix clutch is not engaged with the flywheel crown.
Bendix works according to the following algorithm:
Bendix interior
- The ignition key is turned and current from the battery is supplied to the starter motor, driving its armature.
- Thanks to the helical grooves on the inside of the coupling and the rotational movement, the coupling, under its own weight, slides along the splines until it engages with the flywheel.
- Under the action of the drive gear, the driven cage with the gear begins to rotate.
- If the teeth of the clutch and the flywheel do not coincide, it rotates slightly until they are firmly engaged with each other.
- The buffer spring included in the design serves to soften the starting moment of the engine. In addition, it is needed to prevent tooth breakage from impact when the gears engage.
- When the engine starts, it begins to rotate the flywheel at a higher angular speed than the starter previously rotated. Therefore, the coupling twists in the opposite direction and slides along the splines of the armature or gearbox (in the case of using a geared bendix) and disengages with the flywheel. This saves the starter, which is not designed to operate at high speeds.
Tags: UAZ
Comments 54
Above it was suggested to unhook the wiring from the switch from terminal D from the distributor and connect it to ground (previously, instead of the explosive wire, insert a piece of wire into the coil and place it 5-7 mm from ground) with the ignition on - is there a spark? It always makes sense to have a _tested_ distributor cap, slider, distributor sensor, switch and coil with you.
We should try this
How are you doing, comrade? got out? what happened?
they dragged me)))) after that and I can’t get to it because work keeps me late
How are you doing, comrade? got out? what happened?
I'm blaming the switch, although it's new
Now I’ll say bullshit, but sometimes we don’t even notice the obvious... in the manner of a sudden death. Circuit breakers. Weight. HV wires. Filled it up.
I checked the fuses are intact
Don't you carry a spare switch with you? They sometimes get covered, especially if the mass is bad.
That’s what I don’t drive, now I’ll take half the garage with me for spare parts))))
I still have a Zhiguli, on December 31, when leaving the store, right at the turn the switch burns out, as a surprise. I've been driving ever since.
Do you have a sample? I'll tell you everything point by point
Pull out the central wire from the distributor, lean it against the engine 0.5 cm, turn it with the starter, if there is a spark, check the slider, if not, try to bridge the resistance
The first thing I did was try the central wire to ground and there was no wire. But to bridge the resistance, I’m not very good at electrics.
The box in the photo, the spiral inside, when you start the engine, power goes to the coil from the lock, you release the starter, power goes through the resistance, which reduces the load on the coil.
This happened recently. Cause 100%: the contacts on the contact group were burnt. Those. when you remove the distributor cover you will see contacts (2 pcs). So they got burnt. Cleaning cannot fix it, only replacement (tested).
Do you hear any popping noises when you turn the starter? Is there a spark? Does it catch on? Or completely deaf?
Insert the spark plug wire into the coil and check if there is a spark. If there is one, look at the distributor slider.
no spark, I tried that
Check the distributor. The wiring is attached to it on the side, sometimes unscrewed.
Stands in place and is screwed
He may be standing, but there is no contact. Hanging on one insulation.
Check the plus on the coil, if not, then the variator, whether there is a plus on it from the ignition, check the plus on the switch, if there is, then take terminal D and poke it to ground, while bringing the high-voltage one from the coil to ground, pulling it out of the distributor. If there is, then the sensor in the distributor has run out, if not, then the switch. PS in practice, when there are breakdowns, most often the variator, then the switch, less often the distributor, and even less often the coil.
+ there is both here and there
Check the plus on the coil, if not, then the variator, whether there is a plus on it from the ignition, check the plus on the switch, if there is, then take terminal D and poke it to ground, while bringing the high-voltage one from the coil to ground, pulling it out of the distributor. If there is, then the sensor in the distributor has run out, if not, then the switch. PS in practice, when there are breakdowns, most often the variator, then the switch, less often the distributor, and even less often the coil.
Which sensor is the sensor in the distributor running out?
a thin wire goes to the distributor, it is screwed on the side, unscrew it and poke it to ground, if there is a spark from the central coil, then the sensor has ended in the distributor.
Which sensor is the sensor in the distributor running out?
pull the central one out of the distributor and keep it at a distance of 1-2 mm from the mass
Which sensor is the sensor in the distributor running out?
If there is only one wire coming off the distributor, then it is a contact distributor. The pin on the contact has worn off and it won’t press out. See contact. It was so.
Starter UAZ 469
Power units for Russian UAZ 469 vehicles are produced by two enterprises. These are the Ulyanovsk and Zavolzhsky motor plants. The completion of engines with starters in both companies is carried out by Pramo-Electro LLC, Rzhev, Tver Region. From here, engine builders receive a UAZ 469 starter under the factory catalog number 42.3708.
The starter of the UAZ-469 car is an electric motor that consumes direct current. It contains a series excitation winding. An electromagnetic traction relay and a drive with a freewheel are installed. It is installed on the left side of the engine.
Now the Rzhev plant has mastered the production of a more modern device. The improved automobile starter received a new catalog number 4211.3708-01. The driver turns on the starter remotely using the ignition switch. By turning the key in the ignition, it closes the DC circuit.
Electrical energy from the battery begins to flow to its primary winding, exciting it. At the same time, the retractor relay pushes the working gear. It engages with the toothed flywheel of the engine, performing a rotational movement. The flywheel spins up, all the working parts begin to move, and the power unit starts up.
Design Features
UAZ Patriot is equipped from the factory with two and Bosch starter models. Fundamentally, these models are structurally no different; the difference can only be noticed in the quality of the products. Both models are DC electric motors with electromagnetic excitation. At the top of the housing there is a retractor relay with two types of windings: traction and holding.
On the Patriot, the ZMZ 409 engine is usually equipped with an “AZE 2517” or “BATE” (5112) starter. It works like this: when the engine starts, the solenoid relay is activated first and engages with the flywheel ring, which has many teeth. After this, the starter itself is put into operation, due to which the flywheel rotates, and as a result, the engine starts.
UMZ-4218 engines are equipped with “42.3708” starters. On ZMZ-5143 (diesel) engines you can find models “6012.3708” or “AZE”.
Situations often occur when when you turn the key in the ignition, nothing happens, that is, the starter does not turn. What to do in this situation?
Causes of failure
The main reasons why the starter on a UAZ Patriot does not turn may be:
- Dead battery. The amount of energy consumed when starting the engine depends on many factors: ambient temperature, engine oil viscosity, engine size. In winter, the starting current can reach 300 Amperes!
- The contacts on the device itself may be damaged or oxidized. It is also worth checking the wires going from the battery to the starter.
- There is a malfunction in the electrical part of the car. This could be a problem with the wiring, fuse, relay, or ignition switch. These reasons occur rarely.
Device diagram
Checking the first two points yourself is not difficult. And for a more in-depth diagnosis, the help of a specialist may be required. If it turns out that according to the diagnostic results everything is in order, then the problem may be that the starter has simply served its purpose and it’s time to change it. Although the product itself does not have clear operational limits, depending on the intensity of use, its service life may be reduced.
Most often, problems with the starter occur among taxi drivers, who have to start the car engine several dozen times a day. Experienced drivers in such cases try, if possible, not to turn off the car if the parking is not long.
Dismantling the product
The starter is located behind the right wheel in the transfer case area, the bolt heads are closer to the engine and located one above the other. The starter mounting bolts are part of the transmission bell mounting bolts and their heads point towards the rear of the car. You won't be able to climb up from above using any keys, so you'll have to climb into the hole. In order to remove the starter on a UAZ Patriot you will need the following tools:
- Screwdriver flat and Phillips.
- Wrenches for 14, 13 and 8. When unscrewing the fastening bolts (2 bolts), it is more convenient to use a head with a ratchet.
- Retaining ring remover (if complete disassembly is planned).
Before removal, it is necessary to completely de-energize the vehicle by disconnecting the negative terminal of the battery. Next, you need to do the following:
- Pull off the rubber boot and unscrew the nut, which serves as the power terminal for the annealing relay. Remove the terminal from the stud.
- Unscrew the nut securing the plus terminal to the starter power supply.
- Unscrew the lower and upper bolts securing the device. To unscrew the top bolt you will have to use a ratchet; you cannot get to it with a regular wrench.
Installation of the product is carried out in the reverse order of removal.
Do I need to change it?
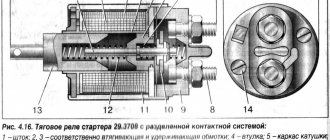
If the starter breaks down, don’t rush to throw it away right away. First you need to check the serviceability of the solenoid relay, the problem may be oxidation of the contacts, then it’s enough to simply clean them. To check the retractor, directly connect the “+” and “-” terminals of the battery to the retractor relay as shown in the figure:
Be sure to disconnect the white wire from the contact bolt
If you close the circuit, the armature of the retractor relay should retract instead. If this does not happen, you will have to replace the solenoid relay with a working one; it is an integral part of the starter and can be changed separately. To replace the retractor, unscrew the two fastening bolts from the end of the device.
UAZ 469 starter maintenance
UAZ 469 starter maintenance:
1. Periodically check the condition of the clamps on the contacts in order to prevent them from loosening, dust, dirt, corrosion, and oxidation.
2. Inspect the collector, remove the protection casing. Eliminate identified defects, clean contacts, lubricate with Litol lubricant.
3. Open cover 13 and check all elements. Clean the contacts and blow with compressed air.
4. Tighten the UAZ 469 starter mounting bolts.
5. When operating a vehicle in a forest, quarry, or rural area, it is necessary to periodically dismantle the UAZ 469 starter and clean it with a wire brush to remove dust, dirt, and deposits.
10000 km
Check the UAZ 469 starter, perform maintenance-1 with the following routine operations:
1.Check the wires.
2.If necessary, tighten loose connections.
3. It must be remembered that a violation of the tightness of the wire from the battery to the starter leads to an increase in the transition resistance in its circuit.
4. As a result, this reduces power and impairs starting.
30000 km
Check the UAZ 469 starter, perform maintenance-2 with the following operations:
1.Remove the protection tape.
2.Blow out the collector with compressed air.
3.Check the brushes and commutator.
4. Eliminate defects.
Once every year, but at least every 25,000-30,000 km of the vehicle, it is necessary to remove the UAZ 469 starter. It should be disassembled, thoroughly wiped and the parts blown with compressed air. If defective parts, assemblies, or mechanisms are identified, replace them with new ones or repair them. Assemble, adjust, perform control check.
Part Specifications
This is how the starter works
The UAZ starter has a torque of no more than 1.6 kgf/m, and a rated power of 1.7 kW. The armature shaft has a clutch and a drive gear. The first element transmits torque in one direction - from the device in question to the motor.
The diagram allows you to find out whether the gear starter is working or not. As for the drive, its suitability is determined by external inspection after disassembling the main unit. The condition of the brushes and commutator is checked in the same way. The first parts are replaced with new ones, and the second ones are degreased with gasoline.
Auto mechanics recommend periodically inspecting the gear starter. Necessary:
- check the condition of the clamps (they should not be dirty, and the fastenings should not be loose);
- remove the casing and inspect the collector (if necessary, troubleshoot problems);
- open the cover, inspecting and cleaning the contacts;
- tighten the main unit housing fixing bolts;
- remove the device in question to remove dirt.
Every 32,000 km, it is recommended to carry out some maintenance work on the main unit. To do this you will need:
- remove the gear starter from the engine;
- check the commutator and brushes (if the height of the latter elements is less than 6 mm, then they are replaced);
- disassembling the starter (replacing worn parts);
- During the assembly process, bearings, bushings and other components are lubricated.
Main faults of the UAZ-469 starter
What to do if the armature does not rotate when you turn on the starter.
| Probable cause of the malfunction | Remedy |
| Contact between brushes and commutator is broken | Remove the starter from the engine, disassemble it and eliminate the cause of the malfunction |
| There is no contact in the starter traction relay switch | Disconnect the wires from the starter, remove the switch cover with terminals. If the contacts are burnt, clean them. Rotate severely burnt contacts 180° around their axis |
| Broken connections inside the starter or in the traction relay | Repair the starter in a workshop |
| There is no reliable contact in the ignition switch at terminal “C” | Check the circuit using a test lamp connected to terminal C and ground. If there is no voltage at terminal “C” in the position corresponding to the starter turning on, replace the ignition switch |
| The winding is broken or the contacts in the additional relay are burnt | Check the circuit with a test lamp. The lamp connected to terminal “K” of the additional relay and ground should light up when the starter is turned on. If the lamp does not light, then disassemble the relay and clean the contacts |
| The armature is stuck in the sleeve of the electromagnet coil | Clean the armature, relay and bushing from dirt. If there is displacement of the traction relay relative to the starter lever, have it repaired in a workshop. |
What to do if, when the starter is turned on, the engine crankshaft does not rotate or rotates at a low speed.
| Probable cause of the malfunction | Remedy |
| Battery is discharged or faulty | Check the battery and replace if necessary |
| Short circuit of the armature or field coils or the armature touching the poles | Repair the short circuit or send the starter to a workshop for repair. |
| The engine crankshaft is difficult to turn | In winter, warm up the engine |
| The starter power supply circuit is broken due to loose wire ends | Inspect the entire starter power circuit, tighten all clamps |
| Severely worn bearings | Send the starter to a workshop for repair |
What to do if, when turned on, the starter shaft rotates at a high speed, but does not turn the engine crankshaft.
| Probable cause of the malfunction | Remedy |
| Broken flywheel teeth | Change the crown |
| Roller freewheel slips | Change the starter drive |
What should you do if, when you turn on the starter, you hear a repeated strong knock of the traction relay and the gear on the ring gear, but the engine crankshaft does not turn.
| Probable cause of the malfunction | Remedy |
| There is no reliable contact in the clamps, especially on the battery | Check and tighten clamp bolts |
| Battery is discharged or faulty | Check and charge the battery or replace it |
| The holding winding of the traction relay is faulty or its contact with ground is poor. | Replace the winding or ensure reliable winding contact |
What to do if the starter does not turn off after starting the engine.
| Probable cause of the malfunction | Remedy |
| The drive jams on the armature shaft | Disassemble the starter and eliminate the cause of the jamming |
| Sintering contacts of a traction relay switch or an additional relay | Fix the problem or replace the relays with new ones |
What to do if the starter switches on automatically when the car is moving.
| Probable cause of the malfunction | Remedy |
| The locking part of the ignition switch is stuck | Replace the ignition switch |
Lighting, light and sound alarm system UAZ-469
conclusions
The UAZ 469 has proven itself to be a fairly reliable off-road vehicle for multi-purpose use. The civilian population actively uses it for their own purposes also due to the fact that it can be serviced with its own hands, using factory documentation and advice from craftsmen.
The electrical equipment of UAZ-31512, UAZ-31514 and UAZ-31519 vehicles is made according to a single-wire circuit. The negative terminals of the sources and consumers of electricity are connected to the body and other components of the car, which act as a second wire. On-board DC network, with a nominal voltage of 12 Volts. Protection of electrical circuits is organized through a fuse box.
To switch the main circuits of the car, a combined ignition switch is used, consisting of a contact part and a mechanical anti-theft device with a lock. When the engine is not running, all consumers are powered by the battery, and after the engine is started - by alternating current with a built-in rectifier unit. When the generator is running, the battery is charged.
Location and purpose of fuses for electrical circuits of the on-board network of UAZ-31512, UAZ-31514 and UAZ-31519.
To protect the vehicle's external lighting electrical circuits from overload, a bimetallic fuse 29.3722 or similar is used, which is installed under the instrument panel on the left. Three 10 Amp fuses are installed in the PR103 fuse box, mounted on the partition of the engine compartment. They protect:
No. 1 - circuits of control devices; No. 2 - direction indicator circuits; No. 3 - alarm and sound signal circuits.
Fuse No. 1 is located closer to the right side of the vehicle. The heater fan motor power circuit is protected by a fuse with a rated current of 6 Amps. The fuse is located on the wiring harness next to the heater switch. UAZ-31512, UAZ-31514 and UAZ-31519 vehicles can be equipped with other additional fuses, depending on the configuration.
Unit connection
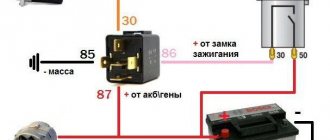
Unit connection diagram
For convenience and understanding of the actions carried out with the generator, it is recommended to study the connection diagram. The figure shows a diagram of the wires that are used during the charging process.
Particular attention must be paid to the size of the belt, which is an important component in the operation of the generator. UAZ is usually equipped with a belt 6 РK 1275
Any work is carried out in stages. The success of the operations depends on compliance with the sequence of actions. To connect the generator to the car system, just follow 5 simple steps.
- The first step is to turn off the electricity supply.
- Turn on and warm up the gas generator.
- Connect the unit to the network.
- Disconnect the generator from the backup network and turn it off. If this is done incorrectly, the unit may be damaged and become unusable.
- Connect the power supply.
Unit connection process
The vehicle must be prepared for repairs. Before turning off the generator for replacement, you must place the vehicle on a level surface and secure it. A prerequisite is to clean all elements of the machine, including the bottom.
Work should only be carried out in the presence of a mechanic. Repairs in a workshop will cost more, but the quality of the work will be much better. You should consider the price of the generator itself. Since the market situation is unstable, the cost of the unit can change quickly
When purchasing new equipment, you should pay attention to the warranty period and workmanship. It is recommended to purchase products only from well-known manufacturers
When the generator fails, it is often necessary to change the belt. To do this, you need to do a few simple steps. The drive belt is removed from the car. The tightened bolt should be loosened slightly, but not completely unscrewed, this will reduce the belt tension. Next you need to install a new belt. In this case, it is necessary to comply with all standards, the main one of which is a weakening of no more than 15 mm with a load of 8 kgf. The load should be applied in the middle of the mechanism. After checking, tighten the adjusting bolt and install the drive belt in its original place.
Period from 1965 to 1984
During this period, the automaker equipped its products with electrical components available to the domestic industry. Some of them were known for a long time, others were experimental, as evidenced by videos from previous years, and which had to prove their suitability.
Lighting control
In particular, the controls and a number of main units migrated from its predecessor, the GAZ-69. Thanks to this, the price of the car remained the same.
On models of the first years of production, a foot light switch was installed, which had several operating modes:
- The first position activated the circuit for switching the low beam headlights and side lights;
- In the second position, the low and high beam headlight circuit was activated.
The modernized light switch has a different operating algorithm:
- The first position supplies power to the side lights only;
- The second position is side lights and low (high) beam headlights.
The most correct option is to replace the old switch with a modern one, which uses only 3 contact groups.
Also, on older versions of the “452” there was no alarm, so in the electrical diagram:
- An RS-57 breaker relay was installed (mounted in the wiring gap from the “+” terminal of the battery to the direction indicator switch);
- The middle contact of the relay closed the indicator light on the instrument panel.
Ignition system
Also on the “452” contact ignition was installed:
- The “+” wire from the battery supplied power to the ignition coil;
- From the coil, the high-voltage wire transmitted the impulse to the breaker (distributor) and further to the spark plugs.
Period from 1985 to 2013
In later modifications, with the advent of injection, some changes were made to the ignition:
- An additional resistance was installed in the “battery-ignition coil” circuit;
- A separate wire from the starter was laid to the coil wire connection terminal (past the additional resistance)
- On later models, an additional starter relay was installed in the circuit.
Conclusions: along with the car, the electrical circuit also changed. This factor should be taken into account when carrying out scheduled repair work in order to eliminate emergency situations.
The UAZ starter can be presented in the form of various units. These models have almost the same design.
The gear starter has 4 poles and 4 brushes. It is attached to the crankcase using 2 studs.
Starter for UAZ 469: time-tested options
A car starter is a complex mechanism that is used quite intensively - failure of the starting device is not a rare case. For the UAZ 469 model range, starters with a supply power of at least 1.6 kW/h are suitable - purchasing a device with a lower power will not ensure uninterrupted engine starting in aggressive conditions and will quickly “burn out”.
| Manufacturer | vendor code | Mechanism type | Device power, kW/h | Approximate cost, rub. |
| PRAMO-ATE-1 | 5742.3708 | Geared | 1.7 | 3800 |
| PRAMO-ATE-1 | 5742.3767 | Geared | 1.7 | 3950 |
| KZATE | 42.3708000 | Geared | 1.6 | 3400 |
| KZATE | 42.3708000 | Geared | 1.6 | 3550 |
| BULSTART | 42.3703400 | Geared | 1.8 | 3900 |
| BULSTART | 2.3708000-11 | Geared | 1.8 | 4100 |
| BULSTART | 2.3708000-11 | Geared | 1.8 | 4140 |
How to remove
Algorithm for removing a node:
- Disconnect the battery from the vehicle's on-board network.
- Remove the rubber cap and unscrew the nut holding the power supply terminal on the traction relay.
- Remove the terminal from the bolt, and then unscrew the nut holding the positive power wire of the motor windings.
- Remove the terminal and then proceed to unscrew the connections holding the starter to the clutch housing.
- Unscrew the bottom bolt using a spanner or socket wrench, and then remove the nut screwed onto the stud located on top of the electric motor.
- Separate the starter from the crankcase for subsequent disassembly.
Why doesn't the starter work?
A car starter is an electric motor that is powered by a battery and is designed to start a gasoline or diesel engine. For this reason, this device is prone to both mechanical failures and problems in electrical power circuits or problems in the contact area. If the car's starter does not respond to turning the key in the ignition and does not make sounds (for certain problems, the starter clicks or buzzes), then the check should begin with the following:
- determine the full charge of the battery;
- carry out diagnostics of the ignition switch contact group;
- check the traction relay (retractor)
- check the performance of the bendix and the starter itself;
The ignition switch contact group can be checked very quickly. To do this, just insert the key and turn on the ignition. The lighting of the lights on the dashboard will clearly indicate that the contact group is in working condition, that is, you should look for problems in the ignition switch only if the indicated lights on the dashboard do not light up after turning the key.
In the case of a suspected battery, it will be enough to turn on the headlights or headlights, and then evaluate the lighting of the light bulbs on the dashboard, etc. If these energy consumers light up very dimly or do not turn on at all, then there is a high probability of a deep discharge of the battery. You should also check the battery terminals and the ground connection to the body or engine. Insufficient or no contact at the terminals or ground wire will result in severe current leakage. In other words, the starter will not have enough power from the battery to start the engine.
To check the battery on a car with your own hands, you need to remove the negative terminal, after which the voltage at the battery outputs is measured with a multimeter. A reading below 9V will mean that the battery is low and needs to be charged.
The presence of characteristic clicks from the starter when trying to start the engine, which are also accompanied by a noticeable decrease in brightness or complete extinction of the lights on the dashboard, indicates that the solenoid relay is clicking. The specified relay can click both in the case of a discharged battery, and as a result of malfunctions of the retractor or starter itself.
What to do if, after repeated attempts to start the car, nothing happens
UAZ “Bukhanka” does not react at all to our actions. In this case, you should perform some actions:
- Check the battery for charging.
- If there is charging, then use the same tester to check the integrity of the electrical wires between the coil and the generator. The car engine may not start precisely because the power supply circuit is broken or the contacts are oxidized. The connections are cleaned and the wires are replaced with new ones.
- The next reason for engine silence is the lack of spark at the spark plugs. It’s easy to check for a spark; just remove the high-voltage wire and bring it to the car frame. When you turn the ignition key, a spark should jump between the cable and the car body. Now for the engine to operate it is necessary to replace the spark plugs with new ones.
But don’t forget about the fuses themselves in the car’s mounting block. Perhaps it's them. Their work is based on the following principle: if an electrical unit or electrical equipment malfunctions, the current increases, the wire through which the current flows to the fuse burns out (a short circuit occurs), the electrical circuit breaks, the integrity of the system is damaged, but the device itself remains unharmed. In other words, fuses perform the task of protecting electrical parts, components and equipment from possible short circuits.
The order of arrangement of protective devices in the mounting block.
| No. | What is he responsible for? | Note |
| 1 | Reserve connector | |
| 2 | Side lighting | Left-hand side |
| 3 | Low beam | Left-hand side |
| 4 | Long range lighting | Left-hand side |
| 5 | Fog lights | Left-hand side |
| 6 | Lamp for illuminating the installation site of the mounting block | Left-hand side |
| 7 | Tail light brake lights | Left-hand side |
| 8 | Alarm | Left-hand side |
| 9 | Klaxon (beep) | Left-hand side |
| 10 | Rear license plate lamps and instrument lighting on the control panel | Left-hand side |
| 11 | Responsible for the cigarette lighter | Left-hand side |
| 12 | Rear fog lamp (if equipped) | Left-hand side |
| 13 | Reserve connector | |
| 14 | Reserve connector | |
| 15 | Side lighting | Right side |
| 16 | Low beam | Right side |
| 17 | Long range lighting | Right side |
| 18 | Fog lights | Right side |
| 19 | Reverse (white light) | Right side |
| 20 | Direction indicators (right and left) | Right side |
| 21 | Heater operation | Right side |
| 22 | Windshield wiper motor and washers | Right side |
| 23 | Interior lighting of the car and connecting the engine compartment lamp | Right side |
| 24 | Reserve connector | Right side |
| 25 | Operation of devices and alarms (sensors) | Right side |
| 26 | Reserve connector | Right side |
If it is necessary to replace a fuse, you must remove it from the socket of the mounting block and put a new one in its place. This is not difficult to do, since the devices are plug-in type.
Not only the fuse is responsible for the correct operation of a particular electrical unit; additionally installed relays must also be taken into account, for example, the fuel pump, charging, starter and turns. Where are the relays located?
Controls the fuel supply process and its shutdown. In most cases, it is mounted under the hood near the battery, but some are installed in the car’s interior next to the mounting block.
It consists of three elements: reverse current relay, regulator, limiter. Their task is to prevent the car's generator from overloads, and also controls the current strength in the range from 13.8 to 14.8 V. It is located in the front of the car under the hood near the regulator.
Located on the left side near the engine. Designed to limit the operation of the starter in the case of a connected current source. The wiring from the starter relay goes to the coil. This strengthens the spark when starting the engine.
The direction indicators themselves will not work without a working relay. In the UAZ "Loaf" the device is installed in the lower part of the car's interior near the fuse line or behind the driver's seat on the partition.
Historical reference
Traditionally, the UAZ 469 was produced in two versions:
- Cargo-passenger version - 7 seats and 100 kg of luggage;
- Commander version - 2 seats for passengers and 600 kg of luggage.
Industry standard 1945
According to the old vehicle classification system, in force since 1945, the UAZ 469 was produced under this name, using an alphanumeric name:
- The letter abbreviation UAZ stood for Ulyanovsk Automobile Plant;
- 469 is a serial factory index assigned by the enterprise itself to its models and developments.
1966 Industry Standard
Although at the time of the release of the UAZ 469 (1972) a new industry classification system was adopted (industry standard OH 025270-66), the car plant continued to use the name according to the old standard.
However, in 1985, the automaker was forced to change its name in accordance with current requirements:
- the car was assigned a four-digit number - 3151;
- According to the new system, the car can be called in the documentation as UAZ 3151.
The car plant named all further modifications and new models in accordance with current standards. In particular, the UAZ Patriot, which appeared in 2005, according to the industry classification, received the “correct” designation - UAZ-3163. For greater identification, the factory instructions contained both names.
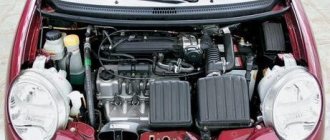
Engine compartment
For many years, the main power unit of the UAZ 469 was the in-line 4-cylinder UMZ-451MI carburetor type. The engine capacity was 2445 cc. cm, power – 75 hp.
With this engine produced by the Ufa Motor Plant, the UAZ 469 lasted on the factory assembly line until 1985.
It was distinguished by a simple single-wire 12-volt ignition circuit, which consisted of (according to the numbering):
For reference: on the black and white diagram of the ignition system shown, the letters indicate the wiring on the UAZ 469 according to the color of the wires. K - red, O - orange, G - blue; F – purple and Ch – black (according to the capital letters of the names).
In particular, the UAZ Patriot wiring diagram includes:
Source