A vehicle often requires adjustments to various controls and systems. For example, you may need to adjust the clutch pedal, which greatly affects the quality of driving a car with a manual transmission. This adjustment is quite easy to do without visiting service centers, and does not require any special knowledge or tools.
How to check and adjust a hydraulic clutch
The operation of a mechanical and hydraulic drive has its own design differences. In this regard, in order to adjust the hydraulic clutch, it is necessary to check the total length from the pusher rod to the fork. According to the standards, it should be about 5 mm.
Then disconnect the spring from the working cylinder bracket. There is an adjustment nut on the rod, by unscrewing which you can change the stroke of the fork to the desired result. The general concepts of changing the working and free play may differ depending on the vehicle manufacturer. Before you begin self-adjustment, you need to read the manual for your vehicle or watch training videos:
As you can see, there are no particular difficulties in adjusting and setting the clutch. However, a beginner should carefully follow all instructions and advice from experts. To get the most effective result, it is better to first become familiar with the operating principle of the clutch mechanism.
Setting the pedal free play
First you need to check the free play distance. This is done by the simple method of pulling the fork away from the pushrod. The normal gap is 4-5 millimeters, and if this distance is different, then adjustment is also necessary here.
The whole process looks something like this:
- First, the spring that holds the clutch fork in its original position is dismantled.
- Then the locknut on the pusher itself is unscrewed.
- Now you need to fix the pusher with a key, and while holding it, adjust the thrust nut until the gap is as desired. To do this, just twist the part in different directions.
- After reaching the optimal position, you need to secure the thrust nut with a lock nut and check the resulting gap.
- If it has taken the desired size, then you can install the spring in place.
At this point the adjustment process can be considered complete, but now you must definitely test your work. To do this, you need to start the engine, engage a gear and slowly release the lever. If the clutch pedal adjustment was correct, the car will start moving approximately halfway through the pedal stroke. If you feel that this value is still increased or decreased, then you need to check everything again, especially since now you know how to adjust the clutch and there should be no problems the second time.
We recommend: Choosing LPG for a car: methane or propane, which is better?
Possible faults
How to fix
| Cause of malfunction | |
| The clutch drives (switching gears is difficult) | |
| Not enough pedal travel | Adjust cable tension |
| Damage (curvature) of the driven disk | Replace driven disk |
| The clutch disc hub is stuck on the input shaft | Clean the splines; if there is severe wear, replace the input shaft and driven disk |
| Curvature of the pressure plate | Replacing the basket pressure plate |
| Damage to the friction linings of the driven disk | Replace the disc and check for axial runout |
| Malfunction of the cable tension mechanism | Replace the cable |
| Clutch slipping (the car does not move when the speed increases and the gear is engaged) | |
| Burning or partial (complete) wear of the friction linings | Replace disk |
| Oily friction linings | Clean the linings, replace worn parts, eliminate the cause of oil leakage |
| Drive jammed | Replace faulty elements |
| Sharp jerks when shifting gears | |
| Disc linings are oily | Clean the linings, replace worn parts, eliminate the cause of oil leakage |
| Drive jammed | Replace worn parts |
| Bent or damaged pressure plate | Replacing the basket |
| Extraneous sounds when turning on speed | |
| Worn or damaged disc damper springs | Replacing the drive |
| Whistle when turning on speed | |
| Worn or damaged release bearing | Part replacement |
Only the main causes of mechanism malfunction are listed; many indirect factors pointing to the same components and assemblies should also be taken into account.
Clutch adjustment VAZ 2107
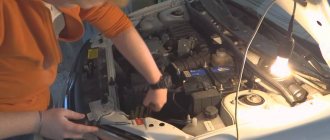
Clutch adjustment is a mandatory step after troubleshooting or replacement. When dismantling the gearbox, basket, or driven disk, the control rod is usually unscrewed, so after assembly, the adjustment must be done again. This is also necessary if during the operation of the car, for one reason or another, the clutch on/off mechanism is broken. It's quite easy to make the adjustment yourself. To do this, you will need an inspection hole, overpass or lift.
Tools and materials
- open-end wrenches for 8, 10, 13 and 17;
- measuring ruler or construction corner with divisions;
- pliers;
- Cobra pliers;
- water-repellent composition WD-40.
The clutch adjustment is carried out after bleeding the hydraulic drive.
Adjusting the pedal free play
The pedal free play should be from 0.5 to 2.0 mm. It is regulated from inside the car by changing the reach of the clutch pedal limiter.
The free play of the clutch pedal is adjusted by changing the length of the limit screw
The procedure for this is as follows
- Using one 17mm wrench, loosen the locknut by 2-3 turns, and with the other same wrench, rotating the head of the limiter, change its length.
- We control the amount of free play using a measuring ruler.
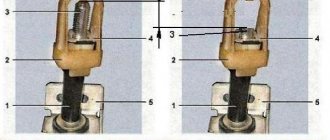
Adjusting the free play of the fork rod
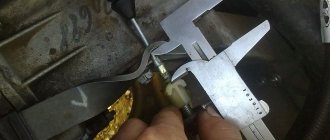
The free play of the fork rod is the gap between the release bearing and the fifth diaphragm spring of the pressure plate. Its adjustment is carried out on the inspection pit or lift as follows.
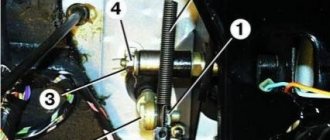
- To make it easier to control the free movement of the fork, use pliers to remove the ends of the return spring from the clutch fork and from the plate under the working cylinder mounting bolts.
- Using a construction angle or a ruler, we measure the free play of the fork - it should be 4–5 mm. If necessary, we adjust it by changing the length of the fork rod.
Adjusting the fork rod
The threaded part of the rod is not protected from dirt and moisture, so the adjusting nut and locknut may not immediately unscrew. It is recommended that after cleaning the rod from dirt, apply WD-40 to the threaded part. You are then prompted to perform the following steps.
- Holding the adjusting nut with a 17 wrench, use a 13 wrench to loosen the lock nut by 2-3 turns.
- We lock the rod with Cobra pliers and, turning the adjusting nut with a 17mm wrench, set the free play of the rod within 4–5 mm.
- We tighten the locknut with a 13mm wrench, holding the rod from turning with Cobra pliers.
After adjustment, it is recommended to check the operation of the clutch. To do this you need:
- start and warm up the engine to operating temperature;
- Depress the clutch pedal and engage first gear;
- turn off first gear and engage reverse.
Video: do-it-yourself adjustment of the VAZ 2107 hydraulic clutch
A faulty clutch can cause a lot of trouble for VAZ 2107 owners. Therefore, experts recommend constantly listening to extraneous noise, knocking, and vibrations when changing gears while driving. It is quite simple to adjust the hydraulic drive yourself. To do this, you only need a minimum set of plumbing tools and careful adherence to the advice of professionals.
How to adjust the clutch pedal?
The clutch pedal is adjusted according to the instructions in the operating manual for your car. I'll tell you how to do this on a VAZ 21010. First, we need a ruler and an adjustment key. Using a ruler, measure the distance from the top of the pedal (rubber pad) to the floor, after removing the mats. The normal distance should be 12.5-13 cm. If you have a distance greater than 16 cm, it is recommended to adjust. The second step is to climb under the hood and tighten or unscrew nut No. 2 (depending on your situation), it is this that tightens or releases the pedal. After you set it to 12.5-13 cm, press the clutch pedal 4-5 times and check the distance from the floor to the top of the pedal again.
Fix the position of nut No. 2 with lock nut No. 1. If you set the clutch pedal lower than the brake pedal, then the clutch will engage almost instantly as soon as you start to release the pedal. If you set the brake pedal higher, then when you release, the clutch will engage at the very end.
This completes your pedal adjustment, it is recommended to check the clutch pedal, even if you did not pay attention to the malfunction and nothing bothers you.
Adjusting the drive with a cable
Measure the distance from the floor to the corrugated plane of the rubber pedal pad; it should be about 16 cm. The accuracy of measurement with a regular stationery ruler will be quite sufficient. If the result of your measurement differs significantly from the distance indicated above, you need to clarify the value of this parameter recommended by the manufacturer of your car and adjust it. If your car uses nuts securing the cable jacket to the box for adjustment, you can increase the distance from the floor by moving the cable jacket from the box towards the pedal. And, conversely, to reduce the height above the floor, move the shirt from the pedal to the box.
After correct adjustment of the distance from the pedal to the floor, the idle value of the pedal, if the clutch parts are in good condition, is within the required limits.
But this definitely needs to be checked. You should measure the pedal stroke without load by holding the same ruler next to it, with one end resting it on the floor. Use your free hand to press down on the pedal until it becomes harder. Determine the stroke value using a ruler as the difference between the readings at the top and bottom points. Then compare it with factory recommendations.
Adjusting the hydraulic drive
To adjust the hydraulic clutch pedal, you first need to make sure that there is no air in the system. In the absence of air inside the system, the pedal should not be soft when pressed, and after releasing it should return to its original position on its own.
If the tests have convinced you that the hydraulic drive is working properly, check the free play of the clutch release fork. For many models, this parameter should be in the range from 4 to 5 mm. What it should be for your car, check with its manufacturer. After this, check the pedal travel without load; for many models it should be within 25–30 mm. If the free play of the clutch release fork is normal, and the idle value of the pedal does not fall within the recommended limits, look for a malfunction in the clutch master cylinder piston pusher or in the clutch release fork.
Adjusting the clutch basket feet
The housing with parts that makes up the clutch basket is one of the most important elements of the entire mechanism, which directly connects and separates the disc and the flywheel. Thus, the basket is responsible for turning the mechanism on and off and is a mandatory component of its design. If a malfunction occurs in this unit, the entire system may fail.
The paws in the basket sometimes begin to twitch. In this case, it is possible to adjust them. Let's look at the adjustment using the GAZ-53 model as an example. In general, there are 2 ways to adjust the claw clutch on a work vehicle. Let's look at the first method, which is documented:
- The car is driven into a pit.
- The clutch housing pan is dismantled.
- To access the paws, the fork is removed.
- A piece of wire slightly longer than a match is prepared for use as a measuring instrument.
- By rotating the flywheel, the most loose leg is found, and its height from the surface of the flywheel is measured using a piece of wire.
- The two remaining levers are being adjusted. They are installed at the same height as the very first one. To do this, the nuts located outside next to the legs are turned in the required direction.
- After adjusting all the levers in height, the operation of the mechanism is checked. If the on-the-go check shows normal adjustment, the locknuts on the basket are finally tightened.
- The final step is to put the oil pan in place.
This is interesting: Replacing the ignition switch and its contact group
This standard method does not always allow you to fully adjust the clutch due to wear of the needle bearings that connect the paws. In this case, the second, more effective method, often used in car services, can help. In general, the sequence of actions is approximately the same, but the essence of the work here is somewhat different. An assistant will be needed here.
So, the algorithm is as follows:
- A set of automotive probes for adjusting the valves is selected in advance.
- The oil pan is removed.
- Approximately 1.5 mm is obtained from several probes.
- An assistant sits behind the wheel and holds the clutch pedal depressed. At this time, probes are placed under each lever of the basket between the flywheel and the disk. They need to be inserted tightly, with the same force.
- When the gaps are set using feeler gauges, the operation of the mechanism is checked while running.
- If everything is in order, the adjusting nuts are locked and the oil pan is put in place.
If the paws are not too worn, this method will help you adjust the clutch correctly the first time. Naturally, the disk should not be deformed.
Adjusting the double disc clutch
Basically, modern passenger cars are equipped with a “dry” single-disc mechanism. For the operation of most cars, this design is quite reliable and efficient. However, cargo and special vehicles, as well as sports models, require the installation of a double-disc mechanism. Similar to the single-disc design, torque is also transmitted from the flywheel to the gearbox. The only difference is that the double-disc mechanism is capable of transmitting relatively greater torque, while having a much longer service life. Structurally, the mechanisms also differ in the number of driven disks and the presence of an additional spacer between them.
The principle of operation is the same. The pressed clutch pedal moves the release bearing, which in turn acts on the levers, moving the pressure plate away from the driven one. At the same time, the release springs are also released, acting on the intermediate drive disk, which is retracted by the springs of the second friction disk. The second moves at the same pace as the first. Thanks to this, one press of the pedal exerts double force on the mechanism. The reverse procedure when engaging the coupled mechanism is performed in the same way, connecting all the disks in series. The double-disc design can be called an advanced version of the single-disc design, in which force and load are distributed evenly. It is the uniformity of distribution and increased resource that distinguish both of these versions of the “dry” type mechanism.
We will analyze the adjustment of the clutch and its other elements using the example of a MAZ truck. First of all, you should check the gap between the surfaces of the structure. To do this, adjust the distance to which the drive disk is retracted. It is also advisable to check the gap between the adjusting nut and the valve body cover. If necessary, it is worth adjusting these elements.
Next, the flywheel housing is dismantled along with the hatch cover. This is necessary for more flexible adjustment of the output of the middle drive disk. Adjustment at this stage is carried out in several steps:
- the clutch engages;
- The gearshift lever is moved to the neutral position;
- the engine flywheel rotates;
- the locknuts of the adjusting screws are unscrewed;
- 4 screws are screwed into the middle drive disk until it stops.
Then, after loosening the screws one turn, you need to continue rotating the flywheel. All elements are then secured with locknuts. At each stage of adjustment of the MAZ double-disc mechanism, it is necessary to ensure that the adjusted gap does not go astray. To do this, you have to constantly hold the screw using a suitable tool.
Adjusting the clutch drive of cars
| The clutch in a car ensures that the engine and manual transmission are disconnected when changing gears. The mechanism is activated by the leftmost pedal in the cabin through a mechanical or hydraulic drive. Regardless of the type of drive, the operation of the unit must be periodically adjusted. The simplest design is found in the domestic classic VAZ: pedal, lever, sheathed cable, release fork and release bearing. The flexible cable, as the main element in the drive circuit, is responsible for adjusting the position of the pedal with acceptable wear of the disc clutches. To adjust the clutch drive, just open the hood to find the attachment point for the cable and fork. But when loosening the adjusting nut while installing the clutch cable, you have to repeatedly measure the free play height according to the instructions. Adjusting the hydraulic clutch driveA more advanced and complex drive device is a hydraulic rigid line, which replaces the mechanical clutch cable. In addition to this replacement, the manufacturer uses the fluid reservoir, as well as the working and master cylinders in the circuit. The structure of both parts is approximately the same:
The pedal assembly is connected to the main cylinder by an adjustable rod. Without an inspection hole, an assistant and a visual aid, it is quite difficult to carry out manipulations. The above steps are practically not applied to new car models. For normal operation of the transmission, timely replacement of the clutch basket (disc) and monitoring of the fluid level in the system is practiced. |
When the trip actuator needs checking
The free play of the clutch pedal must be checked and adjusted every 20 thousand km. This also needs to be done if the car starts to move at the very beginning or at the end of releasing the pedal. A correctly adjusted clutch release drive causes the car to start moving when the pedal is released approximately halfway.
This is interesting: Types of low beam lamps: which bulbs shine better and can be installed in headlights
Adjustment of the drive with hydraulics and with a cable is slightly different. To adjust the hydraulic drive, as a rule, you need a pit or overpass. Cable adjustment is usually done in the engine compartment from above, simply by opening the hood.
What to do if clutch problems start
When operating a car, it is important to listen to the operation of its components and mechanisms. Identifying problems and malfunctions at an early stage will help avoid more serious breakdowns with expensive repairs. Clutch repair may involve replacing the entire mechanism or its individual components and parts
The problem is that only experienced drivers who have the appropriate tools and equipment can perform high-quality clutch repairs on their own. Most car owners cannot cope with this task, so you should contact a car service center.
Clutch repair may involve replacing the entire mechanism or its individual components and parts. The problem is that only experienced drivers who have the appropriate tools and equipment can perform high-quality clutch repairs on their own. Most car owners cannot cope with this task, so you should contact a car service center.
Clutch repair also has the disadvantage of high cost. In this case, owners of foreign cars will face especially large expenses.
Nevertheless, we want to provide a number of useful recommendations for solving clutch problems. Quite often the cause of failure of this mechanism is a malfunction of the driven disk. To perform repairs, you need to remove the driven disk and visually check it for damage.
It happens that the gearbox gears do not engage after the car has been idle for a long time. This problem is caused by “sticking” of the driven and pressure disks or the driven disk to the flywheel. If this malfunction occurs, you need to depress the clutch pedal several times and then try to engage the gear. If the problem persists, you can try another method. With the engine turned off, you need to depress the pedal, apply the parking brake and try to start the engine. If even after this procedure the clutch does not work, you need to contact a car service specialist.
The drive of the automobile clutch mechanism can be mechanical or hydraulic. The system may not turn off completely due to insufficient fluid level in the expansion tank or due to improper adjustment of the drive. The driver must periodically check the fluid level in the system and, if necessary, top it up to the required level.
A constant decrease in the brake fluid level in the clutch expansion tank indicates problems with the tightness of the hydraulic drive elements or a malfunction of the working cylinder (WCC). In addition, the breakdown may be caused by air in the hydraulic drive system. In this case, you need to remove air from the system by bleeding it.
If possible, it is worth inspecting the RCS for the presence of drips by driving the car onto an overpass. Such diagnostics are especially useful in winter, if you have not changed the fluid in the car’s hydraulic clutch system for a long time. Brake fluid is hygroscopic (the ability to absorb moisture), so if it is not changed for a long time, it can freeze in severe frost. Experts recommend changing fluids in the clutch drive and brake system every three years.
The clutch may not engage fully due to insufficient pedal travel. To fix this problem, you need to adjust the free play of the clutch pedal. If engine oil gets into the lining, the clutch disc will slip. To eliminate mechanism slippage caused by oiling or wear of the friction linings of the driven disk, you will need to replace or wash the worn parts
Oily linings are cleaned with solvents, but it is important to eliminate the cause of the oil leak.
The problem with incomplete clutch disengagement can be solved by taking the following measures:
- adjusting clutch drive settings;
- cleaning and lubricating splines;
- installing a new or adjusting an old driven pulley;
- installation of new friction linings.
As noted above, troubleshooting clutch faults requires special knowledge, skills and professional equipment. To ensure that all problems with the operation of this mechanism are solved, you should contact a car service specialist.
Clutch structure and mechanism
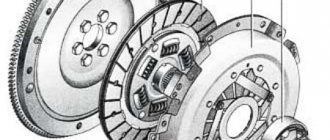
The operating principle of a conventional mechanical device is simple: it transmits engine torque to the gearbox input shaft. It is based on the interaction of two disks - the slave and the master. You can close the connection, separating the power unit from the box, to change the speed. The force is transmitted using a drive: when the clutch is pressed, liquid under pressure enters the working piston. Then the cylinder rod acts on the fork and bearing, the moment is transmitted further to the mechanisms. After releasing the pedal, all drive parts return to their original positions. The basket and disc fit snugly against each other.
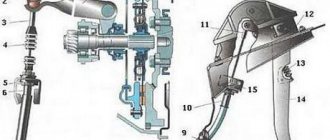
The drive is carried out hydraulically or mechanically. Pneumatics are rarely used. Most modern passenger cars are equipped with a single-plate friction clutch, consisting of several mechanisms:
- disk with basket;
- flywheel;
- bearing;
- torsion damper;
- crankshaft with its own bearing;
- tangential leaf spring;
- release bearing forks;
- guide pipe;
- working cylinder;
- input shaft;
- ball head bolt.
All this is neatly placed in the manual transmission housing.
A robotic gearbox works on the same principle - with the difference that actuators controlled by the unit are responsible for squeezing the clutch, and the drive here is electric.
Is there a difference between automatic and manual transmissions?
Automatic transmissions use an electronically controlled hydromechanical drive (sometimes a hydraulic distributor). There is no usual clutch here. Dry discs are completely absent, and on a manual transmission they are the main element. The torque converter (or converter) is responsible for turning on/off the torque on automatic transmissions. Instead of discs, oil turbines are used, which is why the automatic transmission torque transmission and cancellation device is called “wet”.
If a manual clutch most often has a single-disc clutch, then an automatic clutch usually has a multi-plate clutch. Due to the absence of a separate accelerator, the force is transmitted by an actuator or servo drive.
Clutch classifications
Clutch designs may vary. They differ in how they are controlled and in their structure.
Classification by control method:
- with mechanical drive;
- with hydraulic drive;
- with electric drive;
- with a combined drive (for example, hydromechanical drive).
In order for a mechanically driven clutch to work properly for as long as possible, you just need to smoothly press and release the clutch pedal.
Classification by type of friction:
- dry friction is when friction linings (discs) operate in air;
- wet friction is when the discs operate in an oil bath.
Classification by switching mode:
- permanently closed switching;
- not constantly closed switching on.
Classification by the number of slave disks:
- one disk;
- double-disc;
- multi-disc.
Classification by type and location of pressure springs:
- several cylindrical pressure springs are located around the perimeter;
- The diaphragm pressure spring is located in the center.
Classification according to the number of torque transmission streams:
Clutch diagnostic methods
The main symptoms of a faulty mechanism:
- Slippage (when the disk and basket, when connected to the motor, rotate at different angular speeds).
- Strong vibration inside the mechanism, especially noticeable when starting from a standstill and accelerating.
- Noise generated when the clutch operates.
- Violation of the accelerator stroke.
Diagnostics of the clutch of modern cars requires the use of professional equipment. However, you can do a simple test yourself. To check, press the pedal several times with the engine off. Then listen. Creaks, clicks, and other extraneous sounds will indicate problems with the box.
Another test is carried out in neutral speed mode. The clutch pedal is pressed all the way, then reverse gear is engaged. If you hear a crunching or crackling noise, one of the drives is faulty.
The check at the third stage is carried out in motion. The gears are sequentially switched to 3rd, then the gas pedal is sharply depressed. If the car does not accelerate, but the crankshaft speed increases on the tachometer, this is a sign of a malfunction. At the same time, it begins to smell unpleasantly of burnt rubber.
Serious damage to the transmission device can be judged by an unsuccessful attempt to engage one of the gears. Therefore, when the motor is turned on, you need to use all speeds.
Hydraulic drive device
With this constructive solution, the force is transmitted in a different way. The hydraulic drive circuit does not require a cable; the implementation of a mechanism with this type of control is a little more complicated and the cable is replaced by a hydraulic line. The force is transmitted through an incompressible fluid passing through the line, and since the hydraulic drive is similar to that used in the brake system, the same fluid is used for operation. The clutch device, controlled by a hydraulic drive, includes the following elements:
- Pedal.
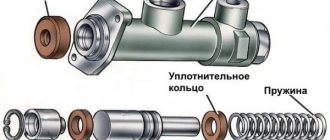
- The main cylinder, consisting of a piston with a pusher, a fluid reservoir and sealing collars.
- The slave cylinder has a similar design.
- The line connecting the cylinders.
- Liquid reservoir.
- Additionally, the cylinders are equipped with valves to remove air from the system.
The principle of operation is quite simple and similar to the mechanical control option, the only difference is in the method of transmitting force. When a motorist presses the foot lever inside the car, the piston of the master cylinder is set in motion, the fluid is compressed and, under pressure, moves through the pipeline into the slave cylinder, pushing the piston, which engages the clutch release fork.
The hydraulic drive can also be equipped with a damping device to dampen vibrations from the interaction of the release bearing with the clutch release parts. Pneumatic or hydraulic boosters are often used for commercial vehicles.
Since a hydraulically driven mechanism is a more advanced and complex device that transmits force over a long distance with high efficiency, its cost is higher, and it is characterized by smooth clutch engagement, which is due to the resistance to fluid movement in the structural elements. Among the advantages of a hydraulic drive is also resistance to wear of parts, but repairs are also more difficult than in the case of a mechanical device.
Mechanical and hydraulic drives are endowed with their own operating features, pros and cons of application, while devices of these types provide comfort in driving a vehicle. In passenger cars, the stiffness of the diaphragm spring of the pressure plate is small, so the driver does not need to exert much effort, but on trucks the unit is larger, and in order to operate the basket, more effort is required from the driver, so amplifiers are introduced into the design.
At the end of the procedure, the clutch pedal should work normally, there should also be no problems with the pistons
This is extremely important, since in some cases swelling of various rubber elements can occur, which is very dangerous because it leads to failure of the entire system
Clutch design and components
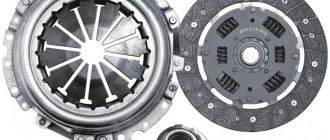
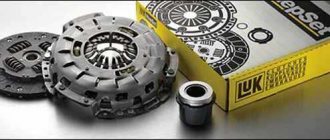
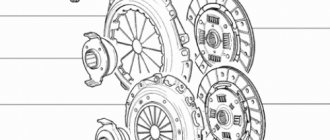
The clutch device can be divided into two parts: the mechanism and the drive. In general, the design of the unit includes:
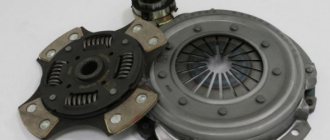
- Pressure plate or basket. It is the basis for other clutch components. Has direct contact with the release springs, which are directed towards the center. The size of the platform is proportional to two radii of the ICE flywheel. The clamping area is distinguished by the presence of grinding only on one side. The disk has a tight connection with the engine flywheel.
- Driven disk. It is located in the gap between the clamping section and the flywheel. It has direct contact with the gearbox using a splined clutch and friction linings. Around the coupling there are damper springs that absorb all the vibration.
- Friction linings. They are located at the base and are made of various composite materials.
- Release bearing. Visually it is divided into two parts, one of which has a round base for influencing the basket springs. The bearing is located on the shaft housing. There are two types of bearings: pull-out or push-down principle. The first type found its application in Peugeot. Sometimes a bearing has several retaining springs.
- Drive and clutch pedal. In automatic transmissions, only the mechanism is retained.
Clutch in a car and its purpose
The clutch serves to enable disconnection and subsequent implementation of a rigid connection between the internal combustion engine and the gearbox, that is, it is necessary to transmit torque from the engine to the gearbox shafts, from where the torque is transmitted further to the wheels.
At the same time, the clutch in a car is a complex mechanism consisting of several parts. The main one can be considered the clutch disc, which interacts with the engine flywheel, as a result of which torque is transmitted.
When to press against the flywheel and when not, the driver himself controls by pressing the clutch pedal (turning the clutch on and off). If the disk is pressed, then torque is transmitted. When the pedal is depressed, the disc does not press.
The pedal has three positions:
- extreme upper;
- extreme bottom (disc pressed);
- average, when at a certain moment the disk and flywheel begin to interact.
Before and after the middle position, the pedal has free play. On different machines, the middle position may also be different. But the driver can adjust it to suit himself. In addition, adjusting the clutch pedal travel is important for driving safety and extending the life of mechanisms and individual machine parts.