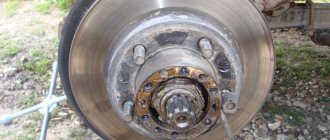
- the brake disc is removed;
the axle complete with hub, brake shield and hub coupling is dismantled;
To summarize, it is important to note the need and importance of carrying out work to replace worn seals on the UAZ Patriot. If you do not carry out repair work and do not change worn parts, this may not cause the most favorable consequences, so it is important to periodically drive into the inspection hole and contemplate the structure of your SUV from below. Thus, with the help of periodic visual inspection, it is possible to prevent adverse consequences in 60% of cases, so monitor the technical condition of your car and carry out repair work on time.
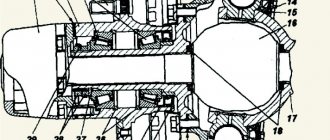
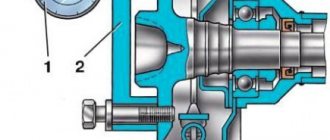
Design and diagram of the steering knuckle
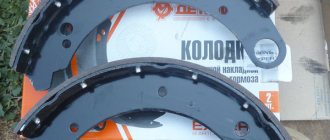
The steering knuckles are mounted on the end edges of the Spicer front drive axle, which is attached to the SUV frame using shock absorbers and spring suspension. To transmit torque, axle shafts are installed inside the beam. The steering knuckle is equipped with a hinge that allows the wheels to be deflected in different directions from the central position (while maintaining the transmission of power flow from the engine). The unit is equipped with points for attaching levers for steering ends and transverse rods, ensuring synchronous deflection of the wheels when turning the car.
There is a factory-adjustable bolt on the knuckle body. Designed to limit the angle of rotation of the front wheels. Inside the knuckle there are cavities for installing a ball joint that transmits torque to the hub with the brake disc. The device includes 2 pins (located at the top and bottom) that hold the hinge cage in a given position. The entire assembly is attached to the front axle axle using a flange connection.
A trunnion is attached to the outside of the knuckle, allowing the installation of tapered roller bearings and the anti-lock brake system sensor disc. The steel hub is equipped with studs on which the brake disc is placed and the wheel rim is attached. On the end of the axle there is a thread for a nut for adjusting the tightening of the axial clearance in the bearing supports.
Removing the steering knuckle UAZ
The rotary knuckle is designed to configure the direction of movement of the UAZ loaf by increasing pressure on the control levers, which is why the wheel angle changes.
This vehicle node is one of the more important ones. The steering knuckle is the base for the hub and is attached to other parts using ball joints. The part is usually made of steel, so it can withstand enormous loads.
With all this, the part should be very lightweight to improve shock absorption and maneuverability.
In the UAZ loaf, the main gear and differential in the front and rear axles are similar in design. The steering knuckle fits into the ball kingpin assembly. It takes on the load that falls on the bridge during movement. Moreover, these loads are significant when driving over rough terrain.
Signs of trouble
The cam circuit does not have many parts that are subject to wear during vehicle operation. When the wheel bearing raceways are destroyed, hub play appears, leading to disruption of machine controllability. Water and dirt entering the hinge causes abrasive wear and corrosion of the metal from which the parts are made. The lubricant is washed out of the assembly, which leads to increasing wear of the mating surfaces. When driving in corners, a knocking sound appears, and the drive jams when starting to move.
Part replacement
If faults are detected with the front wheel drive joint, it is necessary to remove the steering knuckle from the vehicle and then disassemble the structure to check the condition of the parts. The repair procedure does not require the use of special tools or equipment. All work is carried out in a garage with an inspection pit or on a lift. After replacing the parts, you must contact the service center to check the toe angle in the horizontal plane and adjust the thrust element that limits the rotation of the steered wheels.
Required Tools
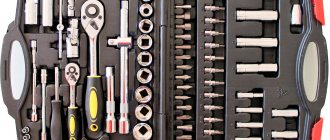
To disassemble the unit you will need the following tools:
- wrenches sizes 12, 14, 17 and 19 mm;
- socket wrench or socket for 10 mm nuts;
- mounting blade;
- impact screwdriver;
- hammer;
- wire brush and rags to remove dirt.
Safety precautions
Before starting work, the vehicle is placed on a level surface, the handbrake lever is raised to the uppermost position. It is recommended to install wheel chocks under the rear wheels. When carrying out work, it is necessary to remove the front wheels, the car body is mounted on steel supports. Safety pads (wheels or wooden beams) are placed under the thresholds to prevent the vehicle from falling onto a person if the supports break.
Dismantling process
Algorithm of actions when removing the steering knuckle from the car:
- Remove the wheel and remove dirt and grease from the surfaces of the brake caliper and knuckle.
- Unscrew the bolt holding the brake pad plate, and then use screwdrivers to push the hydraulic pistons deep into the caliper.
- Remove the brake pads from the socket.
- Unscrew the 2 bolts securing the mechanism bracket, and then remove the bracket.
- Remove the bolt holding the top of the brake caliper.
- Loosen the lower mounting point of the caliper, which will allow the unit to move to the side.
- Using an impact driver, remove the 3 screws holding the brake disc to the hub.
- Remove the disc from the hub with hammer blows applied through a wooden spacer.
- Remove the 6 bolts holding the axle to the steering knuckle. If the threaded connections are covered with a layer of rust, then it is necessary to treat the surfaces with WD40 (or an equivalent).
- Carefully remove the axle together with the hub and the steel brake disc guard. If the car has an anti-lock braking system, then it is necessary to remove the sensor.
- Pull the axle shaft out of the bridge stocking.
- Unscrew the fastening nut, and then remove the tie rod end pin from the hole provided in the knuckle arm.
- Using a wrench, unscrew the 5 bolts connecting the knuckle and front axle flanges.
- Remove the plate against which the bolt rests, limiting the deflection of the wheels when turning.
- Pull the knuckle housing out of the front axle stocking; to complete the work, you will need a mounting blade, which is inserted into the gap between the flanges. The removed fist is disassembled on a workbench equipped with a vice.
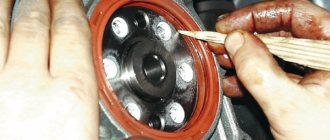
- Remove the 9 bolts holding the collar around the joint cage.
- Unscrew the bolt that limits wheel rotation (equipped with a lock nut). It is recommended to measure the extension length of the element, which will allow you to correctly adjust the deflection angle during assembly.
- Remove the cuff and felt seal, which will allow you to dismantle the rubber seal.
- Remove the ball joint from the seat in the fist; the assembly is held in place by 2 kingpins.
Hinge assembly
A brief algorithm for assembling the hinge:
- Install the bushings for the pin balls into the support and apply a special lubricant to the surfaces.
- Fill the inside of the knuckle with grease and then install the axle shaft.
- Place a ball race on the axle shaft, which should coincide with the holes for installing the ball pins of the king pins.
- Install the ball race symmetrically relative to the knuckle, and then tighten the pin bushings.
- Press down the supporting elements with a hammer through a soft metal spacer, and then tighten the fastenings of the ball pins of the kingpins.
- Place the rubber cuff in its original place, and then place the felt ring on top.
- Install the cage, which is then bolted to the steering knuckle housing.
- Install the bolt that limits the wheel deflection angle.
- Insert the axle shaft into the stocking, and then tighten the bolts connecting the axle and knuckle flanges.
- Adjust the force required to deflect the fist to the sides. The force required to rotate the fist relative to the bridge is 1.0-2.5 kgf.m (the unit must be turned by hand). Adjustment is made by tightening the ball pins of the king pins.
- Mount the hub and other parts in their original places. The central nut, which regulates the clearance in the bearings, is tightened to a torque of 30-40 N.m, and then fixed with a lock washer.
UAZ pivot unit
The usual design of the kingpin on an UAZ is famous for its problems: you constantly need to check the play connecting the steering knuckle to the ball joint, monitor the presence of lubricant, notice problems with the gaskets in time and eliminate them. We offer modernized kingpins with bronze liners and bearings. The kingpin with bronze inserts is very durable; it will not be damaged even if the suspension is hit hard. They performed well both on and off the road. The kingpin on bearings is also very practical to use. Driving the UAZ becomes much easier.
Steering knuckle boot N/A UAZ with Timken, Spicer, Hybrid axles (2 pcs. set)
Steering knuckle boot N/A UAZ with Timken, Spicer, Hybrid axles (2 pcs. set)
The boot serves to hermetically protect the hinge of the support steering knuckle of the front axle of the UAZ vehicle. Applicable to all bridge models: Timken, Spicer, Hybrid (except Military Bridge). The boot is installed to replace the existing sliding cuff. Installs without disassembling or removing the unit.
1) complete sealed protection of the SHPOK from water and dirt;
2) installation without disassembling and removing the fist;
3) the unit becomes maintenance-free (no need to syringe);
4) ensures tightness even with backlash in the pins and corrosion of the ball surface;
5) the design is made in such a way that even if the corrugation breaks, it works as a standard seal;
6) Applicable to all bridges (Timken, Spicer, Military).
1) Thick rubber boot (thickness 4.5 mm)
2) Fastenings (bracket - 4 pcs., lock - 2 pcs., clamp - 2 pcs.)
3) Hexagon fastening bolts - 8 pcs.
The material of the boot, the rubber from which the boot of the CV joint of a vase is made, is only thicker. It is possible to supply a boot made of polyurethane.
Important! The use of boots on bridges with a working angle exceeding the established one is unacceptable.
When developing the boot, the operating range of rotation established by the manufacturer was taken into account. Exceeding this value leads to the fact that there is no gap left on the folding side and strong compression of the boot folds by the metal parts of the ShOPK occurs and subsequent rupture of the boot. Therefore, the use of boots on bridges with a working angle exceeding the established one is unacceptable.
- UAZ pivot unit
Steering knuckle boot for UAZ gearboxes (military) (2 pcs. set)
The boot serves to hermetically protect the hinge of the support steering knuckle of the front axle of the UAZ vehicle. Application: Installed on UAZ vehicles with gear (military) axles, Bars axles, on all-terrain vehicles "TREKOL", Niva Marsh and analogues.
The boot is installed to replace the existing sliding cuff. Installs without disassembling or removing the unit. Differences from boots on “civil bridges” • Increased diameter of the neck (65 mm) • Increased length of the clamp Advantages: • complete sealed protection of the SHPOK from water and dirt; • installation without disassembling and removing the fist; • the unit becomes maintenance-free (no need to syringe); • ensures tightness even with backlash in the pins and corrosion of the ball surface; • the design is made in such a way that even if the corrugation breaks, it works as a standard seal;
Delivery set: 1. Thick rubber boot (thickness 4.5 mm) 2. Fastenings (bracket - 4 pcs, lock - 2 pcs, clamp - 2 pcs) 3. Hexagon fastening bolts - 8 pcs 4. Washer - 16 pcs 5. Nut — 8 pcs Important! The use of boots on bridges with a working angle exceeding the established one is unacceptable. When developing the boot, the working rotation range established by the manufacturer was taken into account (the manufacturer laid down these restrictions since exceeding the rotation angle beyond the norm leads to a sharp increase in loads on the CV joint, its rapid wear or even destruction). Exceeding this value leads to the fact that there is no gap left on the folding side and strong compression of the boot folds by the metal parts of the ShOPK occurs and subsequent rupture of the boot. Therefore, the use of boots on bridges with a working angle exceeding the established one is unacceptable. And failure of the boot in these cases will not be considered a warranty. This type of defect is easily determined by the characteristic imprint and shape of the gap.
- UAZ pivot unit
Maintenance Recommendations
Maintenance of the front knuckle on the UAZ Patriot involves adjusting the tightening of the pins, which will reduce the load on the spherical surfaces. Access to the regulator is closed with a cover with a nut, and the ball pin is tightened with a special wrench. It is allowed to force the finger down with a hammer blow through a wooden or metal spacer. The cover is installed in its original place, the joint line is sealed with a gasket. The fastening nut is tightened with a torque wrench with a force of up to 100 N.m.
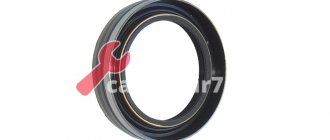
Oil seal and its features
On the UAZ Patriot, the front axle axle seals are rubber sealing rings with special springs that are involved in the sealing process. The slightest deformation of these devices leads to oil leakage.
You should also be aware that a leak through the oil seal may be caused by a clogged breather or may be caused by an excess amount of lubricant.
Currently, UAZ Patriot produces seals made of rubber and polyurethane materials. Rubber seals have a low cost (about 100 rubles per piece), but they also have a short service life. Polyurethane products have a high cost and a correspondingly long service life. But finding polyurethane seals is not so easy.
Product replacement
If you find an oil leak in the area of the steering knuckle, then it is important to take measures such as replacing the seals. In this case, it is not necessary to replace the seals on both sides if the leak is observed in only one place. So, let's look at what it means to replace the front axle axle seal on a UAZ Patriot SUV.
Steering knuckle leaking
- First, you need to place the car on a flat surface and jack up the part where the part needs to be replaced.
- After this you need to remove the wheel.
- The steering knuckle is being dismantled. To do this, perform the following steps:
- the brake disc is removed;
- the axle complete with hub, brake shield and hub coupling is dismantled;
- the axle shaft is removed;
- the tie rod end is disconnected from the steering knuckle;
- The five bolt connections are unscrewed and the steering knuckle is removed.
To summarize, it is important to note the need and importance of carrying out work to replace worn seals on the UAZ Patriot. If you do not carry out repair work and do not change worn parts, this may not cause the most favorable consequences, so it is important to periodically drive into the inspection hole and contemplate the structure of your SUV from below. Thus, with the help of periodic visual inspection, it is possible to prevent adverse consequences in 60% of cases, so monitor the technical condition of your car and carry out repair work on time.
Correcting wheel axial play
The most common reason for the inappropriate behavior of the UAZ 3741 vehicle on the road is a violation of the axial clearance of the kingpins. You can check whether it is broken or not very simply - just lift the front end with a jack and try to rock the wheel up and down. If axial play exists, the kingpin clearance should be adjusted.
The adjustment is carried out as follows.
- We raise the front of the car, having first put the car on the handbrake.
- We dismantle the wheel.
- Unscrew the bolts securing the ball seal.
- We check the axial play
by shaking the structure up and down with our hands. - We unscrew several bolts securing the upper lining of the king pin. Remove the cover.
- We take out the thinnest adjusting shim and put the trim back.
- We perform the same procedures with the lower kingpin pad.
- Tighten all the bolts and check the result. If the play is eliminated, screw the oil seal
and wheel back on and off we go. If the play remains, we adjust everything again, this time removing the thicker gaskets.
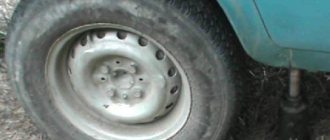
This is the node on the car
It is important to pull out equally thick shims on both the top and bottom to maintain the alignment of the CV joint. If the alignment is disrupted, expensive repairs will have to be made after some time.
What should you do if oil from the steering knuckle flows down the wheel and leaves a trail of oil splashes? And upon inspection, does it appear that there is a leak between the gearbox and the cardan? This is a direct indication to replace the axle shaft seal. Over time, everyone's oil seals wear out, so it is simply necessary to have an idea about replacing them. If you wait a little longer to replace the UAZ Patriot axle shaft seal, then gear jamming will be guaranteed . Before disassembling, you also need to make sure that the breather is not clogged and there is no excess oil in the crankcase , because This can also manifest itself as an oil leak on the wheel.
Today we will clearly tell and show how to do this without taking your Patrick to a service center. So, if the diagnosis is yours and you're ready to get a little dirty, here we go.
How to protect your fist from wear
If the loaf was purchased recently, then the car owner may hear unpleasant sounds of metal rubbing against metal without lubrication when turning the steering wheel. The fists on the UAZ can be protected with lithol.
If you have no experience in auto repair, the fists can be coated with lithol only on the outside. Drivers more advanced in repairs can unscrew the circular oil seal, move it to the middle of the car and pour lithol into the resulting gap.
You should never forget about the need to carry out preventive inspections of the steering knuckle clamping bushings, replace the lubricant in the steering knuckle and identify play in the suspension.
If the steering knuckle needs repair, you can do it yourself or by contacting an auto repair shop.
The pivot assembly of the UAZ Patriot car is a kind of large “hinge” that provides one of the degrees of freedom for the front wheels of the car, which is necessary for its control, that is, for operation. Usually, when the pins wear out, knocking problems may occur, which is associated with the appearance of play between the mating parts. Also, play in the kingpins is possible due to damage, from strong impacts, or due to incorrect selection of parts during repairs.
Replacing ball joints UAZ Hunter
In our service center, replacement of UAZ Hunter ball joints is carried out professionally and with a guarantee. All work, including repairs of UAZ Hunter, 3151, 469, is carried out by experienced craftsmen, of high quality and inexpensively. The price includes only work without spare parts and consumables.
| Automobile | UAZ Hunter |
| Category | 4x4 Tuning Removal and installation |
| Improve | Controllability |
| Car assembly | Steering |
| Periodicity | Upon breakdown |
Removing and installing the ball joint of the steering knuckle (SHOPK) UAZ. Performed during repairs or to change the angle (Castor) of the pivot pins.
What is a steering knuckle ball joint (SHOPK)
The ball joint of the front axle steering knuckle, as its name implies, is located at the edges of the front axle beam and is bolted to it; it is designed to turn the wheels and control the direction of movement of the car. The steering knuckle is installed on the continuous front axle of trucks and all-wheel drive vehicles. SHOPK consists of a housing in which there is a constant velocity joint (CV joint). Also a component of the ball joint is a pivot assembly (pin), an oiler press, a steering knuckle lever, and a wheel rotation limiter bolt.
Operating principle of the steering knuckle ball joint
The work consists of turning the wheels using the steering knuckle lever connected to the steering rod. If there is a driven front axle, torque is transmitted through an axle shaft connected by a CV joint to the wheel hub. The main malfunctions of the steering knuckle are: - oil leaks; — grinding noise when turning the steering wheel; — wheel play; — steering instability; - “yaw” of the car along the road.
Reasons for replacing the steering knuckle ball joint
The causes of breakdowns of the steering knuckle units are the lack of high-quality lubrication of the steering knuckle and pivot assembly, high shock loads, especially when driving in off-road conditions. If there is a driven front axle, the cam mechanisms often break due to improper use of the vehicle. Namely, when connecting the front axle while driving, sharp acceleration with wheel slipping, driving with the front axle constantly engaged, or incorrect use of axle locks.
Repair of the steering knuckle ball joint
If there is play in the wheels, squeaking when turning, or rocking of the car when driving, you should immediately inspect and make the necessary repairs to the steering knuckle assemblies, since the correct operation of this unit ensures the safety of driving and controlling the vehicle. Typically, the culprit of these problems is thinned kingpin liners. In addition, now on some cars they are plastic, which is why many motorists are replacing them with bronze ones. It is much cheaper to lubricate the steering knuckle or replace the kingpin than to subsequently replace axle shafts, CV joints, and sometimes even the steering knuckle body itself.
Axle shaft design
The axle shafts of the rear drive axle of the UAZ loaf car are round solid shafts made of alloy steel. Shaft type – fully balanced.
They are intended only to transmit torque from the gearbox to the driving wheels of the vehicle.
On the inside, each axle shaft is connected at one end to the axle gear. For this purpose, external spline grooves are cut on the axle shafts. They are constantly in mesh with the splined grooves inside the axle gear.
Which ones to choose?
In addition to the factory carbon fiber ones (which owners do not recommend installing in any way), there are several types of king pins:
- Bearing.
- On a bronze bushing.
The first type has a complex design. Such UAZ kingpins combine the lower half with a tapered bearing and thrust ring, as well as a cage.
Bronze elements are highly resistant to shock loads - such bushings are an order of magnitude stronger than bearing bushings. But the steering will be tighter. The cost is almost identical to the previous ones - 1.5 thousand rubles per set. These are excellent kingpins for UAZ “Loaf”, “Hunter” and 469. True, like the previous ones, they require regular lubrication and inspection. We will describe this procedure in detail below.
Replacing a UAZ loaf axle shaft
Step-by-step instruction:
- Place the UAZ 452 loaf car on a flat horizontal surface. Position the jack and lift one of the front axle wheels. Unscrew the wheel nuts, remove the wheel, and set it aside.
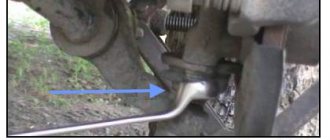
- Unscrew the nuts and remove the hub along with the front wheel bearings on one side. Using a 14 mm socket and a lever, unscrew the six bolts securing the brake shield with a pin to the steering knuckle.
- Carefully remove the brake shield so as not to damage the brake hose. Hang it on the tie rod pin.
- Remove the trunnion , along with the cardboard gasket.
- Pulling forcefully towards you, remove the axle shaft along with the hinge . Clean the internal cavities of the ball joint from old grease, dust, and dirt deposits. Install a new axle shaft with a hinge in its original place. It is first necessary to fill the hinge and cavities of the ball joint with Litol-24 or CV joint grease with a volume of approximately 0.5 kg.
Install all parts removed during dismantling in reverse order. Lubricate the bronze bushing of the axle with the same grease as the hinges. Adjust the hub bearings according to the instructions.
Rear axle structure of UAZ loaf
Rear axles of the same design were installed on passenger-and-freight vehicles of the UAZ-452 family and their modifications. The rear axle structure can be divided into crankcase, final drive, differential and axle shafts.
Main characteristics of the rear axle of the UAZ-452.
— Number of teeth of the main gears: drive — 8 driven — 41 — Roller bearing dimensions, mm: front double bevel, drive gear — 80x35x57 bevel, differential — 90x50x25 rear roller bearing with cylindrical rollers, drive gear shank — 52x20x15 — Main gear drive gear oil seal size , mm: 68x42X15 — Thickness of the shims included in the package installed between the end of the crankcase and the cover of the double tapered bearing, mm: 0.3, 0.5 — Thickness of the adjusting shims in the package installed between the inner rings of the double tapered bearing, mm: 0.1, 0.15, 0.25 — Thickness of the gasket installed in the crankcase connector with the cover, mm: 0.12 - Volume of oil poured into the crankcase to the level of the lower edge of the oil filler hole, l: 0.75 - Weight of the rear axle without wheels, kg: 98
Adjustment
Before you start adjusting, prepare everything you need: bushings for the axle (if there is a groove on the axle), 4 thrust bushings, as well as oil seals. The main condition for adjustment is that the two halves of the CV joint do not dangle, both during straight-line movement and when turning! The procedure is as follows:
- Take the ball joint and press the bushing into it so that half of the CV joint does not hang out in the ball joint.
- There is a thrust washer on top; be sure to install a new one, even if the old one appears to be in good condition.
- Take a metal shaft (you can make it from a valve, for example) with cones on both sides and put a washer on it with a diameter similar to the central ball, that is, 27 mm. Place one edge against the center of the kingpin. Ideally, the second edge should also be in the center of the kingpin. If this is not the case, place the adjusting washers in the same place where the thrust washers are, or rather, under it.
Replacing the axle shaft seal of a UAZ loaf
Step-by-step instruction:
- Jack up, remove the rear wheel and brake pads.
- Using a 14 mm socket, through the large hole in the axle shaft flange, unscrew the four bolts securing the axle shaft and brake shield plates to the rear axle beam flange. Remove the bolts with spring washers.
- Using a Phillips screwdriver, unscrew the two screws securing the shield to the axle plate. Pass an M8 bolt through its hole and insert it into the hole in the beam flange. The shield is temporarily suspended.
- Rotate the axle plate, screw two M12×1.25 bolts into the wheel mounting holes located diametrically until they stop at the brake shield next to the holes in the beam flange.
- Tightening the bolts one by one, press out and remove the axle shaft.
- Pry the oil seal with a pry bar or a metal screwdriver and remove it from its normal place.
Press in the new oil seal with a piece of pipe of the appropriate diameter, lightly tapping its end with a hammer. Reassemble all parts in reverse order. Check the oil seal for leaks.
- Home
- Auto garage
- Replacing the Front Axle Axle Seal of the UAZ Bukhanka
Any motorist can repair the front axle of a UAZ Bukhanka and UAZ 469 on his own. This job is easy. Structurally, both of these models are identical. This is especially true for the suspension. The frame design allows for easy dismantling of the front axle and the highest reliability of the vehicle. There are some differences in leaf spring and spring suspension. However, these features have little impact on the complexity of the work.
During repairs, discs or cassettes, special tools, are actually not useful. The work is performed with the smallest set of tools available to each driver.
Repairing the front axle of UAZ Bukhanka and UAZ 469 at home is not difficult. In most cases, during operation it is necessary to carry out various preventive works. Typically, they do not require removal and disassembly of the bridge. The list of actions for care includes:
- The kingpins are checked for gaps;
- Threaded connections need to be tightened from time to time;
- The alignment is checked;
- Prescriptions for parts lubrication tables are made.
It is imperative to visually inspect the main components. Increased attention is paid to the serviceability of the fastening bolts. They are also firmly reinforced, so it remains for our client to make the locking elements. Inspect the maximum turning angle of the wheels. It should not exceed 28 degrees. If indicators differ from those indicated, it is necessary to make adjustments. Also always check that the kingpins are tightened and functioning correctly. Failure to eliminate small defects in a timely manner leads to the need for major repairs of the front axle.
Repair of this unit begins with dismantling the bridge. On a loaf and a goat, this construction is carried out identically. There are only small differences. When performing repairs, you must be as careful as possible. Removing the bridge involves a series of easy steps:
- You should start by ensuring that the car is stationary. For this purpose, anti-roll brake pads are installed;
- Next, on the goat, the brake pipes are disconnected from the hoses. On the Bukhanka, the tubes have adapter pipes. In this case, the hoses are disconnected from the pipes;
- Remove the nuts securing the lower shock absorber cups. This element is similar on both machines.
- Next, unscrew the bolts connecting the drive gear flange and the front driveshaft. Before this, you need to fill the threaded connection with WD-40;
- Remove the rod from the bipod. The nut located on the ball pin is twisted;
- Tighten the nuts that secure the spring ladders. They disassemble them with linings;
- The front of the car is jacked up by the frame and the bridge is rolled out.
Removing the faulty unit
Since the UAZ 3741 has a frame structure, removing the front axle is quite simple. For this purpose, you need to stock up on a massive jack, stops capable of supporting 1.5 tons of weight of the front part of the car, and a special liquid for loosening nuts - WD-40.
Read
The procedure is as follows.
- First you need to put chocks under the rear wheels.
- Then you need to disconnect the right and left brake pipes from the rubber hoses going to the brake drums of the front wheels.
- Then you should unscrew the nuts
securing the brake hoses and remove the hoses themselves. - Next you need to unscrew the nuts that strengthen the lower ends of the shock absorbers.
- Then you need to unscrew the bolts connecting the front driveshaft to the drive gear flange.
- Then you should undo the cotter pin and unscrew the bipod ball pin nut.
- Next you need to disconnect the rod from the bipod.
- Now you need to unscrew the nuts securing the front spring stepladders, remove the stepladders along with the pads and pads.
- Finally, you should lift the front of the car by the frame and remove the axle
from under the car.
Recommendations
Comments 18
I’m also racking my brains about which ones to install. There are no bearings, tested, they don’t hold. I bought waxoil but will still use the good old mushrooms.
Not “pivot”, but PIN, ...fuck!
for 110 years we have wise people... forgive me, sir, for such a gross mistake, in your youth you were probably punished for this?!
Those in the photo are the best king pins.
On bearings in Spicer axles, the cars lasted 200 thousand km without much maintenance (office cars). On one car a backlash appeared, so they rolled it for a couple of months; when disassembling it turned out that both upper bearings had fallen apart, but the car drove, nothing broke, but if they broke it, they most likely jumped somewhere, because... They tore out the bolts securing the fists to the stockings, on both sides. I have now converted all my cars to bearings, including mine.
Only old collective farm bushings! I support Leshciy, we need to deploy it correctly!
and how to deploy it correctly?
On bearings it is a plus that there is almost never any play. but with large rollers they won’t last long. especially on military bridges
I have them on tapered bearings, 30 thousand have passed, no play has appeared yet...
There is nothing more reliable than original bushings, but only if they are deployed correctly
I agree about the splitting! BUT, it’s better to at least somehow get home, because with a wheel on its side and a torn out CV joint
I recently installed it on roller bearings, I think they last longer than a kingpin on bushings. The bushings quickly break on our roads no matter how you care about them.
There was also a question about the kingpins, I re-read the entire UAZ book and decided to install the same on bronze bushings.
I don’t recommend tapered bearings; when falling into a rut with normal wheels and on military bridges, they will break into splinters
Well, yes, the rollers are serious (respectfully).
EMUR? should I look at the photo?)
Of course you can! Seven of my articles are about this here: titanic-4
I installed it on tapered bearings. Theoretically should be eternal
Replacing the front axle axle seal on a UAZ Patriot
The design of the front axle of the UAZ Patriot SUV has such an important element as an oil seal. Its importance is based on the fact that thanks to it, the hole at the junction of the bridge with the steering knuckle is sealed. Over time, the axle shaft seals wear out and become unusable. If this element has become unusable, then this is fraught with consequences such as oil leakage from the bridge, which can ultimately cause the gears to jam. Therefore, it is very important to always pay attention to the main sign of a seal failure - the presence of a leak in the area where the cardan is connected to the gearbox. In this material we will look at what the Patriot front axle axle seal is and how it is replaced.
Repair of the right steering knuckle of the UAZ 3303 military bridge
Problem:
swinging speed of 30-40 mph from side to side UAZ 3303
Suspected malfunction : broken pin sockets in the steering knuckle and “walking” wheels.
Task : repair the steering knuckle on the UAZ 3303
Progress of work on disassembling the right steering knuckle of the UAZ 3303:
unscrewing six bolts and disconnected the hub
bent the lock washer and, using a pry bar, unscrewed both hub nuts, took out the hub along with the brake drum and wheel
Unscrewing six bolts, disconnected the hub oil deflector with axle
unscrewed two bolts on the steering knuckle housing, and without disconnecting the brake hose, disconnected and hung the brake shield assembly next to the spring
disconnected the ball joint from the transverse link
then unscrewed the remaining six bolts and separated the cover from the steering knuckle housing
the teeth of the driven and driving gears turned out to be undamaged, which was very pleasing
To remove the knuckle housing from the support, unscrew the bolts and disconnect the sealing rings of the oil seal
seals require replacement
unscrewed the steering knuckle lining, took out the kingpin and removed the steering knuckle housing
THE BUSHINGS LOOKED PERFECT! then I was overcome with great surprise and at the same time disappointment that the problem was not in the kingpin bushings (I was only glad that the former owner of the bridges did not deceive me, who said that the bridges had been rebuilt)
further, upset that he did not find the cause of the looseness, he decided to remove the o-rings for inspection, dismantled the steering knuckle, for which he carefully unscrewed five bolts with fine threads using the method of loosening the threads. Then he gently tapped it with a hammer, inserted the pry bar and, turning it clockwise and counterclockwise, pulled out the steering knuckle
Assembly of the right steering knuckle UAZ 3303
The bearings are normal and only the seals and grease need to be replaced, then I washed all its parts in gasoline, thoroughly tinkered with removing and washing out the grease from the steering knuckle housing, and additionally disassembled and checked the driven gear bearing
I bought these sets of UAZ oil seals and gaskets to replace the old ones
cleaned out clumps of old grease from the stocking
I ran the threads with a sword at 10 in increments of 1.0
replaced the oil seal in the steering knuckle support, carefully pressing it in
old oil seal with grooves down
seated with an old oil seal
To lubricate the CV joint I used this 250g lubricant
then I assembled the sideboard on a workbench and adjusted the king pin with shims (it turned out to be a total thickness of 7mm top and bottom)
When installing felt on the ball, you must first soak it in machine oil
When assembling and installing the steering knuckle, I used sealant instead of gaskets
painted the knuckle support
When installing the trunnion, I almost forgot to insert a thin ring, and then assembled everything with sealant
Oil seal and its features
On the UAZ Patriot, the front axle axle seals are rubber sealing rings with special springs that are involved in the sealing process. The slightest deformation of these devices leads to oil leakage.
You should also be aware that a leak through the oil seal may be caused by a clogged breather or may be caused by an excess amount of lubricant.
Currently, UAZ Patriot produces seals made of rubber and polyurethane materials. Rubber seals have a low cost (about 100 rubles per piece), but they also have a short service life. Polyurethane products have a high cost and a correspondingly long service life. But finding polyurethane seals is not so easy.
Product replacement
If you find an oil leak in the area of the steering knuckle, then it is important to take measures such as replacing the seals. In this case, it is not necessary to replace the seals on both sides if the leak is observed in only one place. So, let's look at what it means to replace the front axle axle seal on a UAZ Patriot SUV.
Steering knuckle leaking
- First, you need to place the car on a flat surface and jack up the part where the part needs to be replaced.
- After this you need to remove the wheel.
- The steering knuckle is being dismantled. To do this, perform the following steps: remove the brake disc;
- the axle complete with hub, brake shield and hub coupling is dismantled;
- the axle shaft is removed;
- the tie rod end is disconnected from the steering knuckle;
- The five bolt connections are unscrewed and the steering knuckle is removed.
To summarize, it is important to note the need and importance of carrying out work to replace worn seals on the UAZ Patriot. If you do not carry out repair work and do not change worn parts, this may not cause the most favorable consequences, so it is important to periodically drive into the inspection hole and contemplate the structure of your SUV from below. Thus, with the help of periodic visual inspection, it is possible to prevent adverse consequences in 60% of cases, so monitor the technical condition of your car and carry out repair work on time.
UAZ 469, 452, 3303 we repair the front wheel drive CV joint.
UAZ-469, 452, 3303
The main advantage of UAZs is all-wheel drive. For this, the owner is ready to forgive the car many shortcomings - high cross-country ability and simplicity of design make them tolerable.
But over time, when driving with the front end turned on, an ominous crunch appears, and the wheels slightly “bite” when cornering. The reason is most likely the wear of the CV joints. And it develops if there is longitudinal play in the hinge due to wear of the thrust rings. At the next TO-2, it is worth checking their condition. For this:
| Using a 14mm wrench, unscrew the six coupling nuts. | . and remove it. |
| Holding the splines of the drive, we move it towards and away from us. If you notice any play, the steering knuckle will have to be disassembled to replace the thrust washers of the hinge. | Unbend the lock washer. |
| ...and unscrew the nut. | Remove the lock washer. |
| Unscrew the second nut and remove the bearing thrust ring. | Remove the outer bearing and hub. |
| Using a 17mm wrench, unscrew the six bolts securing the brake shield and axle. | We remove the boot... |
| ...and the brake assembly. And so as not to interfere, we put it on a spring. | We remove the trunnion. |
| We take out the drive and wash the parts in kerosene. |
Sometimes the hinge falls apart right in your hands. In order to make such a CV joint continue to work, it is necessary to eliminate the axial play and align the rotation axes of the hinge and the steering knuckle. When installing a new hinge, these conditions must also be observed, otherwise it will quickly fail.
| If the axle support washer is worn. | . we knock the puck out. |
| . remove the second support washer from the ball joint. |
We find the thickness C of the support washers using the formula: C = (B-A)/2, and their diameters correspond to the diameters of the sockets.
| Using a caliper, measure the distance A between the hinge support cheeks. We measure the distance B from the socket of the support washer to the end of the ball joint. |
Washers to compensate for play can be machined from steel (steel 45) and hardened. We press them into the axle and ball joint.
| Before assembly, fill the hinge cavity with AM or CV joint grease (about 500 g per hinge). |
We carry out assembly in reverse order. Having installed the axle and brake shield, we check whether there is any longitudinal play at the hinge and whether it rotates freely. Do not over-compress the joint. In this case, you need to remove the support washers and reduce their thickness.