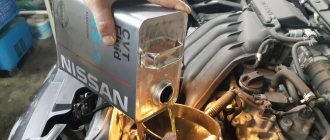
The process of replacing the clutch cable on a Lada Granta car
1. On the interior side, under the device panel (for clarity, the work is shown with the panel removed), unscrew the nut securing the clutch cable sheath stop to the pedal assembly bracket and remove the stop from the stud.
2. Using a screwdriver, remove the locking bracket and the plastic housing of the clutch wear compensation mechanism from the rod.
3. In the engine compartment, remove the clutch cable sheath seal from the hole in the partition between the passenger compartment and the engine compartment.
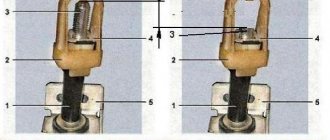
4. Pull the cable forward, in other words in the direction of movement of the car. Remove the cable from the recess on the clutch release fork (see sketch below).
Replacing the clutch release cable
We carry out the work when replacing the cable. In the cabin, under the instrument panel...
...using an 8 wrench, unscrew the nut securing the cable sheath bracket to the pedal assembly bracket.
Use a slotted screwdriver to pry up the spring bracket... ...and remove it from the groove of the clutch pedal finger.
Remove the eye of the housing of the automatic cable length adjustment mechanism from the clutch pedal pin.
We remove the upper part of the cable from the pedal assembly bracket. In the engine compartment...
...by pulling the cable forward, we remove the cable lead from the groove of the clutch release fork lever.
Rotating counterclockwise, unscrew the leash from the threaded end of the cable.
Remove the rubber protective cover from the cable end.
We remove the end of the cable sheath from the hole in the bracket on the gearbox. In the passenger compartment, remove the cable sealing cover from the hole in the front panel and pull the cable into the passenger compartment. Before installing the cable...
...check the condition of the plastic bushing on the pedal pin. We replace the worn bushing with a new one and apply grease to the pin. We install the cable in the following sequence: – thread the cable through the hole in the front panel from the passenger compartment into the engine compartment; – install the sealing cover into the hole in the front panel; – put the automatic cable length adjustment mechanism on the pedal pin and secure it; – screw a plastic leash onto the threaded end of the cable so that the end of the cable tip is flush with the end of the leash; – insert the leash into the groove of the clutch release fork lever; – adjust the clutch drive. To do this, pull the cable forward by the threaded end until it stops, overcoming the force of the clutch pedal spring, and hold the cable in this position.
Second adjustment method
If you don't have a caliper on hand, you can use an alternative method. It begins similarly to the previous case. Again, you need to pull the tip forward as much as possible. When he rests, release him and see how tightly the leash adheres to the fork. If it’s not tight enough, it means you need to wrap it around the rod. Then we return to the salon and press the clutch pedal three times. Once you've done this, go back and look under the hood again.
Pay attention to whether the leash is pressed against the metal? A prerequisite is the minimum movement of the fork (it is better that there is none at all). The fork movement is allowed no more than 2 millimeters
Car enthusiasts can use any of the above methods. If any points remain unclear to you, we recommend watching the video instructions on our website. Despite the presence of an automatic adjustment system, you will still need to carry out this procedure. Even if the cable serves you reliably and does not break, you will still need to periodically look under the hood.
Experienced car enthusiasts recommend not waiting for problems with the clutch and performing this work at least once every 10,000 kilometers. This way you will protect yourself from problems with this system. During adjustment, be sure to evaluate the condition of the cable. If it has become thin and cracked somewhere, it won’t last long. In this case, you can immediately replace it.
Lada Granta - eliminating noise (crackling/creaking) from the clutch pedal.
To remove the clutch pedal on a Lada Granta car, you must perform the following steps:
- Secure the car on a level surface, squeeze the parking brake lever, and install wheel chocks on the rear row of wheels.
- Using a “14” key, unscrew the three bolts and disconnect the steering shaft (interior of the car, at the base).
- Unscrew the plastic clamp from the clutch cable lead.
Plastic retainer
- Replacing the clutch cable of a VAZ 2109/2110/2112 with your own hands
- Remove the protective bracket and remove the brake pedal vacuum booster pin.
Safety bracket
- We disconnect the block with wires from the dashboard with the sensors on the bracket.
- Using a key set to “13”, unscrew the four nuts and remove the vacuum brake booster.
- Using a “13” wrench, unscrew the five nuts and remove the clutch pedal bracket and brake assembly.
After troubleshooting, we replace the worn elements with new ones and assemble the structure in the reverse order.
Signs of a faulty clutch cable
Replacing the Lada “Granta” clutch cable is necessary in the following cases:
- the clutch pedal “falls” (the cable is broken);
- The pedal is pressed and returned unevenly, jerking is observed when starting off (the clutch cable gets stuck).
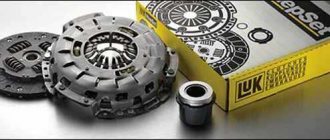
What you need to replace the clutch cable
To change the clutch cable you will need:
- key to 8;
- ruler;
- flat screwdriver;
- pliers;
- new clutch cable.
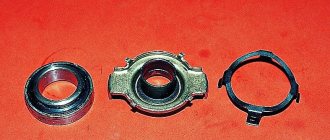
How to check the release bearing on Kalina and how malfunctions manifest themselves (noisy or buzzing)
To understand whether your Kalina needs to replace the clutch, you must first react in time to signs of failure and diagnose the unit. Signs of a faulty Kalina release bearing:
- Noise or hum when pressing the pedal (damaged, insufficient lubrication or jammed);
- Difficulty pressing the pedal occurs when the coupling ear is broken, as well as the spring is deformed;
- These videos clearly show when the Kalina release bearing is faulty (noise, buzzing, knocking, creaking), as well as how to check the release bearing.
How to remove the release bearing from a Lada Kalina - location of the part and gearbox mounting diagram
As mentioned at the beginning of the article, to correctly replace the VP and dismantle it, you will need to remove the gearbox. Below is a photo of the transmission from below. To dismantle the manual transmission, you will need to disconnect all the components under the hood that are attached to it. Next, the wheel drives and front suspension elements are removed. Then the manual transmission is unscrewed from the “engine” and removed. Inside the “head” of the clutch housing is the release bearing itself.
What should be the clutch pedal travel of the Lada Granta?
The free play of the clutch pedal on the Lada Grant is 146 mm - this is the distance from the base of the body to the back of the pedal (frog). The manufacturer allows a stroke play of 2.0 mm.
If the above distance does not meet the standard, we carry out the following adjustment steps:
Checking and replacing the clutch release cable of the Lada Priora
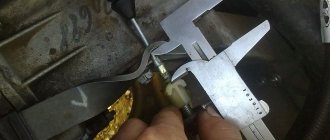
- In the engine compartment, pull the end of the cable forward as far as it will go. Using a caliper, measure the actual distance from the plastic nut to the drive fork. Factory standard 27 mm.
- We carry out adjustments and adjustments as necessary (key to “10”).
- We pump the pedal 2-3 times and take repeated measurements.
- Inside the car we measure the pedal stroke, it should be equal to 146 mm.
If the pedal travel increases/decreases, the clutch cable must be replaced with a new one. To eliminate free play, use the Lada Granta clutch pedal repair kit.
Includes:
- pressure bushings;
- plastic compensator;
- spring.
Clutch cable: how the drive works
Cars can be equipped with two types of clutch engagement and release drives:
- mechanical cable drive;
- lever hydraulic drive.
At the same time, cable clutch release is widely used on budget cars with front-wheel drive. This is exactly the clutch cable installed on the Grant by the manufacturer. This cable is responsible for connecting the pedal to the fork.
On a Lada Granta, the clutch in good condition operates with medium hardness, as the manufacturer tried to balance the settings. The clutch pedal of the Lada Granta cannot be called too light, there is a certain rigidity, but the clutch is not too tight either.
When the driver presses the clutch pedal, the fork moves. In turn, the fork retracts the clutch disc (the clutch disengages), the engine and transmission are disconnected, due to which the Lada Grant’s clutch “opens”, and you can change gears softly and smoothly.
How to adjust the clutch on a VAZ 2108, 2109, 2199
1). When the pedal is released, you need to use a tape measure to measure the distance from the floor to its lower edge. It should be within 18-20 centimeters.
2). Next, press the pedal with your hand all the way to the stop and measure the distance from the floor, again to the bottom edge. It should be within 6-7 centimeters.
3). From the first result obtained, 18-20 cm, we subtract the result of the second measurement, 6-7 cm. As a result, we get 13-14 cm. For cars of the VAZ 2108 and VAZ 2109 brands, this value is considered normal.
4). If this value differs in one direction or another, you will need to readjust the clutch. That is, we either tighten it up or weaken it.
5). We hold the adjusting nut with one wrench, and with the second we slightly loosen the lock nut.
6). By rotating the adjusting nut clockwise, we increase the pedal stroke, and therefore it should move downward.
7). We take measurements and if the result is satisfactory, we tighten the locknut and the work can be considered complete. But if not, then you will need to do this operation again.
Video
Clutch adjustment on VAZ 2108.09.99
How to adjust the clutch on a Lada Kalina?
1). Open the hood and remove the air filter. To do this, unscrew the bolts securing the air filter housing to the hood. Then disconnect the mass air flow sensor. Next, unscrew the clamp and remove the air filter housing.
2). Pull out the cable by the threaded end to the maximum possible distance. In this case, it will be necessary to overcome the resistance exerted by the spring attached to the PS.
3). Holding the cable in this position, using a caliper we measure the distance between the plastic leash and the fork lever. It should be 2.7 cm.
4). If the distance does not match, then using an open-end wrench, we either tighten or loosen the tension nut.
5). Next, we survive the clutch pedal again and take measurements again. If it was not possible to achieve the desired result the first time, you can repeat it again.
6). After the distance has been adjusted, install the air filter in place.
Video
https://youtube.com/watch?v=Eg5BETyYxZ8
How to adjust the clutch on a VAZ 2107
To adjust the clutch of the VAZ 2107, you need to drive onto a pit or overpass. But, if this is not possible, then we install the car on supports using a jack, observing all safety measures.
1). The free play must be adjusted so that the distance from the top position of the pedal to the stop is 0.4 - 2 millimeters. Otherwise, you will need to make adjustments. Using a 10mm wrench, unscrew the locking nut slightly and by rotating it set the required gap.
2). If the VAZ 2107 engine system provides for fuel injection, then you will need to remove the protective shield.
3). Before applying the lubricating mixture to the threads of the pusher, clean it from dirt.
4). We check the stroke of the pusher, since the stroke of the release bearing depends on it. Push the fork back all the way, the pusher stroke should be four to five millimeters. Since significant force is required, it is better to disconnect the spring from the lever.
5). The stroke of the pusher is adjusted using a 17 key. It is also necessary to restrain the pusher adjusting nut from turning, but using a “13” wrench, loosen the lock nut.
6). Fixing the pusher using the “8” key, using the “17” key we set the required 4-5 millimeters.
7). We fix the locknut.
8). We check the pedal travel, which should be approximately 30 millimeters from its top position until it turns off. If necessary, you can perform the operation again.
Diagram and principle of operation of the clutch on the Lada Grant
During the systematic operation of the equipment, the friction linings of the driven disk wear out, as a result of which the clutch fork moves forward. The free play of the cable increases. A length compensator is pre-installed for automatic cable tensioning.
A pressure spring installed in the plastic housing of the compensator automatically tightens the cable, eliminating free play of the pedal.
To maintain the clutch in good condition, periodically lubricate the pedal rolling mechanism, cable, and shaft drive lever. It is best to use graphite lubricant, gear oil. Any car owner who is familiar with the principle of operation of the clutch on the VAZ 2109, 21099, 2108 will not experience any difficulties with the Granta.
When to change and how to check the clutch - its service life may have come to an end
Good day, dear car enthusiasts! Each of us is always concerned about how long this or that part or car system will last. It `s naturally. Especially considering the quality of some products, the “skills” of workers, etc.
This issue fully concerns the car’s clutch. Very often on motorist forums there is a serious question about when to change the clutch, and how to know when the time has come to replace it. So let’s try to figure out together what the actual service life of the clutch is, and whether it exists at all.
Is there a certain clutch resource?
Whether or not you will be upset when you find out that the manufacturer does not indicate specific figures for clutch service life. If, for example, in the brake system, it is clearly stated that the thickness of the brake disc should be such and such, then why is this not applicable to the clutch?
The fact is that clutch wear depends on many reasons, and first of all, of course, on how the driver changes gears and in what mode the clutch is used.
And while clutch disc thickness cannot be measured the same way brake disc thickness can be measured with a caliper, there are ways to measure it. There are two of them.
- The first way to measure the thickness of the clutch disc is with a special measuring gauge. This method does not require dismantling the clutch; it is performed on a lift. But you are unlikely to use it.
- the second method is simpler to implement and allows you to determine the wear of the clutch disc in order to replace it. Replacing the driven disk is a procedure provided by the manufacturer, because The driven disk is a consumable part. The check is carried out as follows: with the engine running, you need to put it in high gear, accelerate it, and if the car does not stall, this means that the driven disk is worn out and requires replacement. It must be remembered that such a check of the thickness of the clutch disc is not technologically correct, but it is effective and allows you to determine the condition of the disc extremely accurately.
As already mentioned, the life of any clutch is determined by its operating conditions. Without going into technical details of the interaction of clutch parts, you should understand that basically the life of the clutch and the wear rate of the discs depend only on the driver.
A clutch of the same quality and manufacturer can last 5,000 km for one driver, and 100,000 for another. Participation in drag racing, frequent slipping, abrupt starting at high speeds, ingress of foreign liquids and objects, unqualified installation and adjustment clutch - all this reduces the life of the clutch.
How to check the clutch?
The clutch is checked using already proven and reliable folk methods, and only by them. Naturally, in addition to disassembling the clutch. We are talking about how you can check the clutch of your car yourself, and then decide whether you need a more in-depth diagnostic with dismantling the clutch mechanism.
So, let's start checking the clutch on the main points.
Clutch slippage. Those. again we are talking about wear on the driven disk when it is not fully pressed against the flywheel, which means there is no full clutch.
- We put the car on the handbrake and start the engine;
- engage a higher gear: 3rd or 4th;
- slowly depress the clutch and “give” the gas;
- When the handbrake is adjusted, the car engine should stall. If this does not happen, then it is time to think about replacing the clutch disc.
The clutch “drives”, i.e. it doesn't turn off completely. This malfunction is accompanied by difficult gear shifting, or extraneous noises and sounds when changing gears. And the gearbox is hardly to blame here. Checking the clutch.
- the engine is idling;
- Depress the clutch pedal completely and engage first or reverse gear;
- If the gear is engaged with uncharacteristic effort, and at the same time you hear extraneous sounds, then the driven disk does not completely move away from the flywheel, i.e. the clutch “drives”;
- you need to pump the hydraulics and adjust the free play of the clutch pedal;
- check again, if nothing has changed, then it’s time to go to a car service for a more in-depth diagnosis of the clutch.
Using these simple methods, you can independently check the clutch before it fails at the most inopportune moment. Timely diagnostics, and even better - correct operation, will increase the life of the clutch, or take timely measures to eliminate malfunctions.
Good luck on your journey.
Step-by-step instructions for replacing the Lada Granta clutch
1. Put the car on a lift and remove the gearbox.
2. Next, if you do not change the clutch basket, you need to check the marks on the flywheel.
3. Unscrew the six bolts securing the basket to the flywheel. As you unscrew the bolts, hold the flywheel with a mounting blade (or a screwdriver).
The bolts are unscrewed with an eight-inch open-end wrench.
4
Carefully remove the clutch basket from the engine flywheel and the driven disc
5. Now you need to remove the release bearing. To do this, use a flat-head screwdriver to pry up the ends of the spring that holds the bearing.
6. After removing the spring from the guide bushing, remove the release bearing along with the clutch.
7. Now we finally remove the spring that held the release bearing.
8. If you need to replace the clutch fork or bushing, you need to pry up the rubber boot and remove it.
9. Next, remove the fork bushing from the clutch housing.
10. Lifting the clutch fork up, remove it from its seat and remove it from the clutch housing. If necessary, we make a replacement.
11. Let's start assembling the clutch. First, wash the entire clutch part in kerosene and replace everything that needs to be replaced.
12. Apply CV joint-4 grease to the guide sleeve of the release bearing as well as to the splined part of the input shaft. Don't overdo it, apply a thin layer of lubricant.
13. We install the removed parts of the clutch housing:
- release bearing
- clutch fork
- spring
- bushing
14. Next you need to center the clutch. To do this, use special. frame that needs to be inserted into the hole in the end of the crankshaft.
15. Place the driven disk on the frame so that the protrusion on the hub faces the gearbox.
16. Install the clutch basket.
17. If you made marks, then combine them and tighten the bolts with a torque of 19-31 Nm.
18. Remove the centering frame and reinstall the gearbox.
19. Check how the gears change. They should turn on clearly and without crunching.
There should be no jerking when starting off.
If you have an urgent need to repair your 2181 gearbox and there is no opportunity to go to a specialized auto repair shop, then you can try to make the repair yourself.
Removing gearbox 2181
Removing the gearbox on a Grant is quite a labor-intensive process, so you won’t be able to do it without an assistant.
Before starting work, place your Granta on a two-post lift and apply the parking brake. Prepare a set of tools and start working according to the illustrated instructions below.
How the clutch works
The clutch device on the VAZ-2190 with a cable box is quite simple and understandable for an experienced car enthusiast. As soon as you open the hood, you will probably immediately notice the cable. It is held in place by a bushing
Pay attention to the clutch fork, through which the tip is passed, and on it there is a special plastic leash. This same leash can be screwed onto the tip or, conversely, twisted
Accordingly, the cable tension will be adjusted.
Before starting work, you will definitely need to dismantle the filter. It will interfere with you, so we will temporarily eliminate it. This is done quite simply:
- Remove the negative terminal from the battery.
- Disconnect the mass air flow sensor connector, the adsorber and the mounting tie. We don't need all these elements now.
- To remove the filter, you will need to remove the supports from the special holes. Now the structure can be removed.
So, when the filter is removed, it’s time to start the main work. Visually locate the plug and tip. Try to pull the tip out using pliers (don't forget to wrap it with electrical tape).
Praise to the author! I am also a terrible car enthusiast, albeit with little experience... I also had right-hand drive ones, but unfortunately, they are not convenient with our traffic. I now have probably the most boring Toyota model. For almost 2 years of owning this car, I had no problems at all, it burned out once a light bulb in the foot, and I changed the brakes and oil according to plan, despite the fact that the car is 8 years old, the mileage is about 150 thousand. It accelerates quickly, drives smoothly, and is maneuverable. spacious trunk and for its size a very comfortable and spacious interior, dad feels completely comfortable in the back seat, and he is a large man. After a night in a windswept parking lot at minus 35, it started up and didn’t even sneeze once. The stove heats perfectly, the air conditioner cools quickly, the consumption is 6-7 liters of 92 in the city. engine 1.5. 106 horses, + with its size it will fit into any hole in the parking lot. In short, the car is just great. )))
I've been meaning to adjust the clutch on my Grant for a long time. I made a printout of your article. Tomorrow I’ll arm myself with the necessary tools and go to the garage to do everything with my own hands step by step, as described in the article.
Open the hood, under the air filter there is a clutch foot. It is equipped with a cable with a plastic screw. Lightly pressing the foot, remove the cable to the side. We adjust the cable screw and put it back on the foot.
When accelerating, the engine roars slightly when the leveler revs up
Clutch needs replacement! It's slipping!
When starting off there is jerking, what could be the problem?
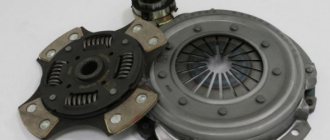
Replacement clutch disc
I sharpened the flywheel! and he was crooked. so you can’t get away with just one disk
The clutch cable broke. I went and bought a new one. Changed it. While I was driving, the clutch was soft; accidentally, in 4th gear at 90 km/h, I jumped into 3rd gear instead of 5th. But nothing. An hour later, I noticed that when changing gears, my car seemed to be giving up gas (by the sound), but in fact I don’t know what it is. The clutch pedal has free play, i.e. hanging out. And the pedal is too soft. Can there be different clutch cables on the grant?
Tips, tricks and useful repair videos
1. Follow general recommendations for transmission operation to increase service life.2. Service life is 80-100 thousand pedal cycles, do not press or hold the clutch unnecessarily.3. Before installation, generously lubricate the new VP.4. Removing a manual transmission is a time-consuming operation (2 hours), so it is recommended to immediately troubleshoot the disk, fork, flywheel, and also replace the cable if necessary. 5. Do not purchase spare parts at the car market or other dubious retail outlets.6. Watch useful videos on repairing, replacing clutches and more!
1. Clutch Lada Granta and its possible malfunctions
2. Adjusting and replacing the clutch cable on a Lada Granta
3. Operations for adjusting the clutch cable Lada Granta
4. How to eliminate squeaks and clicks in the Granta clutch pedal
Lada Granta clutch and its possible malfunctions
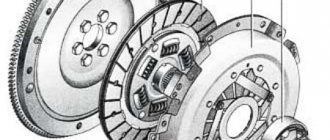
The car has a clutch from the Lada Kalina model. The clutch is a flywheel on which a basket is attached. The basket constantly presses the clutch disc, and it is due to this that torque is transmitted to the gearbox from the engine. When you press the clutch pedal, a metal cable connected to the clutch fork is stretched. The petals of the basket are wrung out and stop pressing the disk towards the flywheel, while no torque is transmitted from the engine.
Here is a drawing for reference only, with the design of the Lada Granta clutch.
Clutch and its drive: 1 - metal clutch drive cable; 2 — cable sheath; 3 — lower tip of the cable sheath; 4 — protective cover; 5 - leash; b - fork lever; 7 — bearing guide sleeve; 8 — clutch release bearing; 9 — clutch casing; 10 — pressure spring; 11 — pressure (drive) clutch disc; 12 - flywheel; 13 — friction linings of the driven disk; 14 — driven disk; 15 — damper spring; 16 — torsional vibration damper; 17 — driven disk hub; 18 — spring; 19 — toothed cable tip; 20 — housing of the automatic cable length adjustment mechanism; 21 — spacer sleeve; 22 — cable sheath bracket; 23 — clutch housing; 24— gearbox input shaft
The clutch does not need adjustment throughout its entire service life.
Clutch malfunctions of Lada Granta
The table below shows possible clutch malfunctions of a Lada Granta car and methods for eliminating them. For more detailed information about the operations carried out to repair the machine’s clutch, see the individual articles in the category.
Adjusting and replacing the clutch cable on a Lada Granta
On a Lada Granta car, the clutch is disengaged and engaged by changing the position of the clutch paddles. The petals are pressed out using the clutch bearing, which is moved by the clutch fork. The clutch fork, which is actually a lever on an axle, is driven by a metal clutch cable. This article provides information on replacing and adjusting the clutch cable on a car.
Tools required to replace and adjust the clutch cable: 8 mm wrench, ruler, flat-head screwdriver
The process of replacing the clutch cable on a Lada Granta car
1. From the interior side, under the instrument panel (for clarity, the work is shown with the panel removed), unscrew the nut securing the clutch cable sheath stop to the pedal assembly bracket and remove the stop from the stud.
2. Using a screwdriver, remove the locking bracket and the plastic housing of the clutch wear compensation mechanism from the clutch pedal rod.
3. In the engine compartment, remove the clutch cable sheath seal from the hole in the partition between the passenger compartment and the engine compartment. 4. Pull the cable forward, that is, in the direction of movement of the car. Remove the cable from the recess on the clutch release fork (see picture below).
5. Unscrew the leash from the cable end, remove the guide sleeve of the cable sheath from the hole on the gearbox bracket (see figure below) and remove the cable from the car. Remove it from the hole in the partition.
Clutch device Lada “Granta”
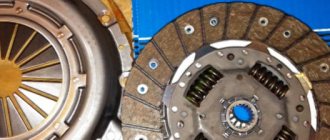
Main clutch elements:
- flywheel;
- basket with drive disk;
- driven disk;
- fork with lever;
- sheathed cable.
Torque from the crankshaft is transmitted to the flywheel, to which a basket with a drive disk presses the driven disk. The latter, in turn, transmits torque to the gearbox shaft. When you press the clutch pedal, the Lada “Granta” clutch cable is stretched, forcing the clutch fork to press on the petals of the basket. The driven disk stops pressing against the flywheel and the mechanical connection between the crankshaft and the gearbox is broken.
A special feature of the Lada “Grant” clutch is a self-adjustment mechanism, thanks to which there is no need to adjust the length of the clutch cable during vehicle operation. However, after replacing parts, adjustment of the Grant clutch cable is necessary.
general information
Like the vast majority of modern cars, the Lada Granta is equipped with a fairly simple clutch, which contains only a few elements.
The clutch (also called the clutch basket) includes a housing, a driven disc, and a throwout bearing. The casing, in addition to itself, also includes a pressure disk; in addition, a complex part is the driven disk, consisting of a damper, friction linings and a ring.
Each Granta is equipped with a closed-type single-plate clutch, which has a special element designed to dampen vibrations generated during rotational moments during shifts. The coupling is ensured by dry friction between the driven disc and the friction linings, which is why this type of clutch is called dry.
In addition, clutches on Grants are devoid of gaps between the release bearings and the legs of the pressure springs located in the casing, which is their main distinguishing feature compared to all previous modifications.
Let's take action: how to adjust the clutch on a VAZ 2114 car yourself?
The essence of the operation is to force a change in the length of the cable “jacket”, due to which the clutch pedal stroke changes. To complete the process there is no need for high qualifications - a little free time and desire are enough.
Experts have developed a good algorithm for how to adjust the clutch cable on a VAZ 2114; it consists of the following points:
- Open the engine compartment and disconnect the negative battery.
- For ease of operation, disconnect the hose from the air filter and remove it.
- Using two 17" wrenches, rotate the tip nuts and set the desired pedal stroke.
- Press the clutch pedal several times and measure again the distance from the lower to the upper point of the pedal position.
- Tighten the nuts and install the air filter in its original place.
During setup, you should pay attention to the condition of the cable. If there are abrasions on the “shirt” and the steel fibers are partially torn, then you will have to replace the Lada Samara clutch drive cable
Often there is corrosion on the tip, making it difficult for the nuts to rotate. WD-40 will work to solve the problem. It would be a good idea to inspect the pedal bracket bushings and replace them if they are severely worn.
The main task of the clutch is to temporarily separate (uncouple) the engine and transmission and smoothly connect them. These operations are necessary while driving to control a manual transmission: shifting gears, stopping, braking, starting the car.
If the adjustment of the free play of the clutch pedal is disrupted, the car stops moving normally, various problems arise - it becomes impossible to move away, gears are switched with a crunch, and the car may also slip and accelerate poorly.
Clutch drive adjustment
After installing the cable, it is necessary to adjust the clutch drive. To do this, the cable is pulled forward by the threaded end until it stops (you need to overcome the force of the clutch pedal spring). Next, the cable is held in an extended position.
The adjustment looks like this:
- Using a caliper, measure the distance from the end of the plastic guide to the clutch fork lever (the norm is 27 mm).
- If deviations are noticeable, you need to obtain the desired distance by rotating the leash.
We also recommend reading the article about why the clutch slips. From this article you will learn about the main causes of clutch slipping, as well as how to repair this problem. - When there is no load (the cable is released), it is necessary to ensure that the leash is adjacent to the fork lever without any gap.
- Next, you need to press the clutch pedal 2-3 times for the automatic cable length adjustment mechanism to work. Then you need to measure the full travel of the clutch pedal, which should not exceed 146 mm.
Having completed the adjustment, you can replace the air filter housing. After installation, you can check the quality of the clutch and drive while driving. Please note that if the clutch on the Grant is selected incorrectly or is badly worn, there are problems with the gearbox, etc., replacing the drive cable will not solve the existing problems with the smoothness and clarity of gear shifting.
How to Adjust Clutch on Grant
Adjusting and replacing the clutch cable for Lada Grant
On a Grant Lada car, disengagement of the clutch is cut according to the configuration of the position of the clutch petals. The petals are compressed by the clutch bearing, which is moved by the clutch fork. The clutch fork, which is practically an axle lever, is driven by an iron clutch cable. This article provides information on replacing and adjusting clutch cables on a vehicle.
Tools needed to replace and adjust the clutch cable: 8 mm wrench, straight edge, flat head screwdriver
The process of replacing the clutch cable on a Lada Grant car
1. Unscrew the nut that secures the clutch cable cover leg to the pedal bracket under the cabinet (the operation is shown when removing the panel for clarity), and remove the stop from the stud.
2. Using a screwdriver, remove the retaining clip and plastic clutch plate housing from the shaft.
3. Remove the seal from the clutch cable cover from the hole in the partition between the passenger compartment and the engine compartment.
4. Pull the cable forward, in other words, in the direction of travel. Disconnect the cable from the socket on the clutch fork (see sketch below).
5. Unscrew the cable from the cable tip, remove the cable guide from the hole in the bracket box (see picture below), and remove the cable from the vehicle. Remove it from the hole in the section.
Lada Granta - eliminating noise (crackling/creaking) from the clutch pedal.
Granta Lada. Eliminate noise (crackling/creaking) from the clutch pedal.
My VK group: my other projects: grant
.com/. site with text versions.
https://youtube.com/watch?v=Eg5BETyYxZ8
Adjusting the clutch cable with viburnum
clutch settings
to viburnum.
6. To install a new clutch cable, insert the cable into the hole in the front panel (partition), secure the cable to the clutch pedal shaft and secure the wear compensation mechanism housing.
7. Secure the stop cable covers to the bracket pins.
8. Insert the seal into the baffle hole. cable covers.
9. Route the cable through the hole in the bracket on the gearbox and install the cable sleeve guide into this hole.
10. Screw the wire to the bottom of the cable lug, making sure that the lug protrudes 0-1 mm from the end of the wire. (see picture below left)
Operations for setting up the Lada Grant clutch cable
1. Slide the clutch cable to its original position by sliding the bottom one to remove the mechanism spring. the end of the cable is completely forward, that is, in the direction of the car. Keep the tip in extended position, measure the size (see size L in the photo) between the plug and the drain, it should be 27mm. If the size does not fit properly, adjust it by turning the lever in the desired direction. (see picture below, mechanisms in the engine compartment)
2. Insert the end of the cable into the groove of the clutch plug and release. Under the action of the spring, the tip must be fixed to the plug without gap.
3. Press the clutch pedal several times until it stops, and measure the pre-controlled distance again (see size L in the photo). If necessary, repeat the adjustment until you reach the desired value of 27 mm.
Additional information about the clutch cable compensation mechanism
Grant Lada clutch cable compensation mechanism Designed to ensure that the clutch cable is always under tension. The mechanism for compensating for minor deviations “selects” or adds to the length.
To better understand the design combining the clutch pedal, clutch fork and cable, please see the picture in the article. “Lada Grant clutch and its possible disadvantages”
Additional Information on Clutch Cable Compensating Mechanism
The compensation mechanism on the Lada Granta clutch cable is designed to ensure that the clutch cable is always taut. A slight deviation is either “selected” or added to the length by the compensating mechanism. In order to better imagine the design that combines the clutch pedal, clutch fork and cable, look at the figure in the article “Lada Granta clutch and its possible malfunctions”
Tools:
- Open-end wrench 8 mm
- Open-end wrench 10 mm
- Driver for socket attachment
- 10mm wrench attachment
- Medium Phillips screwdriver
- Medium flat screwdriver
- Caliper or ruler
Parts and consumables:
- Clutch release cable
- Grease type “Litol-24”
- Clutch cable adjustment pin bushing (if necessary)
Notes:
Carry out the work directly when replacing the cable, as well as removing the gearbox and engine of the car.
For ease of work, it is recommended to remove the air filter housing.
1. In the cabin, under the instrument panel, using an 8 mm wrench, unscrew the nut securing the cable sheath bracket to the pedal assembly bracket.
2. Use a Phillips screwdriver to pry the spring clip and remove it from the groove of the clutch pedal pin.
3. Remove the eye of the automatic cable length adjustment mechanism housing from the clutch pedal pin and remove the upper part of the cable from the pedal assembly bracket.
4. In the engine compartment, pull the cable forward and remove the cable guide from the groove of the clutch release fork lever.
5. Rotating counterclockwise, unscrew the leash from the threaded end of the cable.
6. Remove the rubber protective cover from the cable end.
7. Remove the end of the cable sheath from the bracket hole on the gearbox.
8. In the passenger compartment, remove the cable sealing cover from the hole in the front panel and pull the cable into the passenger compartment.
Note:
Before installing the cable, check the condition of the plastic bushing on the pedal pin. Replace the worn bushing with a new one and apply grease to the pin.
9. Install the cable in the following sequence:
— pass the cable through the hole in the front panel from the passenger compartment into the engine compartment;
— install the sealing cover into the hole in the front panel;
— put the automatic cable length adjustment mechanism on the pedal pin and secure it;
— screw a plastic leash onto the threaded end of the cable so that the end of the cable tip is flush with the end of the leash;
— insert the leash into the groove of the clutch release fork lever;
— adjust the clutch drive.
10. To adjust the clutch, pull the cable forward by the threaded end until it stops, overcoming the force of the clutch pedal spring, and hold the cable in this position.
11. Using a caliper, measure the distance from the end of the plastic guide to the clutch release fork lever, which should be 27 mm.
12. If necessary, rotate the leash to achieve the required distance. When removing the load (releasing the cable), the leash should adhere to the fork lever without play.
13. Press the clutch pedal three times to activate the automatic cable length adjustment mechanism. The full pedal travel should not exceed 146 mm.
14. Reinstall the air filter housing.
The article is missing:
- Photo of the instrument
- Photos of parts and consumables
- High-quality photos of repairs
Source: carpedia.club