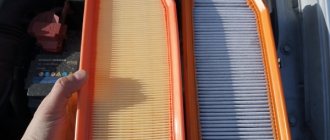
Replacement of brake pads on rear brake mechanisms will have to be carried out in cases where the thickness of the linings has reached the maximum values (their thickness should be less than 2 millimeters), as well as in cases of wear of the drum body itself. In addition, the pads will need to be changed when they have deep grooves, chips, or material has peeled off from the surface. You can replace the rear brake pads on a Renault Duster with both all-wheel drive and front-wheel drive with your own hands; you just need to strictly follow our step-by-step instructions.
Signs of Drum Pad Wear
Symptoms indicating that the rear pads in the Duster are worn out are as follows:
- The working stroke of the brake pedal increases ; for effective braking you have to press the pedal twice. This is especially noticeable when the car is moving backwards.
- The braking distance is extended.
- When the pad comes into contact with the drum , a loud metal grinding sound is heard.
- When braking, a noticeable vibration is transmitted to the foot.
- The car stops jerkily.
Although drum brakes are subject to less load than the front wheels, they are also subject to wear. The parts of the assembly are structurally protected by a drum bowl, but pervasive dampness and chemicals from winter roads gradually destroy the metal.
In addition to the pads and drum, cylinder cuffs made of rubber also fail.
As a result of their wear, technical fluid leaks and air enters the circuit.
Failed cylinder cuffs
Ineffective operation of the Duster handbrake is also a sign of wear on the drum linings.
All these factors make braking difficult . In addition, a defect in the springs often appears over time, causing the linings to gradually move apart. This leads to corrosion and poor performance. This means that the rear brake pads will have to be replaced with intact ones.
Signs you need to replace your brake pads
The main signs of friction lining wear:
- reduction in the volume of working fluid in the compensation tank in the absence of leaks;
- reduction in the efficiency of mechanisms when the pedal is suddenly applied;
- presence of extraneous sounds when using the brakes.
The manufacturer does not regulate the service life of brake linings, since the wear rate of the material depends on operating conditions and driving style.
Some cars are equipped with an ESP system that stabilizes the trajectory by braking the wheels. The operation of electronics additionally loads the mechanisms and accelerates wear of the pads. The machine manufacturer recommends installing new parts with a remaining friction layer thickness of 2 mm. The service life of parts, according to owners, ranges from 40 to 80 thousand km.
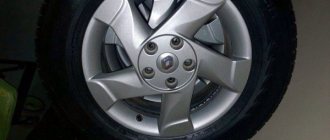
Renault Duster rear brake pads
The design features of the drums for all-wheel drive and front-wheel drive Renault Dusters determine the differences in the rear linings for different modifications of cars. The drum size is 228 by 40 mm , the minimum permissible thickness of the Duster rear pads (pads with base) is 3.5 mm, and the normal thickness is 4.9 mm .
Original: Duster – 7701210109
The article number of the original pads for Duster is 7701210109 (2x4) and 440607493R (4x4) , they are produced under the Ferodo . But analogues can also be used to replace worn parts. We list them for two options: 2x4 – 4x4.
Brand // Article // Price (rub.):
- REMSA 3.7 // 423700 – 415200 //813 – 810.
- LPR 3.4 // 9890 – 1131 // 1 208 – 1 773.
- MEYLE 4.2 // 16145330016 – 16145330012 // 1 206 – 1 250.
- TRW 3.5 // GS-8780 – GS-8455 // 1 250 – 1 250.
- NIBK 3.6 // FN-43551 – ABS-8455 // 1 400 – 1 200.
- BREMBO 3.5 // S-68546 – S-68525 // 1 641 – 1 300.
- ATE 3.9 // 3013704962 – 986487774 // 2 650 – 2 063.
- GIRLING 4.1 // 5187809 – 5184554 // 1 827 – 2 123.
- HELLA_PAGID 3.5 // 8-DB-355000301 – 986487774 // 2 235 – 2 100.
BREMBO 3.5 // S-68546
Spare parts, maintenance
Products from the Dustershop77 range that may be of interest to you:
| Name | Manufacturer | Price | Availability | Add to cart |
| BR-001-GARD-URDP | Mud flaps enlarged (widened) Duster-GARD front | Duster-Guard | 1300 / 1100 rub. Discount: 1000 rub. | >10 |
| DC495 | Discount card (Dusterclubs.ru, Dustershop77.ru) | 700 / 500 rub. Discount: 500 rub. | >10 | |
| DC218 | Air deflector “Warm feet” for Duster, Logan, Sandero, Largus | 500 / 300 rub. Discount: 250 rub. | >10 | |
| patriot-001-1 | Gearbox coupling and gas tank protection (steel) | Patriot | 6000 / 5300 rub. Discount: 4800 rub. | >10 |
| 005-008502 | Trunk sill protection | Russian Artel | 1500 / 1300 rub. Discount: 1000 rub. | >10 |
| PT014-7010402-RDU112901 | Trunk sill trim PTGroup | Pt GROUP | 1300 / 1100 rub. Discount: 850 rub. | >10 |
| DC654 | Frill with fastening without 3M tape (Duster/Terrano) (ArtForm) | ArtForm (Yuago) | 3500 / 2500 rub. Discount: 1900 rub. | >10 |
| R12711 | Wind deflectors (window deflectors) COBRA/Autoplex | COBRA/Autoplex | 2000 / 1600 rub. Discount: 1500 rub. | >10 |
| NRD-009102 | Frill under the windshield (RA) | Russian Artel | 2500 / 2100 rub. Discount: 1800 rub. | 6 |
| RA0052 | Door sill trims (front+rear) RA | Russian Artel | 2500 / 2000 rub. Discount: 1700 rub. | >10 |
Procedure for replacing rear pads on Renault Duster
To open the Duster brake drum and replace the corresponding rear wheel assembly, prepare:
- wheel bolt wrench,
- plain & sliding pliers,
- flat screwdriver.
It's time to change the rear pads when:
- thinning of the linings,
- oiliness of the linings,
- their poor connection with the base,
- chips or deep scratches.
For all-wheel drive or front-wheel drive Dusters, the tension springs in the mechanism are different, as is the release lever of the handbrake , but the internal minimum diameter of the drum is the same. For an all-wheel drive Duster, the springs are located outside the pads; it is better to remove them before starting work.
Warning! Do not use mineral solvents, incl. gasoline or diesel fuel.
Pads should always be replaced in pairs.
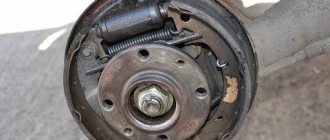
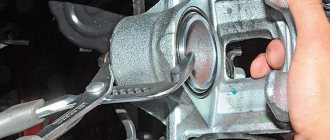
Removing the rear drum of an all-wheel drive crossover
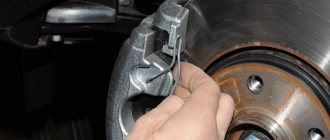
Before replacing the rear pads, you must first remove the ratchet mechanism. It is pryed with a screwdriver through the hub hole, and the length of the spacer bar is reduced . Next, the adjusting screw at the handbrake cable tensioner is unscrewed. To do this, you need to lower the handbrake all the way and unscrew this fastener in its handle.
Link to photo source
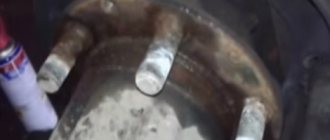
The drum is attached to the hub with two screws . They are unscrewed with a TORX T-40 key. Where the pads separate along the perimeter of the drum, you need to tap with a hammer to remove scale and dirt. As soon as the drum moves away from the hub, pry it up with a flat screwdriver or mounting spatula and remove it.
Using a caliper, set the inner diameter of the Duster drum.
If it is less than 229.5 mm, replace the part. Replacement is carried out on two wheels at once.
Changing the pads
The procedure for replacing rear brake pads is performed in the following order:
- 1st gear is engaged , wheel chocks are placed at the front.
- The handbrake is pushed all the way down.
- The rear wheel is removed and the Renault Duster is supported.
- It is advisable to pump out the brake fluid a little from the reservoir.
- The drum is removed.
- Using a screwdriver, move the release lever of the hand brake drive, at the same time the spring on the cable is compressed.
- The cable is disconnected from the lever.
- The stand adheres , the spring cup rotates after pressing 1/4 turn.
- Cup with spring, support stand are removable.
Link to photo - The second support post is also removed next overlay.
- The tension spring on top stretches a little, the toes of the pads are removed from the thrust slots in the pistons.
- The tension spiral at the bottom stretches a little, the toe of the linings is pulled out from behind the restrictive plate, the pads with springs and spacer are removed.
- As soon as the Duster pads are removed, the cylinder pistons must be temporarily fixed in any way (wire, etc.), so they don't get pushed out, the brake fluid has not leaked.
Image source - The ends of the tension spring are unhooked from the linings , and it is removed.
- The spacer fork is removed from the groove of the block in front.
- The end of the clearance adjuster earring is detached from the front trim.
- The ends of the tensioning spiral are unhooked from the pads, the pads are separated.
- Having stretched the spiral of the spacer, the fork of the bar is removed from the groove of the rear column and disconnected from the release lever.
- The end of the tension spring is detached from the spacer bar, the bar is removed.
- The tension spring of the spacer bar is removed from the rear block.
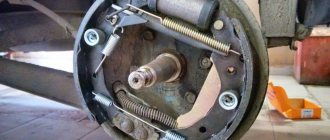
- The brake mechanism is inspected and cleaned of dirt.
- Deformed rusty parts are replaced with new ones.
- Springs, struts, cups must be replaced every time during disassembly of the mechanism . When working, you need to make sure that the right and left parts are not mixed up.
- In places where the pads contact the shields, you need to apply a refractory lubricant . The same lubricant must be used to treat the spacer rod at the thread location.
- After releasing the pistons of the rear brake cylinder from the retainers (wire, etc.), they are supported with sliding pliers and new ones are installed .
- The drum is put in place.
- The gap between it and the linings is adjusted by squeezing the brake pedal 10-15 times . Each press should be accompanied by a click of the regulator. When the sound stops, the adjustment is complete.
- The wheel is put in place and checked how easily it rotates.
- The pads of the second wheel of the Duster are changed in the same way. Next, the parking brake is adjusted.
Replacing pads on a front-wheel drive Duster
In the modification with a 4x2 transmission, a torsion beam with modified drum mechanisms is used at the rear. We remove the wheels and bring the pads together with the tip of a screwdriver, then you need to dismantle the metal protective cap located on the hub. Under the plug there is a central nut, which is unscrewed using a 36 mm socket. The casing with the pressed-in rolling bearing is pulled off the pads. Further actions are identical to the procedure for servicing the rear brakes on a Renault Duster with all-wheel drive.
When reassembling, it is recommended to install a new central nut, which is tightened with a torque wrench to a torque of 175 N*m. The element is automatically fixed on the threaded axis; there is no need to install cotter pins or deform the edge. If there is no new nut, then the self-locking functionality is restored by deforming the existing chamfer with a hammer. The part is placed in a vice with jaws spaced 12-15 mm apart, focusing on the edge, and then the chamfer is crushed at 3 points.
How to tighten the Duster handbrake?
To adjust the Duster handbrake, prepare a socket number 13. At 5-7 clicks of the ratchet mechanism, the handbrake should hold the car at an angle of 25 degrees. If it cannot cope with this task, then its drive needs to be adjusted from inside the cabin. To adjust the Duster hand brake:
- The tunnel lining is being tightened.
- The plug on the lever is thrown forward , opening access to the adjustment unit.
- By moving the adjusting nut , ensure that the lever moves 5-7 clicks.
- After making several such full strokes of the lever , it is lowered all the way.
- The rear of the car is lifted with a jack , the rear wheels are turned by hand. If they spin evenly, then everything is fine. Otherwise, the handbrake or brake mechanisms require repair.
- plug for the adjustment unit and the tunnel are put in place .
Replacement
To change the front brake pads on a Renault Duster, you should prepare the saddle tools:
- Hexagon for seven
- A flathead screwdriver with a wide end
- Pliers
Before starting work, you should check the condition of the brake fluid, and if there is a lot of it, it is advisable to take a syringe and remove the excess fluid, since during replacement it may spill out of the reservoir. When all the work is completed, the fluid will need to be added to normal. You should also know that it is necessary to change the entire set, as uneven wear will occur, and the car will pull to the side when braking.
When everything is prepared, let's get to work:
- First of all, we lift the car with a jack and remove the necessary wheel, then we take a screwdriver and insert it between the body and the pad into the caliper hole, move the piston as far as possible, this must be done in order to move the pads and the piston apart.
- We remove the caps of the bolts that secure the caliper; they are located in the lower and upper parts.
- We take the hexagon and unscrew these bolts.
- Using pliers, remove the staples and spring retainer
- When the springs are removed, we separate the caliper from the disc, so that the inner one remains on the caliper, and the outer one on the disc.
- Before you replace the front brake pads on a Renault Duster, you will need to take a brush and clean all places from dirt and dust.
- When everything is clean, take a new pad and place it on the outer side of the disc, and install the second one on the caliper
- Once the caliper is secured to the brake disc, you can put everything back together.
Renault Duster front pads should be changed when uneven wear occurs and squeaking appears during movement, or when their thickness is less than six millimeters.
In addition to the pads, it may also be necessary to replace the brake discs, so you need to know their volume and catalog number.
Engines with a volume of one and a half and 1.6 liters have 269 mm rims, and the number:
- Original Renault 402066300R
- Analogue Bosch 098479779
The engine with a volume of two liters has discs with a volume of 280 millimeters
- Original Renault 402064151R
- Analogue Bosch 0986479777
There are, of course, other analogues, but these are more popular among car owners.
Replacing the Duster handbrake cable
Duster hand brake cables are replaced if they are so stretched that it is impossible to adjust them; in case of mechanical damage or when the mobility of the rear cables inside their sheaths is lost.
Article: NK 9039148
You will need pliers and a number 13 wrench.
The work is done this way:
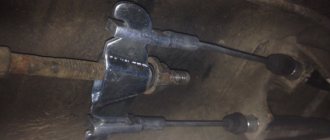
- The tension of the handbrake cables is completely released ; to do this, unscrew the adjusting nut completely.
- The drum is removed.
- The expansion lever is moved forward with a screwdriver , while the spiral is compressed.
- The cable is disconnected from the release lever.
- For an all-wheel drive Renault Duster, you need to remove the rear block, use pliers to press the cable spring forward , after which you can disconnect the end of the harness from the release lever.
- The tendrils of the shell latch are compressed , after which the cable is removed from the hole in the shield.
- The drive is removed from the holder located on the lever.
- The casing is pulled out of the holder on the gas tank.
- The cable is removed from the hole in the suspension beam arm fastener.
- The shell is pulled out from the body holders. The all-wheel drive Renault Duster has only one such holder.
- The harness is pulled into the passenger compartment , disconnected from the equalizer after its tip is removed from the equalizer, and then completely pulled out through the body hole from below.
- After replacing the Duster handbrake cable, all removed parts are installed in the reverse order.
Changing the front cable
To replace the front handbrake cable, you need:
- Release the tension completely by unscrewing the adjusting nut.
- The cable ends are removed from the grooves of the equalizer, then the parts are separated.
- At the back of the lever, the floor mat is cut and its parts are moved to the side. This opens the lower part of the handbrake lever without removing the front seats. This cut will then be covered with a floor tunnel.
- The adjusting nut is unscrewed from the thread of the tip of the harness, after which it is pulled back and removed together with the equalizer.
- Reassembly is in progress.
The final stage of replacing the Duster handbrake cable is setting up the drive.
Step-by-step instructions for all-wheel drive cars
The linings are replaced as a set; it is prohibited to use elements with different thicknesses of the friction layer. If there is uneven wear, the car may move to the side when braking.
Before changing the pads, check the amount of fluid in the reservoir. The level is brought to the Max mark (for example, using a rubber syringe or a medical syringe). When installing new linings, excess fluid may leak into the engine compartment.
Algorithm of actions when replacing pads:
- Place the car on a level surface and turn off the engine.
- Secure the vehicle with wheel chocks and release the parking brake lever down.
- Raise the body with a jack and install a steel safety stand under the threshold.
- Unscrew the bolts and remove the wheel from the hub.
- Push the pads toward the center using a flathead screwdriver, which is inserted into the drum through the holes for the wheel bolts. The automatic clearance adjustment mechanism includes a spacer insert with a ratchet wheel. The tip of the screwdriver moves from bottom to top, reducing the length of the bar and moving the lining away from the working surface of the brake mechanism. The operation of the adjustment unit is shown in a video filmed by the owners of a Renault Duster.
- Using a Torx 40 socket, unscrew the 2 screws located on the front of the drum.
- After the bolts are unscrewed, you need to pull the metal casing towards you. If removing the part is difficult, then it is necessary to additionally bring the pads together. After removing the cover, it is strictly forbidden to press the brake pedal, since the pistons will be squeezed out of the brake cylinder.
- Use the tip of a screwdriver or the jaws of pliers to unfasten the tip of the upper spring from the metal frame of the front pad.
- Remove the opposite hook of the spring from the hole in the rear cover.
- Remove the lower spring in the same way.
- Remove the additional elastic element that maintains the gap between the friction lining and the working surface of the drum.
- Press in and use pliers to turn the stamped washer that holds the trim on the support rod.
- Pull out the rod from the opposite side of the drum mechanism.
- Remove the front trim retainer using a similar method.
- Move the rear block away from the shield, which will allow you to remove the tip of the cable going to the handbrake lever.
- Remove the block and spring installed on the metal end of the cable.
- Remove the front block, which is removed along with the spacer plate and adjustment mechanism.
Mechanism assembly
The springs and position adjuster are cleaned of dust; damaged parts must be replaced with elements from the repair kit. The washed screw mechanism and ratchet are coated with a layer of lubricant that is resistant to high temperatures. When reassembling the strip, take into account the multi-directional threads in the left and right holes. The regulator is mounted on the front pad, which is secured with a support rod. The rear block is fixed on the cable, and then the clamp and adjusting springs are installed.
A layer of dust (from wear of the linings and metal surface) is removed from the surface of the casing with a steel brush; if the height of the side exceeds 2-3 mm, then it is recommended to replace the part. After assembling the unit, the position of the pads is adjusted.
To adjust, you need to press the brake pedal, and then raise the parking brake lever all the way 4-5 times (with the ratchet button pressed). With each lift, a ratchet is activated, which moves the pads towards the working surface.
The correctness of the setting is checked by the number of clicks; turning the wheel by 7-8 teeth is considered the norm. The adjustment stops when the clicking in the mechanisms stops. Then the level of working fluid in the tank is checked, and if the volume decreases, topping up is done.
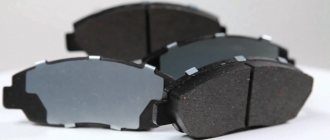
When to change front brake pads (regulations)?
The wear of the brake pads is clearly visible in the photo.
Replacement of front brake pads on Renault Duster should be carried out in case of excessive or uneven wear and in cases where the thickness of the friction material is less than 6 millimeters
Uneven pad wear can lead to noise, squeaking while driving, and uneven brake rotor wear, so it is very important to ensure that your car's brake pads are in excellent condition.
The service life of these spare parts ranges from 30 to 60 thousand kilometers, and such a difference in performance largely depends on driving style. If, after replacing the pads, the brakes do not work effectively, then you need to tighten the handbrake. When the handbrake is not adjusted, the rear pads do not adhere well to the brake drum.
Which pads are better to choose?
The original brake pads for Renault Duster, which are used in Russia with a two-liter engine, are produced by Ferodo and they have the number 440603905R, the price of such a set will be in the range of 3000 - 4000 thousand rubles.
However, there are many analogues on the market that are in no way inferior in quality to the original ones:
The HI-Q brand from the SANGSIN brand has been presenting its products on the Russian market for quite a long time, and has earned enough recognition from a large number of car enthusiasts. Analogue brake pads for Duster have the following part numbers:
- Sangsin Brake HP1390 (Hardron) - the price of such a kit ranges from 2500 to 3500 rubles (made in Korea). These pads are an excellent replacement for the original ones.
- Sangsin Brake SP1390 – the price of pads starts from 1500 rubles (made in Korea). Excellent pads that are designed for a measured and quiet ride.
This is what the packaging for the front pads for Renault Duster looks like.
There are also a couple more options from lesser-known manufacturers, but producing equally high-quality products:
Hankook Frixa FPS05 and LYNXauto BD6317 the price of these kits starts from 1300 rubles. The first and second options have quite good characteristics and performance.
Pads for engines with a volume of 1.5dCi and 1.6 liters:
- Renault 410608481R – Original pads, the price of such a set starts from 1,500 rubles.
- Bosch 0986424795 - Pads that have different performance characteristics with a set price of 1500 to 2500 rubles.
- Sangsin Brake GP1564 – The price of the kit starts from 2200 rubles, they are an excellent replacement for the original.
- Fenox BP43018 – Pads produced in the Republic of Belarus. The price starts from 500 rubles, it cannot be said that such pads are intended for intense and dynamic driving.
Front brake discs for Renault Duster
If, while changing the pads, you determine that you will need to replace the brake disc, you should know their catalog numbers, however, please note that the disc size for cars with a 1.5dCi and 1.6 engine capacity is 269 mm:
- Original Renault 402066300R - price starts from 5,000 rubles.
- Analogue of the original Bosch 0986479779 with a price starting from 3000 rubles.
And for two-liter Dusters the diameter is 280 mm.
- Original Renault 402064151R – price starts from 5,500 rubles.
- Analogue of the original Bosch 0986479777 price from 2500 rubles. In addition to this model, there are several other analogues on the market, but their quality is not reliable.
Replacement process
The sequence of replacing parts on machines with 1.5 and 2.0 liter engines:
- Prepare a jack, safety stand and wheel wrench. To dismantle the calipers and remove worn linings, a 7mm Allen key is required.
- Open the hood, then unscrew the cap of the brake fluid compensation reservoir.
- Raise the front wheel, place a support under the threshold, then unscrew the bolts securing the disc to the hub.
- Using a screwdriver, carefully press the brake caliper piston until it stops. Insert the tip into the oval slot on the side edge of the caliper. Then, using the tool as a lever, remove the inner block.
- Remove the protective rubber caps under which the caliper mounting bolts are located.
- Using a wrench, loosen the screws, which are then removed from the holes.
- Using the tip of a screwdriver, remove the spring bracket that regulates the position of the movable part of the caliper relative to the disc.
- Remove the outer part of the mechanism along with the inner lining; the outer one remains on the guides of the stationary section of the caliper.
- Place the removed assembly on top of the disk, then remove the old pads.
- Remove accumulated dust with a wire brush and compressed air, then insert a new inner pad into the cylinder. On the outer part of the part there is a metal bracket (“crown”) that fixes the element on the surface of the piston. On vehicles with brake discs with a diameter of 269 mm, such a lock is not provided.
- Place an external cover on the guides, which differs from the opposite block in the absence of a “crown”.
- Place the caliper in place, tighten the screws and install the protective plugs.
- Replace the wheel and carry out similar manipulations on the other side of the Duster 4x4 vehicle.
- Check the level of working fluid in the compensation tank, which then close the lid.