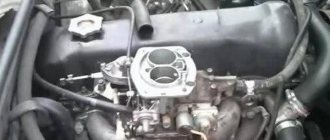
Design and purpose
The engine oil pan is a metal structure usually made of aluminum, but in older cars it could be made of steel.
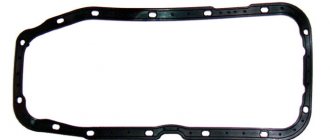
The shape of the oil pan resembles an elongated rectangular basin; it is attached to the cylinder block from the bottom side through a gasket on studs or bolts. There is a plug on the bottom or side surface designed to drain oil from the engine. The pan is designed, firstly, to protect the oil receiver, crankshaft, and other parts of the engine crankcase from mechanical damage, dirt and dust.
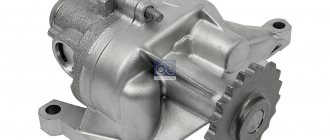
Secondly, it serves as a container for motor oil. It is from this that the oil pump delivers it upward through a filter - to the cylinder head, from where, having lubricated the parts of the gas distribution mechanism and connecting rod-piston group, it flows back.
Then you need to move under the car
Removing engine mounting elements
First you will need to unscrew all the bolts securing the clutch housing from the power unit.
16. Removing the clutch housing
Then you should proceed to the engine mounting elements.
To do this, you will have to unscrew the bolts securing the motor mounts. First, the nut is unscrewed from the bolt on the front support. Since the power plant continues to rest on this support, in order to be able to pull out the bolt, the engine should be lifted slightly using a pry bar and the bolt removed. Next, holding the unit with a pry bar, insert a wooden block into the gap between it and the subframe. After this, it will be possible to unscrew the engine bracket mounting bolts.
| 17. Removing the front engine mount | 18. Lifting the engine with a pry bar, remove the bolt | 19. To unload the bracket, we place a block |
| 20. Using the “17” head, unscrew the 3 bolts securing the bracket | 21. Bracket mounting bolts when removed | 22. Remove the bracket with support |
In the same way, the rear right support becomes loose, followed by installing it on a wooden block and removing the bracket.
| 23. Using a 17 key, unscrew and remove the bolt | 24. Unscrew the 2 bolts securing the rear support bracket | 25. Remove the rear support |
26. Removing the rear mounting bolt of the clutch housing is possible only after dismantling the rear support.
The photo shows a removed engine Removing the left engine mount
| 27. Place a block | 28. Using a key set to “13”, unscrew the nuts securing the left support bracket to the gearbox | 29. Using keys “17”, unscrew the fastening bolt |
Next, in the front part of the engine, the eye that was removed when dismantling the generator is installed in place. The rear eye is attached to the leftmost cylinder head stud.
The lifting mechanism is hooked onto these eyelets. To remove the motor, you need to move it all the way to the left so that the gearbox input shaft comes out of the flywheel. It is quite possible that for this you will have to tilt the engine a little, and at the same time moving it to the left.
After the shaft comes out of the flywheel and clutch discs, the power unit is carefully lifted up by the lifting mechanism. It is better to do this together - one will lift the motor, and the second will guide it so that it does not cling anywhere.
Possible faults
Malfunctions of this part do happen, and it is dangerous to ignore them, since loss of oil threatens serious and expensive repairs of the internal combustion engine. They can be easily diagnosed by oil leaks - a characteristic small puddle that remains on the asphalt after an overnight stay and a wet sump. The causes of leaks may be:
- loose oil pan bolt;
- gasket wear;
- loose drain plug;
- cracks in the metal.
Cracks in metal are a much more serious problem than a poorly tightened bolt. They can appear as a result of impacts with large stones, curbs, etc. Even if protection is installed under the crankcase, it can crack due to non-compliance with the bolt tightening torques recommended by the manufacturer. A crack can also occur if the drain plug is overtightened after an oil change or repair. It has a slightly conical shape, is made of a harder metal, and can tear the pan. Such a crack is difficult to see, and some service workers, trying to eliminate the leak near the plug, tighten it even more, which subsequently aggravates the situation.
It is worth noting that a slight “sweating” around the oil drain plug, in the absence of drops or streaks, is normal.
Engine sump: repair
You can often repair or restore the engine oil pan yourself.
When a leak occurs in the area of the gasket between the crater pan and the cylinder block, first of all it is worth checking the tightness of the mounting bolts/nuts. It is necessary to tighten the bolts according to the tightening torques recommended by the manufacturer, otherwise you can strip the threads or cause a crack to appear - then you will have to make more complex and expensive repairs, restoring the tightness of the engine crankcase.
If tightening the bolts does not eliminate the leak, the gasket must be replaced. In this case, you cannot do without removing the pallet. This is not difficult to do from a viewing hole, on an overpass or a lift. We will look at how to remove and install the engine sump yourself below.
The most easily corrected malfunction can be considered a poorly tightened drain plug; they could simply have forgotten to tighten it well after the next maintenance. It is tightened using the appropriate key, by hand, without using additional levers or pipes.
But if you have diagnosed a crack in the oil pan in your car, then the best way to repair it is to completely replace it. However, there are situations when a car of a rare model or a new part is quite expensive, there are several ways to restore its integrity. For example, using glue, dry welding or argon welding.
How to remove the engine from Oka
Particularly small class cars VAZ and SeAZ “Oka” 1111 and 1113 were the only models of the domestic automobile industry that were equipped with two-cylinder water-cooled power plants. These motors were very compact and structurally very well made.
But, like any power unit, Oka engines required major repairs after long-term operation. Moreover, some of the restoration work, especially the crank mechanism and the cylinder-piston group, is much easier to perform with the engine removed, so you definitely need to know how to remove the engine from the Oka.
In general, removing the engine from the Oka is not a difficult operation, but you need to know the sequence of actions. You will also need the appropriate equipment.
How to remove and install the oil pan yourself
This is not a complicated procedure, and most car enthusiasts can do it, although it does require some repair skills and tools. Depending on the brand of the car, nuances are possible. For example, in VAZ cars of the classic family, with a longitudinal engine, you need to lift the engine. Therefore, before you start disassembling it yourself, read the repair manual for your car.
Procedure for removing the oil pan:
- Prepare a clean container - it can be a canister with a wide neck or a cut one. Its volume must correspond to the amount of oil in the engine of your car;
- Drive onto an inspection hole or overpass; it will be more convenient for you if it is deep enough so that you can stand under the car at full height;
- Warm up the engine to a temperature of 50-60 degrees, the engine oil will become thinner and more fluid;
- If the engine compartment protection is installed, remove it; it is usually secured with 3-4 bolts;
- Carefully unscrew the drain plug, placing a previously prepared container under it, be careful - the oil will definitely flow onto your hands and possibly somewhere else;
- Unscrew the oil filler plug. After unscrewing the filler plug, the flow of escaping oil will increase sharply, make sure that it flows into the canister and losses are minimal;
- Wait until all the oil has drained and begin unscrewing the fastening bolts/nuts;
- If all the bolts are unscrewed and the oil pan cannot be removed by hand, this means that the parts have been glued together. You need to tap it with a rubber hammer, carefully pry it with a screwdriver or other flat object, but so as not to damage the joints. Scratches may cause leaks in the future.
Now that the pan has been removed, you can carry out repairs and also see the crankcase structure.
Installation is carried out in reverse order. The drain plug must be screwed into the pan immediately, and oil must be poured through the filler hole last. It is recommended to combine pan repair with an oil change. It is important to ensure that the bolts and plug are properly tightened, as already mentioned.
Where does the name oil pan come from?
The sump is so called because it is located directly under the bottom of the engine. Many people call it that, but technically speaking, it correctly sounds like an oil pan. Not many people know what a crankcase is. A crankcase is a housing part, inside of which a mechanism is located. In the design of the car, the following types of crankcases are distinguished:
- engine;
- gearboxes;
- clutch;
- steering, etc.
The name karter appeared after an English engineer named Carter developed a protective casing for the drive chain of a motorcycle with an oil bath. This is where the name karter came from. On cars it can be wet - the engine, gearbox, and also dry - the clutch.
Crankcase sump - this phrase is not used by people, so drivers, mechanics and craftsmen simply say engine sump or crankcase. However, calling the pan a crankcase is not entirely correct, although when using such a phrase, this particular detail is implied. Another name for the pan is the crankcase cover.
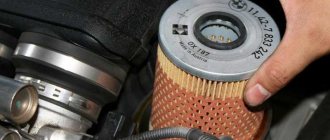
Pad
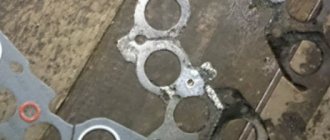
It is the gasket that ensures a tight connection between engine parts. When purchasing, be sure to match the article number. It is not possible to repair a worn gasket. It is recommended to replace it after each removal of the oil pan during installation. In this case, you need to carefully and very carefully clean the surfaces that will be in contact from the remnants of the old gasket and sealant.
To improve the properties of the gasket, you can use graphite lubricant, a special sealant for the engine crankcase, or any heat-resistant silicone-based sealant.
Graphite lubricant is applied to both sides of the gasket in a thin layer; after assembly, it fills micro-cavities, and hardens under high temperatures.
It is preferable to use a special sealant; it is applied in a thin, uniform layer over the entire contact area, on the pan and on the cylinder block. After assembly, the sealant will dry and, as it were, glue the surfaces, ensuring a tight fit and sealing.
Some craftsmen use sealant instead of a gasket, in which case its layer should be thicker, but it is better to leave this method in case the car is so rare that it is difficult to find the right gasket for it.
Instructions for removing, cleaning and replacing the engine sump on Lanos and Chance 1.5
Before starting work on removing the oil pan on Lanos, you will need to first purchase a sealing gasket, oil, filter and sealant. Which oil to choose and how to replace it on Lanos is described in detail in this material. The article number of the sealing gasket for Lanos and Chance 1.5 cars is 90409693
. However, do not rush to buy it, since the likelihood that you will be able to install the pallet in place with it is very low. We use sealant as a gasket.
Let's proceed to directly removing the crankcase cover Lanos and Chance 1.5:
- First, the car must be installed on an inspection hole or overpass, which greatly simplifies further actions.
- Remove the engine protection, if equipped.
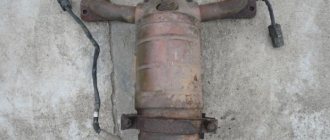
- Drain the oil and wait for the engine to cool. This is necessary in order to avoid getting burned when unscrewing the exhaust pipe.
- Let's get to work and unscrew the nut of the clamp securing the exhaust pipe using a "17" wrench (if such a fastening is available).
- Using a "14" wrench, unscrew the three nuts securing the exhaust pipe to the exhaust manifold. These nuts tend to stick, so it may be difficult to unscrew them. To simplify the process, we first clean them with a wire brush and treat them with WD-40.
- Using the “17” key, unscrew the bolts securing the metal plate to which the clamp for securing the exhaust pipe (if present) is fixed.
- The exhaust pipe is lowered, thereby freeing access to the Lanos engine sump. There is no need to remove it completely.
- Using a “10” wrench, unscrew the bolts securing the plastic cover of the timing mechanism.
- We proceed to unscrewing the 15 bolts securing the Lanos oil pan, using a “10” wrench.
- All 13 bolts are located in plain sight and are easily accessible. Two bolts on the flywheel side are hidden under plastic plugs (if present).
- It is with unscrewing these two bolts that owners of Lanos and Chance 1.5 cars have difficulty. The bolts are located in the channel (for clarity, a photo is shown below).
- The main difficulty is that it is impossible to reach them using a standard ½ inch socket. To do this you will need a 3/8 inch tool.
- Unscrew the 4 bolts securing the pan to the gearbox. One bolt is located on the side of the box. Shown in the photo below.
- Two bolts are on one side.
- And another one is located on the other.
- After this, you can remove the pan. To do this, we use a knife and go around the perimeter of the part. The cover fits tightly to the engine, so there is no need to try to tear it off or knock it off, as it can be damaged.
- The removed pan is subject to comprehensive cleaning and rinsing.
- To carry out cleaning work, you need to unscrew the 8 x 10 bolts that secure the plate. Clean the deposits and rinse the part to the condition as shown in the photo below.
- Don’t forget to remove any remaining old sealant around the perimeter of the pan and on the engine block.
Regardless of what caused the removal of the Lanos and Chance 1.5 crankcase cover, in any case it is necessary to clean its internal part, as well as dismantle the oil receiver and clean the metal mesh. If the oil pan needs repair, then after eliminating the defects using welding equipment, we proceed to assembly. If the part cannot be repaired, then you will need to buy a new pan, the cost of which for Lanos and Chance cars is about 3,000 rubles. Video instructions for removing the Daewoo Lanos 1.5 device.
Cold welding
The cheapest way to repair a crack is by cold welding. It is no different in terms of reliability, because it is not brewing, but rather caulking/sealing. Cold welding, as a rule, consists of two components, which are mixed together, applied to the damaged area and allowed to harden. Before doing this, be sure to degrease and thoroughly clean the damaged area. In the case of a small crack, you can try to seal it without removing the pan. When choosing cold welding, pay attention to the temperature at which it retains its properties - it should be at least 200 degrees.
Argon welding
Argon welding is the most effective way to remove damage. This type of welding can be used to weld both aluminum and any other non-ferrous metal alloys. A good welder can easily fix a crack or weld a small hole, and the seam will not affect the functionality in any way. The disadvantage of such repairs is the high price. You can, of course, save money if you remove the part yourself and contact welding specialists directly. But in the case of common brands of budget cars, it will cost less to replace the oil pan with a new one.
You can also use glue for repairs. There are many different types that allow you to seal metal, but epoxy remains wear-resistant, heat-resistant and water-resistant. It is based on resins, substances to accelerate curing, and other fillers. The application of epoxy adhesive is similar to dry welding, it is also two-component and comes in paste or liquid form.
How to protect the oil pan from damage
The oil pan can be damaged as a result of driving on bad roads, hitting a large stone or curb. Therefore, we cannot turn away from the question of its additional protection.
There are several types of engine protection:
Polymer or plastic options cannot guarantee reliable protection, despite their low cost; they should not be installed in bad road conditions.
Aluminum protection is lightweight and corrosion-resistant, but due to its high cost and soft metal, it is also not recommended to use it when driving on bad roads.
Titanium would be an ideal option, in all respects, if not for their high cost. For now, they remain the prerogative of premium cars.
The optimal solution would be engine protection made of steel. It will reliably protect the engine crankcase at its low cost. On many modern cars, the manufacturer provides the possibility of installing engine protection. Therefore, to simplify installation, you need to select it taking into account the make and model of your car. It would be a good idea to seal the protection by installing special inserts so that it does not rattle when moving, or periodically check the tightening of the fastening bolts.
Not only internal combustion engines have a sump. It can also be with an electric motor or gearbox, be it a CVT, manual or automatic. There it performs almost the same functions and in some cases, for example, if it is an SUV for trophy rally, more powerful crankcase protection is required, not only for the engine, but also for other mechanisms.
Source
How to remove the pan on a VAZ 2107
The pan is installed at the bottom of the engine under the cylinder block and acts as a reservoir for engine oil.
The tray is made of thin sheet metal and is a small bathtub. There is a drain hole at the bottom so that used engine oil can be quickly drained. The shape of the pallet may vary. It depends on the design features of the car. For example, on all-wheel drive vehicles, the front axle gearbox is installed directly under the pan. Their functioning should not interfere with each other in any way, therefore the pallet is made in such a way that it does not touch the gearbox.
In addition to the main function, the pallet also performs additional work.
During engine operation, rubbing parts release small particles of metal, which settle at the bottom of the pan, thanks to a special magnet fixed there, and do not interfere with the productive operation of the engine.
Also, at the bottom of the sump there remains unused oil, which is then sucked into the oil sump by the oil pump and supplied to the working part of the engine, while the other part of the oil ends up in the sump.
The last function of the pan can be considered to be oil level control. This is due to the fact that the oil dipstick measures the oil in the pan.
Engine sump protection
When driving on bad roads, the pallet is at risk of being exposed to external influences. These include various stones on the road and other solid bodies, the strength of which allows them to pierce the thin metal of the pallet. If there is even one hole in it, the oil will begin to leak and ultimately the engine will require very expensive repairs.
All this forced car manufacturers to produce a special protective device for the pan. It is made of thin sheet metal and installed under the pallet. Fastening is carried out to the car body using bolts. The principle of operation is to absorb the impact energy of any obstacle and prevent damage to the pallet.
During the long-term operation of vehicles and after acquiring the necessary experience, the following requirements began to be imposed on engine protection:
1. Stiffness. Deformation of the metal sheet should only occur in the place where the pallet is located. In addition, the protection must have a mandatory slope, which in the event of a car collision will lead the engine not into the passenger compartment, but under the car.
2. Durability . The metal sheet of protection should have as few holes as possible, otherwise such a structure will poorly withstand the energy of an impact on an obstacle.
3. Weight and dimensions . The weight of the protection should not exceed 15 kilograms, otherwise it will create additional load on the front of the car. The dimensions, in turn, should allow maintaining the vehicle's ground clearance. Protection that is too large and low will “catch” almost all the unevenness of the road surface.
Pan protection is not installed on all cars, but drivers install the protection themselves immediately after purchasing a car. For this purpose, the factory provides special mounting holes.
Types of engine protection
Depending on the material used to make the protection, there are several types of engine sump protection.
- Structural steel . It is the most excellent option for any car, which is achieved by the presence of stiffeners. In addition, the steel from which such protection is made has good elasticity, which allows it to return to its original shape after deformation.
- Aluminum . Unlike steel, aluminum protection does not have stiffening ribs stamped on it, but this does not prevent it from being a worthy competitor to steel, the weight of which is much higher than that of aluminum. Aluminum protection is quite expensive.
- Plastic . Usually, it is made of carbon, Kevlar, carbon fiber, etc. It has a fairly low weight, but is significantly inferior in strength, since it usually crumbles upon impact.
This is interesting: Daewoo Matiz fuse box: where are they located and what do they look like?