Repair / From Vladimir
- A set of tools
Which consumables are best to choose: video guide “Behind the Wheel”
- How to change rear pads with high wear (video)
- Video on how to change the front ones
- Tips for choosing the right size consumables on video
Properly functioning brake pads are essential for safe driving. In order for the braking system to work effectively, it is important to install new ones in a timely manner. On a Renault Logan, you can replace the front and rear pads yourself, following simple instructions.
When is it necessary to replace brake pads on a Renault Logan?
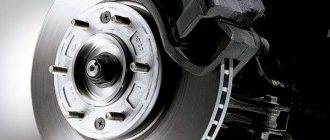
The service life of the pads on Renault Logan is unlimited, so replacement is required only when a malfunction occurs or the friction linings are worn to the maximum possible extent. For proper functioning of the brake system, the thickness of the pad, including the base, must exceed 6 mm. Replacement is also required when installing a new brake disc, friction linings peel off from the surface of the pads, the linings become oily, or defects occur on them.
Driving a vehicle with worn or faulty pads will reduce the effectiveness of the braking system and may cause an accident. The need for replacement is indicated by symptoms such as knocking, rattling, creaking when stopping the car and an increase in braking distance. In practice, the pads on Renault Logan wear out after 50–60 thousand kilometers and begin to rattle.
Wear is not always even on both pads.
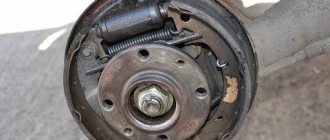
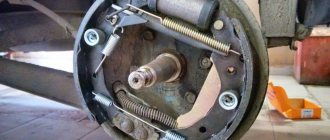
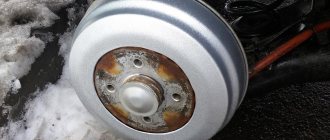
Rear wheel brake mechanism with drum removed: 1 - rear brake pad; 2 — spring cup; 3 — parking brake drive lever; 4 — spacer bar; 5 - upper tension spring; 6 — wheel cylinder; 7 — regulator lever; 8 — regulator spring; 9 — front block; 10 - shield; 11 — parking brake cable; 12 — lower tension spring; 13 — support stand
Terms of use and replacement periods
Before replacing the pads on a Renault Logan, you need to check them to determine the degree of wear of the linings. The mileage of a car before replacement can range from approximately 15 to 45 thousand km; this interval is affected by the quality of the pads and brake disc. Experts recommend diagnosing linings every 15 thousand km. In turn, the rear pads can last several times longer than the front ones, although the driving style of the car owner plays an important role.
For absolutely all years of production of Renault Logan cars, the thickness of the pads should not be less than 6 mm (including the base) and for the rear ones also not less than 3.5 mm
If you notice an extraneous loud sound, namely a grinding sound on metal, then you should pay attention to the wear indicator, it can warn you that the pads need to be replaced
To check the wear of the linings, perform the following steps:
- The front wheels need to be removed and the thickness of the linings measured through the hole in the caliper. If wear has reached the limit, replace it.
- At the rear of the wheels, you need to remove the brake drum and measure the thickness of the linings with a caliper. If wear reaches the limit, replace it.
The main factors when purchasing pads:
Choose a brand that has proven itself well in the automaker market. The packaging of the goods must be of high quality, and the labeling must be written in a legible font. You also need to carefully check the sample of the pad you bought in order to find defects in time, if any.
It is important to examine the appearance of the lining material itself. If the fraction is small, then the pad will be soft and vice versa, if the fraction is large enough, then the pad will be hard. With all this, the disc and drum may wear out faster
With all this, the disc and drum may wear out faster.
Usually a fake is immediately visible. If you are in doubt about purchasing, then do not buy this product. Front and rear brake pads can be purchased from companies such as: REMSA, ROAD HOUSE, LPR, LUCAS TRW, ZIMMERMANN, BOSH, ATE, GIRLING, BREMBO, TEXTAR. The price for front pads varies from 769-1420 rubles. In turn, the cost of rear pads starts from 856-7169 rubles.
Car owners always find it difficult to choose brake pads. But as practice shows, profitable solutions can always be found. Brands such as: ATE, GIRLING, TEXTAR, BOSH have a very good reputation in the market, so choosing pads should not seem difficult to you.
(317)
How to change the rear ones
To replace a set of rear pads on a Renault Logan, follow these steps step by step.
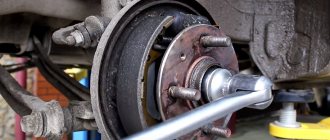
- Place wheel chocks on the front wheels and jack up the rear of the car.
Jack up the car body - Unscrew the fixing bolts on the wheels and remove them.
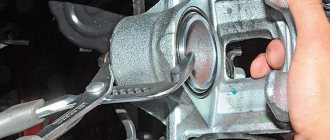
Remove the wheel - Using a flat-head screwdriver, slide the pad towards the brake disc to recess the piston into the working cylinder.
Press the piston into the cylinder - Using a 13mm wrench, unscrew the lower caliper fastener, holding the 17mm wrench to prevent accidental turning.
Remove the lower caliper mount - Lift the caliper up and remove the old pads.
Open the caliper and remove the pads - Remove the metal plates (pad guides), clean them of rust and plaque, and then put them in their original position.
Clean the plates from rust and debris - Pull out the caliper guide pins and treat them with brake lubricant.
Lubricate the mechanism - Install the set of pads and reassemble the structure in reverse order.
Close the cover and tighten the bolt
How to change rear pads with high wear (video)
Replacing the clutch disc and its service life
Before you get started, you should know some design features.
If this tells you something, and you know the structure of the mechanism and are confident in your abilities, it’s time to get to work.
Required Tools
- The key is “11”, or better if it is a socket head.
- Screwdrivers - flat and Phillips.
- Mandrel for centering the driven disk (the one for front-wheel drive VAZs is suitable)
Removing the clutch
First of all, we drive Logan into the pit; you can also enlist the help of one more person. Replacing a clutch is such a thing that extra hands definitely won't hurt. Before you begin, double-check that you have the necessary tools. If everything is in order, let's get to work:
- The first step is to remove the gearbox (if this is not done, you will not be able to get to the flywheel and the clutch itself).
- Now hold the flywheel with a screwdriver so that it does not spin, and at the same time unscrew the bolts securing the pressure plate. The tension of the bolts should be loosened evenly, moving from one to another.
- After unscrewing the bolts, remove the driven and clutch pressure plates from the flywheel, while holding the driven one. When everything is ready, carefully inspect the parts. Cracks and chips are not allowed. If any other problems are detected during a visual inspection, change the driven and pressure ones without hesitation.
- Before installing new parts, make sure that the driven disk moves easily along the splines of the gearbox input shaft. Problems or jams should be corrected immediately either by adjusting the disc hubs or by replacing defective parts.
- Next, we apply a special refractory lubricant to the driven splines.
- Now we need a mandrel, with its help we install the driven disk in place. The correct position is when the protruding part of the disc hub is directed towards the clutch housing spring.
- Then install the pressure plate on the centering pins and you can immediately screw in the fastening bolts. We tighten them, also moving one by one, from one to another.
- The mandrel can now be removed and the gearbox can be reinstalled. Afterwards all that remains is to connect the cable and adjust its length.
DETAILS: Mitsubishi Pajero Sport brake repair: pad replacement || Replacing rear brake pads on a Mitsubishi Pajero Sport, instructions on how to change the brake pads yourself on a Mitsubishi Pajero Sport
Important nuance
Replacing a clutch is still quite a labor-intensive process, however, it happens that in an attempt to save money, car enthusiasts doom themselves to additional work. The thing is that at first glance it may seem that one of the clutch parts is in good condition and can last for some time.
As a rule, the clutch disc lasts about 150 thousand kilometers, but there have been cases where this part has been maintained for about 200 thousand kilometers.
As a rule, the entire clutch kit is replaced. To find out how much this kit costs, you will need to contact your local dealer. To replace the kit, you must have a special tool with which you can do this work professionally.
- Place your car on a lift and remove the front wheels.
- Remove the battery, and then disconnect the necessary elements that make access to the gearbox difficult.
- Unscrew the cable as much as necessary, then remove it.
- Unscrew the gearbox mounting pad at the top, as well as all the necessary bolts securing this unit to the engine block.
- Raise the car, then disassemble the suspension and remove the drive shafts, after draining the oil from the gearbox.
- Install a support element, such as a stand, and then raise the engine as much as necessary.
- Unscrew the lower gearbox mount and the remaining bolts holding the entire assembly.
- Dismantle the gearbox and put it aside.
This procedure for replacing the kit must be carried out together with a partner, since the weight of the gearbox is about 50 kilograms.
- Unscrew the 6 bolts around the basket, then dismantle the kit.
Prepare a new clutch kit, first center the disc relative to the engine flywheel, and then fasten the 6 bolts holding this kit to the flywheel.
- Replace the release bearing from the kit and lubricate the fork guides.
DETAILS: Do-it-yourself replacement of the VAZ 2121 Niva pump
How to replace the front ones
Installation of new front pads is carried out according to the following instructions.
- Secure the rear wheels with wheel chocks and jack up the front wheels.
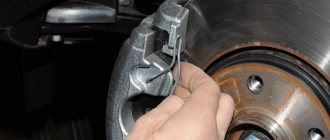
Raise the front of the body on a jack - Remove the wheels and insert a screwdriver into the space between the caliper and pad, pressing the piston into the cylinder.
Push in the piston - Using a spanner wrench, unscrew the caliper clamp and lift its hinged part.
Remove the caliper mount - Remove the pads from their guide and remove the retaining clips.
Remove old pads and brackets - Clean the pad seats from traces of corrosion.
Use a metal brush - Apply grease to the surface of the guide and install new pads.
Install new pads, first lubricating the guides - Lower the caliper to its original place, tighten the fixing bolt and put on the wheel.
Lower the caliper and tighten the mounting bolt. Put the wheel back in place
Video on how to change the front ones
Work before repair: what tools to prepare
As we mentioned, replacing pads yourself is possible
It is only important to carry out the correct preparatory work. We tried to collect all possible tools and liquids that may be needed in this type of work:
- A jack to lift the car and remove the wheels.
- Wheel chocks to prevent the car from rolling away while being lifted.
- A container for brake fluid and devices for pumping it out. Alternatively, you can take an ordinary plastic bottle and a rubber bulb. For this type of work, this toolkit is enough.
- A set of wrenches: open-end 17, socket or bolt 13. These tools will be useful when removing fasteners.
- A screwdriver, pliers, a hacksaw and rags are a number of auxiliary tools that are best prepared “just in case.”
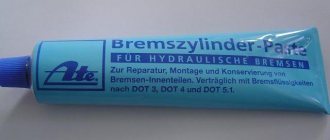
- Lubricant for coupling mechanisms.
As you can see, even such a simple type of car repair as replacing pads requires careful and measured preparation. We are confident that the list of devices and tools presented above will be enough to carry out the work independently.
Specifics of replacing pads on a car with ABS
When changing brake pads on a Renault Logan with ABS (anti-lock braking system), you need to perform several additional steps. The ABS sensor will need to be removed before installing the pads to avoid damaging it. The ABS sensor wire, located under the steering tip, cannot be removed during operation, so it is important to be careful and ensure its safety.
The design of brake pads for vehicles with ABS includes a hole for the system sensor. When planning to perform a replacement, it is important to purchase the correct set of brake pads that are compatible with the anti-lock braking system.
Tips for choosing the right size consumables on video
Problems when doing DIY work
When replacing pads on a Renault Logan, there is a risk of problems that need to be corrected for the brakes to work properly.
- If the pads cannot be removed without effort, just treat the area where they are seated with WD-40 and get to work after a few minutes.
- When, when closing the caliper, the piston element protruding from the working cylinder creates an obstacle, it is necessary to completely recess the piston using sliding pliers.
- To prevent brake fluid from leaking out of the hydraulic reservoir while installing the pads, you need to pump it out into a separate container and pour it back in after the work is completed.
- If the protective cover of the caliper guide pins was damaged during installation, you should remove it and replace it with a new one, after first removing the bracket from the brake pad guide.
- If gaps appear between the pads and brake discs, it is necessary to depress the brake pedal so that the components move into the desired position.
If the pads are replaced correctly, the braking system will function properly and will improve driving safety. By spending a little time installing the brake pads yourself, you can extend the life of your brakes and prevent dangerous situations on the road.
Restoring the safety of Toyota Corolla E120: changing brake discs
How to avoid problems when replacing ball joints on a Renault Logan
If nothing works out
The gap between the drum and the pads is adjusted automatically. But the value of the “ideal gap” can be changed! It is not possible to adjust the handbrake when this value is too small.
Remove the wheel, unscrew the nut - and you're done.
None We will increase the “ideal gap”. To do this, the lever is removed from the ratchet (see figure), and the ratchet itself is turned upward.
None Close the drums and apply the brake 10-15 times. The rear brake clearance will be adjusted and the handbrake adjustment can then be checked.
In theory, tightening the Renault Logan handbrake is not related to adjusting the brake mechanisms. But sometimes you still have to open the reels. This is done when it is impossible in principle to fulfill two conditions at once (no “sticking” and reliable fixation).