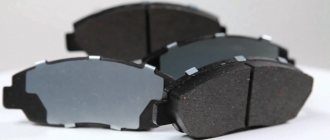
Pads are part of the brake system. This element consists of a steel plate with a friction lining, which becomes unusable over time due to constant friction. The material from which the part is made must be wear-resistant and heat-resistant. Must have a high coefficient of friction. The braking efficiency of the car depends on these indicators. The overlay is usually made of graphite, rubber, or mineral fibers. The main task of such a part is to compress the brake disc or drum. As a result, the wheel begins to rotate more slowly and the car stops.
In disc brakes, the devices are located outside the wheel, so they are not protected from dust, dirt, or stones. In a drum braking system, the devices are located inside the wheel and are therefore considered more durable. The front ones are slightly larger than the rear ones. When braking, they withstand the main load, wear on them is more intense.
The owner of a Renault Duster, like owners of other cars, better have an idea about replacing and repairing these spare parts. Even basic ones. How to replace the front brake pads on a Renault Duster is described in simple language in this article. If even after studying the material the procedure seems complicated, you can watch how the front pads are repaired using a video.
Basic faults
Parts wear out the most not because of the mileage traveled, but because of variable factors: driving style, chemical characteristics of the brake mechanisms themselves, weather conditions, compatibility of the part material with the disc material, etc. It is a mistaken belief that these spare parts should be changed after the same mileage.
It is these parts that are responsible for the length of the braking path and for safety in general. They need to be changed if the following faults are found:
- when braking and turning, noise, squeaking, squeaking is heard, as if the wheel is rubbing against something;
- damage is visible on the outside - scratches, dents, abrasions;
- drums or discs are damaged;
- to stop the car you need to press the brake pedal harder than usual, while it vibrates;
- if the car is equipped with an electric wear sensor, it will beep during braking, and a label will appear on the panel;
- when driving, the steering wheel “does not obey”, the front or rear part of the car is pulled off the road in any direction;
- On a slippery road skidding easily occurs.
You cannot save on repairing braking mechanisms, so it is better to buy factory versions or high-quality analogues that fit the car model.
Step-by-step instructions for all-wheel drive cars
The linings are replaced as a set; it is prohibited to use elements with different thicknesses of the friction layer. If there is uneven wear, the car may move to the side when braking.
Before changing the pads, check the amount of fluid in the reservoir. The level is brought to the Max mark (for example, using a rubber syringe or a medical syringe). When installing new linings, excess fluid may leak into the engine compartment.
Algorithm of actions when replacing pads:
- Place the car on a level surface and turn off the engine.
- Secure the vehicle with wheel chocks and release the parking brake lever down.
- Raise the body with a jack and install a steel safety stand under the threshold.
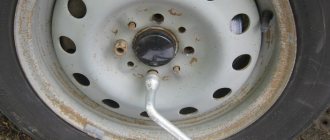
- Unscrew the bolts and remove the wheel from the hub.
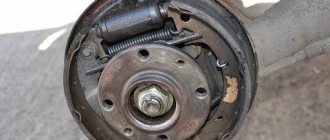
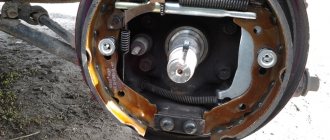
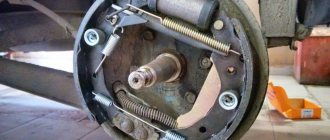
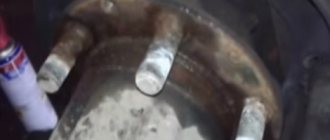
- Push the pads toward the center using a flathead screwdriver, which is inserted into the drum through the holes for the wheel bolts. The automatic clearance adjustment mechanism includes a spacer insert with a ratchet wheel. The tip of the screwdriver moves from bottom to top, reducing the length of the bar and moving the lining away from the working surface of the brake mechanism. The operation of the adjustment unit is shown in a video filmed by the owners of a Renault Duster.
- Using a Torx 40 socket, unscrew the 2 screws located on the front of the drum.
- After the bolts are unscrewed, you need to pull the metal casing towards you. If removing the part is difficult, then it is necessary to additionally bring the pads together. After removing the cover, it is strictly forbidden to press the brake pedal, since the pistons will be squeezed out of the brake cylinder.
- Use the tip of a screwdriver or the jaws of pliers to unfasten the tip of the upper spring from the metal frame of the front pad.
- Remove the opposite hook of the spring from the hole in the rear cover.
- Remove the lower spring in the same way.
- Remove the additional elastic element that maintains the gap between the friction lining and the working surface of the drum.
- Press in and use pliers to turn the stamped washer that holds the trim on the support rod.
- Pull out the rod from the opposite side of the drum mechanism.
- Remove the front trim retainer using a similar method.
- Move the rear block away from the shield, which will allow you to remove the tip of the cable going to the handbrake lever.
- Remove the block and spring installed on the metal end of the cable.
- Remove the front block, which is removed along with the spacer plate and adjustment mechanism.
Mechanism assembly
The springs and position adjuster are cleaned of dust; damaged parts must be replaced with elements from the repair kit. The washed screw mechanism and ratchet are coated with a layer of lubricant that is resistant to high temperatures. When reassembling the strip, take into account the multi-directional threads in the left and right holes. The regulator is mounted on the front pad, which is secured with a support rod. The rear block is fixed on the cable, and then the clamp and adjusting springs are installed.
A layer of dust (from wear of the linings and metal surface) is removed from the surface of the casing with a steel brush; if the height of the side exceeds 2-3 mm, then it is recommended to replace the part. After assembling the unit, the position of the pads is adjusted.
To adjust, you need to press the brake pedal, and then raise the parking brake lever all the way 4-5 times (with the ratchet button pressed). With each lift, a ratchet is activated, which moves the pads towards the working surface.
The correctness of the setting is checked by the number of clicks; turning the wheel by 7-8 teeth is considered the norm. The adjustment stops when the clicking in the mechanisms stops. Then the level of working fluid in the tank is checked, and if the volume decreases, topping up is done.
How to replace front brake pads
First of all, make sure you have brake fluid. If it is there, it is removed. After completion of the repair it must be
Top up as needed to the normal level.
Replacement process:
- The car is raised using a jack, then the wheel is removed.
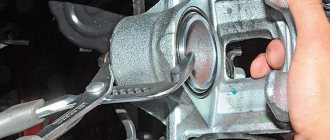
- A screwdriver is inserted between the block and the body. With a few movements the piston moves further away.
- The caps from the bolts are removed from the bottom and top of the caliper.
- The hexagon screws are used to unscrew the bolts.
- Using pliers, remove the staples and spring retainer.
- The caliper is separated from the disc so that the inner part of the pad remains on the caliper, and the outer part remains on the disc.
- All dirt is removed with a brush or vacuum cleaner.
- One part of the pad is placed on the outer side of the disc, the second part is attached to the caliper.
- After these steps, the caliper is fixed in its original position, the bolts are tightened, and the caps are put on.
- The wheel is installed back.
Do the same with the second wheel. An important nuance: the contact area between the discs and new spare parts is small. During the first 100 km, you should drive carefully, because the braking distance may be longer than usual. In order for the caliper to fit correctly immediately after repair, you need to press the brake pedal several times.
Checking the brake fluid level
To drive the pads, a hydraulic circuit with a vacuum booster and an expansion tank is used, which contains an electric level sensor. Before replacing the pads, it is necessary to check the fluid level.
If the amount of solution exceeds the maximum level mark, then you need to pump out the excess with a rubber bulb or a syringe with a volume of 15-20 ml. It should be taken into account that when installing new pads, the pistons go into the caliper, which leads to an additional increase in the level of brake fluid in the compensation tank.
Regulations for replacing brake pads
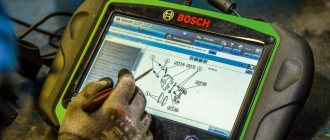
To assess the condition of the spare parts, you need to undergo a scheduled technical inspection, where a professional will tell you that the mechanisms need to be changed
now or you can wait. If damage is detected, do not delay repairs. According to the regulations, Renault Duster has them
are replaced every 15-20 thousand kilometers. This indicator depends on the way the car is used.
If for some reason car repairs need to be postponed, then you need to drive without haste with worn parts. When you press the pedal hard
brakes, damaged mechanisms can even come off the discs.
Replacement on all-wheel drive
Replacing the rear brake pads of Renault Duster occurs in much the same way as in other options.
Design
- Take a TORX-40 wrench and unscrew a couple of screws that secure the drum to the hub, and remove it
- Remove and remove the lower and upper springs using pliers and a screwdriver
- Disconnect the spring that adjusts the gap
- We take pliers and unscrew the spring of the support post and the cup until the tip of the stand and the hole in the cup align
- We remove all separated parts
- We take out the block
- Take a screwdriver and disconnect the parking brake tip from the shoe lever
- Disconnect the end of the spring and cable and remove the brake part
- Disconnect the spring with the ratchet bar and remove the block
- Putting everything back together
Before installing a new part, it is necessary to check the condition of the brake cylinders, then clean the surface from dirt and lubricate the ratchet mechanism.
Replacing pads on a Renault Duster with front-wheel drive has its own characteristics.
- They need to be combined, just like in the first option.
- Take a screwdriver and remove the hub cap
- We unscrew the nut at the hub bearing using a socket
- We remove the drum; this must be done together with the bearing.
Next, we carry out all the work, as in the version with all-wheel drive. Finally, secure the drum with a new hub nut.
As mentioned above, SUVs with different drives have different brake parts:
- All-wheel drive has part number 440607493 R
- Front-wheel drive number: 7701210109
When changing the pads, the tension springs with catalog number: 7701205518 are also changed.
Which front pads to install - manufacturers, prices of analogues
New front brake pads for Renault Duster can be purchased at an auto parts store. Or order online, where you can find out what the price is.
The following recommendations will help you distinguish good front brake pads on Renault Duster from fake ones.
The item is sold with high-quality packaging, on which the inscriptions are correct, with instructions. The price should not be greatly reduced. The part itself matches the car model. The price of ABS 37760 is on average from 1500 rubles. Country of origin: the Netherlands. The product of this brand is quiet and efficient in a wide temperature range. ABS mechanisms have proven themselves in the international market - they are used for brands such as Mazda, Subaru, Renault Duster, Hyundai, Toyota. On any modern machines. BOSCH 0 986 424 795 is the best choice if it is not possible to find factory spare parts. Their average price is 1600 rubles, they are produced in Italy and China. When purchasing, it is better to choose Italian options, since Chinese ones may be inferior in quality. Good German auto parts ATE 607266 cost an average of 2,200 rubles. Made from environmentally friendly friction mixture. The overlay has a uniform color without foreign stains. The surfaces that press directly against the disc or drum are smooth. There should be no chips or indentations along the edges.
exceed 1% of the total working surface area. The product is smooth, without cracks.
Original pads
It is best to use original front pads. Since it will not be difficult to predict their service life, and there will be no problems with installation. It often happens that no name analogues simply do not fit in size.
There is a need to manually achieve matching sizes. Using a grinder, sharpening the linings. The cost of originals, as a rule, is slightly higher than analogues.
| Name | vendor code | Approximate cost, rubles |
| For 2.0 and 1.5 dci engine | ||
| Renault original | 440603905R | From 2 thousand rubles |
| For engine 1.6 | ||
| Renault original | 4106 084 81R | From 2 thousand rubles |
Replacement process
To replace brake pads on a Renault Duster yourself, you will need the following set of tools:
- new consumables;
- a screwdriver with a wide flat tip;
- 6 mm hex key;
- pliers;
- jack for raising a car;
- support stands;
- pry bar, hammer and other similar tools.
Replacing consumables yourself will help save money, because then you will only have to spend money on the pads themselves.
Now you can begin to loosen the fastening nuts. Before doing this, the car body should be raised. The nuts must be loosened by at least 3 turns. There is no need to remove all the wheels at once. First, to replace the front pads, the front wheels are removed, and then, when they are installed in place, the rear wheels are removed, or vice versa.
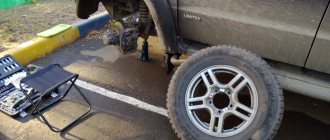
The jack must be installed in accordance with the instructions found in the vehicle's manual. After removing the wheels, the car must be on a pre-prepared support, since you cannot rely completely on the jack - this is required by safety regulations. The car must be secured on all sides.
You can completely remove the nuts from the wheels only when the car has already been jacked up.
The wheels are removed by lightly pulling them towards you. Discs made of light alloys are fixed using special pins. Before replacing the wheels, they must be cleaned with a wire brush and lubricated. The disk mounting area also needs to be cleaned and lubricated.
Take a pre-prepared spanner of the required size and use it to remove the caliper bolts. The caliper serves to begin to slow down the movement of the wheel even before it is pressed by the brake pads. Coupling with the discs occurs using pressure provided by hydraulics.
The calipers are secured with one or 2-4 bolts, which can be quite difficult to remove. To facilitate this process, you need to spray a special product on the mounting bolts - WD-40.
Being under pressure, the caliper can easily fly out while loosening the bolts.
Therefore, you first need to check their pressure. If there is no pressure, the caliper will move forward and backward easily. But even in this case, extreme care must be taken when unscrewing the bolts.
Then you need to remove the washers that are located between the bolts and the surface. When reassembling, they must be installed in place. When the caliper is removed, it needs to be suspended with a wire so that it does not put pressure on the brake pipe to which it is connected.
Now you can start dismantling the pads. They are fastened with special clamps that you have to press on. In some cases, you have to make an effort to get the pads out of the seat. Therefore, you should be very careful not to damage the brake hose. After removing the linings, it is necessary to test the brake discs - there should be no mechanical damage on them. If they are present, it is better to replace the disks too.
Now you can begin installing new consumables. To avoid squeaking during operation, the rear part of the pads must be lubricated before installation.
New pads should be installed in the same way as the old ones. If necessary, you will have to add brake fluid.
After this, you need to install the caliper in its place, securing it with bolts. You must be careful when installing it on the disk. Now the wheels are installed, each mounting bolt of which must be securely tightened before lowering the wheel to the ground.
To install the pads in place, press the brake 20-25 times. The car must be in neutral at this time.
Test new pads. To do this, drive the car at low speed and brake. If braking was normal, then the speed can be increased. Thus, the speed should gradually increase to 50 km/h. You can try to brake in reverse. All these procedures will facilitate the correct installation of the pads in their places, and the driver will be able to make sure that he did everything correctly.
The first time you drive, you need to listen to the sounds.
A slight squeak when braking is allowed - it may well be produced by new consumables. And if you hear a real metallic grinding sound, this may mean that the consumables are installed the other way around. In this case, they will need to be reinstalled. Be careful!