When operating a vehicle, it is necessary to periodically check the condition of the brake drums, brake pads, tension springs, and protective covers that affect the performance of the brake mechanisms.
As the brake linings wear, the clearance between them and the drums is maintained automatically and does not require additional adjustment.
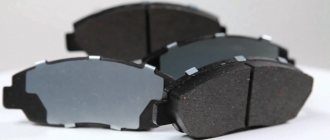
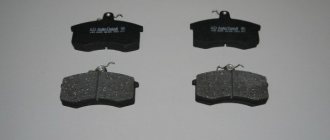
We replace the rear wheel pads if they are damaged, oily, or if the linings are worn to a thickness of less than 1 mm.
We replace the drum if it is damaged, cracked, or if the working surface is worn to a diameter of more than 283 mm.
We replace all four rear wheel pads at the same time.
ATTENTION: The brake drums are machined together with the hubs, so we install the removed drums only in their original places.
The factory instructions recommend grinding new drums together with the hub before installing them on the car.
Do not press the brake pedal after removing the brake drum.
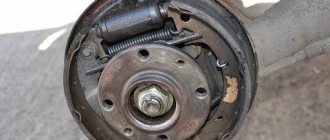
Removing the rear wheels
1. Using a large slotted screwdriver, unscrew the three screws securing the brake drum to the hub.
2. Remove the drum.
3. In case of a tight fit or “sticking” of the drum to the hub, you can compress it by screwing three M10 bolts into special holes.
4. Using a hook or thin pliers, remove the end of the tension spring from the hole in the rear brake shoe
5. It is more convenient to use a special device for this.
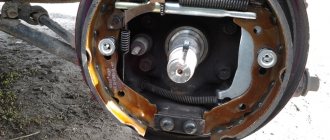
6. From the inside of the brake shield, press the cap of the rear brake pad rod with one hand, and press the cup with the other hand, compressing the spring.
Rotate the spring cup 90°. In this case, the slot on the cup will align with the tip of the axle.
Remove the cups with the spring.
7. Remove the rod from the hole in the brake shield
8. Turn the rear block and remove the lower tension spring
9. Remove the parking brake lever from the cable end.
10. Similarly, remove the fastening of the front brake pad to the brake shield, and remove the front pad.
11. Remove the tension spring from the block and the spring from the spacer rod
12. Using a 17mm wrench, unscrew the nut securing the rod to the block
13. Remove the parts of the parking brake adjustment mechanism.
14. Use pliers to unscrew the nut securing the parking brake lever.
15. Holding the fastening bolt with a “17” wrench, use the same wrench to unscrew the nut
16. Remove the bolt and remove the parts securing the parking brake lever to the block.
We rearrange the removed parts onto new pads.
We install new brake pads in the reverse order, and then adjust the gap between the pads and the brake drum (see How to repair and adjust the parking brake of a Gazelle car).
We install the drum, lubricating its seating belt with CV joint grease-4 or graphite grease.
ATTENTION: The brake drum is installed on the hub in only one position, since the holes for the screws are made with a variable pitch around the circumference.
We install the wheels and press the brake pedal several times to self-install the brake components.
Replacing the brake drum and rear wheel pads
We replace the rear wheel pads if they are damaged, oily, or if the linings are worn to a thickness of less than 1 mm. We replace the drum if it is damaged, cracked, or if the working surface is worn to a diameter of more than 283 mm. We replace all four rear wheel pads at the same time. Remove the rear wheels.
In case of a tight fit or “sticking” of the drum to the hub, you can compress it by screwing three M10 bolts into special holes.
ATTENTION The brake drums are machined together with the hubs, so we install the removed drums only in their original places. The factory instructions recommend grinding new drums together with the hub before installing them on the car. Do not press the brake pedal after removing the brake drum.
Using a hook or thin pliers, remove the end of the tension spring from the hole in the rear brake shoe.
It is more convenient to use a special device for this.
From the inside of the brake shield, with one hand we press on the cap of the rear brake pad rod, with the other hand on the cup, compressing the spring. Rotate the spring cup 90°. In this case, the slot on the cup will align with the tip of the axle. Remove the cups with the spring.
We remove the rod from the hole in the brake shield.
Turn the rear block and remove the lower tension spring.
We remove the parking brake lever from the cable end.
Similarly, remove the fastening of the front brake pad to the brake shield, and remove the front pad.
Remove the tension spring from the block and the spring from the spacer rod.
Using a 17mm wrench, unscrew the nut securing the rod to the block...
...and remove the parts of the parking brake adjustment mechanism.
Use pliers to unscrew the nut securing the parking brake lever.
Holding the fastening bolt with a 17mm wrench, use the same wrench to unscrew the nut...
... take out the bolt and remove the parts securing the parking brake lever to the block.
We rearrange the removed parts onto new pads. We install new brake pads in the reverse order, and then adjust the gap between the pads and the brake drum (see Adjusting the parking brake drive). We install the drum, lubricating its seating belt with CV joint grease-4 or graphite grease.
ATTENTION The brake drum is installed on the hub in only one position, since the holes for the screws are made with a variable pitch around the circumference.
We install the wheels and press the brake pedal several times to self-install the brake components.
In our article today we will continue the topic of the Gazelle brake system. If you have not yet read our previous article about the brake system of the gazelle (Gaz 2705), then we advise you to familiarize yourself with it. In it you will learn how the brake system consists, what features it has and much more, read in general. Well, in today’s article we will talk about how to replace brake pads on the front wheels of Gas 2705. Perhaps this article will not seem interesting to someone, because someone already has experience in replacing brake pads, but someone has not yet I haven't done it since.
The first thing you need to remember when replacing pads is that the pads on the wheels are changed simultaneously on two wheels, and not so I looked at the pads, but on this wheel the pads still seem to be nothing, I won’t change them, but on this wheel I will change them, but the second pads will be my spare ones. Don't skimp on this, our advice to you.
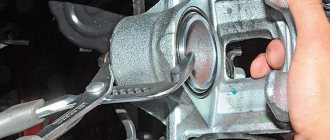
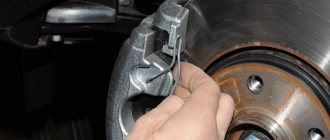
So, let's proceed to the sequence of replacing the pads on the front wheels. The first thing you will need to do is remove the wheel. Everyone probably knows how to remove a wheel. The main thing is that you should never leave the car suspended on one jack; after you have removed the wheel, be sure to lower it onto some kind of block or special stand, so that later when unscrewing the caliper, you will avoid the car falling off the jack. So, the car is insured, we proceed to unscrew the bolt securing the caliper bracket from the guide pin. To do this, you will need two 17mm wrenches, one to prevent the guide pin from turning, and the other to unscrew the bolt as shown in Fig. 1. After the bolt has been unscrewed, move the bracket (caliper) to the side by turning it on the second caliper finger as shown in Fig. 2 and calmly remove the old pads from the brake disc Fig. 3.
After you have removed the old pads, you can install new ones in their place, but before installing them, do not forget to clean the caliper guide grooves from dirt. So, the caliper grooves are cleaned, the pads are inserted, now you need to check the rubber seals on the caliper guide pins, as well as on the brake cylinder. They must be whole and not torn. Since these rubber elements protect the cylinder and guide pins from dirt and moisture getting inside them. If the rubber cuffs are torn, be sure to replace them.
The next step in replacing brake pads is to recess the brake cylinder inside the caliper. This can be done using sliding pliers (fig. 4. but based on my experience, it is best to do this before removing the old pads, using a powerful screwdriver. There is a hole in the caliper through which you can insert a screwdriver between the cylinder and the pad, and use a side force to push the cylinder inside the caliper. After the cylinder is recessed, we turn and assemble the caliper in the reverse order as we did when disassembling it. Well, that's all, the pads have been replaced, the car is ready for use.
Replacing the brake drum and rear wheel pads
We replace the rear wheel pads if they are damaged, oily, or if the linings are worn to a thickness of less than 1 mm. We replace the drum if it is damaged, cracked, or if the working surface is worn to a diameter of more than 283 mm.
Remove the rear wheels.
The brake drums are machined together with the hubs, so we install the removed drums only in their original places. The factory instructions recommend grinding new drums together with the hub before installing them on the car. Do not press the brake pedal after removing the brake drum.
We rearrange the removed parts onto new pads.
We install new brake pads in the reverse order, and then adjust the gap between the pads and the brake drum
The brake drum is installed on the hub in only one position, since the holes for the screws are made with a variable pitch along the circumference.
We install the wheels and press the brake pedal several times to self-install the brake components.
Replacing Gazelle rear brake pads
We will talk about replacing the rear brake pads on a Gazelle car.
During the life of a car, all parts are subject to wear and tear, and the brake system is no exception. Brake elements wear out and must be replaced. Naturally, the brake pads suffer the most wear.
On a Gazelle car there is a special hole through which you can check the condition of the pads. It is located in the brake shield of the rear wheel, there will be a plug there. If the thickness of the linings is less than 2 mm, then the pads need to be changed urgently.
The process of replacing Gazelle rear brake pads
1. Loosen the rear wheel mounting bolts.
2. Place the car on a jack so that the wheel can spin freely.
3. Remove the wheel.
4. Take a brush and clean the brake drum from dirt and dust.
5. Now remove the 3 screws to remove the drum. It happens that the drum cannot be removed. To remove, you need to take 3 M10 screws and screw them into the threaded holes. After this, rotate these bolts one by one and remove the drum. Lightly tap the drum with a hammer while turning the screws.
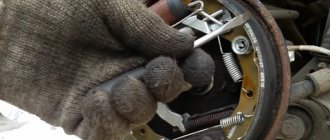
6. Take a screwdriver and remove the upper and lower tension springs.
7. From the side of the brake flap, hold the pad fixation spring rod with one hand, and with the other hand, press the spring cup and turn it to release the fixation spring.
After this, the pads will be released. But you also need to remove the spring from the expansion rod.
Next you need to replace the old pads with new ones. And put the brake system back together.
To ensure good drum installation, coat the edge of the drum with graphite lubricant. And be sure to remember to adjust the expansion rod to the permissible min. length. If you do not do this work, you will not be able to install the drum on new brake pads.
Be sure to change the pads on one axle of the car.
Hello to the visitor of the video-repair.info portal. Today we continue publishing video lessons. We will look and talk about replacing the rear brake pads on a Gazelle car . The video of replacing brake pads on a Gazelle will help a lot, so I advise you to immediately watch the video and then read the text information.
The video lesson consists of two parts.
During the operation of a car, all parts wear out, and the brake system is no exception. Brake elements wear out and must be replaced. Naturally, the brake pads suffer the most wear.
On a Gazelle car there is a special hole through which you can check the condition of the pads. It is located in the brake shield of the rear wheel, there will be a plug there. If the thickness of the linings is less than 2 mm, then the pads need to be changed urgently.
Malfunctions: causes and symptoms
Since the participation of the rear wheels in braking is much less than that of the front wheels, the motorist does not immediately notice a decrease in the efficiency of their work. In this case, the process of reducing efficiency can last quite a long time.
Failures in the operation of drum brakes are felt when braking sharply - the car stops much more slowly. On many cars, failure of the drum braking system is especially noticeable when driving in reverse. The front brake system, which has become the rear, does not “want” to work effectively, stopping the car.
A leak of working fluid often leads to the shutdown of one or two circuits of the braking system - this provokes a decrease in its efficiency by up to 60%. Air in the hydraulics creates a soft pedal feel. In this case, the brake can only be applied at the end of the stroke.
If the pads are “skewed” or the spring/strut in the drum breaks, the motorist may hear grinding sounds . This leads to jamming and overheating of the drum. In addition, this leads to a decrease in vehicle acceleration and increased fuel consumption. Among the failures, “ovality” of the drum is often encountered.
The process of replacing Gazelle rear brake pads
1. Loosen the rear wheel mounting bolts.
2. Place the car on a jack so that the wheel can spin freely.
3. Remove the wheel.
4. Take a brush and clean the brake drum from dirt and dust.
5. Now remove the 3 screws to remove the drum. It happens that the drum cannot be removed. To remove, you need to take 3 M10 screws and screw them into the threaded holes. After this, rotate these bolts one by one and remove the drum. Lightly tap the drum with a hammer while turning the screws.
6. Take a screwdriver and remove the upper and lower tension springs.
7. From the side of the brake flap, hold the pad fixation spring rod with one hand, and with the other hand, press the spring cup and turn it to release the fixation spring.
After this, the pads will be released. But you also need to remove the spring from the expansion rod.
Next you need to replace the old pads with new ones. And put the brake system back together.
Advice
To ensure good drum installation, coat the edge of the drum with graphite lubricant. And be sure to remember to adjust the expansion rod to the permissible min. length. If you do not do this work, you will not be able to install the drum on new brake pads.
Be sure to change the pads on one axle of the car.
Instructions on how to replace the rear brake pads in Gazelle Business, Cummins, Next with your own hands. We tear off the wheels and raise the car on a jack; in our case, this was done on a lift, behind the rear axle, which allows you to hang two wheels at once. From the factory, the drum mounting bolts are installed under a screwdriver, but they almost always stick and unscrewing them is quite problematic. Be sure to soak them in WD-40 for a few minutes. After this, use a sledgehammer to slightly tap the drum where these bolts are located. Then we take an impact screwdriver, apply pressure to unscrew it and hit it. If you don’t have such a screwdriver, you can try to unscrew it with a chisel or a flat “bat”. We separate the pads, tear off the eccentric nut (with a 17-point head), then take the 9-point head and counterclockwise, turn the eccentric. We remove the drum. Inspect the condition of the brake pads and cylinder, and carry out troubleshooting. We remove the spring, the soldiers from the two pads. The new pads do not have a handbrake bar, so we rearrange everything from the old ones.
Video of replacing rear brake pads in Gazelle Business, Cummins, Next:
Backup video of replacing rear brake pads in a Gazelle:
When replacing the rear brake pads, inspect the handbrake cable at the same time; if it is jammed, you should change it immediately. Inspect the brake wheel cylinder to ensure that it and its boots are intact and there are no brake fluid leaks.
Brake pads, as part of a car’s braking system, are consumable components, so monitoring their service life and wear is a mandatory measure to avoid unpleasant accidents on the road. The life and health of transported passengers, as well as the integrity of the cargo transported by vehicle, depend on the condition and quality of functioning of these elements.
You can change the rear brake pads of the Gazelle yourself or with the help of competent specialists. You can analyze the degree of their wear without outside help. Just look into the special hole in the brake shield. It is closed with a plug, which can be easily removed for visual diagnostics of components. If the thickness of the brake lining is close to 2-3 mm, the spare part must be replaced with a new one.
The procedure for dismantling and installing new components is as follows:
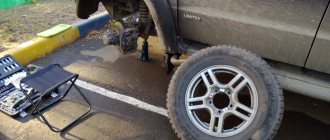
- The technician loosens the locking elements that hold the rear wheel in place. To do this, the vehicle is placed on a jack. The wheel is removed.
- Using a brush, dirt, dirt and accumulated deposits are removed, which can affect the integrity and performance of parts installed in this place. The brake drum is also carefully processed.
- The specialist dismantles the fastening elements of the brake drum and removes it entirely. The upper and lower tension springs are then removed. The pads become free from fixation and, after removing the spring from the rod, are easily removed.
At the end of the procedure, the master replaces the old components with new ones and installs them in their usual place. To ensure high-quality functioning of the parts, the edges of the brake drum are treated with graphite lubricant. When assembled with new elements, the brake system should work much better and more efficiently.
Specialists at the Alfa-Auto workshop recommend changing the pads in pairs to regulate their wear and be confident in the quality of braking and mechanical performance.
Replacing brake pads on any Gazelle vehicle model is done quickly. The specialists of the Alfa-Auto workshop provide a guarantee for all work performed. You can contact our center for repairs, replacement of components, diagnostic and scheduled work, for tuning of any Gazelle model.
If you are the proud owner of a Gazelle car and have noticed that the free play (number of clicks) of the parking brake lever has increased enormously, this information will be useful. There are malfunctions in the car that do not affect the speed, but have no less important functions.
In general, in Soviet-Russian trucks, a handbrake with a mechanical drive is something abstract and is never remembered until the time comes to use it and the question arises of how to separate the brake pads on a Gazelle.
Troubleshooting methods
Before we talk about ways to remove the rear brake drum if it is stuck, you need to name the reasons why this can happen:
- Heating the brake pad causes the metal that makes up the drum to expand, causing the cover to stick to the body.
- Dirt accumulated between the cover and body.
- Rapid heating of the element during braking, and then sudden cooling (for example, in a puddle of water).
All this leads to sticking of the brake drum. Note that dismantling it is quite difficult. Therefore, experts do not recommend resorting to sharp braking in rainy weather, which is quite difficult to dismantle when replacing the pads. Now let’s talk about the most acceptable ways to remove a stuck drum.
If car service technicians cope with this task almost effortlessly, having sufficient experience and the necessary tools, then an ordinary motorist who decides to do such work on his own needs to stock up on a certain tool. Moreover, for each specific case this tool may be different.
But you will always need WD40, which is used when repairing various vehicles.
Sledgehammer to help you
Using this method requires reliable fixation of the car. It is better to perform all actions on a lift (a car jack is not able to provide maximum stability to a raised car). In addition, a metal goat designed to support the machine, or an ordinary stump from a large tree, may be suitable for this. Let's move on directly to the sequence of actions when dismantling the brake drum. You will need:
- Remove the wheel.
- Using a wire brush, clean the cavity from any accumulated dirt.
- Spray the surface generously with WD40.
- Gently tap the drum collar at the bottom until it becomes movable. There is no need to strike too hard - this can lead to damage to car parts.
But it is advisable to warn that this method has one significant drawback - not everyone has a sledgehammer and not everyone knows how to handle it. Therefore, it is advisable to consider other options for solving this problem.
Extreme way
This method involves absolute fixation of the machine . Before starting work, you should check everything carefully, because if the car comes off, the risk of serious injury increases by almost 100%. Having chosen this option for removing a stuck drum, you will need to perform the following steps:
- Get behind the wheel.
- Turn on the ignition.
- Engage 2nd (3rd) gear and release the clutch.
- Rotate the engine to medium speed.
- Shut down the power unit and remove the drum.
The meaning of this method is to spin the moving part of the axis, and therefore the drum itself, using centrifugal force. In this embodiment, the drum will simply be descaled.
Radical measure
If suddenly the methods described above did not lead to the required result , in addition, the brake system cylinder is jammed, then it is advisable to take radical measures. To complete the work you will need a drill with a drill (diameter size 2-3mm), a medical syringe, and a sledgehammer. Here's what to do if all else fails:
- Make several holes at the junction of the axle shaft and the drum.
- Use a syringe to pour brake fluid into the holes and at the same time gently hit the drum with a sledgehammer.
What is a parking brake for?
Experienced drivers will not argue, a handbrake is necessary. Yes, it should not be used in the off-season, when the thermometer can be equally likely to be above or below zero. But, for example, if the service brake system fails, all hope, first of all, falls on the parking brake and only then on engine braking. If both systems fail in particularly emergency situations, you should not neglect such “means” of braking as a snowdrift or bushes.
As the rear brake pads wear, the effectiveness of the handbrake decreases. This is exactly it, since the service brakes do not lose their ability. On the contrary, the pedal becomes more informative, and the braking itself is smoother. The solution is simple - find out how to properly space the brake pads on a Gazelle, and then tighten the handbrake cable.
This operation is not complicated, and any driver can perform it. If you are not confident in your actions, then you need to turn to specialists.
Types of breakdowns
Among the most common reasons that involve removing the rear brake drum and replacing it due to loss of efficiency is not only wear on the pads, but also high wear on the drum itself. On its inner working surface the circumference increases. If the pads and working surface wear out immediately, there is a risk of pistons being squeezed out of the cylinder, wheels jamming, or brake fluid leaking.
Brake drum failure
On cars with high mileage, due to corrosion, the spring “sticks”, weakens or breaks . The pressure force may decrease significantly due to the fact that the handbrake cable has become loose. Not often, but it still happens that the friction linings peel off from the pads, then it is necessary to replace the brake pads on the rear drums.
How to separate the brake pads on a Gazelle
The sequence of actions is as follows:
- Place the car on a flat, horizontal platform (ideally on a viewing hole or a lift).
- Place wheel chocks under the front wheels.
- Place the gear lever in the “neutral” position, the handbrake is lowered, and hang out the adjustable wheel.
- Remove the two rubber plugs from the inside of it. Bottom - for visual monitoring of the gap between the pads and the drum, as well as their condition. The top one hides the locked eccentric.
- Using a 17mm socket wrench or a sufficiently curved socket wrench, loosen the locknut. Then use a 9 mm socket wrench to rotate the eccentric, visually checking the gap between the pads and the drum. Achieve the “golden mean” when the gap is minimal, but the wheel rotates easily.
- Tighten the locknut, check again for easy rotation, and replace the plugs. The job is half done.
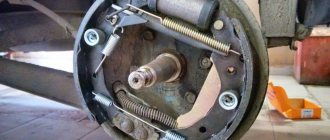
Rear wheel brakes
Rear wheel brake:
- working cylinder fastening bolt;
- working cylinder;
- bleeding valve;
- brake shield;
- block;
- protective case;
- piston;
- thrust ring;
- springs;
- springs;
- expansion link;
- parking brake actuator lever;
- pad mounting plate;
- springs;
- cotter pin;
- screw;
- washers;
- washers;
- bolt;
- plugs;
- eccentric bushings;
- plugs;
- eccentric bushings;
- eccentric;
- eccentric axis;
- screw;
- cups;
- springs;
- kernel.
The brake mechanisms of the rear wheels are shoe, drum type.
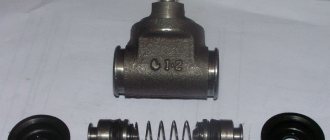
Cylinder 2 (Fig. 7.8), pad support with plate 13, pads 5 are fixed on shield 4.
The upper ends of the pads enter the slots of the pistons, and the lower ends touch the support plate, on which they are held by tension springs 9 and 14. Lateral fixation of each pad on the shield is provided at three fastening points, to which spring 28 presses it.
The thrust split metal ring 8 is installed in the brake cylinder with tension. The ring cut is located in the upper part of the cylinder near the bleeder hole. A piston 7 is inserted into the central hole of the thrust ring so that after it is rotated 90°, the slot on the piston rod is parallel to the plane of attachment of the cylinder to the shield. The piston rests against the ring and can move freely in it towards the pads within 1.7-1.9 mm.
As the brake linings and drum wear out, the piston moves in the cylinder during braking, dragging the thrust ring 8 with it. After braking, under the action of the tension springs of the pads, the piston will move relative to the ring by the distance indicated above, which will ensure a constant gap between the pads and the drum.
Brake drums are cast, made of gray cast iron.
The rear brake mechanism includes parts of the parking brake system: drive lever 12, expansion link 11 and adjustment parts 21, 23, 24, 25.
Element device
The rear brake drum consists of several parts :
- rotating drum;
- brake shoe;
- spring;
- brake cylinder (one or more).
Removing the drum
When braking, the brake pad rubs against the surface of the hollow drum. To ensure the mobility of the pad, the mechanism contains springs, which, depending on the position of the gas pedal, will be compressed or decompressed. A special cylinder is responsible for the correct operation of the pad and its timely operation, pressing it to the surface of the rotating drum under the pressure of the brake fluid. The entire mechanism is mounted on a shield made by stamping.
But the rear brake drum in some cases has a different device. One of the key elements of the tape structure, as the name implies, is flexible tapes made of metal. During the braking process, the belts are stretched and squeeze the drum tightly. However, this design of the braking system has not been used in cars for a long time.