Injectors for VAZ 2110–2112 cars
Cars of the “tenth” family are equipped with various injection engines, each of which is designed to work with a specific model of injectors. Despite the fact that they have their own “names,” motorists usually use a “folk” classification based on color and thickness. For example: black thin ones.
This simplification usually works, but does not fully guarantee the compatibility of the injector with the engine. To avoid having to contact the chip tuner once again to correct the firmware of the electronic injection control unit, check the part number before purchasing.
An article dedicated to the replacement and repair of injectors in VAZ 2114/2115 cars can be found here: https://vazweb.ru/desyatka/pitanie/zamena-forsunok-vaz-2114.html
Table: compatibility of injectors and engines of VAZ 2110–2112 cars
| Engine | Volume (l) | Number of valves | Controller (ECU) | Firmware | Injectors | |
| Siemens | Bosch | |||||
| VAZ-2111 | 1,5 | 8 | M1.5.4 | January-5.1 | VAZ6238 (thick gray) | 0 280 150 996 (turquoise thick) |
| VAZ-2111 | 1,5 | 8 | M7.9.7 | January-7.2 | VAZ6393 (beige thick) | 0 280 158 502 (black thin) |
| VAZ-21114 | 1,6 | 8 | M7.9.7 | January-7.2 | VAZ20734 (orange thin) VAZ20734 (yellow thick) | 0 280 158 017 (black thin) |
| VAZ-2112 | 1,5 | 16 | M1.5.4 | January-5.1 | VAZ6238 (thick gray) | 0 280 150 996 (turquoise thick) |
| VAZ-21124 | 1,6 | 16 | M7.9.7 | January-7.2 | VAZ20735 (blue thin) VAZ20735 (pink thick) | 0 280 158 022 (black thin) |
Photo gallery: injectors for VAZ 2110–2112 cars
Differences between injectors for eight and sixteen valve engines
Among some motorists there is an opinion that the injectors for the “ten” differ depending on the number of engine valves. Others believe that the determining factor is the volume of the cylinders.
Clogged injectors can cause the car to jerk when driving. Details: https://vazweb.ru/desyatka/pitanie/dergaetsya-pri-dvizhenii.html
In reality, neither one nor the other is wrong. The parts must match the engine design, model and firmware of the electronic control unit.
When replacing, it is best to install the same ones that were installed previously. Otherwise, there may be difficulties with startup and operation in transient conditions. To eliminate the shortcomings, you will have to adjust the firmware, which is almost impossible in a garage environment.
In-cylinder fuel injection has been known since the very dawn of the automobile industry. In the early 1890s, the German Rudolf Diesel and the Englishman Herbert Ackroyd-Stewart secured the rights to their own designs for an internal combustion engine running on fuel oil.
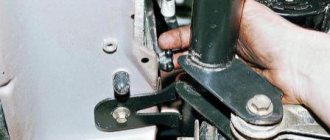
Dismantling
Before replacing or cleaning the injectors, they will need to be removed from the fuel rail. To achieve this, the following activities are carried out:
- Make sure the engine has cooled down properly. It is not safe to work on a hot engine;
- Disconnect the power wires from the fuel pump to de-energize the device;
- Try to reduce the pressure in the engine power system as much as possible. To do this, the engine starts, and then you need to wait until it stalls at idle speed;
- Repeat this procedure several times until the car simply stops responding to turns of the ignition key;
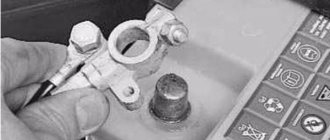
- That's it, now our goal is the fuel rail. To remove it, you must first remove the terminals from the battery, turn off the power to the ramp itself, disconnect the fuel supply hoses, and also disconnect all electrical appliances going to it. These are pressure, idle, throttle position sensors;
- If you have an 8-valve engine, then you do not need to remove the receiver. This step is relevant for engines with 16 valves;
- Experts do not recommend removing the intake manifold without dismantling the throttle valve and the hose going to it. It is better to unscrew and disconnect everything at once, which will allow you to continue working more conveniently;
- Cover the exhaust manifold openings with something to protect them from foreign objects;
- Using a hex wrench, you can unscrew a couple of bolts and remove the fuel rail along with the injectors;
- Make sure that there are no distortions when removing the ramp, otherwise problems may arise with the dismantling processes;
- We remove the injectors. To do this, remove the mounting brackets that hold the electrical connector. You also need to remove the bracket that holds the injector in its seat.
After dismantling the elements, be sure to close the seats to prevent debris and other objects from getting in, and place the nozzles themselves on a table or floor, after laying down a dry rag.
Here you can decide whether to change or clean the elements of the fuel system. If replacement is required, install new injectors in place of the old ones and follow the assembly procedure.
Cleaning
Here proceed as follows.
- Remove the rubber rings from the injectors, and when cleaning is finished, replace them with new seals.
- The cleaning process should begin with the nozzles, on which various deposits form as the car is used.
- Be sure to thoroughly clean the funnel-shaped surfaces where tar deposits accumulate.
- The next step is the fuel mixture supply channels.
- To open the solenoid valve to supply fuel, you will have to trick the device with a 5-7 V power supply.
- Some use stabilized voltage sources, phone chargers, or even a car battery. If using a battery, the voltage should be supplied through the light bulb. It will play the role of a current damper. Otherwise you risk burning the winding.
- Electricity is supplied through two wires, in the gap of one of which a button is installed. It will close and open the network. This creates an imitation of the operation of an injector in an engine due to the influence of a pulsed electric charge.
- You can supply the cleaning liquid to clean the injectors through a can of carburetor cleaner. Inexpensive and effective, even better than specialized chemicals.
- Be sure to tightly connect the cylinder and nozzle with a rubber tube, clamps and any other means.
- All is ready? You can then apply electricity to open the injector. At the same time, press the button on the cleaning agent canister.
- Soon the torch of the liquid jet, which will exit through the fuel atomizer of the injector, will change its “clumsy” direction and will begin to uniformly exit the nozzle. This indicates that you have removed all carbon deposits.
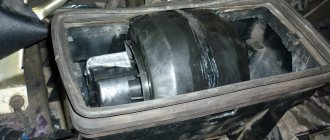
Homemade cleaning device
Before replacing the cleaned injector, check its actual condition.
List of problems with washer nozzles
- Washer fluid does not flow through the nozzle nozzle at all.
- The washer fluid pressure is very weak.
- The jet of liquid supplied is directed to the side and does not provide complete cleaning of the windshield.
- The pump supplying washer fluid or its motor has failed.
- The washer fluid supply tube is damaged.
- The injector has mechanical damage.
- The injector nozzle is clogged with foreign material.
- The nozzle adjustment is incorrect.
What injectors are installed on VAZ 2110–2112 cars
The main advantage of injectors for VAZ cars of the tenth family is that they are interchangeable. There are only two types of sprayers - produced by Bosch and Siemens. And each of them, regardless of marking and year of manufacture, can be replaced with another.
Bosch injectors are traditionally manufactured in black housing
When selecting, there is only one limitation - engine size. 1.5 injectors are not suitable for 1.6 liter engines.
The Siemens injector has a blue tip
Both Bosch and Siemens injectors of any marking can be installed on 8-valve and 16-valve engines.
Table: how to select injectors for VAZ 2110–2112 by marking
| Siemens | Bosch |
| Injector DEKA VAZ 6238 | 0 280 150 996 and 0 280 158 110 |
| Injector DEKA VAZ 6393 | 0 280 158 502 |
| Injector DEKA VAZ 20734 | 0 280 158 017 |
| Injector DEKA VAZ 20735 | 0 280 158 022 |
| Injector DEKA VAZ short 20734 | 280158017 |
| Injector DEKA VAZ short 20735 | 0 280 158 022 |
Car service Automaster Stavropol
Auto repair. Maintenance. ONE HUNDRED. st. Grizodubova, 53, No. 115, tel. 8-918-770-02-02
- Car repair home
- Chassis repair
- Camber - Toe
- Cleaning the injector
- Carburetor cleaning
- Computer diagnostics
- Engine repair
- Transmission repair
- Glass replacement
- Welding work
- Articles
- Oscilloscope
- Video
- Repair of generator, starter.
- Photos
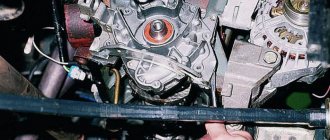
Cleaning the injector of VAZ 2110.
Cleaning the VAZ 2110 injector.
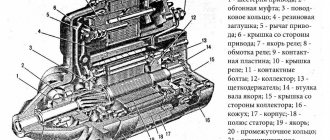
The operating principle of the injector is approximately the same for all cars. There is a slight difference that affects fuel consumption. VAZ cars with a DIS ignition system differ from engines with individual ignition coils.
The module, or ignition coil for 4 cylinders, supplies a spark to 2 pistons at once. At the same time, a spark is supplied to cylinders 1 and 4 and similarly to cylinders 2 and 3. Also, the injection system has different control units. Let's look at the module and ignition coil of a VAZ.
The VAZ 2108 engine is fuel-injected and has an ignition coil. You can find a car with a module in the ignition system. What is the difference? High-voltage coil for 4 cylinders, has a secondary ignition winding. Keys in the form of transistors are located in the car's ECU.
The ignition module for 4 cylinders has a secondary winding and keys to the primary winding in the module housing. As a result, the ignition module is twice as expensive as the coil. The advantage remains with the ignition module. Shorting the secondary winding of the ignition module can damage the input keys of the primary winding, which preserves the serviceability of the ECU.
Emergency closing of the ignition coil can damage the keys in the form of transistors in the control unit. Cleaning the VAZ 2110 injector is not fundamentally different from other cars.
Replacement or cleaning?
In order to understand what needs to be done with the nozzle, change it or simply clean it, it is better to diagnose them on a special stand. Under such conditions, you can test it in operation under different pressures, and also visually see how tightly it closes, and whether it is “snotty.”
If any of the injectors needs to be replaced, then you should buy a new one with exactly the same part number as the old one. Also, during installation of cleaned injectors, all O-rings should be replaced (2 pieces on each injector - approx.).
Installation is carried out strictly in the reverse order, similar to the removal procedure.
Video about cleaning injectors
Attention! When working with injectors, observe all fire safety measures, since gasoline vapors are highly flammable and pose a high fire hazard.
Cleaning methods
There are three main ways that will allow you to clean your injectors. Decide for yourself which one to use.
Way
Peculiarities
Quite effective, but financially expensive. Plus, working with chemicals is risky because it is very dangerous to your health. Cleaning is carried out only in full compliance with safety regulations
Car services will now do everything for your money. But you'll have to pay a lot. Don’t forget that finding a really good, responsible and inexpensive service station is something out of the realm of fantasy. Therefore, either questionable quality of work, or impressive money for effective cleaning
When is it time to change injectors?
Many car enthusiasts are confident that it is necessary to clean the injector only within the period specified in the user manual. But the manufacturer, when indicating the mileage, did not take into account all the details. As a rule, not all of us fill in fuel that meets the requirements of the European standard, so the injection system in the car suffers, or more precisely, the nozzles in the injector. Replacing the injectors will help save the situation. Important! When dismantling the injectors, it may be necessary to replace the seals along with the ramp. And this procedure is long and difficult.
Basic principles and nuances of injector flushing
VAZ 2110, wash the injector yourself
- First, you should disconnect the air filter pipe and the air filter itself;
- then disconnect the connection of the fuel level sensor from the air pipe;
- then the work moves on to the throttle assembly, since it is necessary to disconnect the wiring from it;
- now you need to free the injector itself from the wiring harness;
- then unscrew the two bolts that connect the fuel rail and the cylinder head;
- remove the holder by first unscrewing it from the fuel pipes;
- the fuel rail and the injector are contained in the cylinder head; they must be removed;
- Having unfastened the injector brackets, you need to remove it from the fuel rail.
When to flush the injector of a VAZ 2110
Components that are necessary to flush the injector:
- carburetor cleaner in an aerosol bottle;
- O-rings for injector;
- non-latching button;
- a special chip that allows you to connect the wiring to the injector;
- two light bulbs of 12 and 21 watts, respectively;
- medical syringe for 20 cubic meters;
- several small tubes.
Note. All of the above components can and should be purchased at a company auto parts store. The store’s consultants will help you understand the nuances and assemble a complete, high-quality washing kit.
Professional injector cleaning kit
Injector flushing algorithm:
- First of all, you need to remove the needle from the syringe, and insert a small tube in its place; in order for it to fit tightly, you need to use a seal;
- then place the syringe directly on the nozzle itself;
- after which, you need to connect the terminals to the nozzle;
- turn on the power (the sound of the nozzle opening will be heard);
Note. You can use a car battery as a power source.
- then you need to connect the syringe through a small tube to the balloon;
Note. It is advisable to seal the place where the tube is connected to the cylinder; for this purpose, you can use electrical tape.
- the nozzle itself must be connected to a two- or three-liter plastic bottle, where the liquid will actually flow after cleaning;
- Now you need to press the cylinder, fill the syringe with carburetor fluid, then press the button and open the nozzle (the picture resembles spraying fog).
Note. The nozzle should be cleaned until a wide droplet stream of transparent color appears.
Example of washing injector nozzles
The use of photo and video materials will allow you to create a 3D projection of the entire process in your mind. The instructions are simple; they will allow you to clean the injector yourself and in a short period of time. The price of the entire self-cleaning process is low, the main thing is to adhere to the above provisions.
Method for replacing injectors on 8- and 16-valve engines
Car owners cannot always diagnose faults in the fuel system. Often, failures in engine operation or unstable idle speed can be explained by completely different reasons, and not just interruptions in the fuel supply. If all car systems are operating normally, then the following symptoms will directly indicate injector problems:
- failures in engine operation;
- increased fuel consumption;
- instability of idle speed;
- loss of power;
- black exhaust gas, etc.
Video: how to replace oil nozzles if they leak
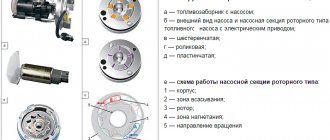
Operating principle and structure of the injector
VAZ 2110 how to clean the injector yourself
Below are the operating principles:
- There is a channel inside the injector that is filled with gasoline;
- the shut-off needle regulates the injector channel and thus controls the supply of gasoline;
- the locking needle is pressed by a spring so that it fits tightly to the injector channel;
- when the needle is raised, a wide stream of fuel is formed, which drips onto the engine cylinders, having previously been well mixed with air;
- the outlet (from where the fuel comes) closes when the needle is lowered, thus stopping the fuel supply;
- The injector contains an electromagnetic coil that regulates the position of the needle: when current is supplied, the needle rises, when there is no current, it lowers.
Note. If possible, the landing spring inside the injector should be made of high-quality metal, which should conduct current well and be resistant to corrosion. If it is not financially possible to purchase one, then it is necessary to regularly treat the landing spring with an anti-corrosion coating.
Diagnostics of the functioning of the injector and obvious signs of a malfunction
Objective signs of injector clogging, when you need to immediately flush the injector on a VAZ 2110:
- as the temperature outside dropped, the engine cooled down and began to start with great difficulty;
- at idle the engine is extremely unstable;
- when you press the gas pedal, you can objectively feel its complete or partial failure;
- reduction in acceleration speed and overall engine power;
- increase in gasoline consumption;
- increased toxicity of engine gases (emissions);
- since the fuel mixture receives an insufficient amount of oxygen, the temperature in the internal combustion chamber rises, which in turn entails a significant increase in engine detonation;
VAZ 2110 injector cleaning
- Popping noises can be objectively heard directly in the exhaust system itself with constant frequency;
- failure of various sensors, including the catalytic converter, and prematurely.
Note. In practice, it is not necessary that all of the above symptoms will be observed when the injector is clogged; the manifestation of at least one is sufficient. Flushing the injector is a simple procedure, however, it must be done on time. Since late flushing of the injector may be ineffective and most likely it will need to be completely replaced.
Repair of injectors VAZ 2110–2112
Repairing injectors means cleaning the product and replacing the O-rings. Simple measures to restore the functionality of the injectors can significantly increase the car’s power and make cold starts easier. Injector repair is possible in the following cases:
- there are no visible deformations on the body;
- the nozzle has not yet exhausted its service life;
- the car owner wants to optimize the operation of the power unit.
In all other cases (cracks and deformations, long service life), it is recommended to replace the nozzles with new ones.