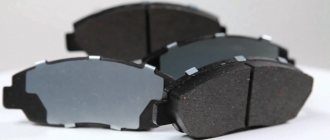
Replacing the brake pads of the rear wheel brake mechanism
Replace the pads in the following cases:
– the thickness of the friction linings is less than the minimum permissible value (1.5–2 mm);
– the surface of the linings is oily;
– the friction lining is not firmly connected to the base;
– deep grooves and chips have formed on the linings.
Do not use gasoline, diesel fuel or any other mineral solvents to clean brakes.
Replace the brake pads on both rear wheels at the same time.
You will need: “8”, “19” keys, a flat-blade screwdriver, sliding pliers.
2. If the brake fluid level in the master cylinder reservoir is at or near the “MAX” mark, pump out some of the fluid from the reservoir. Otherwise, when replacing the pads, it may splash out.
4. Remove the protective cap...
5. ...and, resting the screwdriver on the brake cylinder, remove the tension spring from engagement with the block.
Be careful when using a screwdriver. We recommend using special pliers to remove tension springs.
6. Separate the pads...
7. ...and remove the tension spring.
8. While holding the pressure spring rod, press the upper cup, rotate it 90°...
9. ...and remove the upper cup, pressure spring and lower cup.
10. Remove the pressure spring rod.
After removing the clamping spring rods, secure the pistons of the working cylinder in any available way (for example, tie them with a rubber band or tie them with wire), otherwise the pistons may be pushed out of the cylinder by the spacer spring and brake fluid will leak out of the hydraulic system.
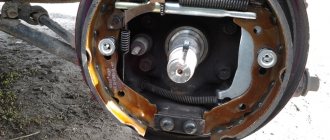
11. While holding the support pin from turning, unscrew the nut securing it...
12. ...remove your finger...
13. ...and remove the block and support pin bushing.
14. Remove the second block in the same way. This will remove the support pin plate.
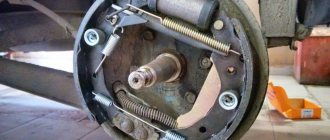
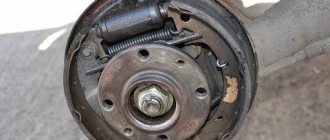
Rice. 9.4. Parts of the rear wheel brake mechanism: 1 – support pins; 2 – bushings of support fingers; 3 – rods of pressure springs; 4 – lower cups of pressure springs; 5 – pressure springs; 6 – upper cups of pressure springs; 7 – front brake pad; 8 – tension spring; 9 – support pin plate; 10 – rear brake pad
15. Clean from dirt and inspect the parts of the brake mechanism (Fig. 9.4). Replace deformed or heavily corroded parts. Replace heavily stretched, lost elasticity or bent springs.
16. Apply refractory grease for brake mechanisms to the places where the brake pads rub against the brake shield.
17. Release the working cylinder pistons from the locking device, compress the working cylinder pistons using sliding pliers and install the brake pads.
Please note that when the pistons are recessed into the cylinder, the level of brake fluid in the master cylinder reservoir increases. If necessary, pump out the liquid.
18. Install the brake drum (see “Replacing the brake drum”).
19. Reinstall the wheel and adjust the gap between the brake pads and the drum (see “Adjusting the rear wheel brakes”).
20. Replace the brake pads of the other wheel in the same way.
Replacement
Rear pads are replaced in the following cases:
- When the thickness of the lining is less than 1.5 millimeters;
- The overlay has traces of oil;
- The friction part or the steel base has mechanical damage.
Before starting work, you need to pump out the brake fluid from the reservoir, otherwise it will leak out during replacement.
After this you can get to work:
- The first step is to remove the rear wheel;
- The brake drum is dismantled;
- The rubber cap is removed from the working cylinder;
- The tension spring is removed from the block; for this, the product is moved apart;
- With one hand you should press the upper bowl, and with the other you need to support the rod at the pressure spring, after which it must be rotated 90 degrees;
- The lower and upper cups are removed;
- The spring rod is dismantled, after which the nut that secures the support pin is unscrewed;
- The finger is removed and the worn product is removed.
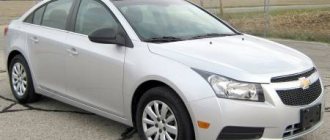
How to change rear brake pads on a UAZ Patriot
Due to the design and use features, replacing rear drum brake pads is quite rare. With a small annual mileage, they are changed every few years. Therefore, it may be difficult to replace the rear brake pads. This is due to the fact that it is not easy to remove the brake drum and unscrew the bolts that have become soured over the years.
The factory recommends periodically removing the brake drum and cleaning and lubricating the brake parts. A good time to check the rear brakes is when you replace the front brake pads - now is the time to think about the rear brakes.
Along the way, we have to: – check the condition of the brake drum and the degree of wear. – adjust the brake mechanisms – this is always done. – if necessary, replace the brake cylinders – tint the brake drum so that rust does not spoil the respect in your Patriot.
We will need: – a set of brake pads – boots for the brake cylinders – we strongly recommend purchasing them immediately. We consider this to be a consumable item. – two rear brake pad tension springs – two protective caps for the air bleeder valve – lubricants – fresh brake fluid – black rust paint (optional)
Before starting work, check the brake fluid level. When the cylinders return, the brake fluid level will rise. Some of the liquid may spill out of the reservoir. Remove some of the liquid from the tank before starting work using a pipette or syringe.
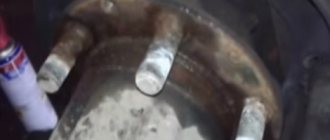
1. Place cobblestones (chocks) on both sides of the other rear wheel to prevent the car from rolling or falling off the jack. Or use a service lift at a convenient height. 2. Unscrew slightly (tear off) the wheel mounting bolts. 3. Release the handbrake. Place the gear shift lever in neutral. 3. Raise the UAZ Patriot wheel with a jack so that the wheel rises 2-3 cm above the ground. 4. Rotate the wheel and assess its condition. Check for play by trying to lift the wheel by the bottom. Check the condition of the tires. 4. Remove the wheel. Place the wheel under the threshold of the car. It will provide insurance in case the jack fails to support the vehicle for any reason. 2. Clean the brake drum from dirt and rust. Clean the brake pipe mounting area and the working cylinder mounting bolts on the back of the brake shield from dirt. 2. Remove the three screws securing the brake drum. This may not be easy to do. 2. Remove the drum. Due to the wear of the drum, the brake pads seem to be inside the drum in the resulting depression. Therefore, before removing the drum, it is recommended to carefully tap the drum. The drum is removed by pressing out by screwing three bolts into the drum into special holes. Screw three M8 bolts into the threaded holes of the brake drum and, evenly tightening the bolts, press the drum from the hub.
Blog about UAZ
Full adjustment of the service brakes of utility vehicles of the UAZ-452 family includes adjustment of the gaps between the pads and brake drums, as well as adjustment of the free play of the brake pedal and its position in the cabin relative to the floor.
Adjusting the service brakes of UAZ-452 vehicles.
Adjusting the gaps between the pads and brake drums is necessary because as the friction linings wear, the gaps between the pads and brake drums increase, and the brake pedal travel increases during braking. To restore the normal size of the gaps and reduce the pedal travel, it is necessary to adjust the brakes with eccentrics, the axle heads of which are moved outward.
Both eccentrics for the service brake of the rear wheel are located slightly above the wheel axis, and for the front wheel brakes, the front shoe eccentric is located below the wheel axis, and for the rear shoe - above the axis.
Adjusting the gaps between the pads and brake drums of UAZ-452 cars.
It is carried out in the following sequence:
1. Jack up the wheel whose brake is adjustable. 2. While rotating the wheel, gradually turn the adjusting eccentric until the wheel brakes. 3. Gradually releasing the eccentric, turn the wheel until it turns freely, without the drum touching the pads. 4. Adjust the gaps between the pads and drums of the remaining brakes in the same way.
When adjusting the front brake pads, as well as the front brake pads of the rear brakes, the wheel must be rotated forward. When adjusting the rear brake pads, the wheel should be rotated backwards. To reduce the gaps, the eccentrics must be turned in the direction of rotation of the wheel, and to increase them, on the contrary, against the rotation.
5. Check while the car is moving that the brake drums do not heat up and that the brakes operate evenly when braking.
When adjusting, do not unscrew the nuts of the pad support pins and disturb the factory setting of the pins. For rear wheel brakes, the support pins are located at the bottom of the brake support disc; for front wheel brakes, the support pin for the front pad is located at the bottom, and for the rear brake pad, at the top. These fingers need to be adjusted only when installing new pads or new friction linings.
With correctly adjusted gaps between the pads and the brake drum, complete braking should occur within 1/2-2/3 of the brake pedal stroke. UAZ-452 vehicles with a full load, with correctly adjusted service brakes on a horizontal section of a dry concrete road should stop:
- when driving at a speed of 30 km/h: at a distance of no more than 6 meters, - when driving at a speed of 70 km/h (except for buses): at a distance of no more than 53 meters - when driving a UAZ-452V bus at a speed of 60 km/h : At a distance of no more than 37 meters.
Adjusting the service brakes when changing brake pads or friction linings.
When replacing friction linings or brake pads, it is necessary to adjust the installation of the pads. To do this you need:
1. Raise the wheel with a jack. 2. Slightly unscrew the support pin nuts and set the support pins to their initial position. For rear wheel brakes, the marks on the ends should face each other. For front wheel brakes, the marks should be located along the cylinder axis. 3. Pressing the brake pedal with a constant force of 12-16 kgf, turn the support fingers so that the ends of the shoes on the finger side rest against the brake drum. Tighten the support pin nuts in this position, making sure that the pins do not turn. 4. Turn the adjusting eccentrics until they stop against the pads. 5. Stop pressing the pedal and turn the adjusting eccentrics in the opposite direction so that the wheels rotate freely.
When installing new pads, when the friction linings have not yet been worn in to the surface of the drums, the brake drums may heat up somewhat after the indicated adjustment. If the heating is small and the hand is comfortable touching the drum rim, then after several braking the pads will wear in and the heating will stop.
If the brake drums are very hot, you need to use the adjusting eccentrics to slightly move the pads of the heating brake away from the brake drum. Both routine and installation adjustments of service brakes are carried out when the brake drums have completely cooled down and the wheel bearings are correctly adjusted.
Adjusting the free play of the brake pedal.
It consists of setting the correct clearance between the pushrod and the master cylinder piston. The gap should be in the range of 1.5-2.5 mm, which corresponds to a free play of the brake pedal of 8-14 mm. The gap is adjusted by changing the length of the pusher.
To make adjustments, it is necessary to install the brake and clutch pedals at the same height from the body floor, and the pedal travel to the floor should be 150+-5 mm. Then, having released the pusher locknut, rotate the pusher by the hexagon until the free play of the brake pedal is established within the specified limits and tighten the locknut.
This gap is necessary to ensure that the master cylinder piston returns to its original position when the brake pedal is released to avoid the inner cuff from blocking the compensation hole.
Article number and approximate price for original UAZ Patriot rear pads
On cars of the first years of production, the parking brake had a separate drum with two pads, the article number of which is 3160350701401, and the price is from 800 to 1000 rubles. In 2014, restyling was carried out as a result of which, from 2015, the handbrake was combined with the main rear brakes. In 2021, a minor modernization was carried out, which did not significantly affect the drum mechanism.
Old style brake pads have a front friction lining that is shorter than the rear. Because of this, they have different catalog numbers. It is possible to replace each consumable separately. The front one has the article number - 3151350109010. Its price is 370-450 rubles. The catalog number for the rear block is 3151350209110. The cost of the product ranges from 340 to 400 rubles.
The new model brake mechanisms contain consumables, article number 3163350208889. Their price is about 450-600 rubles. A distinctive feature is the presence of fastenings for the parking brake lever.
Article number and cost of good analogues of original rear brake pads for UAZ Patriot
The original rear pads do not perform well during operation. They squeak, squeak and vibrate when the car is stopped. Therefore, experienced drivers recommend purchasing analogues of branded consumables, the best options of which are presented below.
Table - The best analogues 3151350109010
| Pad manufacturer | vendor code | Approximate price, ruble |
| Auto part | 3151350109010 | 400-500 |
| Trialli | GF 233 | 950-1000 |
| GAZ | 24350110501 | 460-500 |
Table - Best alternatives 3151350209110
| Pad manufacturer | vendor code | Approximate price, ruble |
| Lada | 24350110501 | 460-500 |
| Auto part | 3151350209110 | 360-400 |
| Trialli | GF 233 | 960-1000 |
Table - Good alternatives 3163350208889
| Pad manufacturer | vendor code | Approximate price, ruble |
| Auto part | 4693501090 | 300-350 |
| GAZ | 4693501090 | 300-350 |
| ALPHA | 3163-00-3502088/89 | 350-400 |
Replacing front pads on a UAZ Patriot
Step-by-step replacement of front disc pads on Patriot is presented in the instructions below.
- Jack up the car, support it and remove the wheel.
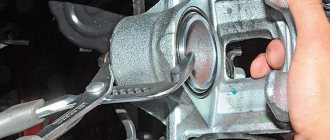
- Unscrew the two bolts securing the clamping bracket.
- Open the brake fluid nipple slightly. In this case, it is important to prevent airing of the circuit.
- Using a screwdriver, press the pistons into the cylinders one by one. It is normal for brake fluid to leak from the fitting. Upon completion of recessing the pistons, it is necessary to close the hole so that air does not enter the circuit.
- Lubricate the brake pistons with a special product. To do this, use a syringe to apply lubricant under the boot.
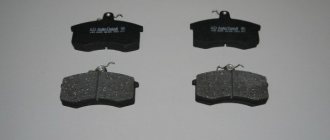
- Install new pads.
- Screw the pressure plate into place.
- Check the operation of the brake system.
Step-by-step replacement of rear pads on a UAZ Patriot
The instructions below will help you replace the rear drum brake pads.
- Jack up the rear of the Patriot.
- Remove the wheel.
- Remove the two pressure springs.
- Unscrew the two bottom bolts that hold the pads in place.
- Pry off the consumables with a screwdriver and remove them from the seat. In the case of a new type of brake mechanism, to remove the pads, you must first disconnect the parking brake. To do this, loosen the cable tension using the adjusting nuts.
- Install new consumables.
- Put on the spring that tightens the pads. To do this, it is recommended to use a screwdriver as a lever by inserting it into the hole between the bridge part and the block.
- The lower bolts have eccentrics, so they not only secure the pads, but also change the position of the consumables. Adjustment is made from the rear side before proceeding with the installation of the drum.
- Put on the drum.
- Install wheel
- Check the brakes and adjust the handbrake if necessary.
Device
If we look at the rear brake pads of the UAZ Patriot in more detail, we can see that they are a structure consisting of a pair of metal arc-shaped parts, the top layer of which has a friction material with a low slip rate. Thanks to a special base, the pads are mounted inside the drum. When the brake is pressed, the mechanism begins to act on the piston, which in turn exerts force on the pads, which begin to press against the drum, resulting in the wheel braking.
Replacing pads on a UAZ Patriot
The brakes of any car must be in good working order, especially for high-speed ones and those intended for operation in difficult extreme conditions. If you do not monitor them and do not make timely repairs, the consequences can be very disastrous, not only for the driver and passengers, but also for other road users, including pedestrians. Therefore, any owner of a vehicle must periodically inspect its brake system to identify breakdowns and malfunctions. Failures of the brake system of the UAZ Patriot are doubly dangerous, since, given its weight, a collision with it can lead to serious consequences, including human casualties. Therefore, we suggest considering information about replacing worn brake pads for this off-road vehicle. What kind of brake pads are installed on the UAZ Patriot, and how to change them yourself we will consider further.
New model UAZ Patriot rear brake pads
The X-Trail has a hill assist button that allows you to hold all four wheels and slowly move down. The X-Trail's off-road capabilities are also somewhat limited by the long front bumper and the CVT's tendency to overheat during long periods of slipping. It’s also nice that the energy-intensive suspension handles potholes and bumps well, but the car doesn’t like deep horizontal ruts.
In bad weather, which is about nine months of the year, the all-wheel drive selector is best left in the automatic position.
But in the city it will really come in handy only a couple of times a year. Ground clearance and good geometry are more important here. The X-Trail does not look like an SUV, but it is sufficiently protected from curbs and snowdrifts.
UAZ Patriot, Rear brakes (Drums - EVIL or NOT.)
On asphalt roads, the X-Trail rides smoothly, although it does mark joints and ridges. You can feel a little roll in corners, but the handling of the crossover is set to be adventurous. The parent is not bored, and the passengers are safe. The thrust of the 2.5-liter engine sometimes gets stuck in the depths of the variator, but there are almost sharp responses to the gas. If you are not an expert in all the nuances of the Japanese company’s model range, then the Nissan X-Trail on the road can easily be confused with a slightly more stylish and expensive Murano - the car is so in line with the latest design trends of the brand.
The geometric shapes of the body have become rounded, the headlights have long since become narrower, and design muscles have been cut into the sides.
When is replacement required?
The first thing that indicates that this element of the brake system needs to be replaced is a squeaking sound during braking. As soon as the brake system emits it when you press the pedal, it is necessary to carry out inspection and diagnostics, and scheduled replacement of the pads.
The cause of the squeak is the friction of the steel base on the brake disc after abrasion of the friction part of the pads. This significantly reduces the braking effect. To prevent complete wear of this part, it is necessary to monitor its condition and replace it in a timely manner. The frequency of its implementation is determined by the mileage of the car. If you install domestically produced brake pads, they will last on average from 10 to 15 thousand kilometers. The duration of use of these elements of the brake system from foreign manufacturers is significantly higher and amounts to 20-25 thousand kilometers. But it is necessary to take into account that the rate of wear is significantly influenced by the nature of driving the car. Replacement is carried out if:
- the thickness of the lining has become less than 1.5 mm;
- traces of oil were found on its surface;
- the steel base or friction part of this element is damaged.
What trims are suitable for UAZ Patriot?
The standard brake pads on the UAZ Patriot themselves produce a squeaking sound and the reason for this is not the wear of the friction part, but the composition from which it is made. Often, asbestos is used for its production, which causes creaking, settling as dust on the drum. For installation on this SUV you can use brake pads from the following companies:
Important! When buying brake pads, the owner of this vehicle should know that the rear units are different from each other, one is longer, the other is shorter. This is the peculiarity of the UAZ Patriot SUV, since they are absolutely the same in other cars.
To make the correct selection, you need to know the catalog number of the brake pads suitable for this car - 12-3501090. The cost of a set of pads, which includes 4 pads, varies from 800 to 1000 rubles. Having purchased brake pads for the UAZPatriot, you can start replacing them.
Important! Before disassembling the wheel, you need to pump out the brake fluid from the reservoir, since when the pistons are pressed in, it will leak out.
Design
The purpose of the brake products on the UAZ Patriot SUV is clear to everyone, but let’s look at the design in more detail. The rear brakes on the SUV are drum-type, which indicates the main working element - the drum. The pads are two arc-shaped steel structures, the top (outer) layer of which is coated with a low-slip friction material. Also, these steel structures have a base, due to which the product is fixed inside the drum.
Rear pads, compared to the front ones, have a longer service life, namely about 50 thousand km.
The pads on the UAZ Patriot SUV are installed in the rear wheels, or rather in the drum. When you press the brake pedal, the mechanism transmits force to the piston, which, in turn, acts on the pads, pressing them against the drum. Thus, the rear wheels are braked not only on the UAZ Patriot SUV, but also on all cars with a drum brake system.
What to put on Patriot
When the standard drum brakes on the UAZ Patriot wear out, they create an unpleasant squeaking sound from under the wheels. The cause of the squeak is usually not the wear of the friction part, but the composition from which the lining is made. Often asbestos is added to it, which actually causes dust to settle on the drum, which contributes to the formation of squeaking. In fact, there are a lot of reasons for squeaking, so when such sounds appear, drivers tend to replace the products with new ones. You can install devices from the following companies on your SUV:
- Markon;
- TIIR;
- STS.
It is also important to know that the manufacturers of the Ulyanovsk SUV installed rear devices in their creation, which are different: one is long, and the other is shorter. This is the only difference from all other car models, where the products are absolutely the same in length. When choosing products, it is important to know their catalog number - 12-3501090. It's much easier to find by product number.
Replacement
Rear devices are replaced when:
- the thickness of the lining is less than 1.5 mm;
- there are traces of oil on the surface of the lining;
- there is mechanical damage to the steel base or friction part.
Before you begin removing the products, it is necessary to pump out the liquid from the tank, since when the pistons are retracted, its amount will increase and flow out.
For your information! Products must be replaced as a set on both sides.
Let's start replacing:
- The rear wheel is removed.
- The brake drum is removed.
- The rubber cap is removed from the working cylinder.
- The tension spring is disengaged from the block using a screwdriver.
- You can move it apart to the sides of the product and remove the spring.
- Hold the pressure spring rod with one hand, and with the other you need to press the upper bowl and rotate it at an angle of 90 degrees.
- All elements are removed: spring, upper and lower cups.
- The spring rod is removed and the nut securing the support pin is unscrewed. In this case, it is necessary to keep your finger from turning.
- The finger is removed and the pad is removed.
The second product is removed in a similar way, not forgetting to remove the support pin plate.
All parts that are worn must be replaced. Before installing new products, it is recommended to apply a special refractory lubricant to the brake shield. Next, replacement is carried out: new pads are installed in place, while freeing the pistons from the clamps using pliers. The drum and wheel are installed in place. The replacement is carried out in the same way on the other side of the car.
To summarize, we can say that the serviceability of the rear products is no less important than the front ones. Therefore, at the first suspicion of wear of the products, they should be replaced immediately.
Source: prohodimets.ru
Algorithm for replacing brake pads on a UAZ Patriot
Replacement should only be made of the entire set, otherwise the braking effect will be significantly reduced, wear and load on the new pad will increase. When changing them, you need to pay attention to the brake disc, as it also wears out over time. If its thickness has decreased to 20.4 mm, then it must also be replaced.
Replacement of pads is carried out in the following order:
- Apply the parking brake and place chocks under the wheels to prevent the vehicle from rolling away. Another way is to secure the car by placing stands under the front axle after lifting. Use a jack to raise the front of the car. Then remove the wheel.
- Remove the rubber cap from the working cylinder.
- Unscrew the 2 bolts holding the pressure spring. In this case, you can use a 12mm wrench.
- Using a pry bar, you need to release the brake pistons. For this it is better to use two mounts. Spinning must be done evenly.
- Next, we remove both replaceable elements from the caliper one by one.
- We carefully remove the brake cylinders with a pry bar and simply push them into the caliper body. We monitor the volume of brake fluid in the reservoir. As noted above, in order to prevent leakage during work, it is necessary to pump it out using a syringe.
- Next, new pads are installed on the same seats.
- After this, they are fixed by screwing the support spring.
Reassembling the wheel is done in the reverse order. The same procedure is used to replace the pads on the other wheel. If you replaced drum brakes with disc brakes as described here, the replacement on the rear wheels is carried out in the same way. After replacing the pads, it is necessary to check the brake fluid level. And bleed the brake system three times by pressing the brake pedal. You can operate the car, but you need to remember that the maximum braking effect will be achieved only after the pads have rubbed against the brake disc.
Replacement process
The algorithm for replacing new-style linings on a 2021 machine equipped with a Deimos transfer gearbox consists of the following steps:
- Place chocks under the front wheels, and then jack up the rear of the car. Install a safety support under the threshold to prevent the car from falling to the ground if the jack breaks. The parking brake lever is in the lowered position.
- Unscrew the mounting nuts and remove the wheel from the hub.
- Remove the screws holding the brake drum. Since the elements rust, a chisel or impact screwdriver is used to unscrew them.
- Tighten the outer housing of the brake mechanism using M8 bolts, which are evenly screwed into the standard holes for fastening the part to the hub.
- Inspect the inside of the removed brake assembly. If there is a bead on the surface (appears as a result of the production of the part), then it is ground on a lathe. If a part is worn beyond the regulated limit, the element must be replaced. When using a worn part, excessive release of the pistons from the hydraulic cylinder occurs, which leads to extrusion of the cuff and jamming of the unit.
- Sink the cylinder pistons by pressing the brake pads evenly toward the center. It is recommended to unscrew the lid of the liquid reservoir and pump out 10-15 ml of the substance.
- Unscrew the support pins located at the bottom of the pads. Remove the springs connecting the pads to each other and to the parking brake drive lever.
- Remove worn parts and then install new elements in their original place. Before installation, wear products from the brake pads and dirt are removed from the cavity of the brake assembly, and the rubber elements of the brake cylinder are inspected. If ruptures or fluid leaks are detected, the drive must be replaced with an assembled part.
- Set the adjusting wedge (located in the upper part of the pads) to the upper position. To hold the parts, a hole is made in the base of the block. An M8 size bolt or a steel rod of suitable diameter and length is inserted into the channel. The wedge and additional spring ensure automatic adjustment of the gap during vehicle operation.
- Replace the springs and then make preliminary adjustments to the position of the brake elements. Position determination ensures correct operation of the parking brake and eliminates the possibility of friction linings rubbing against the inner surface of the drum when the vehicle is moving.
- Install the cast-iron housing of the mechanism in its original place, and then perform 3-4 presses on the vehicle’s brake system control pedal. To adjust the position of the linings, it is necessary to move the elements apart with a 6 mm wrench, which is used to turn the fingers.
Results
Brake pads are an important element of a car, and their timely replacement significantly reduces the risk of road accidents. If there are signs of wear, you should refrain from operating the machine until replacement is made. It is better to entrust the selection of pads and repair work to professionals, since a lack of experience and hastily inaccurate actions can lead to a significant increase in costs. In addition, by ordering a service from a car service center, any owner of this brand of car will save himself from dirty and rather labor-intensive work, which takes a lot of time and effort.