11/29/2019 Category: Power system
A failed rear wheel wheel bearing indicates a permanent problem, often. It comes from the rear and does not go away when driving in neutral. As bearing wear increases, this sound may become increasingly louder. The rear wheel bearing needs to be replaced.
This work can be done most quickly using special devices (pullers). If they are not there, then to achieve the goal, you should use available materials. Let's consider replacing the bearing with this particular slope.
Checking the rear wheel bearing
We hang the wheel on the bearing of which there are suspicions. We rotate it by hand. A wheel with a working bearing rotates almost silently. A faulty bearing reveals itself by noise and a sound “as if balls are rolling in the bearing.” The degree of noise and rolling depends on the degree of wear of the wheel bearing itself. For comparison, you can hang a wheel with a working bearing and listen to the sound it makes.
Required Tools
— An extended 30mm head with a long wrench, or a curved box wrench of a similar diameter (or a similar socket wrench, etc.)
To loosen the wheel hub nut.
— Thin chisel, center punch
To bend back the jammed edge of the hub nut.
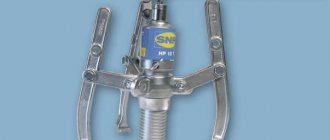
— Three-legged puller
(not required)
To remove the hub from the wheel axle.
— Two-legged puller, or a special semicircular one
(not required)
To remove the inner bearing race from the wheel axle.
— Puller – pliers
To remove and install the retaining ring
— Puller for pressing the bearing out of the hub/pressing the bearing into the hub
(not required)
— Open-end or any other wrench for 12
(11, 8, 7 - depending on the type of pin)
For unscrewing the guide pins securing the brake drum.
— Key for 13 (14)
To loosen the parking brake adjusting nut.
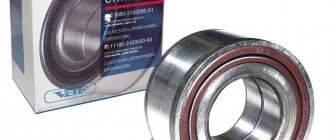
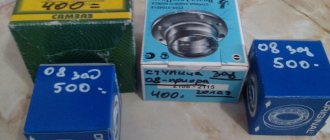
rear wheel bearing for VAZ 2108, 2109, 21099 cars with nut
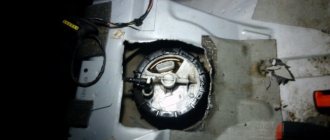
Preparatory work
It is best to carry out work in a pit (inspection ditch), it is more convenient. But if there is no hole, you can do without it.
— We fix the car
, placing it on a level surface, in first gear, placing wheel chocks under the wheels.
— Under the bottom of the car, loosen the handbrake tightening nut.
If the car is not installed in a pit (inspection ditch), then to perform this operation you will have to jack up one of the wheels, put a safety stop under the car and lie down to get to this very nut.
The procedure for replacing the rear wheel hub bearing on VAZ 2108, 2109, 21099 vehicles and their modifications
— Remove the protective cap on the wheel hub
— Removing the dent on the side of the hub nut
Using a thin chisel or core and hammer, straighten the jammed edge. For greater clarity, the wheel in the image has already been removed.
dent on the edge of the wheel hub nut
- Loosen the hub nut
To do this, use a 30 mm socket with a long wrench (or a special wrench) to unscrew the nut. You may have to apply considerable force and extend the handle of the wrench with a metal pipe, as it may become stuck or rust over time. Also, to prevent the wheel from turning, an assistant inside the car can press the brake pedal.
loosen the rear wheel hub nut
— Remove the wheel
Loosen the rear wheel mounting bolts, jack it up, place a safety stop, unscrew the bolts, and remove the wheel.
- Remove the brake drum
Using a 12 wrench (11, 10, 8, 7 - the pin size may be different), unscrew the two guide pins securing the brake drum. If they don’t want to turn away, lightly tap them with a hammer.
unscrewing the two wheel disc guide pins on the brake drum
Since we have already loosened the parking brake, the brake drum should come off without much difficulty. We rotate it left and right with our hands and at the same time pull it towards ourselves. If it goes badly, tap the drum in a circle from behind with a rubber mallet. This should help.
brake drum removed
— Finally unscrew the hub nut
Remove it and the washer underneath it.
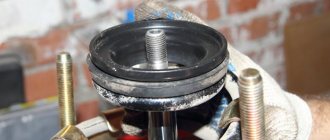
— Remove the rear wheel hub with bearing
We install a three-legged puller on the hub and, by rotating its nut, pull it off the wheel axle.
Removing the rear wheel hub of VAZ 2108, 2109, 21099 cars using a puller
If you don’t have a puller, take the wheel, turn it over with its back side facing you and fasten it to the hub with wheel bolts. We do not tighten the bolts all the way, but several turns (it is advisable, of course, to use elongated bolts, but if they are not available, you can use regular ones). We will use the wheel as a reverse impact hammer. With a sharp movement we move it towards ourselves. If it was not possible to remove the hub from the axle one time, we perform this operation several times.
— Remove the inner race of the bearing from the wheel axle
You can use a two-legged or semicircular puller, or you can simply place a large chisel on the back of the ring and hit it with a hammer. The ring will move along the axis, then you can pry it off with a mounting spatula or a large screwdriver and finally remove it. If after working with a chisel there are nicks left on the axle, we clean them with a fine file.
Removing the rear wheel bearing inner race
— Remove the retaining ring securing the bearing in the hub
We use puller pliers for this. If it is not there, remove the retaining ring with a screwdriver.
Removing the bearing retaining ring in the hub using a puller
— Remove the bearing from the hub
Using a special puller, squeeze it out of the hub body. If there is no puller, knock it out with a piece of pipe of suitable diameter. The diameter of the pipe must be equal to the diameter of the inner ring of the bearing. We strike at him.
knocking out the old bearing from the hub
— Clean and lightly lubricate the inside of the hub
— Press the new bearing into the hub
We do this using a puller or a vice, or simply hammer it in there using a wooden spacer and hitting it in a circle with a hammer. At the final stage of driving, you can use the old bearing as a spacer.
driving a new bearing into the hub
— Install the retaining ring in the groove on the hub
You can use a pliers puller for this, or just a screwdriver.
rear wheel bearing retaining ring
— Install the hub with the inserted bearing on the axle
mounting the hub on the rear wheel axle
— We put on the washer and hub nut.
install the washer and hub nut
— By tightening the nut, press the hub until it stops on the axle.
tighten the nut
— Replace the brake drum and wheel
— Finally tighten the hub nut to a torque of 186.3-225.6 N.m (19-23 kgf.m)
If there is no special wrench for determining the tightening torque, then remember with what force you unscrewed the nut, and with approximately the same force you need to tighten it.
Unfortunately, sometimes our cars break down and need repairs, it is necessary to change various parts, optics, and in some cases the rear wheel bearing needs to be replaced, although, as statistics show, this happens quite rarely.
How to recognize problems with the hub?
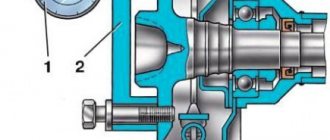
The fact is that the hub is the most important element of any rotating mechanism, including a car wheel. It is the central part of the rotating parts with a hole to allow it to be attached to an axis or shaft. Thus, its main task is to provide rotational motion. To prevent free rotation on the axle, rolling bearings or special plugs are pressed into the hub hole. In addition, it is thanks to the bearings that the hub, as well as the wheel, can rotate.
It is quite easy to notice that the wheel bearing is urgently needed to be replaced; in this case, a characteristic knock occurs in the lower rear part of the body, most often it intensifies when driving on an uneven road or when hitting potholes and bumps. When driving on a relatively flat road surface, a hum may occur. In addition, the brake drum gets very hot.
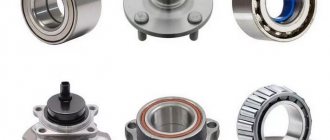
Function and types of bearings
Wheel bearings ensure uniform rotation of the car's wheels. Structurally, the machine axle and the wheel hub are connected only by means of a bearing. The wheel and brake disc are already attached to the hub, in turn.
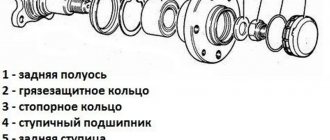
The rear wheel wheel bearing is a rolling bearing. Its structure is as follows: two metal rings - outer and inner, between which conical rolling elements are pressed. The inner ring sits on the car axle, and the hub is put on the outer ring. The conical rolling elements are held in place by a cage.
The modern automobile industry is characterized by large differences in the design of wheel bearings of foreign cars and domestic cars. As a rule, foreign-made bearings are distinguished by their complex and perfect design, which gives the part high reliability.
Western cars are most often equipped with 2nd and 3rd generation HUB wheel bearings. The part has attachment points to the brake discs or to the wheel hub, making it easier to replace the bearing. Often the bearing is attached to both the hub and the brake disc. The bearings are equipped with an electronic sensor. The use of a sensor simplifies the alignment of the bearing during installation, and also allows you to monitor the wear of the mechanism.
As for domestic cars, obsolete first-generation bearings are still used for the rear wheels. VAZ cars with front-wheel drive are equipped with double-row sealed bearings, and the Niva model is equipped with single-row tapered bearings. Other models, even those intended for commercial transportation, are equipped with similar bearings.
What is the inconvenience when using such bearings? All bearings used for domestic cars are quite difficult to install, that is, changing such a bearing yourself is not easy. In addition, they are very demanding in terms of tightening torque. During operation, wheel bearings of Russian cars require regular and abundant lubrication. However, domestic enterprises still produce only HUB-1 bearings (first generation) and zero-class bearings.
We recommend
Checking whether the rear wheel hub bearing needs to be replaced
First of all, the cause of such breakdowns is poor, uneven roads, especially since in some cases our road surface can hardly be called a road at all. The second reason why a bearing may become unusable is the poor quality of the material from which it was made. Refitting the rear wheel is not a very complicated process, so it can be done quite easily on your own at home.
However, before proceeding directly to action, you should find out whether this is really the case. To do this, you need to hang out the wheel from which the hum is heard, and, rocking it with your hands, check the play. If, when carrying out these actions, play is detected, and dull knocks occur, then you cannot delay replacement. A bearing that falls apart along the way will cause damage to other parts of the hub system.
The key to fast and high-quality work is a properly selected tool and high-quality materials, in this case a bearing. Therefore, do not try to save on it, purchase options only from good manufacturers, because the service life largely depends on this.
Replacing the rear hub: signs of malfunction and repair sequence
When is the rear hub required to be replaced? This question can only be asked by new car enthusiasts. Experienced professionals and amateurs know the main signs of a breakdown of this nature. This:
- The appearance of extraneous noise when the car is moving, which, due to inexperience, is sometimes confused with the “howl” of the box. A distinctive feature of the illustration of a hub failure is that the sound does not disappear even when switching to neutral speed;
- This sound is best heard in the rear seat, on the fault side;
- When turning, there is a feeling of braking on the faulty side, and when the breakdown is serious, there are even clicks;
- The wheel heats up as it moves;
If such symptoms appear, it is important to immediately contact a car service center. Or use a jack to hang the wheel yourself, which gives the SOS signal. Then it is well spun in the air and listened to. The appearance of a hum is a bad, but not deadly, sign. Next, you need to grab the wheel and forcefully swing it in a vertical plane. If play is detected, bearings must be replaced. The reason for the failure of this part may be:
- manufacturer's defect;
- severe operating conditions - for example, driving at high speed off-road.
- untimely maintenance - lack of lubrication, dirt and dust getting into the bearings because of this;
- lack of timely service. As a rule, there is a lack of lubrication and dust and dirt enter the bearing;
- incorrect installation during repair work carried out earlier.
All this can be guaranteed to be avoided when replacing the rear wheel hub is carried out independently, taking into account some details and tips. This process requires not so much professionalism as time and patience - it is labor-intensive and slow. To carry it out you will need tools such as:
- Jack;
- Keys: socket (30), 12; balloon;
- A suitable piece of pipe will serve as an amplifier;
- Round nose pliers;
- Hammer;
- Chisel;
- Universal puller;
- Mount;
- New bearing.
Signs of a faulty rear wheel bearing on a Grant
In order to replace an element in a timely manner, you need to know the symptoms that indicate its inoperability. Below are some of the most common:
- Vibration during vehicle driving conditions. Vibration can be felt both in the car body and in the steering wheel when driving. If such signs appear, a thorough diagnosis and (or) replacement of the unit is immediately carried out.
- The appearance of a specific hum, crunching noise when moving. Such sounds indicate mechanical damage and destruction of the hub mechanism (spherical elements).
Causes of breakdowns
Below are the 2 most common reasons for element failure:
- Loss of bearing tightness. The fact is that the product body contains a certain amount of lubricant to reduce friction between the internal elements. The lubricant is retained by special protective covers made of rubber or plastic. Accordingly, these materials deteriorate over time, which leads to a gradual loss of lubrication and failure of the hub element.
- Large production resource. No matter how carefully you operate your car, over time most components and elements become unusable. Each part has its own service life. The bearing, whose service life is about 60 thousand kilometers, is no exception. In some cases (regular or periodic driving through potholes, under conditions of increased wear), the element fails much earlier than the above indicators.
Signs and causes of malfunctions
In the 2108 rear hub mechanism, it is the bearing that most often fails - this is the most vulnerable point. But sometimes more specific breakdowns occur - cracks on the metal surface of the hub, destruction of the threads for the wheel bolts. In the second case, you don’t have to completely change the hub, just cut a new thread. But this doesn’t always help; it turns out it’s easier to purchase and install a new one. Therefore, if when tightening the bolts they turn on the threads, you need to start repairs immediately, otherwise you may end up losing the wheel.
When the bearing wears out, extraneous sounds appear - a strong hum that increases with speed. There may be several reasons:
- Initially low quality of the product.
- Insufficient amount of lubricant inside the bearing.
- Incorrect installation.
- Exceeding the permissible resource.
In any case, the element must be replaced. After the hum reaches its maximum, vibration will begin to appear - and the stronger the wear, the greater the level it will be.
How to change the rear wheel bearing of a Lada Granta
Work related to the removal and installation of the element will require special tools, namely: - a special hub puller; - chisel; — retaining ring remover (or pliers with round ends); — a “30” head, or a key of the same size; - vice; — a puller for pressing and pressing out bearings; - a flat-tipped screwdriver.
So, let's get started, below are 14 detailed stages of the work:
- Remove the plastic protective cap from the rear wheel.
- We move the gearbox lever to the “1st gear” position. To prevent the car from rolling away under the front wheels, we place supports.
- We loosen the tightening torque for the hub nut (it is most convenient to use a long lever). Unscrew it a little and loosen the bolts holding the wheel.
- Using a reliable jack, we lift the rear side of the car, where the bearing is actually changed.
- Unscrew the nuts and remove the rear wheel from the studs. We dismantle the brake drum.
- Unscrew and remove the hub nut, take out the thrust washer.
- We take the previously prepared puller in our hands and carefully press the hub from the axle.
- Now we take the hub, install it and clamp it with a vice. Remove the retaining ring (use a puller).
- Press the bearing out of the rear hub. Then, using a brush with metal bristles, we clean the inside of the hub from dirt. We press the new product back in. Don't forget to install the special retaining ring correctly.
- Taking advantage of this opportunity, we clean the brake system elements from rust and contaminants.
- We put the hub back on the axle element. We return the brake drum to its place and put the wheel back on.
- Tighten the wheel bolts. Let go of the raised part of the car until the wheel is firmly in contact with the ground.
- Tighten the hub nut securely using a long-lever wrench (or a special hub wrench). We return the protective plastic cap to its place.
- In order to check the results of the work performed, we start the car engine and start driving.
This completes the replacement of the rear wheel bearing (Lada Granta). As you can see, the process is not too complicated. All you need is a good specialized tool and some free time.
Many experts agree that on the VAZ 2109, like other domestic cars, the rear wheel bearing (RH) is a weak point. This is not due to the low quality of the products. It's all because of the condition of the roads.
Considering the condition of the road surface, as well as the need to have a car always ready for travel, replacing a faulty bearing should be done in a timely manner. Otherwise, the consequences of operating a car with a worn bearing could result in expensive repairs and an accident.
REPLACEMENT OF BEARINGS USING THE EXAMPLE OF VAZ-2110
Rear hub with bearing VAZ-2110
First, let's consider replacing this element on the “Ten”. The tools that will be needed are not so many, but specific ones will also be required. In total you will need to have:
- Jack;
- Car supports;
- Balloon wrench;
- Socket wrench “30” or a socket with a wrench of the same size;
- Pliers for removing retaining rings;
- Key for 12;
- Special puller for pressing out the bearing;
- Hammer;
- Chisel;
- Mount;
Having all this, you can start replacing. The car is placed on a flat surface, the gearbox is engaged in 1st gear. While the car is on its wheels, it is better to immediately loosen the hub nut. Often this nut is too tight, so it may be necessary to extend the wrench with a pipe.
Then the wheel bolts are loosened, the wheel is jacked up, and the car itself is placed on supports. Next, the wheel is removed from the car.
Before removing the hub, the brake drum will need to be removed. To do this, you first need to unscrew the guide pins. After this, the drum is removed from the hub. Sometimes it can only be removed by knocking down the drum with a hammer and a wooden handle.
[AD]
Next, the hub nut is completely unscrewed to allow the hub to be removed from the axle. Since the bearing sits tightly on the axis, you cannot do without a hammer and a wooden adapter. You need to knock it down carefully, constantly turning the hub so that it comes off the axis evenly.
VIDEO: REPLACING THE REAR HUB BEARING ON A VAZ-2110 CAR
Then everything depends on how the hub came off the axle. The fact is that with severe wear, the inner race of the bearing may remain on the axle, and the outer race, together with the balls, may remain in the hub.
In this situation, you will have to additionally remove the brake pads in order to “rip” the inner race out of place, and then pull it off with a puller or using a chisel and hammer. The method of tightening the inner race is not important, the main thing is to remove it without damaging the surface of the axle. If the bearing comes off the axle completely assembled, you can begin further work.
The bearing needs to be pressed out from the removed hub. To do this, the retaining rings are first removed. Then using a special puller. If there is none, you can simply knock it out.
But putting a new element in place by hammering it in is strictly prohibited. It should be pressed in either with the same puller, or using a powerful vice, using the outer race of the worn bearing as a straightener.
After the new element is seated, its retaining rings are installed, and the replacement of the rear wheel bearing is completed and you can begin assembly, which is performed in reverse order.
When to replace
The rear wheel bearing should be changed no later than every 100 thousand kilometers. But the realities of our roads and the quality of products are such that in fact the service life of the element is noticeably less than the specified period.
Practice shows that it is necessary to change the spare parts every 50-60 thousand kilometers, and in some cases even more often. It is best to focus not on mileage, but on signs of wear.
Symptoms of a problem
The car itself will tell you that it’s time to change the air conditioner by displaying the following signs:
- There is a noise, a strong hum or knocking sound in the rear of the car when driving;
- Play is detected in the bearing.
Checking status
If one of the symptoms appears on your VAZ 2109, you must lift the rear wheels one by one and make sure whether the problem is really in the bearings. For this:
- Lift the wheels and spin each one by hand;
- Listen to whether any extraneous sounds appear when the wheel spins;
- If you hear a characteristic hum, this indicates wear on the wheel bearing;
- Check the assembly for play. The wheels must be hung;
- Firmly grasp the top of the wheel and pull away from you and towards you;
- If the bearing is in good condition, the wheel will not move, that is, play;
- If there is a build-up, then you will have to replace the spare parts.
How to check a wheel bearing?
Act consistently, and then you can eliminate the possibility of mistakes even if you are doing such work for the first time.
If you find any play, you will have to check the tightness of the hub nut.
It is important to have on hand the technical specifications of your car, which indicate the tightening torque of the wheel bearing nut. The sequence of actions is as follows:
- Remove the protective cap of the nut (if equipped).
- Remove the cotter pin (if equipped).
- We put an assistant behind the wheel and ask him to fix the wheel by pressing the brake.
- Using a torque wrench, check the tightening force.
If the torque corresponds to the value specified in the specification, but the play remains, the bearing will have to be replaced.
How to check a wheel bearing? Video:
We diagnose by ear
But it also happens that there is no play, but only a hum, confirming the presence of a malfunction. How to determine which wheel bearing is humming? The task is not easy.
Due to resonance effects, this is not always possible from the driver's seat. Again you will have to call an assistant and use a trick. Possible options:
- Move past the observer standing in the open area, changing modes and direction of movement. This method will give results if the noise is clearly audible even at low speed.
- Place the assistant in another car. Let him move along the highway with you, opening the window and listening to the source of extraneous noise.
Both options for this type of diagnosis require certain skills.
Having established which part needs to be replaced, you can begin work, the complexity of which directly depends on the design features of the car. You will have to take into account:
- On which axle, front or rear, driving or driven, is the replacement being made?
- What type of bearing is installed on your car.
There are parts of various designs:
- Open or closed type.
- Single or double row.
- Conical or radial.
- Ball, roller or combination.
There are two options for configuration and delivery of the part:
- The bearing is manufactured separately. In this case, to complete the work you will definitely need a special puller, mandrels and a press.
- The bearing and hub are assembled into a single unit, which can be replaced as a whole. This greatly simplifies repairs, but increases the cost of parts.
It should be taken into account that the most common cars now are those with front axle drive. We will describe the conditions and sequence of repair operations specifically for machines of this configuration.
Selection of ZPS
When choosing a rear wheel bearing, you should focus on the required characteristics and manufacturers who today produce ZPS suitable for the VAZ 2109.
Let's start with the characteristics. The choice should be made in favor of bearings with the following parameters.
For the rear hub, a ball, angular contact, double-row closed type bearing is used.
Now let's talk about manufacturers. There are several of them, each of which has its own characteristics.
| Bearing manufacturer | Peculiarities |
| VBF from the Volgograd plant | Motorists consider this bearing plant to be quite reliable and proven. An important advantage is that fakes from the Volgograd manufacturer are quite rare on the market. |
| Bearings of the Saratov plant - SPZ | A close option to the Volgograd plant, which is famous for its reliability and has impressive popularity among owners of domestic cars. There are a few more fakes |
| These are products of the same Saratov plant, only for budget consumers. Quite cheap bearings are characterized by less durability. Otherwise, there are no serious complaints about quality | |
| 20 GPZ. Kursk plant | Nowadays it is very rare to come across products from this plant, since the company produced bearings back in the days of the USSR and for some time after the cessation of its existence. Today there is no production, but occasionally the remains of bearings can be found. The quality is excellent (USSR, after all), but the shutdown of production will not allow you to easily find it. Maybe they are no longer anywhere at all. |
conclusions
At this point, the process of replacing the rear wheel bearing can be considered completed. By doing everything exactly according to these instructions, you can not only save money, but also gain enough experience in carrying out such work.
The rear wheel bearing is one of the weakest links in almost all domestic cars.
And the point here is not the low quality of components (although this aspect also plays an important role), but the terrible roads of the country.
Therefore, a good driver must promptly replace the faulty element. Otherwise, this may not only lead to more serious costs in the future, but also to an accident. Let's look at the main nuances of this work.