Removing the axle shaft
- Go to page:
Removing the axle shaft
Post by Magellan » 12 Dec 2009, 03:07
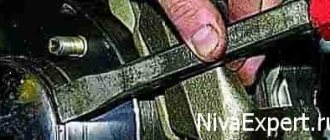
After this, the axle shaft should come out.
Re: Removing the axle shaft
Post by muzolya » Dec 12, 2009, 04:33
Re: Removing the axle shaft
Post by MEW » Dec 12, 2009 12:59 pm
Re: Removing the axle shaft
Post by Himalaev » Dec 12, 2009, 01:17 pm
Re: Removing the axle shaft
Post by Pilot » Dec 12, 2009, 4:18 pm
Re: Removing the axle shaft
Post by ivan1 » Dec 12, 2009, 5:52 pm
Re: Removing the axle shaft
Post by muzolya » Dec 12, 2009, 07:26 pm
I have to disagree with you colleague. The machine is old. The last time the axle shaft was removed. Hmmm. For a long time.
But it turned out to be effective. I think it won’t happen once in a while.
Re: Removing the axle shaft
Post by ivan1 » 12 Dec 2009, 20:06
I have to disagree with you colleague. The machine is old. The last time the axle shaft was removed. Hmmm. For a long time.
But it turned out to be effective. I think it won’t happen once in a while.
Re: Removing the axle shaft
Post by muzolya » Dec 12, 2009, 8:24 pm
Likewise, the left one came out like clockwork
The car stands on trestles, large, Soviet, strong.
Re: Removing the axle shaft
Post by Pilot » Dec 13, 2009, 00:50
Re: Removing the axle shaft
Post by Vigilant Falcon » Dec 14, 2009, 11:03 pm
Re: Removing the axle shaft
Post by Pilot » Dec 15, 2009, 00:30
Re: Removing the axle shaft
Post by muzolya » Dec 15, 2009, 05:56 pm
Re: Removing the axle shaft
Post by ivan1 » Dec 15, 2009, 10:21 pm
Re: Removing the axle shaft
Post by Serg » 03 Feb 2010, 11:46
hehe, I tried this method - it didn’t help. and he put the wheel on the reverse side, and kicked it with his feet, and slammed it with a sledgehammer, and pulled it through the rope with a sledgehammer - the universal tool “sledgehammer” helped zero to ground;
but before that there was a hellish Kama Sutra for a couple of days on removing the square crap that holds the axle shaft - there was one bolt there that just went sour. I had to cut this crap out with a chisel
PS: by the way, I didn’t change the brake flap afterwards, I just bent it back. True, he overdid it a little, he started hooking and hellishly warming up the drum. As a result, there was a lot of smoke, a dead drum and pieces of melted silumin from the drum on the shield. I then gnawed it out for a loooong time, because I didn’t want to get the new drum up.
Re: Removing the axle shaft
Post by longer » Mar 09, 2010, 11:37 am
This is where you need to lift the car and how tall you should be. to fit under the bridge across.
Source: www.niva-club.net
How to remove the rear axle shaft in the field
After dismantling the axle shaft, you need to check its condition and the condition of the parts included in the axle shaft kit. You need to make sure that:
— the ball bearing is not worn out or damaged; if the axial clearance in it exceeds 0.7 mm, replace the bearing;
— the locking ring and bearing have not been displaced relative to the original fit; if the inner ring of the bearing rotates relative to the seat of the axle shaft, replace the locking ring;
— the bearing mounting plate and the oil deflector are not damaged;
— the axle shaft is not deformed and the seating surfaces are not damaged; The runout of the axle shaft, measured at the centers on the journal under the oil seal, should not exceed 0.08 mm.
Before installing into the centers, thoroughly clean the centering holes on the axle shaft from dirt and rust.
If wear or damage to parts installed on the axle shaft is detected, replace them with new ones, following the rules below and using special tools.
Eliminate slight bending of the axle shaft by straightening.
After straightening the axle shaft, the runout of the flange hub, measured at the centers, should not exceed 0.05 mm.
If the runout of the flange end is more than specified, but not more than 0.08 mm, then it is allowed to groove it to eliminate the end runout. Reducing the thickness of the flange due to its groove is allowed by no more than 0.2 mm.
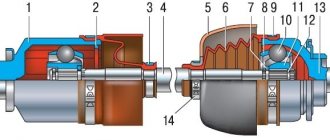
Removing the locking ring
Removing and installing the axle bearing lock ring must only be done using a hydraulic press.
First, bend outward the holders of the bolts securing the plate with the oil deflector and the brake shield, and remove the bolts.
Use the half rings of tool 67.7823.9529 to surround the bearing and install the half shaft vertically so that the half rings rest on the thrust ring.
Place the axle shaft under the press (Fig. 13) and apply gradually increasing force to the splined end of the axle shaft until the bearing lock ring is removed.
Do not reuse the axle bearing lock ring, but replace it with a new one.
Check whether the seating surface of the axle shaft has any marks or damage; if necessary, replace the axle shaft with a new one.
Axle shaft assembly
Place the axle shaft vertically, resting its flange on wheel 7 (Fig. 14) of tool 67.7823.9530.
Install the axle bearing oil deflector and the bearing mounting plate with a gasket on the axle shaft, pre-connected with two screws; Install the axle ball bearing.
Insert the new locking ring into special holder 3, place it in the oven and heat the ring to approximately 300° C so that at the time of pressing onto the axle shaft its temperature is 220 - 240° C.
Press the locking ring onto the axle shaft using mandrel 1 on a press with a force of no more than 58.8 kN (6000 kgf) so that the inner ring of the bearing is clamped between the locking ring and the shoulder of the axle shaft.
After pressing, make sure that the ring does not move under an axial load of 19.6 kN (2000 kgf).
For this purpose, install the axle shaft assembly on a special device (Fig. 15), and clamp the locking ring in a special vice.
Place the indicator leg 1 with a division value of 0.01 mm to the axle shaft flange.
After setting the indicator arrow to “0”, apply the indicated axial load, using a torque wrench to create a tightening torque of 78.5 - 83.3 Nm (8 - 8.5 kgf m) on the device screw.
The screw rests through the ball against the end of the axle shaft. In this case, even the smallest gap should not appear between the lock ring and the inner ring of the bearing.
After removing the load and unscrewing the screw of the device, the indicator arrow should return to the zero position; this proves that no movement has occurred between the lock ring and the axle shaft.
If the indicator needle does not return to the zero position, it means that the locking ring has moved and the axle shaft assembly must be replaced with a new one.
After checking the press-fit of the locking ring, install the bolts securing the plate and oil deflector 6 (Fig. 14) and fix them by bending them inward, the bolt holders.
Measuring the axial free play of the axle shaft on a car
Loosen the rear wheel nuts.
Place chocks under the front wheels and remove the rear axle.
Release the parking brake and move the gearshift lever to neutral.
Remove the wheels and brake drums by screwing fixture 02.7834.9504 to the axle shaft (Fig. 16), pass the extension of the indicator leg 1 through one of the holes of the axle shaft until it stops at the brake shield or
into the oil deflector and secure the indicator.
Take measurements with an indicator, applying a force of about 49 N (5 kgf) to the axle flange in both directions along the axis of the rear axle. Free play should not exceed 0.7 mm.
Source: autoruk.ru
Rear axle bearing and oil seal
Reg.: 04/30/2010 Threads / Messages: 3 / 1803 From: Moscow, TiNAO Age: 30 Car: MMC Pajero Sport 05
Reg.: 06.27.2007 Messages: 1765 From: Moscow Age: 50 Car: 21213, 1999
Name: Alexey Reg.: 03/05/2005 Threads / Messages: 42 / 3713 From: Moscow, Northern Administrative Okrug Age: 38 Car: Shniva 2021 50 tkm
Sever18
Wash the semi-axial bearing as a preventative measure (you need to remove one of the cheeks) and fill it with new grease. At least lithol. Anybody will be better than it was.
There is no need to buy any additional rings, etc.
But I also decided to change the bearings on the axle shafts and the seals. I bought 2121 for the Niva. I brought it to the garage and started putting the oil seal on the axle shaft, but it reached halfway and that’s it. Next comes the thickening of the axle shaft. The store said that the axle shafts on the VAZ 2101 and 2121 are the same. It turns out I have a VAZ 21213 rear axle? I think the bearing will fit. The numbers match 62208r
Added after 8 minutes 26 seconds:
Name: Nikolay Reg.: 11/12/2008 Threads / Messages: 2 / 909 From: Ruza.Moscow region. Age: 48 Car: VAZ21214. 2001, MP 7.0
I'll write down how I removed the axle shaft. Maybe it will be useful to someone. We begin removing the axle shaft as in the manual, and end by screwing the wheel on with the reverse side. It was not possible to “pull” the axle shaft with manual effort. My weight is too low. Next, I proceeded as follows: 1. Attach a chain (about 2.5 m long) to the holes of the disk (symmetrically). It turned out to be a loop that I was going to hit (emphasis on the “U”) with a sledgehammer. 2. I placed a log at the end of the loop, on which I placed a chain, and placed a heavy piece of iron (a counterweight from a washing machine) into the resulting loop so that the loop would not fall off the log. 3. I was about to take a sledgehammer, but the log fell, and when I picked it up and lightly hit the loop with a piece of iron to tighten the chain, a miracle happened: the AXLE MOVED. No problem further.
Added after 1 minute 24 seconds:
In point No. 1, the emphasis is on the first “U”, otherwise not everyone will understand.