What is a node
The name CV joint itself is an abbreviation for the phrase constant velocity joint.
The node faces the following tasks:
- Make the transmission of rotating torque from the engine to the wheels of the drive drive uniform and without loss of power.
- Reduce the load on expensive parts that rotate to move the car: shaft, gear, etc.
- Reducing the level of vibration when moving vehicles.
Modern front-wheel drive cars and some all-wheel drive “horses” are equipped with such homokinetic joints. The manufacturer guarantees the same duration of operation of the unit and the vehicle itself, provided that the CV joint is serviced and driven carefully. That is, if you drive carefully and periodically properly care for the part, it will last for the entire life of the vehicle.
The fulfillment of the first point depends only on the personality of the owner, his desire to monitor the technical and sanitary condition of the car. But the implementation of the second point on most domestic roads is sometimes simply impossible. And sooner or later the grenade (another name for the unit, which arose due to its external resemblance to a military projectile) fails. It is necessary to replace the internal or external CV joint on a Chevrolet Niva or on another car with a front-wheel drive and all-wheel drive design solution.
Front wheel drives Niva Chevrolet
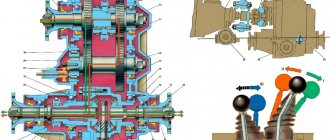
Chevy Niva front wheel drive: 1 – internal joint housing; 2 – clamp; 3 – clamp for securing the cover; 4 – wheel drive shaft; 5 – protective casing; 6 – protective cover; 7 – thrust ring of the cage; 8 – separator; 9 – clamp; 10 – ball; 11 – outer hinge cage; 12 – retaining ring; 13 – outer hinge body; 14 – clamp for fastening the casing. Torque is transmitted to the front wheels from the front axle gearbox through the right and left drives. Both drives are identical in design. Each drive consists of a shaft 4 and two joints of equal angular velocities installed on its splined ends. The internal joint housing 1 is connected to the side gear of the front axle reducer. The outer joint housing 13 is connected to the front wheel hub. The holder 11 is connected to the housing 13 through balls 10, which are located in the grooves of the housing and the holder. The race is installed on the splines of the shaft 4, rests against the ring 7 and is fixed on the shaft with a retaining ring 12. In the compressed state, this ring freely passes through the splined connection of the race 11, which allows you to both connect and separate the hinge and the shaft. The inner hinge body 1 differs from the outer hinge body 13 in that it has straight grooves.
Removal and installation of front-wheel drive Chevrolet Niva
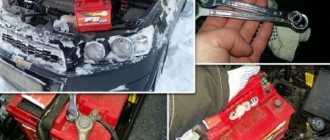
To replace CV joints on a Chevy Niva, you will need a tool: 13, 17, 27 wrenches and a wrench for the wheel nuts.
Hang the car up and remove the front wheels, disconnect the front driveshaft from the front axle gearbox, disconnect the shock absorbers from the lower arms of the front suspension
Unscrew three nuts securing the bearing housings of the inner hinge of the right and left drives
Remove the bolt securing the right front axle gearbox bearing cover to the front suspension cross member
Unscrew the four nuts securing the front axle gearbox suspension brackets
Unscrew the nut and remove the bolt securing the left front axle gearbox bearing cover to the front suspension cross member
Raise the front axle gearbox and secure it in this position in any available way.
Remove the front wheel hub cap and unscrew the Niva Chevrolet hub nut
Varieties
SR as a suspension part began to be used on cars from the mid-20th century. Thanks to the unit, it became possible to simultaneously rotate and control the rotation of the wheels at an angle of up to 70 degrees. In the automotive industry, four technical solutions for components are used:
- cam;
- tripoid;
- ball;
- twin cardan shafts.
All these types are united by the basic design, which is a rigidly connected body and holder. The car's joints are also divided into:
- internal, rotating up to 20 degrees;
- external, more mobile and transmitting without power losses.
The part works according to the following principle.
- There are grooves on the surface of the inner race. Their number is the same as the number of bearings inside it.
- The cage is held in place by bearings that separate the housing and the cam.
- The bearings move along the path of the smaller diameter of the fist and the larger diameter of the housing.
- This creates a rotational impulse that transmits torque to the driven shaft.
If you change the angles connecting the axle shafts, the bearings begin to move inside the grooves. This is how torque is transmitted.
Symptoms of a problem
The CV joint is designed for operation in fairly harsh conditions. Therefore, only proven devices are installed at the car manufacturing plant. Their service life is comparable to the service life of the entire car. But nothing is impossible for Russian roads. The outer CV joint experiences the greatest load. All vibrations associated with uneven road surfaces, sudden braking, and impacts are transmitted to it.
Video - replacing the CV joint boot in Logan, Sandero, Largus and all the nuances:
First of all, you should monitor the integrity of the anthers. Leaks on them are a serious threat to performance.
The aggressive nature of driving with the wheels turned to full is very dangerous for CV joints. This style is taught in extreme driving courses.
Video - replacing CV joint boots:
Failure of CV joints can be determined by play and sound. When under heavy load, faulty outer CV joints produce a squeaking sound similar to the sound of worn-out brake pads. Also, during a sharp start, a characteristic click may be heard on the turned wheels.
The most classic option, when it comes time to replace the CV joint, is the appearance of a characteristic crunch on one side of the car. Such a crunch when turning the steering wheel can only be produced by a constant velocity joint. It is more difficult to determine which CV joint sounds, internal or external.
Video - how to check which CV joint has started knocking:
If extraneous noise appears during straight-line movement, the inner CV joint is most likely worn out. The following procedures may help to make an accurate determination.
Reasons why a hinge joint fails
The internal CV joint on a Chevrolet Niva is a high-quality and reliable part of the automobile chassis system. Listed below are the main reasons that provoke early wear and failure of the unit.
- Incorrect, illiterate, extreme (rapid start with inversion of the drive drive and slipping) driving.
- Lack of care for a part that needs periodic cleaning and lubrication.
- Unfair production of the hinge assembly using low-quality materials and violation of technological rules.
Several signs listed below indicate that there may be a problem with the grenade and the internal CV joint on the Chevrolet Niva needs to be replaced.
- The appearance of a crunching sound when making turns. This phenomenon occurs if the SR requires lubrication of the connections, or a mechanical inclusion, for example, dirt, gets into it.
- Interruptions in the movement of the car at the start, when the speed increases or, conversely, when it decreases.
- Increased vibration when turning, accelerating, or driving at high speeds.
To make a final diagnosis, auto mechanics have created several simple techniques.
Car suspension repair in Tambov
Car suspension - cost in rubles*
| Type of work | Classic VAZ 01-07 | VAZ 2108-099 | VAZ 010 (eng) | "Niva" | Foreign cars |
| Remove/install ball joint | 350 | 250 | 250 | 350 | from 350 |
| Remove/install lower arm | 1000 | 300 | 300 | 1200 | from 900 |
| Remove/install upper arm | 800 | — | — | 900 | from 850 |
| Replacing the lower silent blocks | — | 700 | 800 | — | — |
| Remove/install front spring | 350 | 450 | 450 | 550 | from 800 |
| Remove/install front shock absorber | 250 | 450 | 450 | 550 | from 800 |
| Replacing the stabilizer bushing | 100 | 100 | 100 | 100 | from 200 |
| Remove/install stabilizer | 600 | 550 | 550 | 700 | from 800 |
| Remove/install front wheel bearing | 600 | 600 | 600 | 950 | from 1100 |
| Suspension broach | 300 | 300 | 300 | 300 | 450 |
| Remove/install front bracket | — | 250 | — | — | — |
| Remove/install crankcase protection | 150 | 150 | 200 | 150 | 400 |
| Replacing the internal CV joint boot. | — | 500 | 500 | 900 | from 700 |
| Replacing the outer CV joint boot. | — | 400 | 400 | 850 | from 700 |
| Suspension diagnostics, inspection, check | 199 | 199 | 199 | 199 | 199 |
| Remove/install drive | — | 550 | 550 | 1000 | from 700 |
| Adjusting the rear wheel bearing | 150 | — | — | 250 | from 300 |
| Remove/install rear spring | 250 | 450 | 450 | 300 | from 450 |
| Remove and install rear shock absorber | 250 | 450 | 450 | 300 | from 400 |
| Remove/install rear wheel bearing | — | 350 | 350 | — | from 600 |
| Remove/install rear beam | — | 1800 | 1800 | — | — |
| Remove/install cardan | 500 | — | — | 500 | — |
| Remove/install the crosspiece on the removed cardan | 450 | — | — | 450 | from 500 |
| Replacing the shank oil seal with an oil change | 500 | — | — | 600 | — |
| Remove/install jet rod | 250 | — | — | 250 | from 500 |
| Changing the axle oil | 300 | — | — | 300 | from 300 |
| Remove/install stabilizer link | — | 150 | 150 | — | from 250 |
Service centers
Operating a car on low-quality roads has a negative impact on the technical condition of the vehicle. Whether it is necessary to delay contacting a service center is indicated by the characteristics of the car’s behavior on the highway. For example, problems are often indicated by car skidding on turns.
The primary source of this behavior may be wear of ball joints, malfunction of shock absorbers, or damage to rims. Only diagnostics will help determine the exact cause.
Why should you contact the Kolesa Darom company in Tambov?
Modern equipment and many years of experience enable our professionals to accurately identify the degree of suspension wear and the cause of such an unpleasant phenomenon. When repairing this part of the car, the following can be replaced:
We work only with original spare parts that meet all quality standards. Despite the fact that we carry out suspension repairs relatively cheaply, we always provide a guarantee for all types of services provided.
How much does a suspension repair cost?
We have a wide base of regular customers. This success was achieved by equipping the sites with modern equipment and forming a team of only experienced and competent specialists. We pay special attention to personnel selection. Experienced craftsmen are able to cope with any malfunction efficiently, quickly and inexpensively.
You can view our approximate prices in the price list presented on the website. The cost of our services does not exceed the average market limit in Tambov. For any other questions, you can contact our competent manager at the specified contact phone number.
Diagnostics
Experienced mechanics advise car owners to pay attention to the condition of the boots approximately every 5-7 thousand kilometers. Detection of any defects: cracks, failure of the clamp, indicates that the CV joint may be damaged. How can I check this?
- The car is placed on a lifting mechanism and engaged in first gear. A worn-out assembly will produce a sound resembling a characteristic crunching sound.
- An increase in play of one and a half tens of mm is a characteristic sign of failure. They check it by pumping the internal CV joint of the Chevrolet Niva at the output of the external drive.
You need to check the performance of the part periodically, every 4-5 months of driving on good roads. And every time after driving over rough terrain, dirt roads, potholes, etc.
Replacing the right CV joint on a VAZ 2123: repair manuals (photos and videos)
Caring for front wheel joints
It just so happens that most motorists pay attention to some part of the car after it breaks down. A new CV joint is purchased and replaced, which takes time and considerable money.
In fact, there is no drift to the angular velocity hinges installed in the Niva.
Unlike front-wheel drive VAZ 2110-2114 cars, in the Niva the torque is distributed over 4 wheels. This means that the load on the front wheel drive is half as much as in the same VAZ 2114. And if we theoretically assume that not a drop of abrasive dust and dirt gets inside the hinge mechanisms of the axle shafts, then the service life of the CV joint will be equal to the “life” of the CV joint itself. auto. Of course, this is impossible in real life, and the Niva is designed for off-road driving.
It is quite possible to prolong the life of grenades as much as possible. To do this, you must regularly perform the following activities:
- Conduct a visual inspection of the anthers covering the hinges. When the car is operated on an asphalt road, an inspection should be carried out every 10-15 thousand km. When driving off-road or on embankment and dirt roads, the grenade cases need to be inspected more often, especially after driving in difficult conditions.
- If the slightest damage to the boot is detected, immediately replace it with a new one. This also applies to the clamps that hold the covers in place.
- During replacement, remove old grease from the Niva CV joint along with any dirt that has fallen into it and apply new one. The lubricant used is CV joint-4, its quantity for the outer grenade is 40 cm3, for the inner grenade - 80 cm3.
If you pay attention to these elements, they will easily last 150-200 thousand km
Otherwise, malfunctions may appear within the first hundred thousand km.
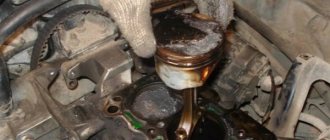
Step-by-step replacement of the internal grenade of a Niva Chevrolet
- Unscrew the 3 nuts securing the bearing housing of the drive's inner CV joint.
- Unscrew the bolt securing the front axle bearing cover to the transverse part of the suspension.
- Unscrew the 4 nuts securing the front axle gearbox mounting bracket.
- Unscrew the nut and remove the fastening of the axle bearing cover to the transverse part of the suspension.
- Using a jack or other device, it is necessary to raise the front axle and secure it in this position.
- Unscrew the hub nut.
- Remove the drive nut and centering sleeve.
- By lifting the lower arm, it is necessary to compress the spring to remove the lower ball joint by unscrewing the 3 bolts from the arm.
- Move the axle aside.
- Unscrew the exhaust pipe from the manifold and the catalyst housing, and then move it closer to the engine. Replacing the boot of the inner CV joint with your own, replacing the stud on the hub of a Gilly Emgrand EC7. Replacing the inner CV joint Niva v video! -. If the left drive is being removed, this operation is not required.
- Move the gearbox back and remove the desired drive from it.
- The axle drive is installed in the reverse order.
Signs and manifestations of malfunction
To carry out timely repairs, you need to pay attention to signs of malfunction. If problems arise with the CV joint, the driver may encounter the following symptoms:
If problems arise with the CV joint, the driver may encounter the following symptoms:
- a characteristic unpleasant, sharp sound appears when turning the steering wheel;
- the sound occurs when reversing;
- slight crunching sound when turning the leading front ears;
- increased crunching and sharp sounds while moving.
The part will need to be completely replaced if shocks occur in the transmission. Slipping also indicates the need for urgent repairs. If the Niva is often used for transportation, how does four-wheel drive work, what maintenance procedure should be found out in advance.
Step-by-step instructions for a quality replacement
If the unit has just begun to signal a problem, then repair work can extend its service life. If it is completely worn out (diagnosis is recommended at a service station), it makes no sense to carry out work to resuscitate the parts or put the mechanism in order - a complete replacement is required.
In most cases, if there is severe wear, the outer CV joint on a Chevrolet Niva is replaced.
It is important to remember that the upcoming process will require time and effort. The car needs to be driven to a special pit to facilitate access to the components and the CV joint itself
- wrenches (set);
- hammer with extension;
- pullers
Experience in plumbing is required if the replacement is carried out in-house.
Replacing the outer CV joint
To change the outer part of the pair in the assembly, you will need to completely remove the axle shaft with the “grenades” installed on it from the car. The sequence of actions in this case is as follows:
- the body needs to be lifted (a car jack is used);
- install a stand to minimize the likelihood of an accident if the jack fails to cope with the task;
- Anti-recoil shoes are installed.
Replacing the internal CV joint of a Niva Chevrolet
All parts of the unit are in constant motion during operation, as a result of which they wear out and fail. Therefore, most car owners are faced with the need to replace a faulty internal CV joint of a Chevrolet Niva with a serviceable one. Below is material for the step-by-step implementation of this work.
- The front of the car must be in an upright position. To ensure safety, it is necessary to place protective devices under it to ensure the immobility of the mechanism.
- At the very beginning you need to remove the wheel and the lower ball joint.
- Next, disconnect the shock absorber and the lower arm on the suspension, from which the spring is removed.
- The fist and hub are not removed, it is slightly hung to the side. To do this, you can adapt a generator belt or something similar.
- Then the cap and bearing nut are removed from the hub.
- The bolt that secures the right suspension bracket is unscrewed.
- At the assembly itself, you need to unscrew the nut and remove the grower, freeing up access to a larger threaded length. Using keys and a hammer, the SR is dismantled, removing it from the hub.
The hinge assembly on a Chevrolet is mounted in the reverse order.
How to remove a CV joint in a field
This method is one of the simplest and fastest ways to replace both anthers or one of them. Also, if necessary, you can replace the lubricant in the CV joints or the external grenade.
Necessary tools: a set of open-end wrenches (including 2 pieces for 13 and 17), pliers with variable pitch or just very large pliers, two flat screwdrivers - medium and thin, a hammer 600-800 g, a good drift from soft metal or a CV joint puller, a large or medium-sized vice (or an assistant), CV joint grease-4, a sufficient amount of wiping material, a plastic bag, a stand for the lower arm of the front suspension. Preferably an inspection hole.
We install the car on the handbrake, you also need to install any rollback wheels under the rear wheels. Loosen the wheel nuts, jack it up, and remove the wheel. We place a reliable support under the lower arm (I use a stack of short boards). We lower the jack, the lever compresses. Unscrew the nuts and remove the three bolts securing the lower ball joint. Unscrew the lower shock absorber mount and push it all the way up:
(R
We knock down the chrome-plated hub cap through a wooden block. We unscrew the hub nut, having first placed a stop (a hammer, for example) under the wheel stud so that the hub does not spin (you can loosen the nut at the very beginning, but removing the cap is not so convenient). We take out the cone washer. Grasping the bottom of the brake disc, pull it towards us and move it to the side, while simultaneously removing the grenade axle from the hub. We place the freed CV joint, as conveniently as possible, on the lower cup.
We go down into the pit. By turning the CV joint by hand, we find a convenient position for grabbing the protrusions of the clamp with pliers:
We squeeze the clamp and use a screwdriver to slightly bend the hook and remove it. We make marks on the grenade body and shaft (with paint or a file - the main thing is not to rub it), so that later we can insert the CV joint in the same way as it was, we remember the position well. We move the freed boot as far as possible from the grenade.
Using your finger, we feel for the wire retaining ring inside the CV joint housing, it is in the groove at the very edge, by touch we find the gap in the ring, and pry it off with a thin screwdriver:
Using the shaft, we pull the CV joint out of the housing:
If you don’t need to change the lubricant, you can immediately put a plastic bag on the CV joint and wrap it around it to prevent the balls from falling out and dirt getting in (the balls are held in place only by the lubricant).
We leave the pit and carefully take out the freed part:
We wash away the dirt. We remove the remaining clamps and cut off the anthers that need to be replaced:
We move the plastic casing and boot of the outer grenade to the inner CV joint. To keep them out of the way, you can wrap them in a bag and secure them. We clamp the shaft in a vice with the outer hinge towards the bottom, remove excess lubricant.
Now we need to knock down or press the inner race assembly with the hinge off the shaft. The radial protrusions shown with a screwdriver are the shaped inner race of the CV joint:
Theory. The inner race of the CV joint is fixed on the shaft with two retaining rings: the outer one (at the very end of the shaft) of circular cross-section; and internal, square section (it is slightly visible in the previous photo between the inner race and the shaft). When knocking down, the holder with a conical groove should compress the outer ring, push it into the groove of the shaft and move further. If the impact energy is insufficient, the ring will open again and the cage will return to its original position.
Option 1. Using a soft metal drift and a hammer, lightly tap the race around the circumference to center the outer ring, then, placing the drift as close to the shaft as possible, knock it down (you can hold it at a slight angle, it’s not scary). The ideal option is for an assistant to pull the hinge shaft downwards. The blow must be strong enough and “long” - using all the inertia of the hammer. 400 g. I managed to knock it down with a hammer only 4 times, although I hit it from all over my shoulder - a heavier hammer would be better. If it doesn’t go astray, the impact force needs to be increased; quantity won’t help.
Option 2. Use a puller. I bought it on the way to the garage, especially for the FAQ, 160 rubles, the price tag said “CV joint puller 2108”. To be honest, I didn’t want to show off the barbaric drift that I had previously used. There were vague concerns about the puller, but as it turned out, it was in vain, I liked working with it, I was so carried away by the new toy that I forgot to take a photo before removal:
Remove the outer ring. Then carefully remove the inner ring from the groove:
Loosen the vice and lightly hit the shaft with a hammer to tighten the ring. The outer groove is narrower, the ring will not get stuck there:
As you can see, the rings and shaft are not damaged:
If a lubricant change is necessary, we wash everything. The outer CV joint can be washed without disassembly, although this takes quite a long time. It can be disassembled; to do this, you need to mark with paint the relative positions of the outer race (housing), the separator and the inner race. Then turn the separator and the inner race until the first ball comes out, remove it, and then remove everything in turn in the same way. Then tilt the separator with the cage at 90 degrees, and, having caught the position, pull it out along with the inner race. Wash, assemble the outer joint and put “CV joint -4” lubricant in 150 and 60 cc sizes into the inner and outer joint housings. respectively.
Lightly lubricate the shaft and put on the boots and cover. We clamp the shaft in a vice and install both locking rings:
We install the hinge on the shaft, and, having felt the splines, lower it until it comes into contact with the outer retaining ring:
Using a hammer, preferably through a spacer made of soft metal, we hit the CV joint shaft and put it in place (do not try to screw the hub or other nuts onto the threads - you will either ruin the nut or the threads). We check the fixation of the hinge in both directions with our hands. I didn’t have a soft spacer, so I hammered it like this, after three fairly strong blows, as we see, nothing happened to the shaft - the metal is hard:
We put the boots in place (the place where the clamps are installed on the shaft corresponds to the deepest groove). We place the clamps in such a way that when moving forward the grass does not cling to them (i.e. on the wool). It takes a lot of effort:
We install the finished product on the car in the reverse order of removal.
All comments and other things can be sent to the Niva 4x4 forum/General technical section/Time to change CV joints.
Auto parts for foreign cars, auto repair
We also disconnect the universal joint fork from the flange of the front axle drive shaft of the transfer case. Remove the front driveshaft. Having disconnected the hinge forks of the rear propeller shaft from the flanges of the rear axle gearbox and the drive shaft of the rear axle of the transfer case, remove the rear propeller shaft. Don’t forget to note its position relative to the flanges of the transfer case and rear axle gearbox.
Install the shafts, aligning the previously applied marks, in the reverse order of removal. The article is missing: Checking the serviceability of the cardan transmission In order to reduce the fuel consumption of the Shnivy Niva Chevrolet how to remove the front cardan, you only need to check the functionality with the PP box in neutral gear.
The car is driven onto an overpass or inspection hole and shoes are placed under the wheels so that the car can move, but does not roll off the overpass. Let's start testing. The inspection is carried out for both types of structures: External inspection. All joints are inspected to see if the bolts are loose, and what condition the boot is in.
Next, both hands grasp the shaft on the side where the connections are checked, and with sharp movements, how to remove the front driveshaft is carried out. If there is a slight backlash, then the design is faulty.
There shouldn't be any play. With sharp movements it is necessary to rotate the shaft around its axis of rotation, while holding the hinge fork-flange with one hand. There should be no circumferential gaps. When does a device need to be replaced?
When the design of the device, so to speak, loses the balancing of the plates, or all parts of the product are replaced, then upon completion it is imperative to re-balance the driveshaft. If, after balancing, the problems with the product malfunction are not eliminated, then the shaft assembly is replaced with all elements.
Balancing the cardan is done either by visiting a service station, where specialists will perform all the related work, or independently, which will save money. But that is another story. Removing and replacing a driveshaft Removing and then replacing a Chevrolet Niva, how to remove the front driveshaft on a Chevrolet Niva up to a year old, is carried out in the following order: The vehicle is installed on an overpass.
At the gearbox, the lever is placed in neutral and the parking brake is in position. Shoes are installed under the wheels for safety. Before removal, it is necessary to make notches on the ends of the flanges, drive axle and transfer case at the joints. This will help return the shaft to its original position without the need for balancing. The nut of the cardan bracket is unscrewed, while supporting the bolt so that it does not rotate.
Replacing the front driveshaft on CV joints on a Chevrolet Niva video
All fastening nuts are unscrewed in the same way. There are four of them on one side.
The nuts are Teflon coated to prevent self-turning. After removal, even if the shaft is not replaced, it is recommended to replace the nuts with new ones. Three fastening bolts are removed from one side, and the fourth is left to fix the product in its original position. We carry out the operations of unscrewing the nuts on the other side of the fastening. The order of unscrewing does not matter.
The last bolt is removed from one side and the cardan is removed, while its parts are reduced to the slot. The product has been removed, it is now being repaired, and if this is not possible, it is being replaced with a new one.
The installation procedure is the reverse of removal. First of all, how to remove the front driveshaft from a Chevrolet Niva car to neutral and the parking brake to position.
A stop is placed under the transfer case, which can be adjusted. The nuts securing the side brackets of the transfer case suspension and the two rear mounting nuts are unscrewed. The box is lowered until it comes off the bracket studs. The cardan is rotated and the nuts securing the shaft to the drive axle flange are unscrewed and removed.
To unscrew the nuts, you will need to install a special blade in the hole between the flange and the CV joint. After this, the CV joint is pressed out with this blade until it moves slightly from the shaft splines and, thus, allows the nuts to be unscrewed.
Removing and installing the Chevrolet Niva driveshaft
Now, using two blades, you need to press the CV joint until the fastening studs come out of the slots in the drive axle flange. The transfer case, which has been removed from the studs, will allow this manipulation to be performed. If you do not remove the transfer case, then the free play of the connection of the splines of both CV joints will be too small.