The Niva family of cars differs from VAZ passenger cars in permanent all-wheel drive - they have two drive axles. In total, the VAZ SUV has three differentials in its transmission - one for each axle and another center differential.
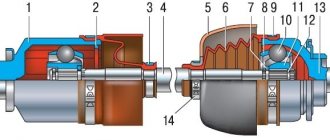
1. Oil seal; 2. Thrust ring of the front bearing of the drive shaft; 3. Front bearing cover; 4. Front drive shaft bearing; 5. Transfer case front cover; 6. High gear; 7. Gear clutch hub; 8. Gear clutch; 9. Low gear; 10. Transfer case housing; 11. Rear drive shaft bearing; 12. Drive shaft; 13. Transfer case rear cover; 14. Intermediate shaft; 15. Rear intermediate shaft bearing; 16. Rear differential housing bearing; 17. Installation ring of the rear axle drive shaft bearing; 18. Rear axle drive shaft bearing; 19. Oil seal deflector; 20. Rear axle drive shaft flange; 21. Rear axle drive shaft; 22. Bearing thrust ring; 23. Differential housing; 24. Rear axle drive gear; 25. Satellite; 26. Axle of satellites; 27. Retaining ring of the satellite axis; 28. Spring washer; 29. Driven gear; 30. Differential housing bearing retaining ring; 31. Differential locking clutch; 32. Front axle drive shaft; 33. Front axle drive housing; 34. Retaining ring of the front axle drive shaft bearing; 35. Differential bearing spring washer; 36. Front differential housing bearing; 37. Driven gear of the speedometer drive; 38. Speedometer drive housing; 39. Front intermediate shaft bearing; 40. Gearbox; 41. Elastic coupling; 42. Constant velocity joint; 43. Transfer case; 44. Shims; 45. Transfer case suspension bracket; 46. Rear engine mount bracket.
I. High gear engaged; II. Low gear engaged; III. Low gear is engaged, differential is locked.
The Niva transfer case is designed to distribute traction forces between axles, and operates on the principle of a 2-speed gearbox.
The device of the VAZ Niva transfer case
The transfer case is not present in all VAZ passenger cars, but only on cars with two drive axles. In the transmission, the transfer case (TC) is installed at the rear of the gearbox; a rear driveshaft is attached to its shank, which connects the transfer case to the rear axle. The front axle is also driven by the steering wheel; it is connected to the transfer case by a front driveshaft.
The reduction gear in the Republic of Kazakhstan is designed to obtain high torque, it is used to overcome difficult sections of the road, and helps to cope with off-road conditions. The VAZ Niva transfer case contains the following main parts:
- the body itself;
- front axle drive shaft;
- intermediate shaft;
- drive shaft;
- gears;
- bearings;
- differential housing;
- satellites;
- differential lock clutch;
- gear shift clutch;
- flanges (for connection to cardan shafts);
- oil seals;
- control levers.
Idle move
The Chevrolet Niva idle speed sensor ensures the supply of air to the engine during idling. When a signal is received by the ECU, the sensor moves the valve, changing the flow hole in the air valve. If it fails, it will not be possible to repair it, since it has a non-demountable design.
To replace it, you need to prepare a thirteen socket wrench, pliers and a Phillips screwdriver and do the following:
- Unscrew the mounting bolts and remove the housing from the throttle valve
- Disconnect the wiring connector of the engine regulator
- Unscrew a couple of screws on the throttle body
- Removing the regulator
- Remove the O-ring from the existing hole.
To summarize, we can conclude that the failure of any of the above elements can seriously affect the operation of the car, therefore, in the event of a malfunction, you need to replace a new part as soon as possible. All replacement work can be carried out independently.
The transfer case is used to change the amount of torque and distribute it between the front and rear axles. The box has two gears with ratios of 1.20 and 2.135. The front and rear axles are constantly driven and connected by a center differential, dividing the torque equally. To increase the vehicle's cross-country ability, the differential can be blocked, and the front and rear drive shafts become rigidly connected to each other (their rotation speeds are equal).
The transfer case is attached to the body floor on three brackets - rubber-metal supports. The transfer case housing parts are cast from aluminum alloy and connected to each other with studs and nuts. There is a hatch in the upper part of the crankcase, closed with a stamped steel cover. The front cover is centered on the crankcase using two locating pins.
There are cardboard gaskets between the covers and the crankcase (during repairs, a sealant gasket can be used instead). All shafts are sealed with rubber-metal seals (oil seals). The speed sensor drive shaft, gear shift fork rods and differential locks are sealed with rubber rings. There are two holes in the front cover - a filler hole (also known as a control hole) and a drain hole.
Transfer case with drive: 1 — differential lock clutch fork; 2 — differential lock fork rod; 3 — protective cover of the rod; 4 — lock washer; 5 — bushing of the lever axis; 6 — lever axis; 7 — differential lock lever; 8 — fork locking bolt; 9 — switch for the differential lock warning lamp;
10 — gear shift fork rod; 11 — differential lock lever rod; 12 — control lever bracket fork; 13 — control lever; 14 — gear clutch fork; 15 — spacer sleeve; 16 — spring and locking ball; 17 — clamp spring bushing; 18 — drive shaft flange;
https://www.youtube.com/watch?v=ytadvertiseru
19 — front cover; 20 — drive shaft oil seal; 21 — thrust ring of the bearing; 22 — front bearing of the drive shaft; 23 — high gear; 24 — gear clutch; 25 — transfer case housing; 26 — low gear; 27 — rear bearing of the drive shaft; 28 — adjusting ring of the rear bearing of the drive shaft;
29 — drive shaft; 30 - bushing; 31 — hub; 32 — back cover; 33 — rear bearing of the intermediate shaft; 34 — intermediate shaft; 35 — rear differential bearing; 36 — rear axle drive shaft bearing; 37 - flange; 38 — rear axle drive shaft oil seal; 39 — rear differential housing;
40 — gear support washer; 41 — rear axle drive gear; 42 — satellite axis; 43 — retaining ring; 44 — spring washer; 45 — side suspension bracket; 46 — satellite thrust washer; 47 — front axle drive housing; 48 — satellite; 49 — differential driven gear; 50 — front differential housing;
51 — retaining ring; 52 — spring washer; 53 — front bearing of the differential housing; 54 — differential lock clutch; 55 — installation ring of the front differential bearing; 56 — oil deflector; 57 — front axle drive shaft oil seal; 58 — front axle drive shaft bearing;
The drive shaft is mounted on two ball bearings, the outer rings of which are located in the sockets of the front cover and crankcase. The front bearing inner race is sandwiched between the shaft shoulder and the thrust ring by a self-locking shaft flange nut. The rear bearing inner race is sandwiched between the shaft shoulder and a thrust washer located under the shaft rear end nut.
Also interesting: Dimensions of the Chevrolet Niva. Chevrolet Niva dimensions, dimensions, volumes, Chevrolet NIVA 4x4 ground clearance, trunk
The nut is locked by pressing its edge into the grooves on the shaft. The drive shaft is secured against axial displacement by an adjusting ring in a groove on the outer ring of the rear bearing, sandwiched between the crankcase and the rear cover. There are two drive gears on the drive shaft. The front (large) is the highest gear; it rotates freely on a heat-treated shaft journal.
Rear (smaller) - lowest gear, rotates freely on a heat-treated bushing mounted on the shaft with tension. The gears have two crowns. The helical (large) rings are in constant mesh with the corresponding gears of the intermediate shaft, and the gear shift clutch is connected to the spur (small) rings when the gear is engaged.
View of the front side of the transfer case: 1 - right suspension bracket; 2 - filler plug; 3 - intermediate shaft; 4 — speed sensor; 5 — speed sensor drive housing; 6 — front driveshaft; 7 — front axle drive housing cover; 8 — left suspension bracket; 9 — rear propeller shaft; 10 — front cover of the transfer case; 11 — transfer case housing; 12 — drain plug.
Transfer case Niva 21213
Model VAZ-21213 is an all-terrain passenger car with permanent all-wheel drive and differential lock. Brand 21213 is a restyled version of the first VAZ SUV, VAZ-2121. RK Niva 21213 has three gears:
- the first - with a gear ratio of 1.2;
- the second, lowered – with the number 2.135;
- neutral
21213 is equipped with 4-speed and 5-speed gearboxes, and when the first speed of the transfer case is turned on, the car operates in standard mode, the gear ratios in the transmission are from 5-speed. The checkpoints are as follows:
When you turn on the second position of the transfer case lever (reverse position), the gear ratios change (lower):
On ordinary roads, the transfer case is always in first gear, the transfer case control lever (reduction gear) is pushed forward. The neutral gear of the RK disconnects the transmission, and in this position the car does not drive; there is also a neutral in the gearbox.
Motorists often ask the question: why is neutral gear needed in a transfer case? The neutral is used when connecting additional units to the transmission, for example, a mechanical winch; in this case, a power take-off must also be installed.
Promval Niva Chevrolet, theory
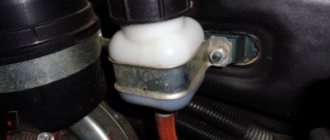
As a rule, when transmission vibrations occur in fields and shnivy, everyone rushes to look at the cardan shafts. There is, of course, some truth in this, except for one remark. In the theory of machines and mechanisms, there is a recommendation: start looking for the cause of vibration either directly from the source of rotation (that is, the engine itself) or from bodies of rotation that have a high angular velocity. Let's go down the chain. The first is the flywheel with clutch. Nothing can happen to it after capitalization or installation, except that when replacing the crankshaft cuff, it could be put in a different position. Next comes the clutch disc, clutch basket, gearbox, centering rubber-metal bushing and finally the Chevrolet Niva flush. The clutch kit consists of metal rotating parts, and, if the manufacturer is of a good level, as a rule it does not produce vibrations. But the hero of this article contains ball joints, a rubber coupling and a spline connection. When the slightest play occurs, vibrations have room to roam. In the vast majority of cases, the rubber coupling is to blame. Yes, it is sold separately, BUT the assembly requires balancing after assembly. There's a dead end here. Even in my native St. Petersburg, there are no companies where this can be done in good quality. The best option is to take a new assembly.
Malfunctions of VAZ transfer cases
The transfer case on the Niva is a fairly reliable unit; problems with repairs in the mechanism itself arise mainly due to insufficient oil level in the valve - if for some reason the oil leaks out, intensive wear of all parts occurs. Among the frequently occurring malfunctions are:
- vibration in the body at various speeds when the car is moving;
- vibration when the vehicle starts moving;
- noise in the transfer case when the car is slipping or turning;
- difficult upshift or downshift, difficult engagement of the lock.
Device and purpose
The unit consists of the following parts:
In early Niva models, an intermediate shaft with a rigid connection in the form of a cross was installed. However, in recent years, manufacturers have been installing CV shafts on CV joints. Both types of parts are available in stores. Therefore, it will be useful for the owner of a Chevrolet Niva to know the difference between the shafts on the crosspiece and the CV joint.
In the intermediate shafts on the constant velocity joint, the rigid type connections are replaced with a movable connection. This reduces vibration, slows down wear of parts and ensures smooth acceleration when starting from a standstill. The design of the intermediate shaft on CV joints has the following advantages:
- low shock loads on the transfer case and gearbox;
- reduced fuel consumption (by 1-1.5 l/100 km);
- reduced noise in the cabin;
- increased service life;
- maintaining torque even with large deviations;
- Availability of sealed protection against dust and water;
- lower percentage of power loss when transmitting torque;
- increased service life of the part (according to manufacturers);
- simplified shaft installation.
The advantage of a shaft with a cardan is its high strength and reliability. It is capable of transmitting great forces, so for off-road use and other harsh operating conditions it is worth installing a universal joint shaft.
In this case, slight discomfort from vibration is the price to pay for reliability. The factory part number is GM 212302202092000. However, stores offer analogues with different markings from different manufacturers.
The price depends on the design and brand. A shaft with a cardan costs from 2500 rubles, with a CV joint - from 4500 rubles.
Vibration
Vibration in the body is the main “disease” of the Niva; it often occurs due to improper alignment of the transfer case. Most often, vibration occurs on VAZ 21213/21214 cars, since the transfer case is mounted only on two supports on the sides of the body; on the Chevrolet Niva, the transfer case is already installed on three supports. But before you start adjusting the position of the transfer case, you should check the condition of other parts of the chassis - vibration can occur for other reasons:
- driveshafts are poorly secured;
- wheels are not balanced;
- there is play in the cardan crosspieces (vibration is especially affected by play in the rear driveshaft crosspieces);
- The vibration comes from the engine itself.
Vibration when starting off on a Niva can also occur for the following reasons:
- the mounting supports of the transfer case have become loose;
- The rubber on the RK supports themselves broke.
Lada 4×4 3D Owlet › Logbook › Flush shaft, elastic coupling, vibration (part 1)
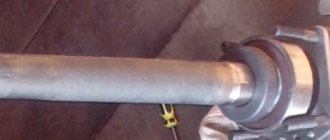
The shaft shaft (or as it is correctly called “intermediate cardan shaft” 21213-2202010) is a legendary Niva part that causes problems for most nivavods. So this trouble befell me. In the spring of 2021, with a mileage of about 46 thousand km, vibration began to bother me at speeds of 80 km/h. Or rather, not so much a vibration as an incomprehensible rattling
from under the dashboard in the glove compartment area (only recently I discovered that this is
created by the passenger seat adjustment bracket
). I crawled under the car: the coupling was all cracked, in one place it was almost completely torn. The shaft was original with a “round” coupling 2101; there were (balancing?) plates on two of its fastening bolts. There were no spacers under the transfer case, and it stood a little diagonally (judging by the marks on the anticorrosive, it looks like it was centered). The CV joint had a slight play, so it was decided to change the shaft assembly (in the hope that it was balanced at the factory). I bought it, it seems, from a trusted online auto store, “original AvtoVAZ.” It immediately aroused my suspicions: no packaging, no balancing plates or grooves, the donut is crooked, the rubber is clumsy, it looks like plastic. But the seller assured that this was the original. There was no choice.
It was before the May weekend, which I wanted to spend at the dacha. And since there is no hole, I decided to go to the service center at the car dealership in the regional center. It seems that the price of the work is adequate, and in the region, craftsmen deal with Nivas more often and know the nuances... yeah, right... The master tinkered around for four hours, removing the cardan shafts and transfer case. And then, without centering, I put it in the same place, following the marks on the anticorrosion. The price of the work is 3000 rubles. Upon departure, I discovered that the vibration and rattling had gone away, but some new rattling sound had appeared (as if a washer was rotating somewhere on a shaft). I went to take a look: I didn’t find anything, I just washed the shaft spinning a little tighter (apparently, the CV boot was limiting the bending, or maybe the CV joint itself was tight...). Then the chirping disappeared. I went to Moscow, went to work for a week, and went to the dacha on Friday evening. I drove 10 kilometers from the city, smoothly accelerating after the traffic lights... At a speed of 70 km/h I heard a loud rubber “thump” on the bottom. At the same time, the behavior of the car did not change until I accelerated to 80. Then the transfer case began to shake so much back and forth that it seemed to have come off completely. I reached the wide shoulder, from 40 km/h. and below there is also a wild vibration: the car rattles like a bucket of bolts. I changed into work clothes and crawled under the car with a flashlight (at that time I didn’t know that you could inspect the washout from the interior by removing the tunnel panel and the lever boots
). Amazing: the donut fragment is completely missing, now it’s like the letter “s”... I’m sitting in the car, it’s 10:00 p.m., it’s getting dark... Should I go back or forward (more than 250 kilometers)? It’s decided: forward and only forward! I googled 24-hour auto stores and services along the way: yes, not a lot. I drove steadily in the speed range of 42-78 km/h. I stopped at a convenience store at the crossroads in Lukhovitsy, not particularly hoping for success. “Is there a flush clutch on the VAZ 21214?” and the sleepy guy: “Uh... What shaft?” He showed with his fingers what it is and what it looks like. About 10 minutes later I brought a “square” bagel 2123 from Balakovo for 700 rubles. At that time I was not yet interested in bagels and did not know about their properties and interchangeability, but based on the size I realized that it would be suitable. It looks high-quality and elastic, but expensive (but then I looked: the price is even lower than in Moscow).
Having perked up, I drove on... and got there! That was the first time I became convinced that Niva would always take you there, no matter how bad she was! I called that service and outlined the result of their work, which took a week and 500 kilometers. The next day , before driving, it somehow occurred to me to loosen the nuts securing the transfer case supports and drive a little
.
And this helped to drive quite comfortably, there were even practically no vibrations. Why didn’t I do that on the track?! In general, again four hours of poking around, the surprised face of the receptionist: “How did you even drive so many kilometers?!” I was ready to shell out three again, because the spare part was mine. But then I was surprised when the receptionist said that it’s a mistake, they work for free, they wouldn’t even take money for the coupling. I thought why I gave my own, but they would have installed the “round” one again and who knows what quality, but this one looks more reliable. I only paid 700 rubles for the alignment of the transfer case. In general, of course, respect to the service that they themselves recognized the warranty case, despite the fact that this was most likely a defective part. But I’ll try not to go to this service again... I didn’t notice any difference in vibrations with clutch 2101 and 2123.
Source
Transfer case alignment
Correct installation of the transfer case can be done in several ways. Most often in auto repair shops, repairmen use the following method:
- hang the car on a lift;
- loosen the transfer case;
- start the engine;
- engage the gear and accelerate the car according to the speedometer to the speed at which vibration occurs (often it occurs at speeds from 40 to 80 km/h);
- without using the brakes, reduce the engine speed, then turn off the ignition.
To come in
Already registered? Sign in here.
There are currently 0 users on the page
There are no users viewing this page.
The transfer case of the Niva car and some other SUVs is designed to distribute the torque of the wheels both between the axles and between different wheels of the same axle. This is done in order to increase cross-country ability on particularly difficult sections of the route. In the language of specialists, this device is called a “demultiplier.”
Eliminate vibration with additional fasteners
Installing the third support of the transfer case on VAZ 21213/21214 vehicles allows you to reduce the level of vibration of the transfer case; with this support it is easier to center the transfer case. The part can be purchased at auto stores or made yourself. The finished product comes with three long studs (for model 2121); to install the third support on this machine, you will need to unscrew the short studs from the transfer case housing and install new studs from the kit. We carry out repairs as follows:
- dismantle the front passenger seat in the cabin;
- remove the floor tunnel lining;
- in the cabin we move aside the carpet covering the body amplifier (in front of the handbrake lever);
- remove the transfer case (alternatively, you can simply hang it up, but removing the third support makes it easier to install);
- We attach the bracket of the new support to the body of the RC;
- we install the transfer case in place, center it in the optimal position, and fasten the side supports;
- we combine the third support with the body, drill two holes in the bottom;
- Using washers, bolts and nuts (from the kit) we attach the support to the bottom of the body.
Vibration is eliminated more effectively by installing a subframe under the transfer case. You can also make such a device yourself or buy a finished product at a car store.
In order to install the subframe, the transfer case must be removed. It is more convenient to carry out such work in a pit; we carry out repairs as follows:
- leave the car in neutral gear;
- disconnect the propeller shaft from the transfer case, it is advisable to mark the driveshaft flange and the drive shaft so that during installation, align the driveshaft according to the marks - this way, the occurrence of unnecessary vibrations is eliminated;
- dismantle the muffler mounting bracket;
- remove the gearbox traverse;
- jack up the transfer case, remove the side fastenings of the transfer case;
- We treat the places where the subframe fits to the body with Movil;
- place the subframe on the gearbox studs;
- we mark the attachment points of the subframe on the side members, drill holes, attach bolts to the body;
- we tighten all fastenings, except for the transfer case supports themselves;
- we perform alignment of the steering wheel;
- Finally tighten the transfer case supports.
It should be noted that installing an additional support or subframe on the steering wheel does not always lead to the desired effect; in some cases, vibration only increases.
replacing the intermediate shaft — Lada 4×4 3D, 1.7 l., 1995 on DRIVE2
In view of the crisis and the endless breakdowns of the Niva, I decided that it was time to master independent repairs to the maximum. Fortunately, for this there is a garage with a pit, tools, books, internet, hands and head. And skills will come with experience. This is not exactly a budget car for its age, and besides, tuning finishes off the already tired hardware. So that's what I'm talking about - vibrations began to be felt while driving, I examined the washout and noticed cracks on the coupling. I decided to replace the shaft assembly with a CV joint shaft with a coupling from a Chevy Niva. According to the book, everything is easy and clear - we remove the cardan shafts, the speedometer cable, remove the cover of the central tunnel in the cabin, remove the light bulb from the transfer case, the balls of the levers, unscrew the bolts securing the clutch to the gearbox flange and remove the transfer case with the exhaust shaft assembly. At first I was shocked by how complicated everything is in reality). The bolts securing the clutch to the gearbox can only be unscrewed at a certain angle, since the gearbox cross-arm, tunnel walls, etc. are in the way. The hanging front driveshaft and the corners of the protection mounts tend to hit you in the head at the slightest movement. It was necessary to remove it completely, but it became broken, but in vain. Okay, I unscrewed it. I begin to pull off the light bulb connector chips, and one of them comes off the copper pin. To hell with it. Then I begin to move the transfer case, it reluctantly crawls out of the cabin with levers into my hands, and then I realize that it doesn’t weigh at all like a feather) I barely pulled it out of the hole onto the table, and began to turn the wash shaft away from it. Of course, 3 out of 4 studs turn together with the nuts, you have to take a grinder and cut them off. I install a new flush shaft and drag the transfer case back into the pit. With agony and curses, I lift the transfer case, resting my back, somehow push it into the tunnel with levers and, after the 10th attempt, put it on the heels. Then, also hard, with the help of a third hand and such and such a mother, I tighten the nuts, while holding the transfer case in weight. I screw it to the gearbox flange and put everything back together. Tired, I decide to make a test drive. I understand that at the end of 2nd and beginning of 3rd gear there is a wild vibration. Aligning the transfer case doesn't help. I remember the video that it may be necessary to compensate for shaft runout by installing washers between the gearbox flange and the elastic coupling. I climb into the hole again, everything is much simpler and faster, I begin to place washers one by one under the petals of the gearbox flange. on the latter it helps, however, I had to change the thickness of the washers several times to eliminate vibration as much as possible. As a result, it was not possible to completely overcome the vibration, but it became much better. The result is money saved, experience gained and one less dark spot on the car. The repair time for a familiar unit compared to an unfamiliar one is reduced by 1.5 - 2 times) It also becomes obvious that good health and physical endurance are your best friends in this matter.
Price: 3,200 ₽ Mileage: 119,000 km
Removing the Niva transfer case
To repair the transfer case on a VAZ 21213 (21214), the unit must first be removed. We carry out removal in the following order:
- in the cabin we dismantle the plastic lining of the gearbox and gearbox levers;
- unscrew the knobs of the transfer case shift levers, remove the casing under them;
- disconnect the speedometer cable, for RK 21214 you will need to additionally disconnect the speed sensor;
- we unscrew the bolts with nuts securing the elastic coupling of the front and rear propeller shafts; in order to remove the bolts, the cardan shafts must be turned - they are removed one at a time in one specific position of the shaft;
- We install a jack (or other support) under the transfer case and mark the places where the side supports of the RC were attached. This is done in order to minimize the alignment of the transfer case during installation;
- unscrew the 4 nuts securing the gearbox to the gearbox;
- unscrew the 4 fastenings of the RC supports to the car body;
- Now all that remains is to dismantle the transfer case.
Flush hole between the gearbox and transfer case — Lada 4×4 3D, 1.7 l., 1996 on DRIVE2
At first, when I just bought the Niva and looked at the design of the shaft between the gearbox and the transfer case, I was very surprised by the design. Especially to the point that the transfer case needs to be aligned relative to the gearbox using adjusting plates and... in general, this is unrealistic! Still not understanding why the designers made such a mistake
promval 21213
and not like the same GAZ-69 and etc. of the crosspiece-crosspiece type and a movable spline connection
GAZ-69 flume
And so the idea of a CV joint-CV joint was born.
But everything would have remained in my head, because in Saratov I didn’t find a person who could cut slots... if not for one person from Nivoforum www.niva4x4.ru with the nickname Pavlukha
, who made a couple of rollers for testing, putting one on himself, and I bought the second from him.
And this roller lay idle with me from May to August. I decided to combine the replacement of the transfer case with the installation of an exhaust valve.
I gave it to a turner at work at Zmey089 to machine the axle/transfer case flange for the gearbox seal. And making the washer. There was no good steel, there was only a nail, so they made a puck for me from a checkpoint helicopter. The thickness of the washer is 5 mm.
First, I assembled one end of the roller. I pressed the CV joint on the side of the retaining ring, added grease, hammered in the plastic plug and put on the boot. And I calculated which side the moving part would be on. My moving part is on the gearbox side, where the distance from the CV joint to the nut is greater.
"BEFORE"
I removed the transfer case and removed the helicopter from the gearbox. At the gearbox, I measured how much the nut can be screwed on, cut off the nut, since its end does not play any role, and the stroke of the shaft is limited
I installed a ground flange with a washer and tightened the nut onto the threaded fastener. Using a grinder, I cut off the end of the gearbox shaft flush with the nut. That's it, now there is no return, you won't be able to install the flush!
THERE IS NO ROAD BACK!
Then I put the RK in the same place along the footprint of the pillows and measured the distance between the flanges. I cut off the excess end of the roller and installed the roller without the second CV joint to make sure that the distance was enough. So I removed and installed the roller 3 times. I trimmed it a little and put it back on. When the distance became ideal, I put on the boot and the second CV joint and applied lubricant. The plastic CV joint plug is not needed here.
He unscrewed the transfer case, hung it on a stand and moved it back so that the roller could fit through freely. The connection of the gearbox flange with the CV joint was sealed with sealant. I lifted the transfer case and screwed its supports to the body.
AFTER
Promval CV joint-CV joint
I did not replace the studs on one side of the CV joint with bolts to make installation easier; I decided that it would be more reliable with studs and self-locking nuts. I screwed the cardan shafts... you can go!
The promval was tested for 1,300 km, sometimes carrying sawn wood under harsh loaded conditions. Everything is great, but there are a number of disadvantages
:. — First, previously the strong rocking of the RK held the sway, but now the sway has given complete freedom to the RK and she hangs freely on two pillows. You definitely need to install a third support! — Secondly, immediately after installation, there was strong vibration during dynamic acceleration or heavy load. Gradually the vibration went away. The new CV joints were to blame for everything; they worked very hard to turn.
Pros:
— There is no need to set the RK. — You can tilt the steering wheel back, thereby unloading the crosspiece of the rear cardan, that’s actually what I did. — At speed 90 there is no more vibration, and at any other speed there is no more. — The car also has a better “feel”; it feels like there is a tight connection in the transmission with the engine. For three days I couldn’t get used to it, I stalled at traffic lights and it was hard to start uphill at first.
In time I went to change all this. But what happened to the native industrial site
Native industrial site
A little more and the coupling would have completely torn apart, and then I would have simply stood in the middle of the road.
To purchase shafts, please contact pavlov-7777
Transfer case purpose
The key purpose of the unit is to distribute the moment of force of the internal combustion engine to the wheel axles. Simply put, the multiplier directs the required force to each axis during movement. This is expressed as follows:
- Niva 2121 transfer case simplifies movement on off-road and unstable soils;
- blocks the center differential;
- disabling one of the vehicle's axles;
- increasing the torque of the driving pair of wheels;
- installation of power take-off for additional equipment.
Elements of transfer case 2121
The multiplier is installed only on VAZ models with 2 drive axles. Located behind the gearbox. A driveshaft is mounted on the transfer case itself. Basic elements that are present in all models of Soviet-made demultiplicators:
- frame;
- intermediate and drive shafts;
- set of bearings and gears;
- satellites;
- drive shafts of the front and rear axles;
- oil seals, flanges, couplings;
- differential;
- control and control levers.
The connection between the unit and the gearbox is rigid, which is carried out through a coupling and a shaft. The transfer case of the VAZ 21214 model differs from the classic one only in the presence of a speed sensor drive.
Chevy Niva blower shaft malfunctions
The parts of the shaft gradually wear out under the influence of load, temperature and chemical exposure. The last two factors concern the rubber coupling and boot. These problems manifest themselves as follows:
To troubleshoot problems, it is necessary to check and tighten threaded connections, replace the boot, balance the shaft or replace individual parts. Most of the listed operations require dismantling the industrial shaft. If repair is impossible, all that remains is to replace the assembly part.
Main problems with the range multiplier
Most transfer case breakdowns are purely mechanical in nature (for example, a cut shaft between the gearbox and the transfer case). This is provoked by inattention to fuel and lubricant levels, wear of rubber bands, incorrect location (alignment) of the unit, and the condition of adjacent components. The first indicator of problems with the transfer case is characteristic noise and vibration in the body.
Other signs of transfer case breakdowns:
- problematic engagement of the front axle;
- overheating of the range multiplier;
- leakage or excessive consumption of oil during operation of the transfer case;
- self-switching of the front axle.
Repairing the transfer case in Niva 21213 with your own hands is quite possible in case of minor breakdowns. The owner will only need the basic skills of a car mechanic. It is more difficult to properly install and center the transfer case. Here it is still recommended to contact a car service. A diagram of the unit itself is presented in the vehicle documentation.
Dismantling the Niva 2121 range multiplier
It is necessary to remove the unit not only in cases of its breakdown. Sometimes it is dismantled to gain access to other nodes. To remove the box, you will need the usual set of tools. The sequence of how to remove the transfer case on a Niva 2121 is as follows:
- Raise the car on a lift or drive it onto an overpass (inspection hole).
- In the cabin, remove the decorative tunnel between the front seats, unscrew the fasteners, lift the cover and disconnect the wires of the differential unit lamp.
- Disconnect the speedometer drive cable from the transfer case.
- Disconnect the rear and front universal joints.
- Disconnect the soft clutch from the gearbox flange (unscrew the first set of mounting bolts, turn the clutch and unscrew the remaining ones).
- Compress the coupling with a clamp and remove the bolts.
- Place the adjustable support under the transfer case and unscrew the fasteners.
- Lower the transfer case onto the support.
Removal and replacement process
The work is carried out using an inspection pit, overpass or lift. To replace the washer you will need the following tool:
You will also need to stock up on the following items:
To remove the intermediate shaft, you must:
Important: you have to knock it out using a beard and a hammer.
In most cases, the leak can be repaired. You can replace the boot or joint, flexible coupling or spline seal. After this, you need to install the intermediate shaft in place. Don't forget to install new self-locking nuts. These parts cannot be reused - they may come loose due to vibration.