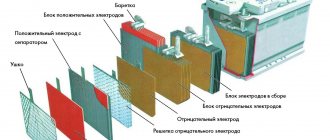
The Servy service center guarantees professional and high-quality repairs of all models of garden sprayers and sprayers with gasoline and battery engines of a large number src=»https://servys.ru/upload/medialibrary/banner_product/opryskivateli.jpg» class=»aligncenter» width=» 414″ height=”321″[/img] You all remember how your beloved mother or grandmother stood at her summer cottage with a container completely filled with some incomprehensible “chemical liquid” and splashed it on various plants in order to prevent them from eaten by parasites. Such hand sprayers are already outdated. Although they are very compact, they are poorly suited even for small garden plots, not to mention the processing of large gardening areas, vegetable gardens and farms, and greenhouses. Therefore, in the 21st century, gardeners most often opt for motorized sprayers, gas-powered sprayers, battery-powered sprayers and atomizers, and now they are more often called the usual “sprayer or atomizer”; the prefix “moto” or “benzo” is simply omitted. A sprayer is a device that can save a gardener a lot of effort and time on fertilizing, protecting, and watering plants. This is why it is so difficult for many homestead owners to accept the fact that their permanent assistant is out of order, because he was entrusted with so many important functions. But modern repairs are a procedure that qualified service workers are ready to perform for you. Servy service center services and repairs sprayers and sprayers
brands such as*:
Brands of sprayers and atomizers accepted for repair
AL-KO Solo by Al-ko Stiga Bosch Champion Makita Echo Efco Oleo-mac Mac Ryobi Hitachi Huter Husqvarna Gardena MTD Wolf-Garten Patriot Stihl
Our service center Servy repairs such gasoline and battery-powered, battery-powered sprayers and sprayers such as: –BLACK+DECKER, Greenworks, Elmos, Einhell, Metabo, Monferme, Worx, Skil
and others.
Cost of repair of sprayers and nozzles*
Service specialists can carry out inexpensive diagnostics of the device, and if irregularities in its operation are identified, they can carry out professional repairs of a gasoline or battery-powered sprayer (sprayer), which will be performed at the highest level. Do not neglect preventive diagnostics and repair work. Do not forget that the correct and reliable operation of any tool is the key to your safety. The final cost (price) of the necessary repair of a gasoline or battery-powered sprayer (atomizer) largely depends on the manufacturer’s price list for spare parts and is agreed upon with the customer by telephone after a fault diagnosis has been carried out by a technician.
The cost of repairing sprayers and nozzles is from 500 rubles.
| Name of work on repair of gasoline sprayers (sprayers) | Cost of services, rub.* |
| Carburetor adjustment | 1900-2300 rub. |
| Starter replacement | 1100 rub. |
| Starter repair | 900-1300 rub. |
| Replacing the spark plug | 100 rub. |
| Replacing the carburetor | 1700 rub. |
| Replacing the ignition coil | 900 rub. |
| Ignition adjustment | 1100 rub. |
| Replacing the throttle control cable | 1300 rub. |
| Adjusting the throttle cable | 500 rub. |
| Replacing the air filter | 100 rub. |
| Comprehensive maintenance (works) | from 1900 rub. (from model) |
| Name of work on repair of battery sprayers (sprayers) | Cost of services, rub.* |
| Replacing the power cable | 1100 rub. |
| Replacing the power button | 900 rub. |
| Replacing the drive belt | 900 rub. |
| Replacing the drive control cable | 1300 rub. |
| Adjusting the ride control cable | 500 rub. |
| Comprehensive maintenance (works) | from 1100 rub. (from model) |
Preparing to grind in the sprayer
A). Checking injectors Read more: Main injector malfunctions
6.4.6 Preparation for grinding in the sprayer
The grinding operation has to be carried out during each scheduled inspection of injectors, and even more so in the presence of failures. The techniques used and the duration of operations depend on the condition of the compaction zone. In any case, the nozzle is disassembled, the parts are cleaned, washed with clean diesel fuel, and dried with compressed air.
If there are varnish deposits on the needle, they must first be removed with appropriate preparations such as “Sicloe”. Before starting grinding operations, it is necessary to find out the condition and location of the sealing band on the needle. To do this, apply 3-4 drops of lapping paste to the needle cone in a place slightly above the seat end area with a finely sharpened match or needle (Fig. 6.4.8). Insert the needle into the sprayer body and with light rotational movements (without impacts or strong pressure) rub the needle for 15-30 seconds. Remove the needle and remove the lapping paste from the needle cone and seat. Dilute the lapping paste in oil and apply 3-4 drops again, but closer to the area of the intended belt and rub the needle with light pressure for 5-10 seconds. Clean the needle and seats again and begin inspection with a more detailed determination of the condition and location of the belt. Before you begin grinding, you need to understand and follow a few basic rules:
· The Sulzer company recommends using carborundum pastes with a grain size of at least 500 (this is at the level of grades 3A, 4A of the “Very fine” class). This condition is met by the domestic paste of the State Optical Institute (GOI) of light green color (thin).
· Avoid getting paste on the cylindrical guide part of the needle and the hole when inserting the needle into the body and back, as well as when cleaning the seat; The presence of paste there during grinding will lead to an increase in the gap and the need to reject the sprayer. When cleaning the saddle, follow the manufacturer's instructions given in the instructions (use wooden sticks with a tightly covered cloth, etc.).
· During the grinding process, do not apply strong pressure or impacts, which will lead to scratching and damage to the surfaces by abrasives. The necessary lapping effect with the removal of fractions of micrometers occurs due to the oxidation of the surface by the oleic acid contained in the paste. Fine abrasives easily remove oxidized layers even with light impact without damaging clean surfaces, which then oxidize again. (This process is called corrosion-mechanical wear and is similar in form to the behavior of self-polishing paints that cover the underwater part of the hull. Under the influence of water jets, thin layers of paint are separated along with adherent microorganisms, ensuring that the outer skin is always clean and smooth).
· Always apply the paste below the formed seal band, thereby creating increased wear of the underlying surfaces, creating an opening of the gap to the bottom and moving the contact zone upward to the base of the cone. As grinding progresses, the paste rises upward and is distributed over an increasing area, its density and aggressiveness decrease, and the abrasive particles are crushed (Fig. 6.4.9). Therefore, the higher the layers are, the lower the wear rate, which ensures the preservation of the wedge gap.
· Apply the paste in small doses each time, thereby preventing fresh (aggressive) paste from getting on the belt being formed and the overlying surfaces. The necessary aggressiveness in the grinding zone is ensured by frequent changes of paste and removal of the used one (15-30 seconds each).
· Do not allow the duration of work on one portion of paste to increase to 3-5 minutes (as indicated in some recommendations). After heating for a long time, the paste dries out, loses its aggressiveness and only scratches rather than polishes the surface. The wear rate decreases and the quality of surfaces deteriorates. For the same reason, you should not use old, dried-out paste. Even if you dilute it with oil, the aggressiveness cannot be restored.
The above rules should be followed in all operations using lapping pastes to avoid mistakes that lead to wasted time and damage to surfaces.
Rice. 6.4.8 Fig. 6.4.9
6.4.7 Lapping the needle and seat
After identifying the condition of the locking belt, several options for further actions are possible.
Option 1.
The sealing band occupies the correct position at the transition of the cone to the cylindrical part, but its width is increased and the lower edge is not clearly visible. The task of grinding in is reduced to reducing the width of the belt at MOD injectors to 0.1-0.2 mm, giving a clear outline of the lower boundary (for MOD, the optimal width of the belt can be at the level of 0.3-0.5 mm). To do this, apply the lapping paste in 3-4 dots slightly below the shiny zone that appears (Fig. 6.4.10). Insert the needle into the body and use light rotational movements (2-3 turns in total)
Fig. 6.4.10 Evenly distribute the paste over the surfaces to be treated. Next, carry out a short grinding-in (15-30 sec.) with rotational impact movements. Pull out the needle and thoroughly clean the surfaces.
Apply again 3-4 points to the very border of the belt and with light rotational movements (without impacts) rub in for 5-10 seconds. Remove the needle again, clean it and the seat and inspect it. If the pair is not very worn, then this is enough to form the desired width of the belt. If not, then the operation is repeated until the desired result is obtained. The steam is washed, dried, and collected.
Note. Some experts prefer to carry out the final finishing operation without paste in oil. At the same time, the belt is smoothed
without wear - the belt is “stuffed”.
Option 2.
The sealing band is slightly shifted down from the base of the cone (Fig. 6.4.11). At the first stage, the task comes down to moving the belt upward to the desired zone, for which the paste is applied below the edge of the belt and also at intervals of 15-30 seconds. Grind in and replace the paste. If the paste after grinding is evenly distributed over the surface, then this indicates that there is no distortion in the shape of the cones and the belt is quite
Fig.6.4.11 Fig.6.4.12 will quickly move up to the base, and its final finishing is carried out according to option 1. If the needle has been ground in many times, then it is possible that there is a depression on the cone under the belt. This situation can be distinguished by the uneven distribution of the paste after lapping operations: the protruding band will be light, and the cavity with the paste accumulated in it will look like a dark stripe (Fig. 6.4.12). The situation becomes more complicated and will require more time or even checking the shape of the saddle and correcting it. If the performer is sufficiently qualified, the protrusion on the cone of the needle on which the belt is located can be removed with a thin (small) block by installing the needle on the machine (remove only 0.01-0.02 mm). After this, repeat the grinding.
Option 3.
The belt on the needle is shifted downwards and it cannot be corrected by grinding against the seat. The shape of the seat in the body needs to be checked. If a violation of the shape of the seat is found, then after correcting it, the grinding can be repeated according to option 2.
Checking and correcting the shape of the seat is carried out using a lapping needle similar in shape and size, and differing from it in an increased cone angle (60 degrees 30 minutes instead of 60 degrees) and a reduced diameter of the cylindrical guide part (for example, for an RND 68 diesel engine, the recommended diameter is 11, 50 mm). In ship conditions it is impossible to manufacture it with such precision in the angle of the cone and it is necessary to place an order for its production. In this case, it is necessary to indicate to the mother: gray cast iron SCh22; SCH28 (cast iron).
The choice of lapping material is motivated by the fact that it should be softer than the surfaces being ground. (So, to process the seat for an injector in a steel cylindrical cap, the lap is made from a softer bronze material). In addition, gray cast iron has anti-seize properties and is not subject to plastic deformation due to zero ductility. That’s why the test plates are made of cast iron. The requirement for reduced hardness in relation to the surface being processed is due to the fact that during lapping, abrasives are able to penetrate into a softer surface and form together with it something like an abrasive stone. Such a surface scratches a harder one, and itself is protected from wear and distortion of shape. How to process the nozzle seat with cast iron lapping is described in detail in the instructions for engines of modifications RND and RTA from Sulzer.
If the reason for the difficult grinding of the needle turns out to be a worn seat, then after correcting its shape, the operation can be repeated.
A). Checking injectors Read more: Main injector malfunctions
Information about the work “Marine internal combustion engine L21/31”
Section: Transport Number of characters with spaces: 82455 Number of tables: 3 Number of images: 17
Duration and procedure for repairing sprayers and nozzles
Orders for the repair of sprayers and sprayers are carried out strictly on time - from 1 to 5 working days* , so our customers do not have to wait long for their sprayer to be repaired. Plus, we almost always have the necessary spare parts in stock, so repairs happen quickly and efficiently. And even if the repair is complex and the required spare part is not in our warehouse, we will deliver this spare part as soon as possible and repair your sprayer. But sometimes the waiting time for delivery can last up to 1 month. In this case, the service engineer will definitely warn you in advance. However, don't worry - this happens quite rarely!
Working with us is divided into 5 simple steps :
- You bring your sprayer to Servy
- We quickly diagnose it within 1 business day
- We call you and describe the malfunction, cost and repair time.
- You agree/refuse service
- And finally, pick up your equipment! Well done!
Warranty for repair of sprayers and sprayers
The Servy service center is confident in the quality of its work. We use only original spare parts. Therefore, we provide a guarantee for our repair and maintenance work on gasoline and battery sprayers and sprayers for a period of 90 days . If your sprayer or atomizer breaks again, we will always fix the defects free of charge. We carefully monitor the level of professionalism of our specialists, so our craftsmen annually attend advanced training courses, trainings and seminars organized by companies that are leaders in the sale of a variety of tools. We focus on the needs of professionals, so our services fully meet even the highest requirements. Contact us and see for yourself!
Injector repair
It is preferable to entrust routine maintenance or major repairs of diesel engine injectors to qualified specialists - they will be able to restore and adjust the part on high-precision automated stands. However, a certain set of repair procedures can be carried out in artisanal conditions without the use of complex equipment.
Required tools and materials
To carry out independent maintenance of diesel engine nozzles, the car owner will need:
- a set of open-end or ring wrenches;
- screwdrivers for straight and Phillips slots;
- clean dry rags;
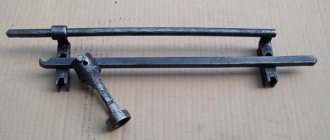
- maximeter;
- flushing fluid for internal combustion engines.
It is recommended to carry out work in a dry, well-lit, dust-free garage.
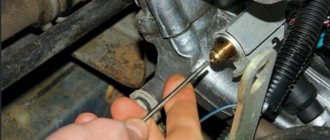
Removing the nozzle
Diagnostics of diesel injectors and their maintenance involve removing the nozzles from the internal combustion engine. Before starting work, it is recommended to thoroughly wash the engine and engine compartment to avoid debris and foreign particles. You need to rinse the cylinder head with special care. Markings must be applied to the high-pressure pipes to help avoid confusion during reassembly.
Before removal, it is necessary to close the injector fittings (use plastic caps) to avoid contamination. It is not recommended to use ordinary open-end wrenches to dismantle the nozzles - an inexperienced repairman can strip the threads from the nozzles. If you do not have the necessary qualifications, use spanners and a tool - a “head” with a long handle.
After removing the nozzles from the holes, dry them and remove external dirt with a rag. O-rings are placed in the injector holes. When repairing injection parts, they must be replaced with new ones. Do not allow dirt from the rings to enter the injection system during removal.
Checking the functionality of the injector
There are several methods for checking the functionality of the sprayer. The easiest way to check the injector is with the engine running:
- Start the engine at idle speed.
- Start unscrewing the nozzles one by one.
- If after removal the engine performance deteriorates, then the removed injector is operational and should be returned to its place.
- By process of elimination you will find an injector, the removal of which will not change the operating mode of the internal combustion engine. This will be a broken device.
You can use a multimeter for diagnostics. In advance, you need to disconnect the battery terminals and disconnect the injector wiring, and then “check” each part with the device. On high resistance injectors, the device values will be in the range of 11 - 17 ohms; at low impedance the multimeter will show up to 5 ohms.
Having a maximeter will be a big advantage. The device is able to show the current pressure at which the sprayer is activated. It will also help identify defects regarding the spray angle and injection jet configuration.
Troubleshooting
A faulty injector must be inspected. First, we look for leaks in the part body. If there are none, we proceed to disassembling the part. We fasten the part in a vice and knock out the spray nozzle by gently tapping it. Next, you need thorough cleaning: soak the parts of the nozzle in diesel fuel or solvent to remove carbon deposits. We remove soot and deposits with a fine steel grater. After cleaning is completed, you need to check the nozzle on the maximeter. If optimal injection parameters are achieved, the device is ready for installation in the engine.
In other cases, it is necessary to completely replace the nozzle on the defective nozzle. When installing a new part, carefully remove all factory grease, otherwise the device will not work.
If the nozzle continues to “flow” even after replacing the nozzle and thorough cleaning, pay attention to the performance of the spring with the pin - they may be worn out. https://www.youtube.com/embed/OzXKpVukCLc
To clean the sprayer, use a compressor - the air pressure will knock out hard-to-reach dirt.
Nozzle installation
Before dismantling the device, mark all parts with a marker to avoid confusion. Be especially careful about marking high-pressure hoses. The nozzle is screwed in by hand as far as you can. Further tightening is performed with a dynamometer wrench. The tightening values are indicated in the motor manual. When installing the injector, bleed the air from the fuel system. On modern cars, this is enough to turn the starter several times; or use a manual pump (if available).
Types of sprayers and sprayers accepted for repair
A garden sprayer is a very important tool for every gardener. Spray water, pesticides and fertilizers - this device successfully copes with these and many other tasks. Plus, many modern devices are equipped with special devices capable of scattering grains and granular fertilizers. It is worth taking a closer look at the principle of operation of sprayers, since in order to understand how these devices are repaired, you need to understand how this unit functions. It must be said that sprayers designed for rapid irrigation generate fine mist. Special suspensions and emulsions will definitely put the garden in order and will protect berries, flowers, vegetables and fruits from various pests with the help of this unique fog that can spread over a distance of up to fifteen meters. Garden sprayers come in different classes. Moreover, the volume of their tanks can vary from 10 to 20 liters. The principle of operation of the device is quite simple: the motor creates pressure in the flask. Thanks to this, the suspensions and emulsions necessary for plants are sprayed. In our specialized service center in Moscow, you can repair any types of sprayers, such as: gasoline (spray) - equipped with compact gasoline engines, battery-powered - powered by a portable battery , backpack - the sprayer is transported by the operator over the shoulders (straps are provided in the design), portable — it is possible to carry the sprayer from place to place manually . Each of the listed types has its own advantages and disadvantages in operation. For example: battery sprayers are less noisy and cheaper and lighter than gasoline ones, gasoline ones are more powerful and more mobile, backpack ones are compact and ergonomic.
Gasoline Sprayer Sprayer Battery Sprayer Backpack Sprayer Portable Sprayer
But, unfortunately, both gasoline and battery sprayers , such useful and convenient garden assistants, can break down. Don’t be upset and run out to buy a new fancy model, we are ready to help you and repair any sprayer in Moscow at a service center! We employ only professional engineers who will quickly identify and eliminate the malfunction of your equipment, in the shortest possible time, and for a reasonable fee, which will be several times less than the cost of a new unit. Of course, for long-term reliable operation, any garden equipment needs timely maintenance and repair, and sprayers and sprayers are no exception. It should be emphasized that the repair of garden sprayers is an important area of our work, so our technicians know almost everything about repairing these devices, and even a little more. Specialists are well acquainted with different models: simple and more complex, from domestic and foreign manufacturers, with a large selection of “bells and whistles” and with modest functionality. We guarantee that our specialists will not be puzzled by any breakdown, since each of them has been involved in repairs for many years and knows all the intricacies of this work very well.
Possible malfunctions of diesel injectors
The most common cause of malfunction is a malfunction of the needle in the nozzle guide sleeve. If its value is reduced, then a large amount of fuel flows through the new gap. In particular, for a new injector, a leak of no more than 4% of the working fuel that enters the cylinder is allowed. In general, the amount of fuel from the injectors should be the same. You can detect a fuel leak at the injector as follows:
- find information about what pressure should be when opening the needle in the injector (it will be different for each engine);
- remove the nozzle and install it on the test bench;
- create obviously high pressure on the nozzle;
- Using a stopwatch, measure the time after which the pressure drops by 50 kgf/cm2 (50 atmospheres) from the recommended value.
Checking the injector on the stand
This time is also specified in the technical documentation for the engine. Typically for new injectors it is 15 seconds or more. If the nozzle is worn, this time can be reduced to 5 seconds. If the time is less than 5 seconds, then the injector is already inoperative. You can read additional information on how to repair diesel injectors (replace nozzles) in the additional material.
If the injector valve seat is worn out (it does not hold the required pressure and excessive drainage occurs), repairs are useless and will cost more than half the cost of a new one (which is about 10 thousand rubles).
Sometimes a diesel injector may leak a small or heavy amount of fuel. And if in the second case only repairs and a complete replacement of the nozzle are necessary, then in the first case you can do it yourself. In particular, it is necessary to grind the needle to the seat. After all, the main reason for leakage is a violation of the seal at the end of the needle (another name is a sealing cone).
Replacing one needle in an injector without replacing the guide bushing is not recommended, since they fit together with high precision.
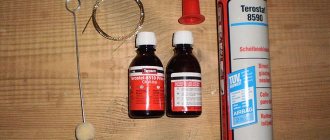
To remove leaks from a diesel injector, thin GOI grinding paste is often used, which is diluted with kerosene. During lapping, it is necessary to ensure that the paste does not get into the gap between the needle and the bushing. At the end of the work, all elements are washed in kerosene or diesel fuel without impurities. After this, you need to blow them with compressed air from the compressor. After assembly, check again for leaks.
conclusions
Partially failed injectors are not critical, but a very unpleasant breakdown. After all, their incorrect operation leads to a significant load on other components of the power unit. In general, the machine can be operated with clogged or misconfigured injectors, but it is advisable to carry out repairs as quickly as possible. This will keep your car engine in working condition, which will save you from even greater financial expenses. So, when the first symptoms of unstable operation of the injectors on your diesel car appear, we recommend that you at least check the functionality of the injector in an elementary way, which, as you can see, anyone can do at home.
Typical breakdowns of sprayers and nozzles
Sprayers and atomizers can break down for various reasons, and most often breakdowns occur for the following reasons*
:
- The gasoline sprayer (sprayer) does not start, there is no spark formation reasons: faulty spark plug, faulty ignition coil (magneto), damage to parts of the manual starter, clogged fuel system, wear of the cylinder-piston group;
- The garden sprayer stalls, possible reasons: clogged fuel system (no fuel supply), wear of the cylinder-piston group, carburetor out of adjustment, clogged air filter;
- A gasoline sprayer does not spray liquid, the main reasons are: clogged tank or gun, ruptured tubes.
- The battery-powered sprayer does not turn on - reasons: the battery is damaged, the switch is faulty, the electric motor is faulty;
- The battery sprayer does not spray liquid, the main reasons are: clogged tank or gun, ruptured tubes.
The Servy service center has been repairing sprayers and atomizers for several years, and therefore we can identify the main causes of the above breakdowns. Among them: improper operation (no maintenance), untimely cleaning and washing of the sprayer, use of a low-quality gasoline mixture (oil and gasoline) or non-recommended fuel or improper charging of the battery from the electrical network, use of non-recommended nozzles and sprayers, many hours uninterrupted operation of the sprayer, mechanical damage to the device units. However, with the right and professional approach, all breakdowns can be easily repaired by specialists from the Servy service center. We know very well how difficult it is for residents of our capital to find a service center that would carry out high-quality repairs of sprayers and other garden equipment, not to mention law firms (landscape bureaus, farms, landscaping companies). Now you know this place. Repairs made at the service center will certainly pleasantly surprise the owners of any sprayers. Our experienced and qualified craftsmen will complete the job quickly and accurately. We understand that it is difficult for residents of the capital and Moscow region to cope with time, since many of our clients need to visit many places in a day. We sincerely respect our customers and value their precious time, so our sprayer repairs are always carried out strictly within the agreed time frame.
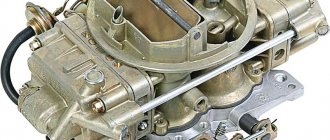
Design and principle of operation of pump-injectors
The nozzle is a metal tube with a special cross-section designed to spray the fuel mixture. For the first time and to this day, such a device is used on diesel engines, where such important parameters as engine efficiency, low noise level and low exhaust toxicity are important.
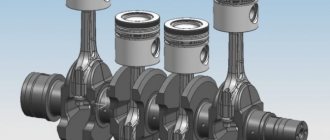
The injector pump is installed above each cylinder and has the same structure. It usually includes: a shut-off piston, a special plunger, a spray device needle, a check and control valve and a spray device spring.
The plunger is a part that creates a certain pressure inside the nozzle. Pumping occurs during the translational movement of the plunger. To do this, there are special cams on the camshaft, which at certain times act on the plunger and bring it into action.
The control valve opens along with the movement of the plunger and allows fuel to flow into the combustion chamber. The valve design is selected in such a way that diesel fuel is supplied in atomized form. This way it burns more efficiently and economically. Based on their operating principle, control valves can be divided into electromagnetic and piezoelectric. Piezoelectric valves are the most effective, as they work quickly and prevent the formation of excess fuel, as well as its starvation in certain areas of the injection system. The main element of any control valve is its needle, which is responsible for the speed of the system.
The atomizer spring is installed to ensure a tight needle fit. The spring force is usually supplemented by fuel pressure created in the high pressure fuel pump. To do this, a special locking piston is installed on the opposite side of the spring, which presses on it under the influence of fuel.
Any pump-injector is controlled using an electronic engine control unit. The ECU receives various readings from all sensors, analyzes them and, based on the data received, opens or closes the injectors at certain times.
Principle of operation:
- Pre-injection. At this moment, a special timing cam acts on the plunger, forcing it to move down. The fuel-air mixture enters the injector channels and the check valve closes. The plunger creates a pressure of 13 mPa, and at this moment the nozzle control valve is activated, which passes the mixture under pressure into the combustion chamber. At the last moment, the inlet valve opens and a new portion of fuel enters the injector channels. At the same time, the fuel pressure inside the element decreases.
- Main injection. At this stage, the plunger goes down again, the control valve closes, but a pressure of 30 mPa is created in the nozzle. This time, the fuel is supplied under high pressure, which ensures its effective compression and combustion in the working chamber. Each subsequent compression process is accompanied by an increase in pressure inside the nozzle. The maximum value is 220 mPa. The end of this stage occurs in exactly the same way as with preliminary fuel injection.
- Additional injection. It consists of cleaning all elements of the injector from traces of soot and soot. Additional injection is carried out immediately after the main one. All injection actions are carried out in the same way as during the main stage. In another way, this phenomenon is also called double fuel injection.