I decided to create a topic, it will constantly change and be supplemented. The topic will be of interest to newcomers to driving, who will ask the question: “what should I do with the car?” Another goal is to preserve and remember some rare parts, even those that have gone out of use, because everyone who modifies a car sometimes wants to install something unusual. Go. (mostly there will be factory tuning created by enterprises, not homemade)
1) Rear window cover
2110 (specifically for the sedan). The same ones exist for the VAZ 2114.
2) Frill overlay
decorative (attached with self-tapping screws).
3) Mirror covers
Kurazh-3
4) Rear window trim
2110, 2112. There are different variations, it can be transparent. Their main goal is to hide rust when selling (some people use it as tuning).
5) Athermal glasses
(green glasses). Sometimes people buy a kit and replace regular glasses with green ones. Here I will also add such an improvement as a heated windshield from Priora.
6) Hella optics
, also stands on M-ki. There are halogen and xenon variations.
7) Plastic front fenders
for a normal face. 21108403015 - left, 21108403014 - right. Articles from the manufacturer Kamplast, there are others.
 Front bumper from Bogdan 2110
. Factory bumper, an interesting replacement instead of the original one. It’s worth mentioning here that you can’t count all the bumpers, there are a lot of them.
9) Mirrors from Priora
. On the left is the old one, on the right is the new one. Review of inexpensive mirrors for Priora from Aliexpress
10) Flashlights Autointersvet
, domestic and factory, withdrawn from sale, currently available on Avito. There is light chrome and black variations.
11) “Putter” lights. I strongly recommend the manufacturer OSVAR, do not buy Chinese ones, they fade and often have wiring problems. OSWAR “sticks” are available in light and dark.
light
dark
12) Jabot from Priora-2. May require local adjustments. 2170-8212734 - right part of the frill 2170-8212735 - left part of the frill.
13) Headlight washer. There was a full-time one. In addition, we can recommend the skif OFS-12S washer.
regular
Scythian
14) Windshield seals from Priora. Fights dirt on side windows and does not erase paintwork from the roof. 21700-5206070/65/64 - article number (we change the last two digits, consists of 3 parts)
15) Leather deflector (hood sconce, auto sconce), a rare thing these days, but it’s still on sale.
16) Rear window linings with a deflector, apparently protection from dirt for the rear window. I don’t have the name of the body kit or other information.
17) Euro pens, the majority of positive reviews are collected by pens from the Lynx company, so I recommend them, beware of China, otherwise your money and time are wasted.
18) Headlight cleaner 2110. Nowadays there are few offers for sale.
While I remembered such options, and only for external tuning, perhaps I will create separate themes for the interior, engine, etc. Write interesting options in the comments!
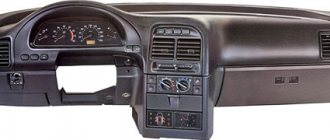
INSTRUMENT PANEL UPGRADES
The main problem of the dashboard on the VAZ 2110 is that it is very soft and can be deformed even when poked with a finger. Therefore, car owners strive to strengthen it. Here's what you need for this:
- screwdriver with a set of open-end wrenches;
- sandpaper;
- epoxy resin;
- polyurethane foam;
- fiberglass.
SEQUENCING
The main thing that the driver must understand is that you need to work with the panel very carefully. It's easy to break.
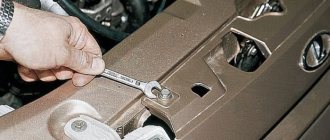
- Since it is impossible to work with the panel inside the cabin, it will have to be removed by unscrewing the fasteners with a Phillips screwdriver.
To modernize the dashboard it will have to be removed from the “ten” - The removed panel is thoroughly cleaned of dust and dirt. This is done using a piece of dry rag.
- A thin layer of polyurethane foam is applied to the cleaned outer surface of the panel.
- When the foam hardens, it is given the desired shape using sandpaper.
The polyurethane foam on the surface of the panel hardened and was treated with sandpaper - The resulting surface must be strengthened. To do this, fiberglass is laid on it in several layers, which is fixed with epoxy resin. After the glue has dried, the surface is sanded again.
- Now all that remains is to cover the panel with high-quality vinyl film. Its choice depends on the driver’s preferences. Many people choose film painted to look like carbon.
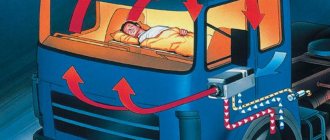
Stages of trunk soundproofing
All work can be divided into the following main stages:
- Preparation for work, which includes calculating quantities and selecting the right material.
- Dismantling the trunk.
- Preparatory treatment of the trunk.
- Direct work on installation of soundproofing material.
- Assembling the trunk after the work.
Preparation for work
Before you start disassembling the trunk, you need to prepare for this work:
- Choose a soundproofing method.
- Choose the right soundproofing material.
- Find and prepare the necessary tools for the work.
- When carrying out work in winter, you need to find a warm garage, since doing this work at low temperatures is inconvenient and impossible due to the characteristics of the materials used.
- Find free time, as work can last all day.
Considering these points, let’s focus on the most important thing – the choice of soundproofing material. Tuning a VAZ 2110 with your own hands, namely insulating the trunk, can be done using the following types of special materials: vibration-absorbing, sound-absorbing, sound-insulating, heat-insulating, anti-creaking.
The choice of one material or another completely depends on the desires and financial capabilities of the car enthusiast. The most classic option would be to use 7 sheets of vibration-insulating and 4 sheets of sound-insulating material (STP M3 sheets) - this is exactly how much will be needed to ensure 100% coverage of the trunk. By the way, approximately the same amount will be needed for tuning the Lada 2106.
Dismantling the trunk during tuning of a VAZ 2110
Disassembling the trunk should not cause any particular difficulties, especially for hatchback owners. In order to remove the casing, you will need to remove the fasteners and, in some places, screws, and in the end only one metal should remain.
Preparing the trunk for soundproofing
After the trunk lining has been completely removed, you should pay attention to one detail - the inside of the body is coated with a special anti-corrosion substance, which must be removed to carry out the work. Do not worry that the body will quickly rot after removing this substance.
After all, the sheets used also have a high degree of waterproofing, which will not allow moisture to penetrate the metal. If the anticorrosive agent is not removed, then over time the insulating sheets will peel off from the base. The anticorrosive agent is removed using a special solvent.
Soundproofing process
After the solvent has completely dried, we begin to work. The first layer, as a rule, is laid with a vibration-insulating material, which in most cases is represented by the main composition of bitumen. In order to glue the vibration, you need to use a heat gun to heat the material until one of the sides becomes sticky.
We apply the heated sheet and begin to roll it out using a hard roller, applying force. It is worth noting that the work of gluing this sheet can be considered completed only after 100% complete gluing of the vibration to the surface, since it will serve as the basis for subsequent work (you should ensure that there are no bubbles).
Next we glue the soundproofing material. Everything is much simpler here: we tear off the protective film, lean the material against the base and begin smoothing the sheet around the perimeter.
Having done this work with your own hands with all parts of the trunk, including its lid, after assembling the trim, the work can be considered complete.
Assembling the trunk of a VAZ 2110
Assembly of the trunk can be somewhat complicated due to the use of several layers of material on top of metal. Therefore, when carrying out work, you need to be patient and remember that if you use great force, the sheathing panels may burst. The same applies to other VAZs, starting with the VAZ 2101.
Tuning a VAZ 2110 - a photo of this car after completion of the work can amaze everyone, it can turn an inconspicuous car into one of the main exhibits at car exhibitions.
And here is a video selection of tuned dozens for every taste and color:
There are also such tuned VAZ cars:
Tuning VAZ 2101, Tuning VAZ 2105, Tuning VAZ 2106, Tuning VAZ 2107, Tuning VAZ 2108, Tuning VAZ 2109, Tuning VAZ 21099, Tuning VAZ 2111, Tuning VAZ 2112, Tuning VAZ 2113, Tuning VAZ 2114, Tuning VAZ 2115, Tuning Priora , Tuning Kalina, Tuning Lada Granta, Tuning Lada Largus.
You can also read on this topic:
Subaru Forester with a boxer 210-horsepower engine on the secondary market
Tuning Kia Sportage 3 to make the car unique
Compare the new Hyundai Solaris versus Lada Vesta
Russian cars: not as bad as it seems!
Tuning a VAZ 2108 (tuning eight) with your own hands is easier than ever
Share on social networks
Alex S October 26, 2013
Published in: Russian cars
Tags: Our cars, Tuning, Tuning VAZ
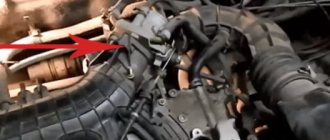
IMPROVING INSTRUMENT LIGHTING
The dashboard lighting on the VAZ 2110 has never been bright, since it uses ordinary incandescent light bulbs. Therefore, drivers often replace them with LEDs. They are brighter. And they last longer.
SEQUENCE OF OPERATIONS
To install the LEDs, you will first have to remove the instrument cluster from the panel. The light bulb sockets are located on the back wall of this unit, and there is no other way to reach them.
- The steering wheel of the car is set to its lowest position.
- Use a Phillips screwdriver to unscrew two self-tapping screws located above the devices.
- After this, the decorative trim can be pulled out by pulling it towards you.
- Below it there are 3 more screws that hold the instrument unit with light bulbs. The screws are unscrewed with the same Phillips screwdriver.
- The instrument unit is removed. All wires are disconnected from the rear panel. The incandescent light bulbs are removed and replaced with LEDs.
The arrows show the location of the backlight bulbs, which are replaced by LEDs - The block is installed in place, then the instrument panel is reassembled.
LED backlit instrument panel looks much brighter
STEERING WHEEL COVER
Without braiding, the steering wheel on the VAZ 2110 seems thin and slippery, which does not have the best effect on driving safety. So after buying a car, car owners usually install a braid on the steering wheel. You should choose size “M”, intended for steering wheels with a diameter of up to 39 cm (this is the standard wheel for the VAZ 2110).
The braid is sewn together with a clamp needle and nylon thread
The purchased braid is put on the steering wheel, its edges are tightly sewn together using a clamp needle and strong nylon thread.
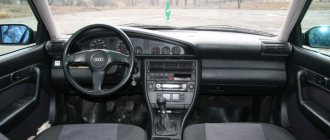
Interior improvements on the VAZ 2110
What can you say about the factory interior for the VAZ 2110 model? It is quite reliable, durable, the internal space is well organized, which has a positive effect on capacity.
But the level of comfort here is frankly low. In this regard, many dozens of owners decide to partially or large-scale improve the interior of their car.
Today we will talk about elements that can be improved, and also share ideas and give useful recommendations.
Standard outfit
ABOUT REPLACING SEATS
The standard seats on the VAZ 2110 have never been comfortable. Therefore, car enthusiasts replace them with seats from the following cars: Skoda Octavia A5, Hyundai i30 or BMW E60.
Domestic car enthusiasts often bet on the “tens” of seats with the Hyundai i30
All these chairs are distinguished by their thoughtful design, comfort and compactness. It is not possible to install them in a garage, since the fastenings will have to be seriously modified and reworked. So the car owner has only one option: take the car to the appropriate car service center, having previously agreed with the specialists. The price of such a service is from 40 to 80 thousand rubles.
PHOTO GALLERY: VAZ 2110 SALON AFTER TUNING
Blue leatherette inserts blend seamlessly with the gray interior background
The seats have red leatherette covers, the doors have red plastic inserts
The car owner used leatherette and vinyl of the same color to decorate the interior
So, every car enthusiast can improve the interior of the VAZ 2110. The main thing in this matter is not to get carried away. Excess is not good for any business. And car tuning is no exception.
Tuning VAZ 2110: an integrated approach to modernizing the “tens”
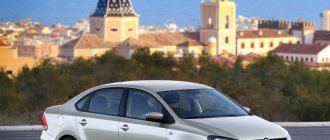
The choice of car is influenced by many factors, including the age of the driver.
Lada 2110 is a domestic swallow, which is perfect for young people looking to buy a car at an affordable price. In addition, it will not be difficult for them to tune this car themselves, thereby turning it not just into a means of transportation, but into a fashionable sports car with good dynamics, comfort and an attractive appearance. Having even modest financial resources and, most importantly, ingenuity and a strong intention to improve your car, you can make many improvements to the car, such as:
- Acoustic system tuning;
- Body tuning;
- Engine chip tuning;
- Car tuning with neon lighting and much more.
VAZ 2110