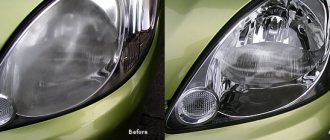
Most owners are concerned about the appearance of their car. But alas, it is impossible to protect the car’s paintwork from accidental scratches. Most often, plastic bumpers suffer - both rear and front. There are many reasons: bad parking, pebbles on the roads from oncoming cars, tree branches and other circumstances. The question is: is it necessary to fight them?
The answer is simple: any scratch on the plastic is the beginning of the destruction of the paintwork. Failure to take action will lead to corrosion of metal products, and deep marks from “wounds” can destroy plastic parts over time. So it’s better to remove them immediately after they appear.
Do-it-yourself removal of small scratches on a car
All minor defects - scratches, chips, abrasions, cobwebs, cracks are divided according to size and depth of damage. It can be superficial or deep - depending on the nature of the damage, a method for eliminating the defect is chosen.
Every car abounds in surface scuffs and tiny cracks in the body and bumper. Without posing a threat of corrosion, such damage to the top layer of paintwork in itself is harmless, but it spoils the appearance of the car, especially a new one. To eliminate them, cosmetic repairs of scratches on the car are done without painting. It comes in two types:
- camouflage using special compounds;
- removing scratches from a car body by polishing.
You can fix scratches on your car by treating the surface with special restorative compounds based on silicone, wax or Teflon. The duration of action of such drugs is short, the cosmetic effect lasts from 2 to 12 washes.
Scratches on car doors
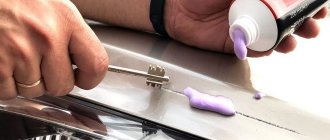
Removing scratches on a car body without painting can be done using a wax pencil - this is the easiest way to disguise surface damage that has not affected the ground. The color of the pencil is selected as close as possible to the shade of the car's coating. The area around the scratch is cleaned, and then the damage is shaded using transverse movements. The wax will fill the depression, the surface will be leveled, and the defect will become invisible. According to reviews from car enthusiasts, the masking effect of the wax composition persists after 2-3 washes. After treatment with a wax pencil, it is recommended to sand the surface with an abrasive polish. Instead of a pencil, you can use a wax-based polish; it is more durable and can withstand 5-6 washes.
Synthetic pastes are produced based on Teflon; they are more expensive, but can withstand up to 12 washes. To remove a scratch on a car, rub the paste into the surface, first cleaning and then degreasing the damaged area.
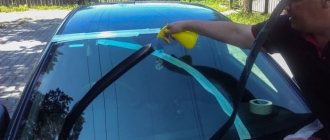
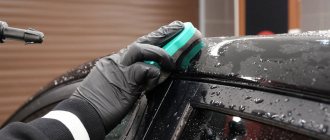
Silicone restorative polish is used to remove scratches from the car body. The car is first washed with water and the damaged area is dried. Shake the polish, apply the product to a damp cloth, and rub it into the surface with smooth movements without effort. After the silicone composition dries, a soft coating forms on the surface of the car - a thin film is formed at the molecular level. Remove any remaining product from the surface with a dry cloth.
Removing scuffs using polish
Advice. Before using the composition, read the instructions for its use, not neglecting the details. For example, we must not forget to shake bottles or other containers before use, since dissimilar chemical constituents settle during storage.
One of the most effective methods for repairing surface damage is to buff out the scratch on your car yourself. To work you will need:
- grinding machine with wheel;
- fine-grained (3000) sanding paper;
- abrasive paste (one or a set);
- restoring polish;
- water with sprinkler.
The surface of the car is washed, degreased, and before work it, together with sanding paper, is moistened with water.
Using a lint-free cloth, cover the surface of the part with an abrasive paste, begin sanding with smooth movements, in order to polish the scratch on the car with your own hands, but without removing an excessively thick layer of varnish. Using a grinder speeds up the process, but when working with it it is important not to overdo it. After sanding and cleaning the paste, the surface is treated with polish to give a glossy shine.
Products for removing defects from paintwork
Polishing pastes are available in several types, numbered from 1 to 4 - from coarse-grained (No. 1) to fine-grained (No. 4). Polishing can be carried out sequentially with all pastes from the first to the fourth number, changing the polishing wheel of the grinder or reducing the grain fraction of the sandpaper. Polishing wheels vary in hardness, the degree of which is indicated by color: the coarsest is white, medium is orange, soft (for finishing) is black.
Removing minor scratches on a car will allow you to update the appearance of the car with the least cost and effort.
Methods for removing scratches
There are many methods to correct the defect if you scratched the bumper. The most basic of them are aimed at masking damage to the top layer when the paintwork is not touched. These include polishing pastes with different sizes of abrasive, as well as wax products like pencils that fill cracks with a special substance.
Painting is a way to completely damage the production paint layer. When spot painting, it is enough to remove a layer of paint from one area, sand it well and then apply a new layer of a suitable color. If scratches are noticeable over the entire area of the part, the entire bumper must be repaired, with the old paint completely removed.
The deepest scratches without breaks require surface restoration, for which several layers of putty are used. Instructions for using all these methods are provided below.
Wax pencil
For those who have only slightly scratched the bumper, purchasing a wax pencil will be enough. Before using it, you must clean the bumper using special products, and then degrease it with a solvent.
It is best to use a wax marker at moderate temperatures in a warm, windless room. The wax is applied in several layers, and between approaches it is necessary to take breaks so that the layers have time to dry. Apply first with transverse movements, and then with longitudinal ones. It is advisable that the product does not fall outside the damaged area, and if this does happen, then you need to remove the wax using an ordinary napkin. After applying the last layer, the area to be treated should be lightly polished. In addition to filling scratches, such a pencil creates additional protection for the surface - but for this it is better to choose wax of increased hardness.
Before use, do not forget to shake the pencil slightly, and then close it with a cap so that the product does not dry out.
Coloring
Coloring is, of course, a much more detailed and complex process that requires special tools and materials. Any painting begins with cleaning the bumper, and it does not matter whether you are going to remove it or carry out all the work right on the spot. As in the previous case, the part must be washed, dried and degreased. To polish and remove the old coating, you will need a sanding machine, as well as sandpaper of varying degrees of grit.
- First you need to thoroughly machine the bumper around the entire perimeter; for hard-to-reach places you will need sandpaper, which we use by hand. Then a primer is applied to the surface in two layers, and the bumper is left to dry.
- When the composition has hardened, the bumper is cleaned again and then you can begin painting. In order for the color to adhere well, the part can be slightly heated beforehand.
- The paint is applied using a sprayer or a special gun. It will take about 3 layers, then the surface is varnished.
- For more complex damage, it is advisable to use putty along with the primer.
We recommend: Why do we need an oil pressure light and what to do if it lights up while the engine is running
Filling deep scratches
Using putty requires additional time and manipulation. It is applied after the bumper has been cleaned, degreased and sanded using sandpaper or a machine.
- The putty is applied in a small layer to the scratch so that it fills all the damage. Then you should sand the area. This must be done very carefully so that the surface does not become thin.
- When the first layer becomes smooth and even, you need to repeat the procedure, this time smoothing the surface at a slower speed. Remember to use fine-grit sandpaper for difficult areas, as no power tool can replace hand work.
- After the surface has acquired its previous shape, a primer is applied on top in two layers and all the above-described manipulations with paint and varnish are performed.
- Then it will take at least a day to dry and it will be better if the part dries naturally to prevent it from deforming.
Now you are not afraid of scratching your bumper, since in reality the repair is a fairly simple process that can be done without the intervention of a specialist. The most important thing is to strictly follow the instructions and correctly calculate your skills.
Types of damage and the choice of ways to eliminate them
If the owner scratches the bumper, even the smallest marks will be visible during the day. As practice shows, owners have to deal with the following types of damage:
- complete destruction of the bumper when it broke into several pieces. Often such damage occurs when involved in an accident. What to do in this case? The most preferable option is to carry out a complete replacement. Although if you have all the pieces on hand, you can try to solder it with special equipment;
- cracks. They arise as a result of strong mechanical impact on vulnerable areas - for example, when driving along a curb. A special soldering iron or fiberglass with a special resin can solve the problem. Repairing cracks on a car is quite simple, the main thing is to understand the technology;
- chips. As practice shows, a chip on the bumper is a common occurrence. Chips appear as a result of small stones hitting the surface, flying out from under the wheels of cars in front. It will not be possible to eliminate deep abrasions without painting, since the paintwork in this case has received serious damage. Local painting is carried out;
- scratches. The most common type of defect. If the owner left a small scratch, it can be removed without the use of specialized equipment. The defect can be eliminated in a garage, provided that the appropriate repair tools are purchased in advance.
As you can see, there are quite a large number of types of bumper defects. Often it is he who suffers, since its surface has to reflect crushed stone, tree branches, sand, and so on.
What are the types of damage to plastic in a car based on complexity?
This kind of interior deficiencies can be divided into several types:
- minor scratches are the simplest and most common option, which cannot be avoided even with very careful operation of the car, but at the same time, such damage can be corrected promptly and quickly;
- deep scratches can lead to the need for major repairs or part replacement, especially for those car owners who are perfectionists by nature. But still, this type of damage can also most often be dealt with on your own;
- damage caused by exposure to sunlight is perhaps the most problematic, since it is difficult to deal with and avoid them due to the specific weather conditions and the inability to leave the car constantly in shaded areas.
Depending on the severity of the damage, you should decide whether to replace the part, thoroughly repair the interior, or partially restore the part yourself.
Polishing the bumper with a grinder
When the paintwork is completely covered with a network of small and deep scratches, only machine polishing will help remove them. The technology is also applicable in cases where there has been light contact with another car, causing abrasion to form on the body kit. It is better to carry out the procedure indoors so that during processing dust does not get into the defect area, acting as an abrasive. Reason two: it is not allowed to polish a surface heated by the sun.
To complete the work you will need:
- grinding machine with polishing wheels;
- sandpaper No. 2000 with fine grain;
- There are two types of polishing paste - starting and finishing, it is better to take the latter to match the color of the car;
- degreasing liquid (nefras, white spirit);
- tube - corrector with paint matched to the color of the car;
- rags, antistatic wipes;
- protective glasses.
Nefras is one of the best degreasers
Advice. Buying a grinder is an expensive pleasure; it is not advisable to purchase it for 1-2 treatments, unless you are going to do professional polishing. It's easier to rent equipment. As a last resort, you can use an electric drill with appropriate attachments.
After initial sanding, the scratches look like this:
Removing multiple deep scratches begins with removing the bumper and thoroughly washing and drying it. If there is foreign paint left on the surface from contact with another car, remove it with gasoline or white spirit. An important point: you can repair the bumper and remove traces of contact with another car only after you have fully documented the accident and recorded it with the insurance company, otherwise you may be left without payment.
Any scratches found are touched up using a tube with a mini brush.
Machine polishing is carried out according to the following algorithm:
- Stretch the sandpaper onto a flat piece of wood. Wet it with water and clean all scratched areas. Maintain even and gentle pressure, otherwise you will erase all the varnish to paint.
- Rinse the bumper with water, dry and degrease.
- Apply a coarse abrasive polish to the surface, give it a minute to harden and begin polishing, setting the wheel speed to within 2000 rpm. Periodically test the coating by touch to monitor its heating. The temperature should be what your hand can tolerate, no more.
- Wash the body kit again and examine the result after drying. If deep scratches are visible in the paint layer, degrease them and carefully apply the coloring composition from the corrector 2-3 times with breaks for drying (at least 10 minutes).
- Apply a coat of finishing polish and repeat the sanding procedure. You may have to do it several times for full effect. To ensure a uniform bumper finish, polish the entire surface.
- Wash and completely dry the body kit.
Applying polishing paste
Advice. During final polishing, do not try to cover more of the surface, but rather sand in sections so that the applied compound does not have time to harden.
Gloss is achieved by machine polishing
We recommend: Automatic transmission in a car: timely repair and service
Of course, specialists will perform such procedures better than you. But they will ask for a price of several thousand rubles (depending on the damage). It may not be possible to create a flawless appearance and completely remove all scratches, but overall the car will look much better, and the costs will be limited to the cost of materials. To secure the top layer of the coating, it does not hurt to apply a polish containing wax to it.
The result shows that not 100% of the defects were removed
How to remove deep marks on a plastic bumper by painting it?
Sometimes it will not be possible to do without painting the damaged part. This method is relevant when the scratches are deep.
The work is carried out in several stages:
- The problem area is cleaned of dirt, degreased and sanded. First, use P2000 sandpaper (it is pre-moistened in water), after which the surface is treated with a rubber squeegee and fine-grained sandpaper.
- Apply a primer to the cleaned part. It is necessary to level the surface. The sanded area is cleaned, a degreaser is applied over it and primed in several layers. Leave the part to dry for a day. After the specified time, the primer is cleaned. This is done so that the paint lies evenly.
- Paint the bumper. The coloring composition can be applied specifically or on its entire surface. It is most convenient to use a spray bottle.
- After the paint has dried, the bumper is polished to give it a beautiful shine.
This method allows you to completely remove scratches, but it requires force and also takes time. In addition, drivers often indicate that it is difficult for them to choose a paint color to match the car.
How to remove scratches on a plastic bumper with your own hands
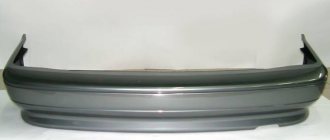
General purpose passenger cars use dampers that are made of high-strength plastic.
Plastic bumper
The main role of this device is to decorate the design of the car's appearance. Most machines use impact-resistant thermoplastic (ABS plastic) as a passive protection element. But there are dampers made from polypropylene, polyurethane and fiberglass. This can be indicated by the markings that are applied to their inner surface. The plastic is lightweight, easy to stamp, and holds the paintwork well. The protective functions of the bumper play a secondary role. They appear only in low-speed collisions:
- as a result of maneuvering in a confined space when parking;
- when driving over rough terrain.
Diagnosis and subsequent repair of bumper damage
In Russia, male car owners are jacks of all trades. For them, removing scratches from a plastic bumper is a feasible, somewhat familiar, and not very difficult task. Life itself forces you to resort to such tricks - not everyone has enough money to go to a car service center on every occasion.
Scratches and scuffs on the bumper (bottom)
But first you need to assess the scale of the damage in order to choose the right strategy for your actions. Having carefully studied the defects of the bumper, you need to classify them into one of the points of the accepted classification:
- Slightly noticeable, shallow abrasions and scratches do not require removing the bumper and painting. They do not cause any harm to the plastic, but they cause frustration to the owner of the car due to the spoiled appearance. This flaw can be corrected by polishing the area directly on the car.
- Scratches to the depth of the paintwork and small cracks are the result of minor accidents and inept parking. In this case, special restoration methods are used - heating, wax pencil, local or complete painting - of the bumper. Minor defects are corrected on site. The damage is more serious on the removed buffer.
- Deep scratches and dents are caused by violent collisions. Here you will need to putty the damage on the removed bumper. In this case, a special technique is used to restore the original state of the plastic part.
- Destruction of the integrity of the damper with the formation of ruptures, breaks, and through cracks most often requires the purchase of a new part. When repairs are possible, welding is used. But this work can only be done in a car service center, so such defects will not be considered in this article.
Do-it-yourself local polishing of small scratches and abrasions
Wash, clean, polish
The entire process of getting rid of a flaw is divided into two stages:
- polishing with removal of the thinnest layer of paintwork (paint and varnish coating) of plastic;
- restoration of paintwork using wax polishes without the use of abrasives.
The procedure is as follows:
- clean, wash and degrease the defective area with a solvent;
- polish the scratches with fine-grained sandpaper and pour plenty of water until they disappear completely;
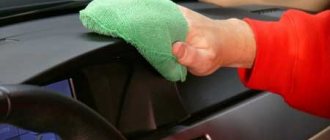
- treat damaged paintwork with felt, without abrasive wax pastes (in difficult cases, you can use tooth powder);
- Wipe dry with a woolen cloth.
Removing deep scratches with a hair dryer
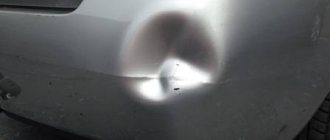
Heating a damaged area of the bumper with a hair dryer
When heated, the plastic becomes fluid. This property is used to save the bumper from surface damage in the form of deep marks from sharp objects. This method can only be used for unpainted products. High temperature will destroy the paintwork and instead of benefit, harm will result. Using a hair dryer, carefully gradually warm up a significant area, including the area with scratches.
This process should go slowly, evenly, consistently. The danger here is that plastic under the influence of high temperature can behave unpredictably: instead of tightening defective marks, its surface will “float”. In this case, depressions are formed that will be very difficult to eliminate in the future. Attentiveness, accuracy, and slowness will help you stop at a critical moment.
Repairing scratches and chips with a wax pencil
This method can correct the defect only of such marks, the depth of which extends to the layer of varnish, paint and primer of the bumper. Wax pencil is a universal product consisting of polymer synthesis. They create a strong protective layer that is not inferior in strength and uniformity to the paintwork of the bumper. Wax pencil has the following advantages:
- its composition is durable, which is why it easily withstands several dozen car washes using car shampoos;
- it is easy to use, so an inexperienced driver can easily use it;
- it will not harm any type of primer and paintwork that was used when the bumper was painted at the factory.
Wax pencils come in two types:
Marker. Reminds me of a regular felt-tip pen. They just need to paint over a scratch or chip. The amount of substance released depends on the force of pressing. The contents of the marker are similar in consistency to the composition of the paintwork. Colorless wax pencil is used for any color of paintwork.
Corrector. Consists of a bottle and a brush. Requires individual selection of a suitable pencil for a specific color of the bumper paintwork. When using a brush, an area with undamaged coating may also be captured. In this case, it is necessary that the colors of the paintwork and the corrector match 100%!
Painting over a scratch with a wax pencil
For cases where only the paintwork is damaged, a colorless correction pencil can also be used. The paint poured into it is colorless, so there will be no negative consequences from its use. In a situation where the primer layer is damaged, a colorless wax pencil will not be able to help eliminate the defect.
We recommend: Do-it-yourself car mirror repair
Procedure for using a wax pencil:
- the damaged area of the bumper is thoroughly washed, degreased and dried;
- A pencil should be drawn over the scratch gradually, evenly, sequentially;
- deep chips are painted over in several steps;
- After finishing work, you must remove the remaining contents of the pencil with a paper towel or napkin.
Elimination of scratches, chips and abrasions by painting
If the area of the defective area of the bumper is significant, complete painting of the entire product will be required after eliminating the defects. In such cases, the buffer is removed from the car. It is thoroughly cleaned of dirt and washed. The problem area is sanded using a small grinder, as well as the use of flexible abrasive wheels: emery cloths, tapes, petals, brushes. This method can remove scratches whose depth is limited by damage to the primer. Then the cleaned area is washed, degreased, and primed. Then the entire surface of the bumper is painted and then varnished. After drying, the damper regains its original appearance.
Filling deep scratches
Bumper putty
Serious signs of damage affecting the plastic material can only be eliminated with putty. This technology is based on the use of putties, primers and enamels of the same polymer base. This approach creates a durable, uniform layer of new paintwork that will not swell, peel or peel. The putty is applied in several stages. Each layer is dried. The quality of the bumper repair and the applied paintwork depends on the thoroughness of this operation. The putty is sanded with a soft abrasive material.
To the touch, the area where defects have been eliminated should be indistinguishable from adjacent undamaged areas. This process requires skill, perseverance, and diligence. Then the area with the defects eliminated is degreased, primed, and painted. The top is varnished. This method can be used to get rid of deep scratches, chips, and dents on the bumper, both installed on the car and removed from it. It all depends on the location of the damage and the area.
A scratched bumper is not the biggest evil in a new car. It is located below and its task is to absorb traces of pebbles, branches and other hard objects found on our roads. Even a novice driver who is inexperienced in plumbing or painting can eliminate these defects on his own. The main thing is to start and finish the work. Then the bumper restored with your own hands will again delight you with its original appearance.
How can I repair damage to my car?
You can remove the defect using inexpensive means, including: wax pencil or polish. They cope with shallow scratches located in the top layer of paint.
Polishing
Polishing will get rid of scuffs and scratches on the bumper. After this treatment, the part acquires an attractive appearance. Procedure:
For ease of work, the bumper can be removed. It is washed to remove road dust and dirt, and wait until the surface is completely dry.- Degrease the part using any solvent, for example, white spirit.
- If the scratches are large, they are sanded using P2000 sandpaper. To prevent it from damaging the surface, it is recommended to soak it in water for 15 minutes. During the grouting process it is constantly moistened.
- If the scratches are small, you can do without sanding. A paste with a coarse abrasive is immediately applied to them and evenly distributed with a polishing machine. A white circle is used as a nozzle. Work is carried out at low speeds with their gradual increase to 2500.
- Don't put too much pressure on the machine. Her position will definitely change. If you polish the bumper in the same place for too long, it will be damaged. After completion of the work, the car is wiped with a soft cloth that does not leave lint behind.
- The final stage is polishing the structure with a fine abrasive paste. An orange circle is used as a nozzle.
To give the bumper a shine, it is treated with a non-abrasive paste and a circle with a black nozzle.
The video will show you how to remove scratches without painting the bumper:
Wax pencil
To remove shallow and thin damage, use a wax pencil. Mode of application:
- clean and degrease the surface using a solvent;
- dry the part, since the pencil will not work on a wet surface;
- carefully paint over the scratch - use a pencil to sort of shade the surface of the bumper;
- remove excess product.
Popular brands of wax pencils:
- Kerry body corrector pencil. Price – 150 rubles.
- Runway pencil "Pen Scratch Away Winner". Price – 240 rubles.
- Doctor Wax body pencil for painting over scratches. Price – 480 rubles.
The pencil is convenient to use, it is inexpensive, and does not harm the paintwork. However, a visible effect can only be achieved by painting over minor damage.
Hairdryer
You can deal with shallow scratches using a hair dryer. To complete the work, you will need a degreasing compound, such as alcohol.
Procedure:
- the surface of the bumper is degreased to remove dust particles and other contaminants;
- the area where the scratch is located is heated with a hairdryer - under the influence of high temperature, the plastic begins to melt and straighten;
- To prevent a dent from appearing on the bumper instead of a scratch, you need to heat it evenly.
You should not bring the device too close to the car so that the part being processed does not become deformed. Only an unpainted bumper can be heated with a hairdryer.
Repairing deep damage to the body
A scratch that penetrates the car to the metal carries the risk of corrosion and is subject to immediate restoration. The principle of eliminating damage is to remove rust and fill it with special paint-cementing compounds. Removing deep scratches on a car without painting is carried out according to the following scheme:
- The surface of the car is washed, degreased, and dried.
- If the damage has become corroded, oxidized metal particles are removed: the recess is treated with a rust converter. If the scratch is fresh, it is filled with primer for better paint adhesion.
Deep damage along the entire side of the machine
- After the treated surface has completely dried, the car's scratches are painted - paint specially designed for local repairs (for example, Touch-Up, produced in the form of a pencil) is applied inside the recess. Some car owners, in order to remove scratches from the car body, use special kits from car manufacturers, consisting of paint and varnish that are ideal for the car’s paintwork.
- When the paint and then the varnish have dried, the area is treated with abrasive polishes - coarse and fine abrasive. If possible, the surface is sequentially sanded with both compounds, but you can get by with just one.
- The last step in removing a scratch on a car is rubbing it with a restoring polish, which adds shine to the surface.
Removing chips on a car without painting is carried out according to the same scheme.
Features of metal bumper repair
Body kits made of metal are quite rare on modern cars. In terms of damage, they differ from plastic in that deep defects must be repaired as soon as possible. Otherwise, the metal will be affected by corrosion, which over time penetrates under the layer of paintwork, causing the latter to swell and begin to crumble.
Removing scratches from a metal bumper is done using the technology used for plastic body kits. Small shallow grooves are removed with a wax marker and polishing, and deeper cracks and chips are removed by touching up. But if the scratch has penetrated to the very base, then the processing technology is complemented by another operation - removing corrosion. It is done using a rust converter liquid, followed by cleaning the damaged area.
Note. Different compositions are used for priming metal and plastic surfaces; this must be taken into account when purchasing materials.
The deeper and more extensive the defect in the bumper coating, the more difficult it is to deal with it at home. Therefore, you should not get to work when a body element is covered with dents or requires complete painting. At the same time, one must understand that minor damage is not removed without leaving a trace, and the painted area, to one degree or another, stands out against the background of the old coating. Therefore, your task is to remove scratches and do it as efficiently as possible, so that the difference goes unnoticed during a quick inspection of the car.
How to repair a bumper yourself
The cost of car painting services today is quite high, so many car owners decide to do this work themselves; fortunately, you can easily paint over existing damage by choosing paint to match the color of the bumper and car body. If in the past it was difficult to carry out high-quality repairs with your own hands, today in car accessory stores you can pick up various markers and high-quality polishes that will help completely restore the appearance of the coating.
You can remove scratches on a plastic bumper yourself in the following ways:
- machine polishing;
- using a wax pencil for minor damage;
- filling deep cracks with putty and painting.
The undoubted advantage of doing repairs yourself is significant savings, and the car owner will not lose in the quality of work. If you use high-quality wax pencils and similar products, you can completely paint over existing damage. In specialized workshops, the car owner will be asked to pay at least 5-7 thousand rubles for painting a plastic body kit.