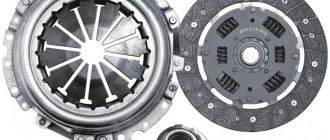
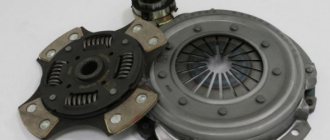
Clutch disc assembly
The clutch is one of the components of a car's transmission. When this system breaks down, further movement becomes difficult, sometimes the car stalls, and sometimes it simply does not move when you press the accelerator pedal. Let's look at how to diagnose and replace clutch elements of a VAZ 21099 car with your own hands.
Clutch system failures are felt instantly, here is a list of the main symptoms.
- When driving uphill, when you press the gas pedal, the car does not move, despite the ever-increasing engine speed.
- When driving in a straight line, acceleration time increases significantly, the engine often overheats, and fuel consumption increases.
- When stopping, pressing the brake and clutch pedals simultaneously will stall the engine.
- It is difficult and crunching to switch gears on and off when the car is moving. When the engine is off, they switch without difficulty.
- In the morning, when you try to start the car, the starter has difficulty turning the flywheel, despite the clutch pedal being depressed, and after starting, the engine runs hard and stalls after a while.
- There is a noise when you press the pedal.
- When changing gears, the car makes a jerk, and sometimes the engine stalls after it.
- The clutch release pedal is difficult to press.
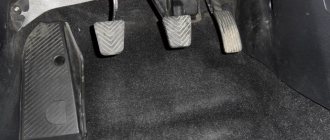
- Full pedal travel exceeds 16 cm.
Causes and troubleshooting
Installing the disk on the machine
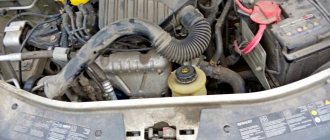
Symptoms 1 and 2 indicate critical wear of the clutch driven disc or contamination of it with engine oil that has leaked from the cylinder block or gearbox due to leaky seals of these units. To more accurately determine the cause, just look into the engine compartment and look through the window on the clutch housing cover. If there are traces of oil on the flywheel teeth, then the seals will have to be replaced. If there are no traces of oil, the clutch driven disc needs to be replaced.
Symptoms 3, 4 and 5 indicate incomplete shutdown of the mechanism. This occurs when drive parts break, driven and pressure disks are deformed, the cable breaks and the VAZ clutch drive is incorrectly adjusted.
Symptom 6 indicates a breakdown of the damper springs or wear of the release bearing. Symptom 7 indicates that the wheel hubs are jammed on the gearbox shaft splines. They just need to be removed, cleaned and lubricated. Symptoms 8 and 9 indicate that the cable needs to be replaced and the drive adjusted. Replacing the clutch assembly is also carried out after purchasing a used car.
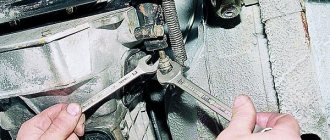
Adjusting the VAZ 21099 clutch drive is a very simple procedure, it is done like this.
- First you need to take a ruler and measure the distance the pedal moves when pressed. If it is less than 12.5 or more than 13.5 cm, we proceed to adjustment.
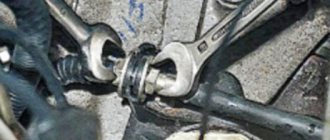
- We look into the engine compartment, remove the battery, find the place where the cable passes through the gearbox bracket (next to the ignition coil). It is secured with adjusting nuts on both sides of the bracket.
- If we need to increase the pedal travel, turn the nut located clockwise, located closer to the car interior. If, on the contrary, it is necessary to reduce the stroke, turn clockwise the nut that is closer to the front bumper.
- Again, measure the distance with a ruler: if it is within the recommended limits, the adjustment is complete.
Replacing the cable is also not a very difficult task.
- Open the hood and unscrew the adjusting nuts.
- Remove the cable from the gearbox bracket.
- Remove it from the clutch fork.
- We move into the interior, knock the lock washer off the pedal pin and remove the cable end.
- We take out the rubber gasket from the front panel from the side of the engine compartment and take the tip out.
The cable has been removed, now we install the new one in the reverse order. After installation, adjustment is required again.
see also
How to check the clutch
- 36 0 57k
Clutch faults
- 21 2 35k
Clutch pedal failed VAZ 21099
- 0 5 5k
Why is the clutch pedal on a VAZ 2109 hard to press?
- 0 3 6k
The clutch pedal fails and does not return normally, VAZ 2108
- 0 3 3k
Clutch failure is one of the troubles that can await a driver on the road. Usually, the car simply stops moving, even though the engine is running normally. Such a breakdown does not always occur suddenly; often before this you can observe some signs of an imminent breakdown.
Complex procedures
Replacing the clutch on a VAZ 2108-21099 is a labor-intensive and time-consuming process. To do this, you first need to remove the gearbox. After the gearbox is removed, you can proceed to the following operations.
Replacing the clutch cable
Replacing the fork and release bearing.
- Using a screwdriver, remove the protective cover of the plug.
- Unscrew the bolts securing the clutch basket and remove it.
- Use a screwdriver to press the spring off the release bearing clutch legs.
- We remove the bearing.
- We remove the spring.
- Unscrew the 3 bolts and remove the bearing guide sleeve.
- Use a screwdriver to grab the special protrusion and remove the plastic bushing of the fork.
- We remove the fork axle from the support sleeve and remove it from the basket.
Disassembly is complete, now we install new parts in the reverse order. When installing, it is necessary to lubricate the fork bushings with CV joint-4 grease.
- First, remove the basket and lock the flywheel.
- Unscrew the 6 bolts securing the casing to the flywheel.
- Carefully remove the clutch cover along with the driven disc, holding it with your hand.
- We inspect all parts for cracks and wear. We replace defective parts.
- We put everything back together in reverse order.
Tools required for repairs
To replace the VAZ 2109 clutch basket you need to prepare the following tools:
- standard set of keys;
- jack.
Do-it-yourself repairs are quite advisable, since the price for replacing a VAZ 2109 clutch as of March 3, 2021, on average in car services is 3.2 thousand rubles.
But self-repair is quite accessible even without an assistant, and without completely removing the gearbox. The principle of repair and the sequence of work are identical for models 2108-2115, so we suggest you see how such dismantling is performed on a VAZ 2114:
Symptoms of malfunction
The clutch release bearing itself will tell you that its life is already at its limit or it has completely failed. Therefore, your task is to monitor the behavior of the car and promptly respond to emerging problems.
Sign of breakdown
Peculiarities
The clutch pedal becomes hard to press
Initially, this only causes a certain discomfort, since you have to apply more force to change gears. But this phenomenon should not be ignored. Bearing needs to be replaced
Difficulty engaging first and reverse gears
This indicates that the bearing's life is gradually ending, and you urgently need to take action. If you don't do this, you will soon be unable to engage any of the gears in your transmission.
The car doesn't pull
There is a loss of efficiency and performance of the box. Consequently, it is not possible to change gears correctly and quickly. This makes maneuvers, overtaking and a banal increase in speed more difficult.
This happens occasionally at first, and therefore almost every time you change gears. This symptom clearly indicates that it is time to send the car to a service station or garage for repairs.
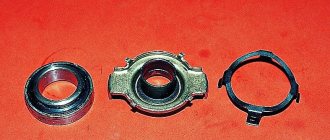
Old and new VP
If the release bearing is not replaced in a timely manner, the gearbox will soon fail, the clutch will not work, and this will lead to dire consequences.
Consequences of wear
If you have encountered such a phenomenon as wear of the clutch release bearing, then you probably often drive your own VAZ 2109. It is time and the many kilometers traveled that lead to such breakdowns.
If the bearing is not replaced in time, this will result in the following consequences:
- Any subsequent trip may be the last for the car;
- The clutch disc will overheat, which will lead to destruction of the lining;
- In addition to replacing the bearing, you will have to replace the entire clutch disc;
- It is not uncommon for the clutch to fail. If you hear an incomprehensible noise coming from the clutch system, then there is a problem with it.
Let's summarize
If the check shows that the free play is normal, but you doubt your competence in adjusting the unit, contact a service station. Incorrect settings can cause rapid clutch failure. If you want to complete the work yourself, you can find the necessary information on the vehicle manufacturer’s website or in its service book. It is important to complete the work in a timely manner so as not to get into an unpleasant situation on the road. Monitor the service life of clutch parts; for example, the service life of the driven disc is 100 thousand kilometers. But, if a motorist has an aggressive driving style, it can decrease by 2-3 times.
Replacement
Not all car owners decide to replace the release bearing (TR) themselves. But if you are ready for this kind of work, then go for it.
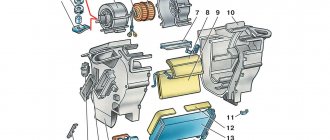
VI components
Therefore, think twice before making a final decision. There is always the opportunity to contact a car service.
To work you will need the following set of tools and materials:
- Set of wrenches;
- Jack;
- Several durable bricks;
- New release bearing;
- Screwdriver Set;
- Container for draining transmission fluid;
- Clutch holder;
- Garage with a pit or lifting mechanism.
It is better to divide the entire replacement procedure into two main stages.
- Removing the gearbox.
- Bearing replacement.
Many people make the mistake of relaxing too much when they finally change the bearing. In practice, reassembly often causes more problems than dismantling work. Please take this into account.
Dismantling the gearbox
- Place the car over a hole or overpass.
- Lift the hood, remove the negative terminal from the battery and throw it aside.
- Disconnect the ground wire from the clutch housing.
- Use a screwdriver to remove the engine splash guard. To do this, you need to unscrew several screws that hold the mudguard to the elements of the side wings. For the VAZ 2109, a key size of 8 is used. Having removed all the screws there, remove the parts of the engine mudguard and put them away for now.
- Disconnect the transmission drive rod. To do this, use a 13mm wrench to loosen the clamp bolts. Next, use a screwdriver to separate the ends of the clamp and disconnect the element from the gearbox.
- Be sure to disable the reverse optics sensor.
- Place blocks or bricks under the rear wheels of the car to prevent the car from moving.
- Remove the front wheels by first loosening the bolts and lifting the front part of the body. After removing the wheels, place pre-prepared bricks under the body.
- Using a 17 wrench, unscrew the nuts securing the ball joint to the steering knuckle on both sides.
- The extension is moved to the side, and the fastening screws of the left extension to the vehicle's suspension arm are unscrewed.
- Using a 10 mm wrench, remove the fasteners of the lower clutch housing cover.
- Remove the transmission mounts. This is done as follows. Place supports or bricks under the engine and a jack under the box. Unscrew the mounting screws of the support to the body with a 17mm wrench. After removing the bolt, remove the support bracket by unscrewing several corresponding nuts.
- We proceed directly to dismantling the gearbox. Using a 19 wrench, unscrew the fasteners of the clutch housing to the cylinder block. Use a jack to lower the gearbox slightly and move it away from the engine. Lower until the input shaft begins to come out of the box.
- Enlist the support of a partner, since it is quite difficult to remove the gearbox alone.
- Make sure that the gearbox input shaft does not rest on the clutch spring petals. If you allow this situation to happen, you will simply damage them.
- Carefully place the gearbox on the supports, being careful not to hit it. Otherwise, repairs will cost much more than buying a new bearing.
Order of Operations
To carry out repair work, you need to place the car on an inspection hole, put it on the handbrake, disconnect the negative terminal to de-energize the on-board network, and remove the engine mudguard. Now you can start disassembling:
- Install a jack that will temporarily replace the front pair of wheels. You need to unscrew the nuts on them, remove the chassis and put them aside.
- To remove the contact part of the ball joint from the hub, you need to unscrew the bolts.
- Instead of the 2 upper conventional bolts, you need to install cylinder head fasteners.
Now you can remove the starter; it is attached to three nuts that need to be unscrewed.
At this stage it is necessary to install a jack under the engine. After this, the side motor support is detached.
After this, you can disconnect the rear engine mount and unscrew the gearshift linkage.
The protective cover must be removed from the clutch.
- The box is secured with several bolts; first you need to unscrew the front one.
- Now the transmission is accessible, the rear nut is unscrewed first.
The gearbox bolts are located on the left wing side; they need to be unscrewed until they stop and the gearbox should be removed. It is important to ensure that the end of the assembly rests on the lever extension. This will create a gap that will allow you to remove the clutch. IMG9Disassembly is complete. At this point, the guide for the clutch remains. It needs to be thoroughly lubricated. After this, you can put the release bearing on the guide.
- Subsequent operations are performed in the reverse order of the above steps. Important! There is no need to rush while completing the work. All operations are performed consistently and calmly. Make sure that after assembly there are no “extra” spare parts left.
How to replace a VAZ 21099 clutch, watch this video:
Signs and causes of clutch failure
The VAZ 2108, 2109, 21099 clutch consists of a basket, a pressure bearing, a drive and driven disk. The main signs of a clutch malfunction are clutch slipping and incomplete disengagement:
- When switching off is incomplete (the pedal is pressed), there is difficulty shifting gears with the engine running, noise and crackling noises when changing gears, and large free play of the clutch pedal.
- When the clutch “slips” (the pedal is released), a burning smell may be felt in the cabin from the burning of the clutch disc linings, the car’s dynamics will deteriorate, the engine may overheat, and fuel consumption will increase.
In addition to the clutch disc itself, the release bearing can also fail - it serves to smoothly engage and disengage the clutch. When the release bearing wears out to the limit, you can hear a characteristic squealing sound - this is a sure sign that the bearing needs to be replaced. The cause of clutch failure may also be a breakdown in its drive mechanism, for example, a break or jamming of the clutch drive cable, a breakdown of the lever system, a fluid leak from the hydraulic drive if the clutch is hydraulic, or other similar breakdowns in the drive.
By the way, when replacing the release bearing at a service station, they may advise you to also replace the clutch disc. Usually, if problems begin with the clutch, it is better to replace all these parts, because replacing the clutch is very difficult: you need to remove the gearbox. But if someone wants to save on this, then all clutch parts can be purchased separately.
To work you will need the following:
- wrenches 8, 10, 13, 17 mm;
- torque wrench, 8 mm socket;
- jack;
- container for draining oil;
- inspection hole or lift.
- flat screwdriver, hammer.
Incomplete shutdown
Many experienced motorists can quickly determine that there is a significant problem when the clutch begins to “lead.” This happens due to its incomplete engagement, while the main symptom may be the appearance of a crunching noise at the moment when the driver engages the gear, but the car has not yet moved.
Most often, the cause of such a malfunction is the deformation of various structural elements of the clutch, for example, the driven disk or release levers. An excessive increase in clutch pedal free play may also be a possible factor.
Replacing the clutch on a VAZ 2109/21099 without removing the gearbox
Replacing the VAZ 2109/21099 clutch without removing the gearbox is quite difficult. You will not find instructions or recommendations on this topic in the car's owner's manual. These recommendations are based on the experience of car enthusiasts who share their experience of replacing the clutch.
The main problem when replacing a clutch is that not every motorist has an overpass, a pit, and especially a lift, and it is necessary to make sure that the massive gearbox does not fall to the ground. But lifting it is problematic, since it is impossible to crawl under the car with it. All steps for removing the gearbox are almost the same as the instructions above, with the exception of some nuances:
- Purchase two bolts from the upper arm of the classic front suspension from the store. Their threads are exactly the same as those on the bolts that secure the box and the engine block together.
- Screw them in from above, only after that, with a small crowbar or screwdriver, we begin to disconnect the nodes. After moving away, the rear part of the box will rest on the transverse rod, and a gap of about 15 centimeters will form between the clutch housing and the flywheel.
- The release bearing is removed through the resulting gap and the bolts on the basket are unscrewed.
Installation of new spare parts, disk alignment
The new disk is installed in the same way as the old one, and is clamped by the basket, only before screwing the basket all the way, the driven disk must be centered, otherwise the input shaft of the box will not fit into it. The easiest way to center it is with a special mandrel, but if you can’t get one, you can do everything by touch. We screw the basket onto all the bolts, having previously pushed the driven disk under it, but we do not screw it all the way, but so that the disk moves under it. We need to align it in the center, this can be done by touch by sticking your finger into the middle hole, by touch we align everything in the center and only after that we tighten the bolts. We check whether everything is in the center, if so, then tighten the bolts, first locking the flywheel. The clutch is in place. If it is not positioned in the center, then if you put the box on, it won’t fit. Well, then we put the box on, if it doesn’t want to sit down, you can shake it, twist the drive so that the input shaft rotates and takes the desired position, everything should jump up quite easily. After that, we fasten everything that was unscrewed, see if there are any extra parts left on the sides, if there are any, then we screw them where necessary.