Basic cooling system maintenance work
EO.
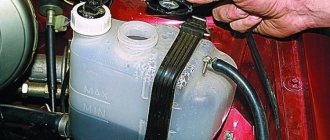
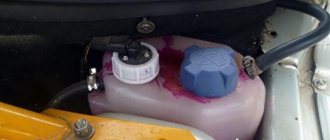
Check the fluid level in the radiator. The water level should be 15-20 mm below the filler head.
When filling the cooling system with antifreeze, you need to fill it 6-7% less than water by volume, since when heated it expands more than water. When antifreeze evaporates, add water, and if there is a leak, add antifreeze.
Check for fluid leaks in the cooling system.
TO-1.
Check that there are no fluid leaks in all connections of the cooling system; if necessary, eliminate leakage. Lubricate the water pump bearings (according to the lubrication schedule). The lubricant is pumped with a syringe through the oiler until it appears from the control hole of the pump. Further injection of lubricant can lead to squeezing out the seals.
TO-2
. Check the cooling system for leaks and, if necessary, repair fluid leaks. Check and, if necessary, secure the radiator, its lining and shutters. Check the fastening of the water pump and the tension of the fan drive belt; If necessary, adjust the belt tension and tighten the fastening. Check the fan mounting.
Lubricate the water pump bearing (as scheduled). Check the operation and tightness of the heating system and the operation of the blinds. When the handle is in the extreme forward position, the blind plates should be completely open, gradually closing as the handle is moved towards you.
Check the operation of the steam-air valve of the radiator cap, CO. Flush the cooling system twice a year. Check the condition of the insulating cover (in winter) and the reliability of its fastening. When preparing for winter operation, check the condition and operation of the starting heater and other auxiliary means for facilitating engine starting installed on the vehicle, and, if necessary, correct the malfunction.
When storing cars without a garage in the cold season, after finishing work, it is necessary to drain the water from the cooling system by opening the taps on the block and the lower radiator pipe, the radiator filler cap and the body heating system tap.
Source
Cooling System Maintenance
During maintenance of the cooling system, the coolant filling is checked, there are no leaks, the tension of the fan drive belts is checked and adjusted, the radiator mounting, the operation of the shutters, the fan, the water pump, the operation of the thermostat and the steam-air valve are checked, and scale and sludge are periodically removed from the system.
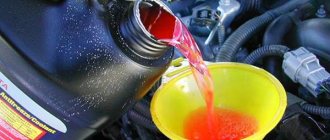
The engine cooling system is filled with low-freezing liquid, and in the summer it can be filled with water; the KamAZ-740 engine system is filled only with low-freezing liquid “TOSOL-A-40M” or “TOSOL-A-65M”.
During ETO, the fluid level in the system, the tightness of connections, and whether there are any fluid leaks are checked.
Cooling system malfunctions
The need to repair the cooling system arises in the event of constant overheating or undercooling of the coolant, a decrease in the level of coolant in the system as a result of a leak, the occurrence of electrolysis in the coolant, etc.
Overheating of the coolant causes engine detonation, which sharply increases wear on the cylinders and piston rings, leads to burnout of the pistons and reduced durability of the plain bearings (liners). Disruption of the combustion process of the fuel-air mixture during overheating and an increase in friction forces lead to an increase in fuel consumption and a decrease in engine power. A decrease in coolant temperature in the engine cooling jacket increases wear of CPG parts due to oil being washed away from the cylinder walls by fuel. The oil is diluted by fuel entering the oil sump, resulting in more intense formation of resin and varnish deposits on the pistons and piston rings.
A decrease in coolant temperature for every 10 °C from the nominal value reduces engine power by 1.5% and increases fuel consumption by 2%.
Engine overheating can be caused by: lack of coolant in the cooling system due to its leakage or boiling over, clogging of the system, breakage or slipping of the fan drive belt, failure of the electric or fluid coupling of the fan, jamming of the thermostat in the closed position or the blinds in the closed position, incorrect setting the ignition timing.
Malfunctions of the radiator and tank, how to fix them
Possible malfunctions of the cooling radiator:
- mechanical damage to the tanks, which manifests itself in the form of cracks, dents or holes;
- frame plates may crack or break;
- if the radiator has been soldered, then there may be liquid leaks in these places;
- cooling plates or tubes may be damaged;
- The system may become clogged due to the appearance of scale or insects.
Repairing a car's cooling system in the event of scale or contamination of the radiator begins with the need to clean the system using a special installation and heated washing liquid to a temperature of 70-85 degrees Celsius. Washing is carried out with ordinary water.
As for repairing barrels, everything is somewhat more complicated. For example, if a dent appears on a brass tank, you can remove it with a mallet. First you need to lay the part on a wooden lining. If there are cracks, but they are not too large in size, then you can simply fill them with solder.
DETAILS: Engine crankcase and gearbox protection - which is better
If there is damage to the upper or lower expansion element of the system, they are usually restored by installing patches. To install a patch into the internal combustion engine cooling system, you need to clean both the damage site and the patch, they are tinned, and then soldered to each other.
Sometimes it happens that there is damage to the tubes and it is not possible to install a patch. In such cases, the problem can be fixed by soldering it at both ends. However, in this way, only three pieces are allowed to be soldered for one radiator.
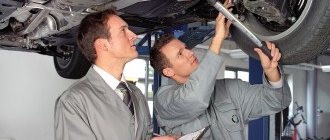
2. Diagnosis of the engine cooling system
General diagnostics of the technical condition of the cooling system consists of determining its tightness and heat balance.
A conclusion about the tightness of the system is made by visually verifying that there is no coolant leakage when the engine is running or not running, as well as by the rate at which liquid decreases from the expansion tank during vehicle operation.
The thermal balance of the system is judged by the time it takes for the engine to warm up and maintain its rated operating temperature under normal load. The check is carried out using a coolant temperature gauge.
The operation of the cooling system is considered satisfactory if the engine temperature is maintained within 85...95 °C when the loaded vehicle is moving at a speed of about 90 km/h.
You can check the general condition of the cooling system and find specific coolant leaks by supplying air under low pressure into the cooling system.
To check the tightness of the cooling system, you can use an air network (Fig. 1, a), and in case of its absence, an air pump (Fig. 1, b), which is connected to the plug of the expansion tank or radiator.
Using a reducer or pump, raise the pressure to the opening pressure of the expansion tank plug (0.09...0.13 MPa) for 2 minutes. Monitor the pressure gauge reading: the pressure must be stable, otherwise visually detect coolant leaks or check the coolers of individual engine components (recirculation systems, oil cooling radiator, etc.).
The reason for the rapid decrease in coolant in the system may be improper operation of the expansion tank plug valve and its insufficient tightness. If this malfunction occurs, it is necessary to check the condition of the plug valve and its opening pressure (the pressure value is indicated in the technical specifications of this engine).
Rice. 1. Checking the tightness of the cooling system using an air network (a) and an air pump (b) : 1 - pneumatic reducer; 2 - pressure gauge; 3 — sealing nozzle; 4 - radiator; 5 - pump; 6 - expansion tank plug
The performance of the radiator is determined by the difference in coolant temperatures in its upper and lower parts, which should be within 8...12 °C. A decrease in the temperature difference indicates the presence of scale in the radiator tubes or its contamination.
When checking the thermostat, it is removed from the engine and placed in a container with liquid at ambient temperature. You can use ordinary water, but given that the coolant temperature in modern engines can exceed 100 °C, it is advisable to use technical glycerin, whose boiling point is higher. In the case of using water, you can only set the beginning of the valve opening. The liquid is gradually heated; at a temperature of 70...80 °C (depending on the engine model), the thermostat valve should begin to open. The opening temperature is taken to be the one at which the stroke of the valve located on the side of the radiator inlet pipe is 0.1 mm. To more accurately determine the stroke value, you can use a dial indicator on the bracket. A further increase in temperature to 90...110 °C (depending on the engine model) should lead to full opening of the valve (6...8 mm). If, after carrying out the above check, it is determined that the thermostat does not meet the specified conditions, it is replaced with a new one, since it cannot be repaired.
If there is a coolant leak from the radiator, if it is not possible to find the location of the leak, the radiator is checked for leaks. There are two ways to check: directly on the car and with the radiator removed.
When checking on a car, the radiator is filled with water, all pipes are closed with plugs, leaving one open (through which air is supplied to the radiator at a pressure of approximately 0.1 MPa). The location of the leak is determined by where the water appears.
However, due to the difficulty of accessing the radiator, it is more convenient to check it by removing it from the car. After removal, close the filler neck and all radiator pipes, leaving one open, through which air is supplied to the radiator at a pressure of approximately 0.1 MPa. Place the radiator in a bath of water and observe the appearance of air bubbles, which will indicate the exact location of the leak.
The liquid pump is checked for leaks through the lower inspection hole. If the pump makes noise during operation, its axial play is also checked. If there is a coolant leak from the liquid pump, noise during operation and increased axial play of the pump, it is removed from the engine, disassembled, checked and, if necessary, the pump is repaired or replaced.
Radiator seal problem
Sometimes it happens that liquid leaks, but all o-rings, connections and other elements are securely fastened. In this case, you need to check the radiator itself. Repairing a car's cooling system in this case involves identifying the location of the leak and eliminating it.
To identify the location of the leak, you need to fill the radiator with water, close all the tubes with special plugs, after which air is supplied through the open pipe at a pressure of 1 kgf/cm. In the place where water appears there is a liquid leak. Quite often it happens that access to the radiator is severely limited, and checking is quite difficult. To solve this problem, you will have to remove the part from the car.
- To begin with, the coolant is completely drained from the radiator and engine into a container.
- Next, you need to disconnect all the electrical wires that go both to the fan and to the sensor that turns it on.
- After this, all remaining hoses from the radiator and from the expansion tank are disconnected.
- Next comes a rather complicated stage, at which you need to remove the casing guides. There are four of them - top, bottom, right and left. To remove the top mount, you need to remove the radiator from special grooves; to separate it from the right clamp, you need to disconnect it from three mounts, and from two more on the left side. The lower casing is attached directly to the radiator using three bolts that will have to be unscrewed.
- After this, you need to remove the electric fan from the radiator without disconnecting it from the casing itself.
- By this time, the radiator will be held in place only by bolts that are screwed to the bottom bracket; they need to be unscrewed and the part removed.
- The last step is to remove the expansion tank, for which you need to unscrew another bolt.
Cooling system maintenance
Currently, the cooling system is filled with special non-freezing liquids (antifreeze), which are a mixture of ethylene glycol and water (solution density 1067...1085 kg/m3) with the addition of anti-foam and anti-corrosion additives. It is also possible to use water, but in this case, deposits of calcium, magnesium and other metals contained in the water form on the internal surfaces of the cooling system elements.
Scale has low thermal conductivity and impedes heat exchange between water and cooling system elements, reduces the cross-section of radiator tubes, and impairs water circulation. For example, a layer of scale more than 1 mm thick increases fuel consumption by up to 20...25%, oil consumption by up to 25...30%, and reduces engine power by up to 10...20%. To reduce the scale layer, softened water with a low salt content, obtained by electromagnetic treatment of water, is poured into the cooling system (water is repeatedly pumped through a magnetic force field in the direction perpendicular to the power lines). As a result, the water acquires new properties: the salts it contains do not form scale and fall out in the form of sludge. In addition, it helps dissolve previously formed scale, turning it into an easily washable powder. You can also soften water: by boiling; adding soda, lime, ammonia; purification from salts by passing water through mineral, glauconite or sodium cation filters.
If scale still exists, it is removed using special substances, which are divided into alkaline and acidic.
The basis of alkaline compositions is caustic or soda ash (1 kg of soda and 0.15 kg of kerosene per 10 liters of water). Alkaline compounds are poured into the system for 5...10 hours, then the engine is started for 15...20 minutes and the solution is drained. After this, it is advisable to flush the cooling system with water, since alkaline solutions cause corrosion of non-ferrous metals (aluminum alloys of the cylinder head, brass radiator elements and their solder joints).
As acid compositions, a 5...10% aqueous solution of hydrochloric acid with the addition of 3...4 g/l of utropine is used to protect ferrous metals from corrosion. The sludge is washed off with water, passing it in the direction opposite to the circulation of the coolant.
After repairing or replacing elements of the cooling system, as well as every 60 thousand km, after three years, or according to the instructions of the vehicle manufacturer, the coolant should be replaced. The need for replacement is due to the fact that the anti-corrosion components contained in the system, during the process of filling it, are deposited on new or repaired and cleaned parts to form a persistent anti-corrosion layer.
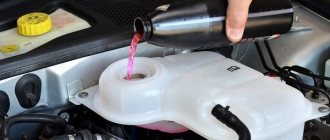
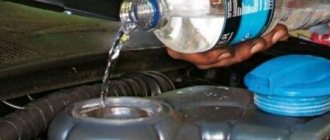
Coolant replacement should be carried out on a cold engine or with heated liquid on a warm engine in order to avoid its damage due to sudden cooling of metal parts: set the heating regulator in the cabin to the maximum degree of heating so that the coolant fills the heater radiator, remove the cap from the expansion tank and open the tank taps radiator and cylinder block (if equipped).
Many modern cars have special plugs to remove air from the cooling system; There may be several plugs or one, usually located near the thermostat housing. Before filling the system, the plugs are unscrewed slowly in a continuous stream and the system is filled with liquid until it begins to flow out through the plugs. Then the plugs or taps are tightened, and the liquid is added to the expansion tank or, if there is none, to the bottom of the radiator neck. If the fluid level in the expansion tank has stopped decreasing, you should vigorously squeeze the lower radiator hose 2-3 times.
After filling the system, the engine is started, warmed up to operating temperature and allowed to run for 3...5 minutes, periodically changing the crankshaft speed from minimum to 3000 rpm. Stop the engine and add coolant if necessary.
Currently, special installations are used to replace coolant (Fig. 2). With this installation you can:
- replacing coolant without airing the system;
- checking the engine cooling system for leaks;
- checking the functionality of the overpressure valve on the radiator cap or expansion tank;
- checking the functionality of the car thermostat;
- checking the actual fluid temperature in the engine cooling system;
- checking temperature sensors;
- pressure control in the engine cooling system;
- checking the voltage of the car battery and generator.
Rice. 2. General view of the installation for replacing coolant
The unit is connected to the vehicle's cooling system in the upper radiator pipe. The coolant is replaced with the engine warmed up and turned off when new coolant is supplied under pressure (0.3 MPa).
The above installation can also be used to replace the coolant in the cooling system of an automatic transmission (AT).
3.1. The main work performed during maintenance of the cooling system
During maintenance of the cooling system, the work described below is performed. EO. Check: the operation of the heating system and glass heating (in the cold season), ventilation system; coolant level in the cooling system.
TO-1. Inspect the tightness of the engine cooling system (including the starting heater), as well as the fastening of equipment and instruments to the engine.
TO-2. In addition to the TO-1 work, check: by inspection the tightness of the heating system and the starting heater; condition and operation of the radiator blind (curtain) drive, thermostat, drain valves; fastening the radiator, its lining, shutters, hood, fan, liquid pump.
SO (seasonal service). Check the condition and operation of the cooling system valves and drain devices.
Source
Power system diagnostics
If there is any malfunction in the power system, a light with the inscription “CHECK” lights up on the vehicle’s instrument panel. To identify a malfunction in the EFI (electronic fuel injection system), it is necessary to perform a self-diagnosis. The car has a diagnostic connector under the hood. With the inscription “DIAGNOSTIC”.
This car has an engine control unit equipped with a self-diagnosis system. It is as follows. If the readings of any sensor deviate from the parameters stored in the computer, this sensor is turned off and a bypass program is activated. When the sensor becomes operational again, the bypass program will be removed and the engine will start working normally. While the bypass program is enabled, a light with the inscription “CHECK” or with an image of the engine will light up on the display if a malfunction has occurred in the engine. When the problem is corrected, the light will go out. But information that there was a malfunction is entered into the computer’s memory, and if the computer’s power was not turned off (for example, when the battery is removed, the constant power to the computer disappears), this information can be read on the instrument panel. There are malfunctions in which the engine stalls, and there are those in which everything in the engine’s operation is normal at first glance, but, for example, fuel consumption is increased, or some kind of dip appears when the speed increases, etc. In any case, the “CHECK” light will light up and the malfunction, or rather its code, will be stored in the computer’s memory. This system is very convenient for diagnosing random engine failures.