When to change CV joint
There may be several signs of problems with the operation of such devices. Usually, drivers determine by the sounds from the car's suspension that the CV joint needs to be replaced. This is indicated by a crackling noise when the car turns sharply. To make sure that you urgently need to replace the CV joint, you should stop and turn the wheels to their extreme position. A crunch that appears after starting means that the damaged front CV joint needs to be replaced.
The appearance of the same sounds when the wheels are turned in the opposite direction means that the mechanism on the other side of the wheel has come to an end. In such a situation, the condition of the protective covers should be assessed. It is better to put the car on a lift and inspect them carefully. If fresh signs of grease are visible near them, the bellows need to be replaced. If its rupture is clearly visible and there is no lubrication, you will need to immediately replace the CV joint.
Symptoms of a problem
The operation of a CV joint is always associated with the impact of enormous loads. Despite the use of high-strength materials in the design of the unit, it can sometimes fail. The following reasons contribute to this:
- Use of low quality materials in the manufacture of assembly parts, use of counterfeit or defective spare parts.
- Lack of lubricant inside the mechanism or its poor quality.
- Water or abrasive debris getting inside the mechanism due to damage to the boot.
- Excessive load on the mechanism due to poor road conditions or aggressive driving style.
- Long-term operation, during which the life of the parts is exhausted.
A malfunction of the internal CV joint is manifested by the following symptoms:
- A characteristic crunching sound when hitting obstacles, starting from a stop or sharp acceleration.
- Jerking and vibration during acceleration.
- Play in the joints of the hinge when the wheel is hanging.
What is needed to install a new CV joint
If the car owner lacks locksmith skills, it is better to immediately go to a decent car service center. They will replace the mechanism at a reasonable price. Experienced car mechanics do this work quickly. If you want to do it yourself, you need to prepare:
- lift;
- set of spanners;
- pliers;
- screwdriver;
- metal pipe as a lever;
- bench vice.
You will need a new CV joint with a protective cover included, fixing clamps and lubricant. To make it more convenient to change the CV joint, part of the transmission oil is drained from the gearbox. To dismantle the drive, the front wheel is removed from its side. Then the hub nut is unscrewed with force, the brake disc with caliper, ball joint and steering wheel tip are dismantled.
To ensure greater torque when unscrewing and screwing the hub nut, it is better to stock up on a pipe that is put on the wrench. The splined drive shaft of the device is removed from the gearbox using a pry bar, which is used as a lever. Then, carefully knock out the outer joint from the wheel hub with a hammer and a wooden block.
Disassembly - assembly of the internal hinge
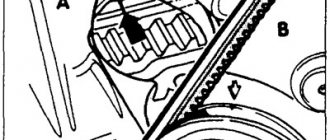
1. Photo 1. Internal hinge.
Use a sharp object to make marks for correct subsequent assembly.
2. Photo 2. Rotate the hub with the separator and balls in the hinge body.
3. Photo 3. Remove the hub and separator with balls from the housing.
4. Photo 4. Using a screwdriver, remove the balls from the separator. It is advisable to remove the balls and arrange them in a certain sequence for further installation in their “native” places.
5. Photo 5. Having turned the hub in the separator, remove the hub from the separator.
6. Photo 6. Inspect the hinge body, hub, cage and balls for damage and wear. Signs of wear on the hub.
7. Photo 7 Assembly. Insert the hub into the cage and install the balls.
Read more: Xenon for Ford Focus 2 pre-styling
9. Photo 9. Aligning the previously placed marks, install and rotate (lay) these parts into the hinge body.
10. Photo 10. For filling the joint with lubricant.
11. Photo 11. For filling the joint with lubricant.
Replacing the outer CV joint
- We tear off the mounting bolts from the wheel and the hub nut, and place wheel chocks under the rear wheels. (To make it easier to tear off the nuts, it is better to use an extension for the wrench).
- We jack up the car and put it on a stand (under no circumstances do we work on a jack) and hang the wheel.
- We remove the wheel.
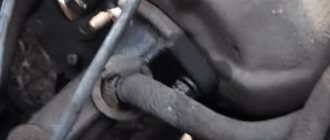
- We unscrew the 2 bolts that secure the ball joint to the steering knuckle.
- If it doesn’t work, use a wrench extension and WD-40.
- We turn the steering wheel to the side and slightly pull back the steering knuckle with the stand and remove the outer part of the hub along with the CV joint (For convenience, you can make several gentle blows with a hammer).
The installed hinge, together with the outer CV joint boot, is fixed in the hub. All that remains is to add the oil drained before dismantling into the gearbox. Such a replacement of the outer CV joint does not present any great difficulties, and can easily be done independently. The partially disassembled front suspension is restored after installing a new outer joint.
Dismantling the CV joint
2. Having installed soft pads on the jaws of the vice, we secure the hinge in the vice. Using a permanent marker, we apply marks to the end surfaces of the hinge parts, determining their relative position.
Helpful advice. In the absence of such an “indelible” marker, marks can be applied with a diamond file.
Warning. When securing the CV joint (inner joint) in a vice, be especially careful with the surface in contact with the working edge of the transmission oil seal. Even minor scratches on this surface will damage the seal.
3. Using a thin slotted screwdriver, remove the retainer from the hinge body.
4. Remove the inner race from the hinge body along with the balls and separator.
5. Place the separator on a clean surface, slightly move the inner race down and remove the balls from the separator. We place the balls in the prepared chute, starting from the first ball located opposite the mark, and then clockwise. During assembly, each ball must be installed in the place from which it was removed.
6. Having turned the inner race inside the separator so that its spikes are located opposite the separator windows, remove the race from the separator.
7. Thoroughly wash all CV joint parts in kerosene. We check all parts for any damage. If any signs of corrosion or wear are found on any of the parts, we replace the CV joint assembly. The use of balls from another CV joint is not allowed.
Replacing the inner CV joint
Replacing the internal CV joint, which transmits torque from the gearbox to the shaft, is easier than replacing the external one. To decide how to remove the CV joint connected to the gearbox, just look at it on the lift from below. It can be fixed to the box in various ways. After releasing it from the fastenings, it is enough to turn the wheels all the way so that the inner CV joint is removed as if it is not being held in place by anything. Before removing the inner CV joint, remove the boot, housing, three rollers and the retaining ring securing the three-beam fork to the shaft. She is also filming.
The inner CV joint can be removed either separately or on the drive together with the outer one. Using this method, replacing the inner CV joint is not too difficult. If you have a tripod CV joint, then when installing it back, minor difficulties are possible. The three-spoke plug may not fit into place. The rollers located on it may not fit into their guide grooves inside the housing. It is enough to turn the drive shaft a couple of times, and they will be where they need to be.
You should be aware of the plastic plug removed from the damaged product. It is installed on a new, grease-filled inner joint. If necessary, update the boot of the internal CV joint. It is more convenient to do this from the end of the shaft closest to the transmission. First of all, the inner boot of the CV joint, the locking ring, and then the device itself are removed. Replacing the inner CV joint boot does not require excessive effort and does not take much time.
Diagnostics of CV joint faults
During operation, the CV joint is subjected to mechanical stress, which necessarily leads to wear of the mechanism. The most common malfunction is the wear of the boot, which tears, thereby allowing dust and foreign particles to enter the joint. Eventually, the CV joint will pop out of the drive shaft or transmission, and the vehicle will no longer be able to move.
You can recognize a grenade malfunction using the characteristic crunch of the CV joint that occurs when turning. This sound cannot be confused with anything else, and at the first sign of its appearance, it is necessary to urgently replace the part.
To determine which grenade needs replacement, you can perform two simple tests. The first involves checking the performance of external CV joints, and the second - internal ones.
- Find a large enough flat area and turn the steering wheel all the way in any direction. Engage first gear and try to move off quickly. If the same crunch was heard when you started driving, then the outer CV joint needs to be replaced. The replacement side is determined by the direction of movement, that is, in which direction you turned the steering wheel - on this side the faulty unit is located.
- A different test is used to test internal grenades. Find an area with a shallow ditch. Start moving towards the ditch at an angle. This means that one of the front wheels will end up in the ditch much earlier than the other. The resulting crunch when driving through a ditch indicates a malfunction of the CV joint whose wheel, at that moment, fell into the ditch.
How to remove and replace the CV joint yourself - technology for removing the internal and external
Hello, dear car enthusiasts! Front drive wheels provide car owners with many bonuses in the form of: more responsive steering, increased maneuverability, stability on slippery roads and other delights.
In return, the machine, namely its chassis coupled with the drive, will require additional attention. The front wheels are able to pull the car only thanks to the presence of a shaft connecting the hub to the variable gearbox.
However, that's not all. It would be impossible to transmit rotation from the transmission to the wheels without special devices installed at the ends of the shaft - CV joints.
A constant velocity joint is, today, the only way to transmit rotational motion between axle shafts located at an angle to each other.
In this regard, any self-respecting car enthusiast should know how to remove and disassemble the CV joint, diagnose, maintain and repair it.
How to remove a CV joint yourself without the help of a car service
Despite the apparent complexity of the front-wheel drive design of a car, regardless of its make and model, the design of this unit is quite simple and similar in all cars.
In order to remove and replace the CV joint, it is enough to have a garage with an inspection hole or an overpass to facilitate access to the lower part of the car, as well as a set of standard tools.
As a rule, experienced car enthusiasts manage their work without any special devices, but if there is a desire to speed up repair work, you can purchase a CV joint puller.
Considering that each drive wheel has two hinges, repair work can be carried out depending on the following types of failure:
- removal of the internal CV joint and its repair;
- removing the outer CV joint;
- Removal and repair includes a shaft and two joints.
How to remove the inner CV joint in the garage
Repairing an internal CV joint is an event that is quite rare, but you must have the skills to handle this mechanism, because for its long life it is necessary to carry out preventive measures, replacing the boot and lubricant.
Before describing the technology that includes removing the internal CV joint, it should be noted that in this case, an inspection hole will be simply necessary, because the joint cage is bolted (6-8 pieces) directly to the differential gears, and this is the lowest point of the transmission.
After all the fastening bolts have been unscrewed, the steering wheel should be turned to free the spline joints from moving freely. Using a pry bar, the CV joint is very easily removed from the mounting socket. Removing it from the shaft is also easy; to do this, you just need to unfasten the retaining ring and the boot clamps.
A strong recommendation to all car enthusiasts: you should not remove the CV joint from the shaft under the car and, especially, do not disassemble it. It is much more convenient and rational to remove the shaft with two CV joints at the same time, and then perform all the manipulations on the workbench with a vice.
How to remove the outer CV joint yourself
The outer CV joint, which is installed directly at the hub, although more accessible, will require more time and effort to remove. Here you will have to almost completely disassemble the front suspension.
The wheel is removed, the hub nut is unscrewed and the lock washer is removed. After unscrewing the lower ball joint, the moving strut allows you to remove the CV joint axle shaft.
Repairing CV joints can be associated with certain difficulties. The first is the inability to remove the axle shafts or shaft from the splined joint. There are several options for getting out of the situation. First you need to take a wooden or brass spacer and try to knock out the axle shaft.
If nothing could be done at this stage, you will need a CV joint puller. One of the most common and simple pullers is made in the form of a horseshoe, which is attached to the axle shaft, and the thrust bolts remove the CV joint when rotating.
Kinds
In modern cars, only 2 types of designs are used for internal CV joints.
- “Receiver” - used in the vast majority of external grenades, and on some cars as an internal CV joint (for example, Volkswagen Transporter T4). The unit consists of the following parts: a housing with a splined part that fits into the wheel hub, a separator, a race, balls and a retaining ring.
- “Tripod” is a three-pin joint that works in relatively small angles (up to 25º). Nevertheless, this is quite enough to compensate for suspension travel, displacement of the power unit and gearbox in turns, when driving over uneven surfaces, which is why the Tripod is most often used for the manufacture of internal CV joints. Structurally, it consists of a body in which running tracks are machined, a hinge with rollers and a locking ring.
Rzeppa
As an example, let's take the internal velocity joint of the VW Transporter T4. In order to assemble a ball CV joint, you need:
- fix the drive shaft in a vice;
- put a boot with a metal shield on the shaft;
- install a limiting ring;
- the housing with the separator and inner race can be assembled separately. It is necessary to put the separator on the holder and place it inside the housing. Then, turning out the cage and separator, insert one ball at a time. The video shows the assembly process of a CV joint fixed in a vice. Initially, a race, separator and housing are put on the drive shaft. Then, as in the previous case, balls are inserted into the grooves one by one.
Tripod
It is much easier to assemble a tripod-type CV joint. All you need is:
- install the boot on the drive shaft in advance;
- place a hinge with rollers on the slots;
- fix the hinge by installing a retaining ring (there is a groove for it on the drive shaft);
- generously lubricate all rubbing pairs;
- install the housing;
- fix the anthers;
- manually develop the mechanism by making several turns in different directions.
For a visual representation, we suggest watching a video of the assembly of the outer and inner CV joints.
Important points when replacing
Useful tips that will not only help you assemble the inner CV joint correctly, but also extend the life of the joints and angular velocities in general.
- If you notice a torn boot in time and the CV joint has not yet begun to crunch before disassembly, you can get by by washing the unit and replacing the lubricant.
- Litol, grease or graphite grease cannot be used as a lubricant. Only special grease for CV joints is acceptable.
- If you disassembled the old CV joint to wash it and replace the lubricant, mark the location of the race and separator relative to the body. When removing the balls, arrange them so that you can then install them in their original places.
- Gasoline, a small brush and clean rags work well for washing.
- Factory crimp clamps are considered disposable. If you reinstall them, be prepared for the fact that when the wheel is turned out (especially in cold weather), the boot may come off. As a result, installing a new one or washing an old grenade will go down the drain. You can crimp such clamps with thin pliers.
It is most convenient to compress and release retaining rings with special pliers. Without them, assembly and disassembly may require more time and nerves.
In what cases is it necessary to replace the inner CV joint?
Replacing the internal CV joint on front-wheel drive VAZ vehicles is required if the following symptoms are present:
- Crunching and knocking noises when driving and accelerating in a straight line;
- Vibration and shock when changing gears;
- Significant play when testing by hand;
- If the “grenade” fails completely, the vehicle cannot move further.
” alt=””> The main reason for the malfunction of the VAZ “grenade” is the entry of water and dirt through the hole in the torn boot. The second possible cause of failure is a sharp press on the gas with the wheels fully turned, although in this case you risk killing the external rather than the internal grenade.
In addition to the above, replacing the internal CV joint on VAZ-2110 and other models may be necessary if the quality of the previously installed joint is poor.
CV joint device
The CV joint was invented in the 20s of the last century. It helped to cope with the problems of loss of power on turns, vibration and non-uniform distribution of torque in highly maneuverable and maneuverable front-wheel drive vehicles. The unit, thanks to which the wheels can easily change the angle, consists of two “grenades”: internal and external. They differ in design and purpose.
We recommend: Causes of slipping and ways to eliminate them
The internal “grenade” is connected to the transmission. It transmits torque through the drive shaft to an external “grenade” located on the hub. The inner CV joint ensures the movement of the axle shaft.
The external “grenade” transmits torque to the wheels. It has a fairly large rotation angle, and it takes on significant loads, so it fails more often. The inner CV joint is larger in size, the outer CV joint is smaller.
Since the “grenade” is highly reliable, many believe that with proper operation and proper care this unit will never fail. But this opinion is wrong. Despite the fact that modern lubricants significantly reduce the coefficient of friction that occurs when various parts come into contact during operation, it continues to be the main cause of malfunctions.
So with the CV joint, as with other car mechanisms, problems can arise. Oddly enough, failure of this part in front-wheel drive cars is far from uncommon. It cannot be repaired - only completely replaced. If this happens in your car, you will have to decide whether to replace the unit yourself or go to a car repair shop, but this will be expensive.
Our article will be useful for those who chose the first option. Changing the “grenade” yourself is quite possible, and with appropriate preparation it can be done in an hour.
Replacing the inner CV joint with your own hands
” alt=””> The procedure for replacing a “grenade” is the same for the entire front-wheel drive VAZ line, starting with 2108 and ending with VAZ-2115, “Kalina”, “Priora”, “Grant”. Before removing the inner CV joint, the oil is drained from the gearbox. Then proceed according to the following algorithm:
- Unlock and unscrew the hub nut. To make the work easier, a piece of pipe about 1 meter long should be put on the key.
- The desired side of the car is hung on a jack or lift.
- Remove the wheel.
- Remove the washer located under the hub nut installation site.
- Disconnect the steering tip.
- The CV joint is removed from the hub.
- Using a pry bar, remove the drive and internal joint from the gearbox.
Note: when removing both drives at the same time, a suitable mandrel should be installed in their place.
How to change the “grenade” with the drive removed? To do this, clamp the shaft in a vice, loosen the clamps and remove the boot. After this, the hinge is knocked off the splines with hammer blows.
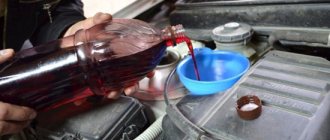
The new CV joint should be hammered by applying light blows to its end with a hammer. For this it is better to use a wooden mallet. The “grenade” is first filled with a special lubricant.
Before installing a new constant velocity joint, it is necessary to clean its seat from old grease and install a new boot. Assembly is carried out in reverse order.
The repair is considered complete after successful sea trials. In this case, there should be no extraneous sounds from the drive side in all modes of vehicle movement.
Replacing the VAZ 2109 CV joint and checking it Remzon VAZ
Replacing the VAZ 2109 CV joint is necessary only in cases of damage, and their presence can be determined by characteristic signs.
For example, if you begin to hear an incomprehensible crunch when turning, you can judge that there is a problem with the drive. Of course, it is worth diagnosing the entire suspension. The fact is that knocks and crunches may not be due to grenades, but due to ball joints and rod ends. Even the steering rack can make such unpleasant sounds. Therefore, before starting expensive repairs (the price of a set of external CV joints will be about 2000 rubles - for the left and right sides), carry out diagnostics.
How to determine faulty CV joints on a VAZ 2109
It is advisable to conduct a full examination, but there is no specific method that will help make a final diagnosis. It is better to use several methods, only all of them together can identify breakdowns. Replacing the CV joint on a VAZ 2109 is necessary if there is a crunching sound when turning. This indicates that there is large play in the outer hinge.
When reversing, this unpleasant sound will bother you. Don't think that there is nothing wrong with this. This can all result in the joint jamming, which will lead to loss of control of the VAZ 2109. Frankly, the comfort when driving the car is deteriorating. When performing diagnostics, inspect all suspension components in parallel, namely:
- Front wheel bearings.
- Shock absorber boots.
- Ball joints and boots on them.
- Tie rod ends (and boots).
- Anthers of internal garnets.
As a rule, it is the outer pair of CV joints that fail; the inner one suffers much less during vehicle operation. The fact is that the load on the external ones is greater, their angle of rotation is more significant, which cannot be said about the internal ones.
It is most convenient to carry out diagnostics on a pit or a lift, while the entire suspension should be suspended so that no loads are applied to it. However, replacing the outer CV joint of a VAZ 2109 should be carried out on a car that is in exactly this position.
Drive disassembly
First of all, you will need to remove the drive (in fact, the left and right ones are removed in the same way, the only difference is their length). The connection between the external CV joint of the VAZ 2109 and the hub is made using splines, a ring and a nut. Internal - using a special ring. So, you will need to carry out the work:
- The standard set includes open-end wrenches, ring wrenches, as well as a socket wrench with a large lever at “30”, a jack and stops, and stands.
- Hammer.
- Chisel.
- Mount.
- Vise.
Materials: a small supply of graphite-based lubricant. Everything you need for replacement is included in the kit:
- Hinge.
- Screw.
- Rings.
- Lubricant pack.
- Anther.
- Two clamps.
If you plan to change the anthers on the internal grenades, then be sure to purchase a set of clamps. Replacing the VAZ 2109 CV joint is carried out in a certain sequence, which you simply need to follow. The most difficult thing is to unscrew the nut on the hub. Sometimes you have to resort to extreme measures - drilling, since it is impossible to unlock it.
Partially unscrew the nut with the car mounted on all four wheels, and be sure to place stops under the rear wheels. After you have loosened the nut, unscrew it and lift the side to be repaired. After dismantling the wheel, unscrew the tie rod end nut (first remove the cotter pin). At the bottom, unscrew the ball joint mount. After releasing the entire strut and hub, you can hold the brake pipe and try to pull the hub towards you.
With difficulty, but you will remove the VAZ 2109 CV joint from the splines. After this, you need to remove the internal grenade - install a small chisel between the gearbox and the grenade. Apply several sharp blows so that the CV joint comes out of the gearbox. In just a few seconds you will be able to do this. That's all, now take the entire drive and clamp it in a vice. You knock out the old outer CV joint with a hammer, but before doing this, it is advisable to break the boot.
If you don’t mind the old grenade, then the new one should be stuffed carefully, trying not to damage the slots and threads. When replacing the VAZ 2109 CV joint, you must thoroughly wash and clean everything so that dirt does not get under the boot on the new grenade. Otherwise, after a while you will again be faced with the need to carry out expensive repairs.
Boot replacement and repair
The boot can be changed without removing the grenade if you have special equipment. His work is demonstrated on video. ” alt=””> If you do not have such a device, to remove and replace it, you must perform the above-described procedure for removing the drive and dismantling the hinge. The procedure is necessary if there is even minor through damage on the boot.
Temporary repairs to the CV joint boot can be made without removing it from the vehicle. To do this, you need to thoroughly clean and degrease the damage, then seal it with a piece of rubber and cyanoacrylate-based glue (superglue).
An alternative repair method is to seal the holes with silicone caulk. It should be remembered that it takes a day to completely polymerize.
Note: express repair is a temporary measure. Replacing the inner joint boot may be delayed for a short time, but not completely cancelled. Typically, these types of repair methods are used to get to the point of repair.
Malfunction prevention
In order for this part to last as long as possible, it is necessary to completely eliminate the possibility of dirt and water getting under the rubber cuffs of the CV joint. If there is the slightest damage, this part must be replaced with a new one.
For this purpose, it is better to use original spare parts that are made from high-quality rubber. If you purchase counterfeit cuffs, the procedure for replacing this part will have to be carried out too often.
Another reason why the CV joint often fails is its insufficient fastening to the main gear shaft. If the bolts are not tightened well enough, then over time they begin to unscrew randomly. In this case, the outer CV joint moves significantly away from the shaft, and with a significant gap, knocking noises will be observed in the transmission. If this malfunction is not detected in time and the fastening bolts are not tightened, then in a short time the CV joint will be completely “broken.”
How to change the CV joint and how to determine the malfunction of this part is described in detail in the article. The operation of replacing the CV joint will not take much time, but if you do not want to fix this problem yourself, you can always turn to a car repair shop for help.
CV joint repair
As mentioned above, the hinge cannot be repaired. Conventionally, one of the repair measures includes washing the “grenade” after driving with a damaged boot.
Washing is carried out at the same time when the damaged boot on the pomegranate is replaced. The hinge is carefully knocked off the shaft, inspected for damage and thoroughly washed to remove any dirt and grease in gasoline or kerosene.
What lubricant to use for CV joints
The main tasks of lubricants used in CV joints are protection against friction and prevention of corrosion. Also, the lubricant must be inert with respect to the polymer boots, which prevent moisture and debris from entering the mechanism. Most of the above requirements meet the following types of lubricants:
1. Lithium. These are viscous yellowish compounds, which at low temperatures acquire an even thicker consistency, making it difficult to spread on parts. They are able to significantly reduce friction and loads acting on the hinge elements, protect them from moisture and neutralize accidentally trapped dirt. Their only drawback is the ability to dissolve some types of anthers made from organic polymers. One of the representatives of this type of lubricant is the domestic Litol-24, which is replaced after a run of 100 thousand km.
2. Based on molybdenum disulfide. More universal lubricants that are characterized by increased resistance to corrosion. Their composition has a reduced content of organic acids, thereby reducing aggressiveness towards polymer products. Such lubricants are recommended for use in CV joints of cars of any manufacturer. Their main drawback is sensitivity to moisture ingress when the seal of the boot is broken, due to which the lubricant loses its properties. Domestic manufacturers produce lubricants with molybdenum disulfide under the general name SHRUS-4.
3. Barium grease. It is resistant to moisture getting inside the mechanism, successfully resists corrosion, and is also neutral to any polymers from which the anthers are made. Its main drawback is poor resistance to low temperatures. Lubrication is currently not very common due to its high cost. All domestic compounds manufactured using this technology are labeled under the name ShRB-4.
To protect CV joints, even if recommended by sellers, it is not recommended to use the following compounds:
- Graphite lubricants, since they are designed to work in bearings, and when used in CV joints, its service life will not exceed 25 thousand km.
- Hydrocarbon lubricants, including technical petroleum jelly, are destroyed at temperatures exceeding 45 o C and lead to hinge failure in a short time.
- Consistent compositions made on the basis of calcium and sodium, since they are not able to work in units with high mechanical loads, will lead to failure of the hinge after a run of 15-30 thousand km.
- Compositions made on the basis of zinc or iron.
When changing the joint lubricant, follow the operating instructions for the vehicle and the lubricant itself. Its scheduled replacement should be carried out every 100 thousand km, as well as when installing a new CV joint or boot.
Collecting tools and materials
If the hinge has become unusable, the following tools will be required to replace it:
- jack;
- knob;
- internal hexagon 16 under the wrench;
- keys for 13, 15, and 18;
- small crowbar;
- ratchet for heads;
- bolt head 17;
- massive hammer.
Interesting on the topic: Camshaft sensor Suzuki Grand Vitara 2.0 and 1.6 liters: we solve all the problems ourselves.
A nylon tie and penetrating lubricant WD-40 or something like that will also come in handy; there are plenty of similar aerosols on sale.