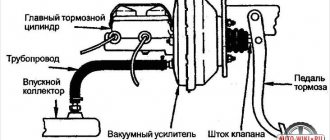
The vacuum booster is designed to create additional force applied to the master cylinder rod. The vacuum in the brake booster is created by reduced pressure in the intake manifold.
The vacuum amplifier cannot be repaired and must be replaced in case of malfunction. If unusually high pedal force is required while the engine is running to achieve sufficient braking, check the brake booster.
Check
carry out the vacuum booster in the following order:
Press the brake pedal 5-6 times with the engine not running to create the same pressure, close to atmospheric, in the vacuum and atmospheric chambers of the vacuum booster (remove the vacuum vacuum);
Keep the brake pedal depressed and start the engine;
If the vacuum booster is working properly, the brake pedal should “move forward” after starting the engine and weaken the resistance force on the foot;
If the brake pedal does not move forward, check the tightness of the connecting hose between the inlet port and the booster or the serviceability of the vacuum booster itself.
The cause of a malfunction of the vacuum booster may also be a check valve. Using a screwdriver, carefully squeeze the valve and blow it in the direction of the arrow stamped on the valve. When purging, the air should come out from the other side of the valve. If you blow against the arrow stamped on the valve, then the air, on the contrary, should not come out on the other side. During installation, the valve is pressed into the vacuum brake booster.
Removing and installing a vacuum booster without an ABS system installed
Removal
— carry out the vacuum booster in the following order:
Remove the “–” wire from the AB terminal;
Remove the sound insulation located in the engine compartment;
Remove the AB;
Remove the expansion tank of the cooling system;
Disconnect the multi-pin connector block for indicating the coolant temperature and unscrew the two bolts;
Unscrew the two bolts and remove the right partition of the battery compartment;
Unscrew one bolt and remove the left rear partition of the battery compartment. Set the expansion tank aside;
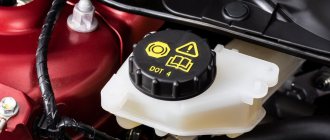
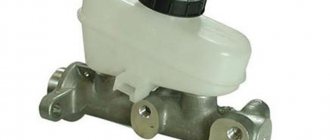
Disconnect the connector on the brake fluid reservoir cap and unscrew the reservoir cap;
Using a bulb siphon, pump out the brake fluid from the reservoir and remove the master brake cylinder;
Disconnect the vacuum hose going to the brake booster;
Remove the driver's side lower instrument panel cover;
The effectiveness of your car's brakes is important - if the brake system does not work effectively, an accident may occur. To ensure precise brakes, a booster is installed on all modern cars; it ensures that the vehicle stops instantly when you press the pedal.
Repair of the vacuum brake booster is necessary if the brakes become “wobbly” and you have to press the pedal with great force to brake.
Repair of vacuum brake booster VAZ 2106, 2107, 2108, 2109, 2110
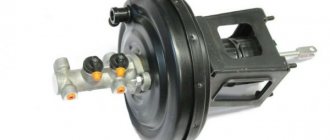
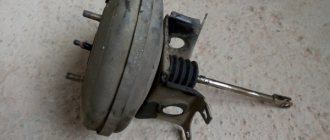
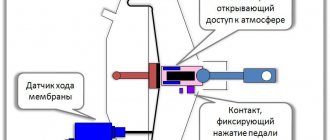
The vacuum brake booster (abbreviated as VUT) of VAZ vehicles makes the driver’s work easier - it enhances the effect of pressing the pedal in the braking system (TS). This unit consists of the following main parts:
- valve;
- metal case;
- diaphragms;
- piston;
- rod;
- powerful return spring;
- a pusher that connects to the brake pedal;
- protective cover;
- flange for installing a check valve.
The body of the device is divided into two halves by a diaphragm, and the master brake cylinder is installed on the side where the vacuum is created. A vacuum (vacuum) is created by connecting this part of the housing to the intake manifold of the internal combustion engine, and when the engine is not running, the channel closes the check valve installed in the VUT flange. Air (vacuum) with the help of a rod and piston when pressing the brake enhances the braking effect, thereby making the driver’s work easier - there is no need to press the pedal with great force. After releasing the pedal, a powerful return spring allows the diaphragm inside the housing to return to its original position. When the engine is turned off, no vacuum is created in the system and the vacuum brake booster does not operate.
On VAZ-2106-07 and VAZ-2108-10 cars, brake boosters are installed that differ in appearance, but the principle of operation of the devices is the same. We check the serviceability of the VUT as follows: press the brake pedal and start the engine - if the pedal “falls” (lowers under the pressure of the foot), the VUT works.
The main problem with a vacuum booster is damage to the diaphragm. When the diaphragm is ruptured, air penetrates from the outer part of the housing into the vacuum cavity, and a vacuum is not created in the device. But the malfunction may not necessarily lie in the device itself - often the VUT does not work due to air leaks or for other reasons:
- the “vacuum” check valve is faulty;
- there is air leakage from the hose connecting the intake manifold to the brake booster;
- there is no compression in the internal combustion engine cylinder where the vacuum comes from.
It should be noted that the vacuum brake booster on VAZ 2106-10 vehicles is connected by a hose to the fourth cylinder of the engine.
Repair of the vacuum brake booster of VAZ 2106, 2107, 2108, 2109, 2110 should begin with the dismantling of this unit, then the VUT must be disassembled.
Removing the VUT on a VAZ classic car is quite simple, and if you have minimal plumbing skills, this work is not difficult to complete. We remove the unit as follows:
It is not difficult to disassemble VUT 2108-2109, but for disassembly it is necessary to fix the device. We disassemble the node in the following order:
Typically, the repair kit for the VAZ-2109 vacuum amplifier contains a diaphragm, a cuff, a boot, covers (2 pcs.) and a valve. All parts should be changed so that you don’t have to redo the work later. When assembling a vacuum amplifier, it is better to immediately fix the diaphragm on a plastic casing, this will make it easier to mount the unit.
It doesn’t matter which side the spring is placed on, but when assembling the amplifier, you will have to make an effort to get the holes in the housing onto the studs.
How to install disc brakes
To install disc brakes on military bridges or civilian bridges, you will need the following tools and parts:
- locking mechanisms for calipers;
- mounting bolts size M12*1;
- adapters M10 or M12;
- washers;
- studs 50*10 mm;
- spacers;
- set of wrenches;
- disk system kit for UAZ;
- caliper
In order to install disc brakes on a UAZ, you must:
- Place the vehicle on an inspection pit or platform for repair work.
- Secure the wheels using locking devices.
- Remove the wheel mechanisms.
- Remove the drum device and eccentric support pins.
- Unscrew the fasteners from the pads and tubes.
- Remove the bolts from the clutch.
- Bend back the locking ring.
- Using a wrench, unscrew the adjusting screw.
- Remove the thrust ring and hub.
- Remove the shield and trunnion.
- Install the caliper holder with the embedded structures facing outwards.
- Remove all old fasteners and studs from the hub and install new ones.
- Disconnect the flexible hose and the small copper pipe.
- Install a new washer and connect the hose and pipe to this washer.
- Install the pads, discs and caliper assembly.
- Reassemble the entire mechanism, performing all steps in reverse order.
If the caliper does not spin fast enough, you can trim it from the outside with a grinder.
Repair of UAZ vacuum brake booster
Problems with the vacuum booster of UAZ vehicles can be identified by the following symptoms:
- the engine suffers, and since on UAZ engines the vacuum hose goes to the manifold of the first cylinder, if the VUT is faulty, this particular cylinder is not completed;
- a hissing is heard under the hood - the diaphragm is poisoning the air;
- the brake pedal is hard and does not press when starting the engine;
- There are wet leaks between the turbocharger and the amplifier (brake fluid is leaking).
If leaks of the brake fluid are detected in the area of the VUT, it is necessary to urgently change or repair the GTZ, but if the liquid has already entered the vacuum booster, most likely the VUT will also have to be repaired.
Another common malfunction in the brake system is failure of the check valve. This simple mechanism is very easy to check - you just need to blow into it. The valve should be blown freely in one direction (when rarefied air is supplied from the manifold), but air flows in the opposite direction with great difficulty. If the valve is faulty, it is blown freely in both directions.
The amplifier is removed on cars produced by the Ulyanovsk Automobile Plant according to the same principle as on VAZ cars. Let's consider replacing VUT using the example of a UAZ-31519 car:
the two lower nuts of the amplifier bracket are located in the car interior, they are turnkey 17, unscrew this fastener;
Adjusting the brakes
In order to correctly adjust this mechanism, you need to use the diagram of the UAZ brake system, which is in the user manual.
When adjusting brake pads, safety precautions must be observed, so it is recommended to wear protective gloves.
First, you should place the vehicle on a flat surface and secure the wheel mechanisms using special locking devices. There is no need to tighten the handbrake. After this, you need to lift the rear wheel using a jack.
Having gained access to the mechanism, you need to unscrew the mounting bolt and turn the wheel by hand until it stops. When the wheel device begins to slow down, you should start turning the bolt in the opposite direction. This will help disinhibit the element.
During free rotation, the wheel should not touch the drum mechanism and pads, so the eccentric must be released and rotated slowly, without sudden movements. The entire procedure should be repeated for other brake pads.
When adjusting the brake mechanisms of the front wheels, the elements must be rotated forward. In order to reduce the gap, the eccentric must be turned in the direction of rotation of the wheels, and to increase the gap - in the opposite direction.
After completing the adjustment work, you should start the engine and check that the brake drum does not heat up and that the pads operate reliably during braking.
Features of repair of UAZ vacuum amplifiers
Unlike the vacuum amplifiers of VAZ cars, the VUT housing on UAZ cars is very durable, and it is not at all easy to halve it. You can bend the protrusions using a pry bar and a hammer, but this way the work is done in violation of the technology - according to the instructions, you need to rotate one half relative to the other. The biggest problem during disassembly is the “halving” of the body - sometimes these parts boil so much that it is impossible to disassemble the assembly. Car owners are advised not to press one body into another under any circumstances - then turning will definitely not work.
Another problem in repairing “vacuum units” is the low quality of spare parts in the repair kit; sometimes the installed parts are not enough for six months. Motorists advise not to do repairs, but to buy a new spare part, although there is another disadvantage - VUT for cars like UAZ-469 or UAZ-452 is not cheap, about 3 thousand rubles. As an option, you can pick up a “vacuum” from a foreign car at a car disassembly shop, whose mountings fit the main brake cylinder, and install it on the car by fitting it. The result is cheaper and more reliable - imported parts, even in used condition, last for several years without any complaints.
Often, after replacing the VUT, problems appear, and the car no longer brakes as well as it did before with a working “vacuum system” - the brake pedal takes off at the very end, or the system does not fully release the brakes. The whole point here is the rod that presses on the GTZ piston - it may not be adjusted from the factory. This rod has an adjusting screw, which is secured with a locknut. On UAZ cars (we don’t take the “Patriot” model into account), we check the rod adjustment as follows:
Even on the UAZ Hunter, the pedal can “take” at the very end, and it has a large free play. It is necessary to pay attention to the position of the pedal - if it is too low from the floor in the cabin, it needs to be adjusted:
The main factor in the malfunction of the vacuum brake booster is considered to be its complete or partial inability to create a vacuum in the working chamber. A potential source of the problem is a break or depressurization of the hose connecting the engine intake manifold and the amplifier.
Interference in the operation of the unit is also caused by defects located inside the amplifier - due to a violation of the integrity of the working surface of the diaphragm or loss of elasticity of the valve. In order to detect malfunctions of the vacuum brake booster, certain tests are carried out.
Methods and signs of detecting faults in the vacuum brake booster
- For example.
Start the engine, and after a few minutes, turn it off. Then press the brake pedal a few times with normal force. If the amplifier is working properly, at the moment of the first press, the pedal will be pressed, as expected, all the way. The system will operate, and the created vacuum will attract the diaphragm, which helps push the piston of the master cylinder through the rod. Next, the valve will equalize the pressure in the chamber with atmospheric pressure. During the second and subsequent pedal presses, there will be nowhere for the vacuum to come from, causing the pedal stroke to become less and less. If no difference is felt between the initial and subsequent pedal presses, then it is clear: this device does not provide additional force in the master brake cylinder. - Following this experiment, it would be useful to perform another one. The engine is turned off. The brake pedal has been pressed any number of times in a row. Her move testified to something. Either the results of the experiment seemed inconclusive, or there was a desire to carry out a control test. The following actions are performed. The brake pedal is depressed, and when the pedal is pressed, the engine starts.
When the vacuum booster is working properly, a vacuum forms in its vacuum chamber, due to which the membrane presses on the rod, the rod pulls the pusher connected to the pedal, and the latter drops slightly.In the case when the pedal remains in place, the conclusion is drawn: the expected chain of events did not take place due to a malfunction of the vacuum brake booster. Such checks reveal significant damage to the part.
- The next test makes it possible to determine the presence of small air leaks.
With the car engine running, press the brake pedal and then, without releasing it, turn off the engine. Hold the pedal in the same position for half a minute. Due to the leakage of the amplifier, the pressure in the vacuum chamber will increase. The diaphragm, under the influence of the return spring, having lost the support of the force balancing its position, will put pressure on the pusher and raise the brake pedal.
If this is not observed, then there are no malfunctions and the vacuum brake booster is working normally. In any case, if there is a need to repair any brake unit, it is taken into account that there may not be a second chance for repair, so they turn to car service professionals for assistance in diagnosis and repair. They can produce .
Vacuum brake booster
Other questions about the brake system
The squeaking of brakes on a UAZ is its integral attribute. You may get the impression that the pads were worn down to the rivets, but this is usually not the case and the squeaking occurs due to dirt on the pads and brake drum. Intensive braking (but not skidding) from high speed helps a little. As a rule, the remainder goes through without a squeak. Personally, I’m not worried about this, quite the contrary. This squeak works better than a beep, especially if someone is cutting off.
My whistle disappeared after replacing all cylinders with . From which I can assume that the nature of this phenomenon lies in the uneven distribution of the load on the pads when using standard cylinders. No matter how you adjust them, after several brakings the gaps become different.
I once read in ZR a long time ago, like advice from experienced people, you need to drill two or three holes in the brake lining the thickness of a pencil lead and insert these same rods there, and so it was stated that all squeaks are due to the properties of graphite.
- Mark and remove ALL brake drums and use a caliper to measure their diameter. As a result of uneven wear or grooves, this size can vary within quite large limits - hence the unevenness. Check if the brake fluid or transmission is leaking somewhere. If it leaks, fix it.
- Make two pairs of them - for the front and rear axles - with the same (within 0.2-0.3 mm) diameter.
- Mark and remove the pads. Wash and clean them and all parts of their suspension.
- Assemble so that the pads work “on their own” drums. Adjust carefully.
- Ride around the city for a day.
The trick is that the VUT GAZ-2401 comes as a separate unit (not near the pedals), and I have lower pedals and therefore don’t want to redo the pedal assembly.
There are no problems with the installation. From Ch. brake from the cylinder there is a tube to the amplifier, from the amplifier there is a tube to the circuit separator, and from the latter there are two tubes - one to the front wheels, the other to the rear. Vacuum from the intake manifold. There is also a circuit indicator (optional) - see doc. according to GAZ-24. Doubts arise about the fair passage of technical inspection. And it seems that it is rather weak for an UAZ, but still better than without it.
Description of the hydraulic brake drive circuit: 1. main brake cylinder; 2. hazard warning light; 3. hose with a diameter of 12 x 26, connected to the engine intake manifold; 4. hydraulic vacuum booster (24-3550010); 5. brake separator (24-3575010); 6. hydraulic vacuum booster bleeder fitting; 7. control lamp; 8. rear wheel brake cylinders; 9. front wheel brake cylinders; 10.air filter for hydraulic vacuum booster.
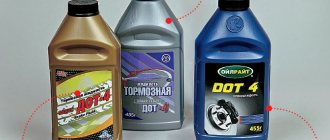
Bleeding the brake system with an installed hydraulic-vacuum brake booster GAZ-24. Fill the main brake cylinder with BSK or Rosa liquid (Do not pour Neva, it is not compatible with GAZ-24 brakes, it is also not allowed to mix BSK and Rosa), turning the valve in the separator 2-2.5 turns brakes, pump the brakes of the rear and front wheels alternately, then the hydraulic vacuum booster. We close the separator bleeder valve with the brake pedal released. As always, when doing this work, add fluid to the brake master cylinder so that no air gets into the system. If all brakes and their actuators are adjusted correctly and there is no air in the system, the brake pedal should not go down more than half of its travel when you press it with your foot, and the hazard warning lamp should not light up when the ignition is on.
I installed a vacuum brake booster from a 1990 BMW-7 (inflated). The only thing that is needed in advance is for a turner to grind out the adapters (since the UAZ brake pipe fittings differ in size and thread from the holes on the BMW-7 master brake cylinder). I also removed the reinforcing plate on the engine side panel and replaced the working self-regulating brake cylinders with GAZ-24 (). The brakes have become much softer and more effective. The amplifier has been working for four years, during which time I haven’t even climbed or taken it apart.
Volga brake cylinders, starting from 24 (since 1970), are all self-feeding; manual adjustment of the pads is not required and less effort is required when braking. Back
UAZs are suitable from 24 (by 32 mm), because on 2410, 31029, ... (I mean the rear cylinders) there is a different thread for the brake pipe (without an intermediate bolt).
On the front
- from 2410 or 24 (the first are better - they have foam inserts, which must be lightly impregnated with BSK or castor oil, which prevents corrosion). Beware of the "leftists" - there are plenty of them in South Port. The main difference is the appearance: the anthers do not “shine”, are irregular in shape, and there is often rust under the anthers. You can also change the pads themselves - the force will decrease somewhat, and most importantly, the mileage will increase. They are glued and work almost until they are completely worn out.
After the modification, the brakes need to be pumped MORE CAREFULLY, because due to the locking ring this process is a little “delayed”.
After much thought and reading the statements of smart people (see CHIF’s note above), I came to the conclusion: Front
— GAZ-3102 they are also GAZ-2410 they are....(they are all the same) diameter 32. Without alterations.
I took it and installed it. The rear ones
are GAZ-3102, also known as GAZ-2410, diameter 28. With an adapter fitting. I searched for fittings for a long time. There are no UAZ cars from GTZ 3160. The solution was found unexpectedly while looking at the display case in the storeroom. Adapter fitting 6x5 for rear working brake cylinders Moskvich. From a conversation with the seller I learned that there have been no working brakes from Moscow on the 412 for a long time. Available only on 41st. And they have the same problem - on the 41st x5, and on the 412th x6. 10 rub. issue price. Moskvichevsky adapter into a Volgov cylinder, into it our adapter (6x6 to another thread), and into our adapter a tube. Next, nadot. Wrench x12 twist the fittings. Bleed the brakes with a 10-piece spanner (for Volgov models, the fitting is x10). A set of copper washers for the front cylinders (it’s better not to use old ones), 6 pieces per wheel. Well, remember about the possibility of collapsing the tubes.
The cylinder must be disassembled before installation. Well, or at least bend the anthers. And now there are a lot of them - they look normal, but are rusty inside. And one more thing - in the store they are not very carefully reloaded. When I was choosing for myself, I didn’t find ONE(!) with a whole anther. I had to buy it separately.
There are different cylinders in stores that suit us: From 3102
- very often, under their brand, there are native UAZ vehicles, which are
NOT even self-driving
.
From GAZ-24
, they are also from 3302 - they stand up without problems, like family.
The only negative is that on an empty car the rear reaches before the front - in theory, a regulator is needed, but there are no special problems (I’ve been driving for the 5th year already.) From 3160 and from GAZ 2410
- smaller in diameter than from 24 or 3302, but for docking them with our tube we need an adapter - GTZ fitting from 3160 (standardly these cylinders are for 5 mm tubes.)
I installed all FENOX cylinders. In the store I compared the factory rusty ones with sagging threads and the neat FENOX.
It is necessary to cut rings with a diameter of the RTC from 10mm foam rubber, saturate them with either castor oil or brake fluid, and place them under the anthers of each RTC.
And at the gas station I saw a UAZ with front disc brakes... it was very clearly visible through the alloy wheels... and the owner said that everything from the Volga fit almost like original, only the discs were sharpened (or ground)... and he also said that the car stopped working When braking, try to change lanes in the next lane.
We installed disc brakes from 3160 on UAZ 31512 of our jeep girls. For installation on civil axles, you need a 3160 steering knuckle housing, calipers (2 pcs), brake discs and brake hoses. 40 mm spacers were installed on the hubs.
Bottom-mounted brakes - increased pedal travel A feature of my car is the bottom-mounted pedals. Over time, signs of double squeezing of the brakes appeared. Spreading the pads and bleeding did not give anything - the free play of the pedal was 50-70 mm. ...From the lyrics I read about grinding RTC and GTZ, about rubber bands, about brake fluids. Armed with knowledge, I went to the garage. Breaking is not building, so I removed all the working cylinders, struggled with the long bolts securing the GTZ at the bottom (I had to use a gas wrench), and removed that too. The sight was not the most joyful, so I got to work. I took a long hairpin, onto which I put several squares cut out of felt, and secured them on both sides with nuts and washers. On a lathe they made me something very similar to a cylinder from this composition. By tightening the nut from below (be sure to lock the nut), thus tightening the cylinder, you can adjust the diameter of the cylinder, which in my case was 32 mm. It took a long time to tinker, about 25 minutes per cylinder and constantly adding GOI, but the result exceeded all expectations: the cylinders became mirror-like. The history of the brakes also came to light - there were some snags, so the pistons also had to be polished. I assembled everything and began to fill the hydraulic drive with (new) fluid. For some time we managed to fill and bleed, identifying leaks along the way, but the pedal caught at the very bottom. The pads and fingers were spread according to the UAZbook and the book. The free movement remained, there was a feeling of springiness, as if there was air left in the system. I had to crawl under the car and carefully look at the entire kinematic diagram. Here the main surprise awaited: the pedal really picked up at the very bottom, so the remainder of the piston stroke was not enough for any normal work. It turned out that during service two holes became oval. One of them is located on the brake pedal ear, the other is in the U-head bolt. For this reason, the pedal moved freely along two oval holes, which together gave such a large stroke. By removing the parts from the car, welding the holes and drilling new ones (round ones) :), we managed to completely get rid of the pedal sagging. Now the brakes grab at the very beginning, which is very pleasing.
The hydraulic drive of brakes and clutches of cars contains a unit that facilitates the control of these systems - a vacuum booster. Read everything about vacuum brake and clutch boosters, their types and design, as well as the selection, repair and replacement of these units in the article presented on the website.
article presented on the site. What is a vacuum booster? Vacuum booster (VS) is a unit of the brake system and clutch with hydraulic drive of wheeled vehicles; a pneumomechanical device that increases the force on the brake or clutch pedal due to the difference in air pressure in isolated cavities. The hydraulic brake system used on most cars and many trucks has a serious disadvantage - the driver must apply significant pedal force to apply the brakes. This leads to increased driver fatigue and creates dangerous driving situations. The same problem occurs with hydraulic clutches found on many commercial vehicles. In both cases, the problem is solved by using one pneumomechanical unit - a vacuum brake and clutch booster. VU acts as an intermediate link between p
Vacuum brake booster: stopping the car effortlessly
Braking a car sometimes requires a lot of force on the pedal, which leads to driver fatigue and carries a potential threat - at some point the driver simply does not have enough strength for normal braking.
All these problems are solved by a special unit - a vacuum brake booster. Read about what it is, the operation of the amplifier and its operation in this article. and then the movement of the diaphragm stops, and along with it the movement of the piston - the braking system slows down the wheels of the car, and is ready to respond to any movement of the brake pedal. When the pedal is released, the follower valve again closes the atmospheric channel and opens the vacuum channel, the pressure in the chambers is equalized, and the system returns to its original state. The return of the brake cylinder piston and diaphragm to their initial position is ensured by a return spring in the amplifier housing. It should be noted that the vacuum brake booster does not simply “turn off” after the engine stops or breaks down - this is ensured by a check valve in the vacuum chamber. The valve only allows air to escape from the chamber, but as soon as the engine stalls (or the pump stops), the valve will close due to the increased pressure on the reverse side and prevent the pressure from growing in the chamber. Interestingly, the effectiveness of the brake booster depends on Facebook