UAZ 31512 Bobik rat look › Logbook › Injection
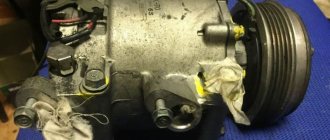
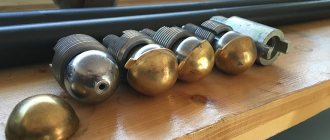
I finally bought this wonderful gadget for myself.
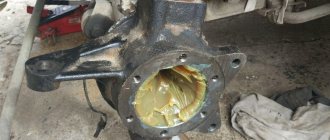
Plus I got JCB miracle lubricant from a tractor driver I know. I cleaned the grease tanks and pumped this plastic blue crap into them. At the same time, water and old grease were seen coming out of the crosspieces and steering tips. I pumped into the pins until grease came out of the cover bolts, apparently from the greaser.
I still don’t understand how the lower kingpin is lubricated; there is no grease fitting.
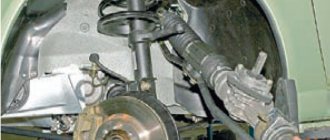
Crawling under the car with a syringe at the same time brought another result: the front axle was examined, which was humming suspiciously in the fall; a shank that moves suspiciously. It seems that all this will have to be capitalized.
As a result of the injection, exactly one tube of bourgeois lubricant was used up. The steering wheel began to turn easier. Well, with bridge repairs it’s like this: you’ll have to buy spare parts and get pullers from the collective farm.
Issue price: 810 ₽
Stages of repair work
For those who want to replace the kingpins on a UAZ Patriot with their own hands, the video located on our website will help . It describes in detail the process of carrying out such repair work. At the same time, the algorithm of necessary actions is quite simple, so even people who are far from car repair can figure it out.
When changing the pivot pins on bearings on a UAZ, we perform the following operations:
- unscrew the tie rod fasteners and release the axle shaft;
- Using a special nozzle, unscrew the bolts of the kingpins;
- remove the oil seal, take out the fist and ball joint;
- We clean out the old grease and replace worn gaskets. It is also worth paying attention to the quality of fasteners. If necessary, nuts and bolts should be replaced;
- replace the plastic liner with a bronze element;
- we cut off the worn spherical cups, clean the surface of the stocking, weld new bushings (it is important to align them perfectly so that there are no distortions);
- we press tapered bearing races into these components;
- apply new lubricant to the surfaces, assemble the suspension (in reverse order);
- when installing the ball joint, we focus on the fasteners; the location of the steering knuckle housing should be noted in advance (for example, using paint);
- before installing the pivot pins, they need to be lubricated (if we are talking about a bearing modification, a conical support is put on, which is pressed in with a nut);
- adjust the control mechanism until the backlash completely disappears.
You can clearly see all this in the video on how to change the king pins on a UAZ Patriot:
At the same time, if you are not confident in your abilities, the dismantling of the faulty element and the installation of a new king pin on bearings on the UAZ Patriot should be entrusted to the hands of professionals. They will guarantee the quality of the work performed.
see also
Comments 18
Syringe for tubes? If there is any information on it, please describe it.
Yes. Under the tubes. A very convenient thing. Price 810 rubles, complete with a hose with a replaceable nozzle and a metal tube with a narrow spout. The piston is spring-loaded with a limited stroke, as a result of which lubricant does not escape from all the cracks. Presses like hell. I sprayed my UAZ for the first time in a year and a half of ownership, it pushed into all the grease fittings the first time. This thing is worth the money.
Blue grease (previously under No. 158) is good for crosspieces; for everything else, grease-litol would be better, it is not washed out so quickly and is more flexible.
This lubricant has been well tested on various components of the JCB front loader at the plant where I have been working for about 10 years. Tested in winter, summer and off-season. In the most difficult conditions of construction sites, factories and trenches with pits. Solid oil and lithol were not lying next to her. It is plastic in cold weather, thick in hot weather, and cannot be washed off with water. I believe my eyes and experience. So I will smear it. Ours is closer to someone. But somewhere, somewhere, and in this lubricant, the bourgeoisie are far ahead of ours!
I fully support, I also apply foreign ones used on Construction equipment. This lubricant works on all joints of working equipment, and there is water, sand, shock loads and constant friction
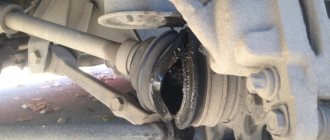
But my question is this: if the front balls, which are visible on the front axle when turning the steering wheel from below, are dry and a little rusty, what does that mean? Is there not enough oil in the front axle?
My opinion is this: it rusts because there is no lubrication in the pins and the car is not driven often enough. If you use the car relatively often, then, in my opinion, these “balls” will shine even without lubrication. I may be wrong, correct me if so.
The lower kingpin lubricates itself, due to the nigrod that lubricates the joint.
While I was lubricating, I didn’t check the level or the presence of lubricant in the bridges. Like I uploaded last year, I haven’t watched it yet. I will change it. Because there’s a lot of slurry there again.
The lower kingpin lubricates itself, due to the nigrod that lubricates the joint.
Lubricant from the axle can only flow there if the axle shaft seal is faulty. Solid oil also flows and gets there.
That is, pressing it until it appears from below (which is not at all guaranteed) will not work? It’s bad that you can’t check it visually: the steering tips and crosspieces are very convenient, I pressed it, a new one came out, which means I lubricated it. Or is there some way?
Usually you pump a little grease into the upper kingpin and that’s enough; it will then reach the lower one on its own, that’s why there is no oiler there.
Lubricant from the axle can only flow there if the axle shaft seal is faulty. Solid oil also flows and gets there.
I poured nigrol specifically for the CV joint and many people do this.
Nigrol is not at all suitable for a CV joint - it will simply be knocked out of there at high speeds.
Four years, normal flight!) Doesn’t it spread other lubricants? Other lubricants have much worse fluidity than nigrol, especially since the current nigrol is many times more fluid than the Soviet one.
Here you need grease, grease, it won’t scatter.
Solid oil? Yes, I haven’t used this lubricant for 30 years. As soon as water gets in, only dirt remains from the grease. I prefer lithol or shruz lubricant, or something imported, but not solid oil.
I'm also going to have the same thing next weekend.
Kingpin maintenance
Various transmission oils are most often used as a lubricant for servicing kingpins. This is the cheapest and most accessible option. But, since these are liquids, they are washed out very quickly and the units have to be serviced quite often.
Greases are more effective in this case, but they are not without their drawbacks. If low-quality material is used or the pins are serviced infrequently, the lubricant becomes coked and the channels become clogged.
Below is a review that describes popular means for servicing such components and selects the most effective lubrication of pins.
Analysis of the lubricants used in the Spicer steering knuckle.
Analysis of the lubricants used in the Spicer steering knuckle.
Post by Vaxoil » Thu Mar 30, 2021 09:34
Any serious manufacturer of a spare part for a car, as a rule, includes instructions that describe the procedure for installation, operation, repair and maintenance of the product. If the product requires the use of a lubricant, the recommended type of lubricant must be indicated. Which is not surprising, modern industry produces a huge range of lubricants, which differ significantly in their characteristics and very often carry specific properties that are useful for one mechanism and harmful for another. We all probably know many examples where quite expensive products were damaged due to the use of incorrect lubricants. Therefore, the issue of lubrication is extremely important and we are often approached with questions about the lubrication of steering knuckles.
While establishing the serial production of kits for repairing the pivot assembly, we also became concerned about this issue and, in order not to guess from the tea leaves, we turned to representatives of Biysk science for an answer. It’s not for nothing that our city bears the honorary title of science city and we think that our scientists, unlike the British ones, can give a truthful answer to any question. As usual, academic science approached the issue with all seriousness and conducted research, the results of which we systematized and present to you.
Analysis of the lubricants used in the Spicer steering knuckle.
Posted by wert1234 » Tue Sep 26, 2021 03:02 pm
Analysis of the lubricants used in the Spicer steering knuckle.
Post by vadim20 » Tue Sep 26, 2021 06:03 pm
Analysis of the lubricants used in the Spicer steering knuckle.
Posted by wert1234 » Tue Sep 26, 2021 07:53 pm
Analysis of the lubricants used in the Spicer steering knuckle.
Post by vadim20 » Tue Sep 26, 2021 08:34 pm
Analysis of the lubricants used in the Spicer steering knuckle.
Posted by Stephen » Wed Sep 27, 2021 10:39 am
Vaksoil wrote: Any serious manufacturer of a spare part for a car, as a rule, includes instructions with it that describe the procedure for installation, operation, repair and maintenance of the product. If the product requires the use of a lubricant, the recommended type of lubricant must be indicated. Which is not surprising, modern industry produces a huge range of lubricants, which differ significantly in their characteristics and very often carry specific properties that are useful for one mechanism and harmful for another. We all probably know many examples where quite expensive products were damaged due to the use of incorrect lubricants. Therefore, the issue of lubrication is extremely important and we are often approached with questions about the lubrication of steering knuckles.
While establishing the serial production of kits for repairing the pivot assembly, we also became concerned about this issue and, in order not to guess from the tea leaves, we turned to representatives of Biysk science for an answer. It’s not for nothing that our city bears the honorary title of science city and we think that our scientists, unlike the British ones, can give a truthful answer to any question. As usual, academic science approached the issue with all seriousness and conducted research, the results of which we systematized and present to you.
Source: uazpatriot.ru
Replacement and repair
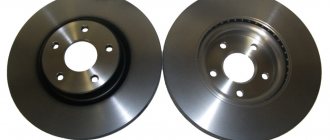
Despite the apparent complexity, replacing a part such as a steering knuckle is not particularly difficult. The first step is to put the vehicle on the handbrake, then place wheel chocks under the rear wheels and lift the front of the car with a jack.
- Remove the brake disc.
- Unscrew the trunnion fastening.
- Remove it as an assembly with the wheel release clutch, brake disc shield and hub.
- Remove the axle shaft.
- Separate the rods from the steering knuckle itself.
- Remove the bolts securing the ball joint to the axle housing flange.
- Remove the wheel stopper.
- Using a pry tool, press the ball joint shank out of the axle shaft housing. To do this, use a ball joint remover.
- Carefully remove the required part, in our case the steering knuckle.
After replacing the knuckle, the steps should be performed in the reverse order, not forgetting to replace the rotation limiter. To repair the steering knuckle, clamp it in a vice and disassemble it by unscrewing the cuff mounting bolts, the stop bolt with the lock nut. Next, the cuff clip and felt seal are removed. Finally, the ball joint seal is removed.
The hardest part is behind us; what remains is what needs attention. Carefully remove the ball joint. This is approximately how the repair and replacement of the steering knuckle works.
Replacing the pivots on a UAZ loaf with your own hands
The frequency of replacing kingpins directly depends on the conditions in which the UAZ “Bukhanka” is operated. With constant driving on severe off-road conditions, repair of this part of the car will naturally be needed earlier than with moderate use.
If the part is still worn out and requires replacement, you can contact a service station or replace it yourself without resorting to the help of specialists. This is not as difficult as it may initially seem.
The first step is to select and purchase a new kingpin . It comes in roller and standard versions. The roller one differs in that there is a bearing inside and such a kingpin does not need to be installed on a car driven in areas with deep mud.
For tough use, it is better to install a standard part on the UAZ, it is more reliable.
Approximate cost on the market
It could also be a left or right steering knuckle. Outwardly, they are almost identical, but since these details are directly related to each other, it is best to play it safe. On one of them there is a bipod; on the other there is no access to the longitudinal thrust. It is for these reasons that their prices differ.
Auto parts can be purchased at auto stores, car markets, and ordered on various websites. The right steering knuckle costs approximately 8,400 rubles, the price for the left one starts at 6,530 rubles. These are approximate prices for the UAZ-31519.
You should not save, even if the cost of domestic spare parts is higher than Chinese ones. More than likely, an expensive part will last much longer.
Algorithm for replacing the king pin on a UAZ “Bukhanka”
- The front axle of the car should be hung on jacks ; jacks are more often used. Additionally, something strong is substituted so that if the jack breaks, the car does not fall.
- The transmission oil needs to be drained from the axle.
- Next, remove the brake shield , brake caliper, steering tip and turn out the oil nipple.
- Direct removal of the king pin . You need to screw a bolt with a diameter of M10 into it and try to pull it by prying it by the head. If this does not work, you should firmly fix the steel sheet above the pin and make an M10 hole in it through which the bolt will be screwed. A pair of nuts are attached to the bolt under the plate, through which the kingpin will successfully rise to it.
- Then you can get the washer without any problems, but you need to tinker with the bushing. You can get it out with a sharpened nail, carefully sliding it from the side of the lock under the sleeve. Oscillatory movements must be done in a circle until it becomes possible to grab the bushing with pliers. After removal, the bushing is washed with gasoline, and then a new lubricant, usually lithol, is applied.
- The new kingpin is carefully hammered into place with a hammer, preferably through a wooden board, avoiding the part being distorted.
- The remaining parts are installed in their places.
Purpose and repair of the steering knuckle on the UAZ Patriot
The steering knuckle of the UAZ Patriot is a structural element of the front axle. The design of the unit has high mechanical strength, but when the vehicle is used in off-road conditions, damage to the rubbing parts occurs. The owner can repair the unit himself or contact a specialized center.
Purpose of the mechanism
The mechanism is designed for the following purposes:
- transmission of torque to the front wheels;
- deviation of the wheels from the central position to make a turn.
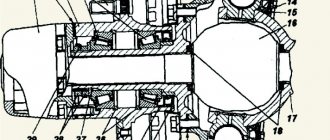
Design and diagram of the steering knuckle
The steering knuckles are mounted on the end edges of the Spicer front drive axle, which is attached to the SUV frame using shock absorbers and spring suspension. To transmit torque, axle shafts are installed inside the beam.
The steering knuckle is equipped with a hinge that allows the wheels to be deflected in different directions from the central position (while maintaining the transmission of power flow from the engine).
The unit is equipped with points for attaching levers for steering ends and transverse rods, ensuring synchronous deflection of the wheels when turning the car.
There is a factory-adjustable bolt on the knuckle body. Designed to limit the angle of rotation of the front wheels.
Inside the knuckle there are cavities for installing a ball joint that transmits torque to the hub with the brake disc.
The device includes 2 pins (located at the top and bottom) that hold the hinge cage in a given position. The entire assembly is attached to the front axle axle using a flange connection.
A trunnion is attached to the outside of the knuckle, allowing the installation of tapered roller bearings and the anti-lock brake system sensor disc. The steel hub is equipped with studs on which the brake disc is placed and the wheel rim is attached. On the end of the axle there is a thread for a nut for adjusting the tightening of the axial clearance in the bearing supports.
Signs of trouble
The cam circuit does not have many parts that are subject to wear during vehicle operation. When the wheel bearing raceways are destroyed, hub play appears, leading to disruption of machine controllability.
Water and dirt entering the hinge causes abrasive wear and corrosion of the metal from which the parts are made. The lubricant is washed out of the assembly, which leads to increasing wear of the mating surfaces.
When driving in corners, a knocking sound appears, and the drive jams when starting to move.
Part replacement
If faults are detected with the front wheel drive joint, it is necessary to remove the steering knuckle from the vehicle and then disassemble the structure to check the condition of the parts. The repair procedure does not require the use of special tools or equipment. All work is carried out in a garage with an inspection pit or on a lift. After replacing the parts, you must contact the service center to check the toe angle in the horizontal plane and adjust the thrust element that limits the rotation of the steered wheels.
Required Tools
To disassemble the unit you will need the following tools:
- wrenches sizes 12, 14, 17 and 19 mm;
- socket wrench or socket for 10 mm nuts;
- mounting blade;
- impact screwdriver;
- hammer;
- wire brush and rags to remove dirt.
Safety precautions
Before starting work, the vehicle is placed on a level surface, the handbrake lever is raised to the uppermost position. It is recommended to install wheel chocks under the rear wheels. When carrying out work, it is necessary to remove the front wheels, the car body is mounted on steel supports. Safety pads (wheels or wooden beams) are placed under the thresholds to prevent the vehicle from falling onto a person if the supports break.
Dismantling process
Algorithm of actions when removing the steering knuckle from the car:
- Remove the wheel and remove dirt and grease from the surfaces of the brake caliper and knuckle.
- Unscrew the bolt holding the brake pad plate, and then use screwdrivers to push the hydraulic pistons deep into the caliper.
- Remove the brake pads from the socket.
- Unscrew the 2 bolts securing the mechanism bracket, and then remove the bracket.
- Remove the bolt holding the top of the brake caliper.
- Loosen the lower mounting point of the caliper, which will allow the unit to move to the side.
- Using an impact driver, remove the 3 screws holding the brake disc to the hub.
- Remove the disc from the hub with hammer blows applied through a wooden spacer.
- Remove the 6 bolts holding the axle to the steering knuckle. If the threaded connections are covered with a layer of rust, then it is necessary to treat the surfaces with WD40 (or an equivalent).
- Carefully remove the axle together with the hub and the steel brake disc guard. If the car has an anti-lock braking system, then it is necessary to remove the sensor.
- Pull the axle shaft out of the bridge stocking.
- Unscrew the fastening nut, and then remove the tie rod end pin from the hole provided in the knuckle arm.
- Using a wrench, unscrew the 5 bolts connecting the knuckle and front axle flanges.
- Remove the plate against which the bolt rests, limiting the deflection of the wheels when turning.
- Pull the knuckle housing out of the front axle stocking; to complete the work, you will need a mounting blade, which is inserted into the gap between the flanges. The removed fist is disassembled on a workbench equipped with a vice.
- Remove the 9 bolts holding the collar around the joint cage.
- Unscrew the bolt that limits wheel rotation (equipped with a lock nut). It is recommended to measure the extension length of the element, which will allow you to correctly adjust the deflection angle during assembly.
- Remove the cuff and felt seal, which will allow you to dismantle the rubber seal.
- Remove the ball joint from the seat in the fist; the assembly is held in place by 2 kingpins.
Hinge assembly
A brief algorithm for assembling the hinge:
- Install the bushings for the pin balls into the support and apply a special lubricant to the surfaces.
- Fill the inside of the knuckle with grease and then install the axle shaft.
- Place a ball race on the axle shaft, which should coincide with the holes for installing the ball pins of the king pins.
- Install the ball race symmetrically relative to the knuckle, and then tighten the pin bushings.
- Press down the supporting elements with a hammer through a soft metal spacer, and then tighten the fastenings of the ball pins of the kingpins.
- Place the rubber cuff in its original place, and then place the felt ring on top.
- Install the cage, which is then bolted to the steering knuckle housing.
- Install the bolt that limits the wheel deflection angle.
- Insert the axle shaft into the stocking, and then tighten the bolts connecting the axle and knuckle flanges.
- Adjust the force required to deflect the fist to the sides. The force required to rotate the fist relative to the bridge is 1.0-2.5 kgf.m (the unit must be turned by hand). Adjustment is made by tightening the ball pins of the king pins.
- Mount the hub and other parts in their original places. The central nut, which regulates the clearance in the bearings, is tightened to a torque of 30-40 N.m, and then fixed with a lock washer.
Steering adjustment
This is mandatory, otherwise problems with driving the car will inevitably occur and premature wear of the tires on the front wheels is possible.
The steering is adjustable with shims. For a standard kingpin, 4 pieces are suitable, and for a roller pin – 5 pieces of 0.5 mm each. After the test ride, you need to touch the wheel and kingpin. When the wheel heats up, a couple of spacers should be removed, but if the kingpin is hot, then add it.
The quality of UAZ control depends on the condition of the pivot. If it malfunctions, you will feel impacts on the steering wheel, so you should replace it in time. It is quite possible to carry out this repair with your own hands, however, if you have the opportunity to contact a specialist, you should not neglect this.
Features of prevention and repair
Repair of the UAZ steering knuckle can be carried out either independently or by contacting a car repair shop. The cost of repair work will depend primarily on the price of the parts to be replaced.
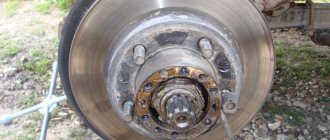
The fist is drying up
If you have some experience and the necessary set of tools, having studied the instructions on how to disassemble and repair the steering knuckle, it is enough to buy the required spare parts and carry out all the repairs yourself. This will not only save money, but also gain new knowledge about the design of the car.
We must not forget about regular preventive measures, which consist of inspecting and assessing the condition of the steering knuckle clamping bushings, as well as identifying the presence of play in the front suspension.
Before you begin repairing the steering knuckle, you need to familiarize yourself with the features of its implementation.
- If Nyloc nuts are installed, they will definitely need to be replaced, as they have a special coating that prevents them from unscrewing and loosening the clamp. After screwing the nuts, this coating is destroyed.
- You cannot put the car on wheels if at least one drive shaft is disconnected from the hub, as this can lead to deformation or destruction of the hub bearing. If it is necessary to move the machine a short distance, the shaft must be returned to the hub and secured with a nut.
- Depending on the model of the car and the year of its manufacture, the UAZ knuckle has two modifications, in one of which the hubs are solid, and in the other they are hollow, which is determined by the presence of a hole.
Before starting repairs, the following manipulations are carried out.
- The car is put on the handbrake.
- Stops are placed under the rear wheels to prevent the car from moving.
- The front part of the car is raised with a jack or winch and fixed on supports.
Only after making sure that the front part of the car is securely fastened and that it cannot move or fall off the stops can you begin to remove the wheel.
Symptoms of a problem
Symptoms of a breakdown do not appear immediately. So, the motorist will notice uneven tire wear.
- Raise the front axle.
- Check the wheel play without removing it in the radial and axial direction.
- When worn out, the UAZ kingpin is replaced with a new one.
They also check the distance between the beam and the fist. The gap should not exceed 0.2 millimeters.
What tools will we need?
To replace the UAZ Patriot king pin on bearings, we will need:
- jack;
- safety stand;
- a set of keys and screwdrivers;
- set of sockets and ratchet wrench;
- torque wrench;
- a powerful wrench and pipe extension;
- clean rags;
- recoil stop;
- low stool.
In addition, it is quite difficult to do everything alone, so you will have to call an assistant or assistant.
How to replace kingpins with your own hands?
First, drain the oil from the bridge. If it is black, it cannot be reused. Next, we remove the wheel bolts and jack up the car. Having hung the bridge, we begin to dismantle the caliper and brake shield - they will interfere with us when replacing the kingpins on the UAZ.
Next, screw an M10 bolt into the kingpin. Then we pull out the cap and remove the element in this way. If dismantling with a bolt does not work, a steel plate will be required. We fix it above the kingpin and make an M10 hole. We screw our bolt of the appropriate diameter through it. Place several nuts under the plate and tighten them.
When replacing the UAZ kingpin, it is important to completely clean the old bushing of grease. A new one is being laid in its place. Litol-24 is used as such. Next, a new king pin is installed. It is hammered through a wooden die. The king pin is not pressed in completely - it is important to eliminate the slightest distortion. Otherwise, it will go tight and with a characteristic sound. If this happens, the kingpin is pulled out and pressed in again. All other elements are assembled in reverse order.
Wheel and brake removal process
To remove the wheel, you must perform the operations in this sequence.
- Remove the cap from the wheel hub, remove the R-shaped bracket, and dismantle the locking head. Loosen the nut on the drive shaft that connects it to the hub. After that I remove the front wheel.
- If the car model is equipped with an ABS system, there is a sensor on the wheel that must be removed.
- The nut securing the drive shaft to the front suspension hub is twisted.
- The brake caliper is attached to the steering knuckle with two bolts, which must be unscrewed and disconnected from the brake disc, after which it is tied to the spring on the front suspension.
- Before proceeding with the removal of the brake disc, it is necessary to note its location relative to the suspension hub. The line can be applied with chalk, but it is better to use white paint so that the line is not erased during repair work. Only after this, unscrew the fastening screw and remove the brake disc.
Fist lubrication
To facilitate the process of dismantling the steering knuckle from the strut, it is necessary to use a special device with which the suspension springs are compressed and fixed. For this purpose, cables are used, for example, as on device 0903 AF. The procedure for compressing and fixing the springs is as follows:
- in the upper part of the rack there are two holes, into one of which a cable is inserted;
- then the steering column is turned and the second cable is inserted into the second hole;
- the free ends of the cables cling to the lower edge of the cup;
- The upper ends inserted into the rack are fixed by screwing 6 mm diameter bolts into the holes.
Adjusting the UAZ king pins
A mandatory step after replacement is adjusting the steering. Otherwise, problems may arise with tire burning and the car pulling to the side. The adjustment is done using spacers. Start with the top kingpin. For the bronze element, 4 spacers, each 0.5 mm thick, are used. For roller bearings - 5 with the same thickness. Next, we tighten the mechanism and go for a test drive. It is unacceptable for the wheel to heat up. If this is the case, the kingpin will need to be loosened by reducing the number of shims.
Kingpins on bearings for UAZ Patriot. Kingpin on bronze on UAZ Patriot. King pins UAZ Patriot
Standard kingpins serve properly only if all technological requirements for assembly and adjustment are met, especially after the factory begins installing carbon fiber inserts. The carbon fiber in the friction zone works properly without lubrication until the seal is broken and dirt appears, which quickly destroys the liners.
No matter how much the factory kingpins on carbon fiber are praised, it is clear to everyone that this part of the UAZ Patriot is a weak point. Without going into details, we recommend replacing the UAZ Patriot kingpin.
Installation of kingpins on bronze on a UAZ Patriot (kingpin with a bronze insert)
Kingpins on bronze (a kingpin with a bronze liner) are theoretically more durable during strong shocks from the suspension than on bearings, so they are installed for heavy off-road use. Bronze pivots are suitable for all UAZ Patriots and give good results.
After installing the bronze king pin on the UAZ Patriot, turning the steering wheel will be difficult for the first 2000 km.
After running in, with an increase in the caster angle, correct installation and high-quality lubrication, the forces applied to the UAZ Patriot steering wheel come to acceptable values.
When installing a bronze pivot on a UAZ Patriot, if possible, increase the caster angle so that the wheels independently return to their original position more easily. The bronze pivot on the UAZ Patriot is considered the most reliable, and at the same time, inexpensive solution to the problem.
Installation of kingpins on bearings on UAZ Patriot
King pin on bearings UAZ Patriot
Kingpins on bearings make the UAZ Patriot much easier to control and are also quite reliable. If you do not plan to constantly operate the UAZ Patriot on heavy off-road conditions, then it is advisable to install kingpins on bearings for the UAZ. Installing a kingpin on a UAZ Patriot on bearings is more expensive than on bronze.
In this case, a prerequisite is the installation of a steering damper. Without a steering damper, the UAZ Patriot with kingpins on bearings behaves as if the front wheels require balancing.
Installing kingpins on bearings on a UAZ Patriot will cost more than with bronze liners, since they are more expensive than bronze liners, and the installation of a steering damper is also required.
Let's put it here.
Which ones to choose?
In addition to the factory carbon fiber ones (which owners do not recommend installing in any way), there are several types of king pins:
- Bearing.
- On a bronze bushing.
The first type has a complex design. Such UAZ kingpins combine the lower half with a tapered bearing and thrust ring, as well as a cage.
Bronze elements are highly resistant to shock loads - such bushings are an order of magnitude stronger than bearing bushings. But the steering will be tighter. The cost is almost identical to the previous ones - 1.5 thousand rubles per set. These are excellent kingpins for UAZ “Loaf”, “Hunter” and 469. True, like the previous ones, they require regular lubrication and inspection. We will describe this procedure in detail below.
What to choose?
When choosing one or another type of spare part, you must remember that each type is suitable for different operating conditions. For example, if you drive mainly around the city, you need to buy a bearing kingpin. The UAZ Patriot, equipped with such a mechanism (with plastic inserts), is very easy to control. If you often drive in areas where there are no roads, use elements with bronze liners. However, keep in mind that the steering wheel will be very tight for the first 2 thousand kilometers. After this period, the mechanism will finally break in and be ready for full operation. Bearing kingpins have average characteristics on asphalt and dirt roads. Reviews advise purchasing products from Altai. It offers kingpins with a +8 caster angle. This makes driving a car much easier.
About syringing
This is the name for the procedure for lubrication of mechanism bushings. It is produced through grease nipples using a specialized syringe. A waterproof lubricant (for example, “Litol-24”) is placed inside the latter.
How often should the pins be injected? This procedure is performed every 20 thousand kilometers or once a year. This simple preventative measure will extend the life of the bushings and ensure easier steering rotation. This is noticeable already from the first meters of the road.