Over time, the fuel filter becomes clogged with impurities present in gasoline and requires replacement. Lada Largus is no exception here. How to find out that the fuel filter has become unusable and is “asking” for replacement? Is it possible to perform this procedure independently without resorting to a service? What consequences await the fuel circuit and engine if timely replacement is neglected? A whole lot of such questions may arise, especially for an inexperienced owner of a Lada Largus. Our material is intended to clarify the identified aspects and help many owners solve this problem themselves.
Fuel filter device
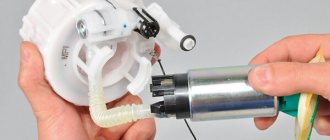
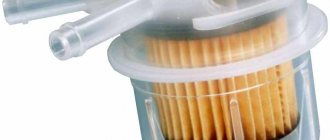
The design of the fuel filter on the Largus is interesting, as for a car model from AvtoVAZ. The design has two filter fuel elements that are installed in the fuel pump system. Fine and coarse filters in tandem with a fuel pump are a one-piece design. This means that in the event of a breakdown, in most cases the unit is completely replaced. Taking this feature into account, AvtoVAZ made the fuel filter for Lada Largus reliable, high-quality and with a long service life.
The design of the fuel filter and fuel pump on the Lada Largus is complicated, so there is no point in considering individual elements. But, despite this, even an amateur motorist will be able to visually determine the degree of contamination.
Symptoms of malfunction
The most common signs of filter clogging in power supply systems for 8-valve and 16-valve motors are:
- the appearance of unjustifiably high fuel consumption;
- the presence of engine jerks, especially during loads;
- the motor tends to stall;
- interruptions in fuel supply;
- a sharp decrease in the level of traction.
In some situations, the Lada Largus engine begins to stall unjustifiably while in idle mode. You can come to the conclusion that the filter is clogged only after some time, when these symptoms progress in their manifestation. If the breakdown is accompanied by a sudden nature, then it is likely that the reason does not lie in the filter.
Ground clearance Renault Sandero 2
What is better Duster or Hover
When to change
You will not be able to know if the fuel filter is dirty unless you regularly check its integrity and condition. Due to the specific design, the fuel cell on Largus is endowed with a “heroic resource”. As AvtoVAZ says, fuel filters together with the fuel pump are designed for the entire period of operation of the car, that is, about 160 thousand kilometers. But is this true? Based on practical experience, no.
Considering the average statistics, we can highlight the following:
- a mesh filter in the nozzle of the injection system, which passes fuel through itself after primary and fine cleaning, can last no more than 30-45 thousand kilometers;
- The main fuel filter has a service life of 80-120 thousand kilometers.
Experienced car repairmen advise every Largus owner to dismantle the entire fuel pump module and check the level of filter contamination every 20 thousand kilometers. The check is also carried out if:
- slight loss of traction;
- problems with the fuel system;
- reduction or increase in fuel consumption.
The main difference between the fact that it is the fuel filter element that is dirty is the gradual appearance of the symptoms described above.
Example in the video: removing the fuel pump, you can’t do without a mounting blade
Every motorist knows that ideally clean fuel does not exist. The situation with gasoline is most difficult in Russia and the CIS countries. “Bodyazhnaya” or simply low-quality fuel fills two-thirds of gas stations in the post-Soviet space, as a result of which every motorist must monitor the fuel system and the condition of the engine.
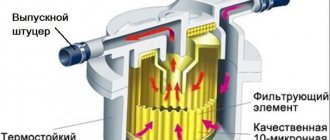
An integral part of this system is the fuel filter, which cleans the gasoline entering the carburetor or injector. Surprisingly, such a small unit, with proper operation, can increase the service life of an average motor by up to 30%. In today's material, our resource decided to cover the question of how to find and replace the Lada Largus fuel filter.
Part replacement features
Replacing this part is not so difficult if you know where the fuel filter is located on the Largus and how to carry out the repair correctly. It is important to note that even an amateur motorist can perform the replacement procedure, since the whole process is very simple. Replacing the filter does not require any serious preparation, except for the following measures:
- It is best to replace the filter element in a spacious workshop, where the car can be parked on level ground, securely fixing it with a handbrake or a wheel stand;
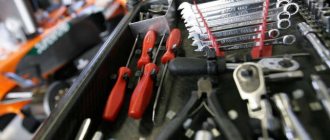
- prepare in advance a standard car repair kit: several screwdrivers, a set of keys, rags and gloves;
- buy a fuel pump assembly or a separate fuel pump “mesh” (for example, the same part will do, but only from Renault Logan).
The procedure itself takes no more than 30 minutes, of course, if you do not want to completely disassemble the fuel pump system and try old-fashioned methods to clean the fuel filter. Replacing the part with a homemade filter is considered a bad idea. Also, this should not be done because incorrectly cleaning or assembling the fuel pump will cause serious damage to the entire Lada Largus fuel system. Is it worth it? Most likely no.
Operating principle
In the Lada Largus model, the design of the filter component has an unusual solution, so replacing the fuel filter can cause a number of minor difficulties. The unit consists of two components that ensure cleaning of the fuel entering the system. They are located in the pump itself and represent a single module that can be replaced entirely. The manufacturer has included an enviable resource in the filter component, which, if the owner complies with regulatory requirements, can reach 160 thousand km.
If there is a need to replace the filter, you will need to dismantle the fuel pump, and this procedure is quite labor-intensive and painstaking. In such a situation, a reasonable action would be to replace the fuel filter, that is, the entire module, consisting of two components. Frequent disassembly procedures of this unit, for example, to replace one of the components, are extremely undesirable for the fuel pump and its associated infrastructure.
How to change the filter element with your own hands
So, the step-by-step algorithm for replacing the fuel filter on Largus is as follows:
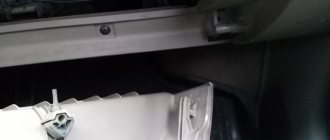
- Remove the rear sofa cushion and lift the plastic hatch that is located under it. For greater convenience, experts recommend removing the carpet.
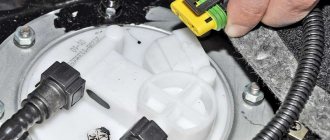
- Having disconnected the battery in advance, bend the tab located on the fuel pump connector and turn it off.
- Next, you need to connect the battery and start the engine. The running engine should run for two to three seconds and then stall. Next, de-energize the entire system again by disconnecting the terminals. Disconnect the fuel pipe and turn the fuel pump retaining washer counterclockwise. Using a special mounting spatula will help make the job easier.
- Having completed all the above steps, the fuel pump module can be removed without any problems. If necessary, the mesh filter or the fuel pump is replaced completely. After replacement, you need to reassemble the entire structure in reverse order.
It’s still not worth disassembling the fuel pump system to replace filter parts. Such repairs may negatively affect the condition of the entire fuel system in the future. It’s better not to save money and change the entire design of the fuel pump. Many auto repairmen believe that changing the fuel filter on a Largus is quick and easy if you study the features of its design and location in the car in advance.
Gasoline pump Lada Largus 16 valves
Buy a fuel pump (gasoline pump) for Lada Largus assembled or separately? The fuel pump for Lada Largus is sold either as an assembly, or is available separately from the fuel pump. If the fuel pump is non-separable, you will have to buy it assembled together with the housing. Some craftsmen try to pick apart the non-separable case themselves. If you are one of them, then we can select a separate fuel pump if we have a sample.
The fuel pump for Lada Largus is selected only by the VIN number of the car
Please note that the fuel pump on Lada Largus may come with a fuel filter. When purchasing a fuel pump insert separately, please note that it must meet two parameters identical to those of the original fuel pump
The two most important of them are productivity (l/h) and minimum pressure (kPa). Gasoline pumps are submersible, i.e. are located in the fuel tank or suspended i.e. located in the fuel line.
Cost of a fuel pump (gasoline pump) Lada Largus:
| Fuel pump options | Fuel pump price | Buy |
| Fuel pump assembly Lada Largus, suspended | from 1200 rub. | |
| Fuel pump assembly Lada Largus, submersible | from 1800 rub. | |
| Fuel pump insert Lada Largus | from 500 rub. |
Buy a fuel pump (gasoline pump) Lada Largus
Telephone
(multi-channel, 10.00-20.00)
Viber
Delivery in Moscow on the day of order Delivery to the regions from 2 days.
The cost of a fuel pump depends on the type, whether it is new or used, the manufacturer, as well as availability in our warehouse or delivery time to our store.
Rating of fuel pumps based on owner reviews:
1. Bosch (Germany) 2. ERA (Italy) 3. Airtex (Spain) 4. Magneti Marelli (Italy) 5. Krauf (European Union)
Replacing an outboard fuel pump does not raise any questions, but to replace the fuel pump in the tank, we recommend contacting a service station. If there is no service hole in the car, you will either have to cut it out or remove the fuel tank.
When to buy a fuel pump:
— engine failures during smooth driving; — the car began to stall frequently; — poor starting when the engine is warm; - loss of power and traction.
Addresses in Moscow: Service station on Gorbunova: st. Gorbunova, house 12A, from 10 to 20, seven days a week. Service station on Budaisky proezd: Budaisky proezd, 9, from 10 to 20, seven days a week. Service station on Transportnaya: Reutov, st. Transportnaya, 13, from 10 to 20, seven days a week. Service station on Shosseynaya: st. Shosseynaya, 90 C5, from 10 to 20, seven days a week.
Lada Largus: a box with a secret
"Lada-Largus" is a copy of the "Dacia-Logan MCV", known in some European markets under the Renault brand. The localization of production at AVTOVAZ has so far affected only small things. The most noticeable parts are the radiator grille and the nameplates on the rear doors: they feature the branded boat and the familiar name LADA. The machine's components were borrowed from other Renault models - Logan, Symbol, Megan (ZR, 2008, No. 2; 2010, No. 4; 2012, No. 3). They have been studied quite well by both car service mechanics and garage craftsmen. Nevertheless, let us recall the basic maintenance techniques and tell you about the differences.
When replacing spark plugs on a K4M sixteen-valve engine, the main thing is not to drop the fasteners of the individual ignition coils: the bolt easily slides off the head and disappears into the abyss between the intake manifold and the valve cover. If you don’t catch it, it can later cause trouble by shorting out electrical circuits or rubbing holes in the plastic manifold. Therefore, it is better to use a magnetic head or, at worst, attach a powerful magnet to the extension cord. Such a useful household item can be obtained, for example, by gutting an unnecessary computer hard drive.
To remove the connector from the individual ignition coil, press down the latch tab. If there is a lot of resistance, slide the connector onto the coil, selecting some play, and then press. To remove the connector from the individual ignition coil, press down the latch tab. If there is a lot of resistance, slide the connector onto the coil, selecting some play, and then press.
On the eight-valve K7M (they also install such ones) the candles are in full view. But don’t rush to rejoice: before you take the spark plug wrench, remove dirt from the bottom of the spark plug wells, otherwise it will certainly fall into the cylinders. First, we separate the stuck together grains of sand with a thin, hard brush or piece of wire, and then blow them out with compressed air. Perhaps, in this discipline there is complete parity between “different-valve” engines.
It is easier to change the oil in an eight-valve unit: if you remove the exhaust manifold protective cover by unscrewing three nuts, you can hook onto the filter housing from under the hood. And even a chain puller. But it is advisable to purchase an original cup puller - it is relatively inexpensive, and it is much more convenient to work with (and you don’t have to remove the casing). The drain plug is for an 8 square socket, have this key ready in advance. Access to the plug is possible through the slots in the standard protection of the engine compartment.
The oil filter (shown by the arrow) is hidden away. Even if you have a puller, act carefully so as not to damage the communications. It is better to immediately cover the engine number (in a circle) with anticorrosive. The oil filter (shown by the arrow) is hidden away. Even if you have a puller, act carefully so as not to damage the communications. It is better to immediately cover the engine number (in a circle) with anticorrosive.
The approach to the filter on a sixteen-valve valve depends on the presence of an overpass or inspection ditch. If these amenities are available, then it is better to remove the protection by unscrewing the six bolts and enter from below. No - we get up from above, removing the protective screen of the fuel rail. In any case, there is nothing to do here without a filter cup remover, since the communications of the power steering, generator and air conditioner greatly interfere. Compared to Priora, this option receives a well-deserved two in the final protocol.
Replacing the coolant is no easier, since the system does not have drain plugs. There is nothing left to do but remove the lower radiator pipe, risking getting burned by hot liquid (there is more escape when it is hot) or inhaling toxic fumes (from the trough they “smell” much more strongly than from the narrow neck - but how to get into it?) . To compensate, there are fittings to remove air from the filled system, but this is little consolation.
View of the power unit with the engine compartment protection removed. The drain plugs of the engine and gearbox are shown by arrows, the butterfly filler plug of the box is circled. View of the power unit with the engine compartment protection removed. The drain plugs of the engine and gearbox are shown by arrows, the butterfly filler plug of the box is circled.
PRODUCT NUMBER ONE
You can probably handle replacing the air filter on both modifications. Considering that the cover is attached with self-tapping screws, we recommend that before installation you feel for the entry of the thread: after turning the fastener counterclockwise, catch the gap and only then turn it clockwise. This way it will be possible to preserve the thread, and therefore the body itself, for many years.
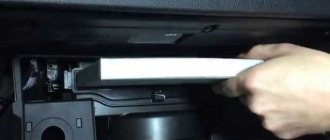
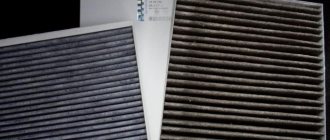
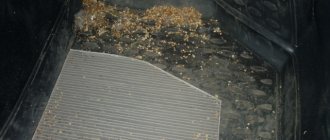
Neither a fuel nor a cabin filter is provided - a huge minus. If you can live carefree without the first, as the experience of using Logans shows, up to 200 thousand km, then sometimes you can’t do without the second on our dusty roads. “Garage workers” propose to embed a filter from a Nissan-Micra (or Renault-Modus) into the body of a standard heater, cutting through a window 150 × 38 mm (ZR, 2008, No. 9). Most likely, this technology will also take root at AVTOVAZ official dealers. But why doesn't the plant improve the heating system?
Saving on a cabin filter looks ridiculous. The plane in which the window must be cut is shown by an arrow. What prevents you from doing this at the factory, even if you close the hole with a plug? Saving on a cabin filter looks ridiculous. The plane in which the window must be cut is shown by an arrow. What prevents you from doing this at the factory, even if you close the hole with a plug?
If you decide to install the filter yourself, take your time: move the passenger seat back, lie down comfortably on the floor and use a shoe knife (or better yet, a piece of hacksaw blade) as carefully as possible so as not to accidentally make a hole in the heater radiator. And protect your eyes from falling chips! The first filter we install is the original one - 7701059997, 7701062227 or 27891-AX010, it comes complete with a plastic cover. Subsequently, you can save by buying individual non-original filter elements, of which there are a great many.
PRODUCT NUMBER TWO
You are unlikely to change the timing belt yourself, since to do this you need to have mandrels to align the crankshaft and camshaft in the only correct position (this applies to a greater extent to the K4M), as well as hang the power unit and remove the right support. None of this is easy, so most owners find it easier to turn to specialists.
God forbid you start replacing the timing drive on a sixteen-valve engine without such mandrels (shown on the left side of the photo). The fact is that there are no keys or pins in the connection of the shafts with the pulleys. God forbid you start replacing the timing drive on a sixteen-valve engine without such mandrels (shown on the left side of the photo). The fact is that there are no keys or pins in the connection of the shafts with the pulleys.
The automatic serpentine belt tensioner is only available in the version with air conditioning (applies to both engines). To remove the old belt, first dismantle the right side panel of the engine compartment and move the tensioner to the side, using a 15mm wrench to grab the roller bolt. We check the bearings of the mounted units and the rollers themselves - support and tension: you should not feel the balls rolling.
On a car without air conditioning, we tighten the belt, displacing the generator. You should not take on this work if you do not have instincts and experience, because if the tension is weak, the drive will slip, and if the tension is excessive, the bearings of the mounted units will suffer. It’s better to trust the specialists here too. They use a frequency meter to control tension: holding the device in one hand and the sensor in the other, they “play” the belt, as if on a string, with a third part of the body and at the same time manage to take readings. The vibration frequency of a correctly tensioned belt is 234 ± 11 Hz. Fine work!
The drive of mounted units on the K7M (pictured) is no different from that on the K4M. Moving the tensioner clockwise by the roller bolt, insert the pin into the holes on the sectors (shown by arrows). The drive of mounted units on the K7M (pictured) is no different from that on the K4M. Moving the tensioner clockwise by the roller bolt, insert the pin into the holes on the sectors (shown by arrows).
SEE THE ROOT
It is easier to replace headlight bulbs on the right. The battery prevents access to the left headlight; it is often better to remove it. Especially if your hand is calloused and your fingers are not like a pianist’s. And yet, in most cases, it is possible to fasten the spring latch of the H4 lamp, although not the first time. Access to the turn signal is more or less acceptable.
To replace the fog lamps, you will have to lie on the ground and unscrew the corner screen fasteners under the bumper. The work is dirty and terribly unpleasant, especially in the slush. The question is, what prevented you from providing technological windows in the mudguards, as is done on many French cars?
To replace the bulbs, the lantern must be removed, and you will suffer with the tightly tightened upper fastening knob. The board with lamps is secured with three latches. To replace the bulbs, the lantern must be removed, and you will suffer with the tightly tightened upper fastening knob. The board with lamps is secured with three latches.
To replace lamps, headlights must be removed. It seemed that ) had provided such a scheme for attaching the lights, which one could reluctantly come to terms with - to dismantle it, you need to unscrew two plastic thumbs. But the top one turned out to be tightened to death; even with cobra-type pliers they could not touch it. Fortunately, at the end of the head there was a recess for Torx-30. With the help of this tool and not without a strong word addressed to the assemblers, we managed to overcome the restive fasteners. It seems that with the arrival of Renault-Nissan at AVTOVAZ, we will have to get used not to pulling, but to “pulling.”
Igor Kozlov:
“Alas, the “casket” did not open as easily as we would like. Poor access to the oil filter let us down, but most importantly, the rear optics were disappointing. It would be a good idea for the plant to standardize the tightening torque of the flashlight fasteners so that we don’t break our fingers on it.”
Lada Largus: a box with a secret
Thank you (Strogino, Moscow)
for assistance in preparing the material.