What repair options are there?
In addition to painting the car dashboard itself, you can use other materials:
- painting with liquid rubber (plastidip).
- covering with vinyl film.
- covered with leather or leatherette.
In addition, the paint itself can be either glossy or matte. Of course, most drivers choose a matte coating color, since gloss causes glare in the sun and can create discomfort when driving.
Preparatory stage of work
As with any painting job, you will need to first prepare the surface of the dash for paint application. First of all, prepare all the tools and consumables that you will need to repair the torpedo yourself.
- screwdrivers for removing the front panel.
- car shampoo for cleaning plastic.
- sandpaper grade P500 - P2000.
- degreaser.
- primer.
- paint and, if desired, varnish.
The second point is the workroom. It should be clean, ventilated, warm, and well lit.
If everything is ready, then you can begin dismantling the dashboard in the car. Here the whole process is divided into several steps.
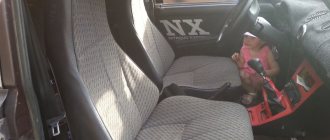
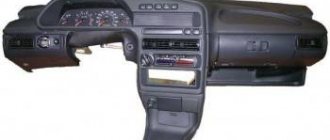
- It is necessary to study the technical documentation and understand the mounting diagram of this panel. They usually use latches and screws that are hidden with plastic. If you skip this step and do everything by eye, you can break some of the fasteners and, as a result, the panel will not fit back tightly when installed. For local repairs, such as repairing a small scratch or chip, you can repair the torpedo without removing it, but at the same time having previously covered all untreated surfaces with masking tape and film.
- We dismantle the steering wheel and all switches available for this operation.
- After removing the panel from the fasteners, you need to carefully disconnect all the wires that are connected to it. And here is an important point, in order not to get confused during reinstallation, it is advisable to label all the power cables, or take a few photos that will serve as a hint.
Take a particularly responsible approach to this step, because if the branded plugs are damaged or the torpedo itself is broken, you will need to look for new elements during disassembly, and this is a rather difficult process for many cars.
Now we prepare the part for painting
The operation algorithm will depend on the condition of the torpedo and the choice of paint type. We will provide step-by-step instructions.
- Washing and cleaning the plastic panel from dirt and dust. If there is serious damage such as cracks, then you need to solder the problem areas. If the scratches and chips are small, they can be removed using an abrasive.
- The part is polished with abrasives of various grades P500 - P. They begin to work with coarse-grained sandpaper and gradually move on to fine grain, bringing the surface of the torpedo to a perfectly smooth state.
- Washing and degreasing the surface. An important point here is that you can use alcohol or anti-silicone as a degreaser, the main thing is that this product does not corrode the plastic.
- Primer. With the help of primer, we will not only increase the degree of adhesion, but also fill all the micropores that remain after grinding, thus leveling the surface. Apply 2 – 3 layers of material, with drying breaks between layers of 15 – 20 minutes. You can use cans of paint for this; for such work, one can will be enough for you, everything will depend on the size of the panel. After applying the last layer of primer, wait until it dries and sand the surface using fine-grained sandpaper. Next, we degrease it again.
This completes the preparatory stage.
Apply paint
Spray paint on the torpedo either with a spray gun or a spray can. They also use a scheme with several layers of material. The first layer is made thin, and the second and third are thicker. Allow the surface to dry for 15-20 minutes between coats.
After the finishing layer, the part is sent for drying, or it is treated with varnish from the same manufacturer as the paint itself.
Video instructions for restoring paintwork on a dashboard.
Painting a torpedo with liquid rubber
If you decide to use rubber-containing paint instead of enamel, then this material has both its pros and cons. It’s up to you to decide whether this type of panel is right for you, or whether it’s better to use the classic solution.
- After drying, you will get a pleasant matte surface, somewhat reminiscent of rubber.
- On such a coating there are no reflections from the sun.
- high drying speed of the material.
- moisture resistance.
- no odors.
- Even with a slight play, the torpedoes will not work; cracks or chips of the material will appear.
- From user reviews we can conclude that the gloss of the surface itself quickly disappears.
- If the technology is not followed, there are cases of material peeling off from the panel.
- difficulty in dismantling when re-repairing a car dashboard.
So, the preparatory stage of work will be similar to that described above, and the rubber-containing paint itself is sold in aerosol cans and is not at all expensive.
Apply 2 – 3 layers of coating.
We briefly looked at the technology for painting the worn-out surface of a car dashboard yourself and looked at what alternative options you can use. How do you remove chips and scratches from a dashboard? We are waiting for your feedback in the comments.
Design Tips
Gloss or matte texture for a car dashboard - this choice is up to the owner. However, the choice of colors also plays a key role when carrying out restoration work. Using lighter shades will reduce stress on the eye and eye muscles. You should avoid bright and contrasting colors that can dazzle and interfere with driving. An interesting solution would be to use “liquid rubber”, which has a pleasant color without sharp contrast, excellent texture with an even decorative coating. In addition, the base material is very resistant to chemical reagents and mechanical stress.
Restoring the plastic of a car interior - methods and solutions
Each driver of his vehicle, in one way or another, tries to take care not only of the appearance of his iron horse, but also pays a lot of attention to the interior decoration - the interior of the car. As practice shows, not only leather interiors deteriorate under the pressure of daily trips to work and at least a couple of trips to the country house and to the store. The interior of a car is where we spend a lot of time, so it’s worth paying special attention to its condition. Many owners of cars with high mileage in this case prefer to contact special services, but in this article we will tell you how to restore the plastic of the car interior with your own hands.
Why shouldn’t you immediately resort to services?
Many car enthusiasts categorically refuse to care for the car interior on their own. This is due to the fact that today on the market you can find a huge selection of automotive chemicals, which are by no means always of high quality. Some drivers are afraid of ruining the interior of their car by using one or another cleaning product incorrectly. In fact, these fears are quite justified, because cases of damage to the interior using some cheap and, as the manufacturer claims, universal remedy are quite common. But don’t sound the alarm right away!
Exactly the same people work in car services. Therefore, if you want to learn how to care for the interior of your car yourself, then all you need is a little patience and desire. In this article, we will introduce you to restoring the plastic of a car interior with your own hands, where we will tell you in detail what and how to do. The main thing in this matter is to clearly and impeccably follow all the instructions, then nothing bad will happen to the interior of your car, and the old plastic will again delight you and your passengers!
Car interior plastic repair and its types
Today, there are several methods that can be used to achieve good results when restoring plastic in the car interior. As mentioned above, you can contact a special service where professionals will do all the work for you. But we will take a different route and try to restore the previous appearance of the salon ourselves. First you need to decide on the recovery method:
- Spraying paint for plastic
- Reupholstering an old part with artificial or natural leather
- Pasting the part with a special film
- Grinding a plastic product with heating
All of these four methods are used today by professionals in automotive services, but this does not mean that the work of the master cannot be repeated. Let's look at each of the recovery methods in more detail.
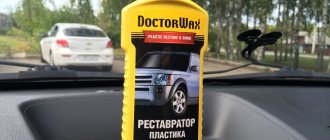
Spraying paint for plastic
This is perhaps the simplest and most straightforward method you can use. Restoring the plastic of a car interior using this method has been practiced for quite a long time, and during this time professional craftsmen have managed to draw up a certain algorithm of work.
First you need to dismantle the damaged plastic panels using the appropriate tools. Then the parts should be thoroughly washed, cleaned of accumulated dirt and degreased with a product so as not to spoil the plastic.
In the case where there are deep scratches on the part, when restoring the element there is no way to do without putty. The corresponding places are puttied and then cleaned with fine-grain sandpaper. However, it should be noted that if the part has a corrugated surface or any pattern, then it is better to avoid the putty process. Or you need to do this very carefully!
Having completed the above manipulations, you can begin priming the part, painting it and varnishing it. The primer is applied in 2-3 layers, if necessary, after the primer, the surface is additionally sanded. All that remains is to apply paint and varnish. Both procedures must be performed in several layers. The part is ready for installation!
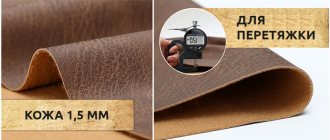
Restoring the plastic of a car interior - leather reupholstery
Upholstering parts with natural or artificial leather will cost you a little more, and the complexity of the work in this case increases several times. Here the main attention must be focused on accurate calculations and accuracy in carrying out restoration work. Only in this case, the restoration of the plastic interior of the car will go smoothly.
As in the previous method, it all starts with disassembling the interior, dismantling the parts necessary for restoration and cleaning them from dirt. Next, you need to cut the leather for the parts to be reupholstered. To do this, the leather product is applied to the part and a mark is made along the contour with a special marker. It is also worth noting that it is necessary to leave a couple of centimeters for allowances from the contours made.
All that remains is to cut out the skin for each part and glue it onto the plastic. For maximum quality, it is necessary to use a rubber roller, which will help to properly smooth the skin during the gluing process. Excess leather is folded under the piece, and the remainder is trimmed off. After these steps, the parts should be allowed to dry and only then carefully begin installation into place.
Vinyl film
Repairing the plastic of a car interior cannot always be done efficiently, since the part is already noticeably “tired” and restoring the appearance is an extremely difficult task. That is why vinyl film, which is used to restore the plastic interior of a car, has recently been gaining popularity. The good news is that film manufacturers offer a huge selection of films of varying quality, color and density, so there are no problems with the choice.
Restoring the plastic of a car interior using vinyl film is reminiscent of covering it with leather. After dismantling the necessary parts, they also undergo the cleaning and cutting process as described above. However, in this case, the film is removed from the substrate and glued using a hair dryer. To ensure that there are no bubbles or other irregularities left, a rubber roller or spatula is also used to level the film. All that remains is to let the part dry and you can safely install it in its rightful place!
Heat sanding
It so happened that the most affordable and fastest way to restore the plastic of a car interior ended up at the end of our list, but this does not mean that it can be neglected. If the plastic in the interior of your car is not so badly damaged, then this method will be the best solution for restoring the interior to its previous appearance.
It’s worth saying right away that in this case we don’t need to disassemble the interior, which is what makes this restoration method so simple. However, no one has canceled the process of cleaning parts! To work you will need a hair dryer. You need to work with it carefully, trying not to overheat the part. It is necessary to warm up the surface of the part and polish the plastic in a circular motion using a terry towel. The first results will be visible almost immediately - the plastic will look fresher, and minor scratches will completely disappear.
Tuning techniques
To successfully complete any modification to a car or its dashboard, you need to know a few simple techniques that will allow you to perform the necessary actions. We have already talked about how to properly stick tint film, and these are the same techniques that are used when gluing translucent films to the back of the device display with slots so that the divisions and numbers glow with the right light. Another no less interesting technique is the use of fluorescent paints to paint the needle or scale divisions of the device. To apply this paint evenly, it is enough to use either a simple template over which you can safely paint, or simply carefully apply it with a thin brush. Also, do not forget about the need to correctly calibrate the pointer after removing it, because an incorrectly calibrated device is a very serious problem that can only be solved in a service center.
We repair plastic parts ourselves - 3 simple ways
Manufacturers love relatively cheap, pliable and lightweight plastic. And car owners have a reason to love it - parts made from this material can be repaired very well. This means there is no need to regularly go broke on replacing damaged parts.
Before we tell you how to repair plastic products, let's pay attention to some of their features. Today, manufacturers use various types of plastics, including ABS plastic, polypropylene, polyurethane, polyvinyl chloride and others. They all have different properties, so before starting repairs you need to find out what material you are dealing with. Marking will help you - it is on any part. Trying to weld two parts from different plastics, you will waste your time: the connection, for example, of polypropylene with ABS plastic will be fragile, and therefore extremely short-lived.
Let's get back to repairs and tell you how to repair plastic parts using glue and soldering. In front of us is a damaged spare part. Let's get started!
Soft backing
It is needed to add volume to thin fabric. The substrate smoothes out all bulges, sharp iron corners, and irregularities that appear through the material. Typically, foam rubber with a thickness of 3-6 mm is used, although you can opt for a thicker version. Foam rubber is often equipped with a knitted layer that keeps the thread from passing through the spongy material when stitching.
The dimensions of the soft substrate should be such that it does not protrude beyond the edges or is 1 mm shorter. This will give the edge more edge. Do not wrap the backing over the other side of the insert - this may cause too much bulk at the edges. For upholstery, it is better to use high-density raw materials with closed cells. Whatever material you choose, remember - the denser it is, the longer it will wear out, maintaining its original aesthetic qualities.
Solution 1: Gluing
This repair method is quite simple. It will require a special glue, we use dichloroethane, it is the most affordable and glues ABS plastic perfectly. You will also need a brush, preferably a synthetic one. It is convenient because after the first use, the glued hardened hairs can be trimmed, and the rest of them can be heated, the hairs will fluff up, and the brush will still serve you.
So, take a brush, moisten it in dichloroethane, apply it to the parts or parts to be glued - first on one, then on the other. It is better to put the composition in two layers, since the first, preliminary one, will begin to actively corrode the plastic. We apply the parts to each other, press and wait. Dichloroethane takes quite a long time to dry, up to six hours. With patience, we get the whole part!
Important points
- If the folds of leather formed on the cover after putting it on the dashboard cannot be smoothed out with your hands, you should use a rag soaked in hot water. To avoid burning your hands, this operation should be performed only with thick rubber gloves;
- Care should be taken to ensure that drops of glue do not fall on the front side of the leather. If this happens, you need to let the drop dry and carefully cut it off with a knife. And the stain remaining on the skin can be erased with a regular eraser.
So, all a car enthusiast needs to re-tighten a dashboard is patience. The only difficulty may arise at the stage of stitching the fragments, especially if the car owner has little idea how to work with a sewing machine. If this is so, then before working with leather, it is worth practicing on ordinary matter.
Copywriter with five years of experience.
Solution 2: Soldering
In fact, there are two ways to weld a plastic part at the site of damage - using a hair dryer and a plastic rod, or a soldering iron and a brass or copper mesh. But first, let's talk about the device with which we will carry out the work.
Usually, powerful large hair dryers (also called technical hair dryers) are used for soldering. But they are inconvenient to work with: such hair dryers are bulky, heavy and heat up a large surface. Therefore, we preferred a simple soldering station with a soldering iron and a lightweight compact hair dryer. It is inexpensive, around 3,000 rubles - the price may vary depending on the configuration. We will not need the solder included in the kit, which is used to repair radio components.
Method 1: Repair using a hair dryer and a wand
We remove the hair dryer from the station. We set the temperature required for soldering ABS plastic to 300 °C. As the work progresses, the temperature should be adjusted if the plastic melts too much or, conversely, not enough.
We heat the rod with a hairdryer so that it becomes soft and almost begins to melt, and we do the same with the damaged area on the part. The mating part must be well heated, otherwise the adhesion will be poor and the resulting connection will be fragile. If the plastic of the part being repaired swells, it means the process is going correctly.