The procedure for replacing the cabin filter in a car can be done independently if you follow the algorithm of actions and regularly carry out diagnostics of car spare parts. Some car enthusiasts do without the device and do not follow the procedure for installing a new part.
But the absence of a cabin filter in a car will affect the quality of air in the cabin. Each driver decides whether to install the product or not independently - the legislation of the Russian Federation does not regulate the relevant issue in any way. But it is necessary to take into account that according to the regulations, the car manufacturer advises installing a filter element to improve the performance of the car.
Types of cabin filters
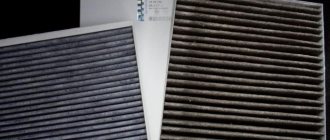
There are currently two types of cabin filters used on cars: dust and carbon.
The filter element of the dust filter is cellulose or synthetic fibers. They are presented in the form of corrugated paper, folded in even rows with cells. All this is assembled into a rectangular structure.
Such filters are designed to capture dust, soot, small and large particles of sand, small insects, and pollen.
In addition to corrugated paper, the carbon filter also has a layer of activated carbon. This gives it the opportunity to retain the smallest harmful particles. It traps various oxides, phenolic and benzene elements. But the number of harmful elements that the carbon layer can contain is limited; over time, it will no longer be able to capture them, then such a filter becomes functionally like a regular dust filter.
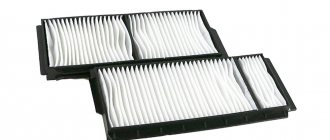
Additionally, they may have an antibacterial coating, but not always. This coating prevents mold and fungi from appearing on it. In general, the cabin filter looks like a rectangular block with a ribbed surface.
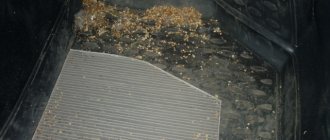
But over time, as the car is used, this filter gradually becomes clogged and no longer performs its functions. In this case, the filter element is replaced.
The technical documentation for the car indicates after what mileage of the car the filter should be replaced. However, this condition is advisory in nature, since the frequency of filter replacement depends on the operating conditions of the car.
So, in southern latitudes, where there is an increased amount of sand particles in the air, replacement must be done more often than when using a car in northern latitudes, where there is less sand and dust. Constant use of a car in urban environments also affects the rate of filter clogging.
When is replacement needed?
It is worth changing the filter regularly, it depends on the recommendations provided by the manufacturer. On average, this is 15 - 20 thousand kilometers or the first deterioration in terms of operation. In southern regions or polluted cities, the replacement frequency doubles. One way or another, aim for at least once a year. Among the external signs indicating the need for replacement, it is worth highlighting the following:
- increased humidity in the cabin;
- decreased airflow, weak operation of the air conditioner and stove (read also about whether you can turn on the air conditioner in winter);
- unpleasant odors in the cabin.
Checking the condition of the cabin filter
The condition of the cabin filter can be determined by indirect signs:
- The first is the appearance of foreign odors in the cabin. It turns out that a clogged filter no longer purifies the air, but, on the contrary, begins to add polluting particles to it.
- The second method of determination is to check the performance of the interior ventilation system. You need to turn on the ventilation motor and check with your hand the air flow it creates. If the air flow is weak, the filter is clogged and cannot pass enough air through it.
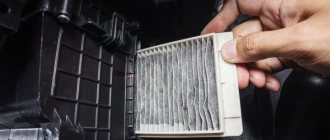
- Well, the third method of determining the condition is visual inspection. If it has a large dust deposit, and there is a significant amount of polluting elements between the ribs, then the filter must be replaced.
But in order to carry out a visual inspection, as well as replace it if severe contamination is detected, you need to know where it is located in the car and how to remove it.
Read more about the types and types of cabin filters and their necessity here. What is a car's VIN code and how to decipher it can be found in this article. When and how should you appeal traffic fines?
There are three places where the cabin filter can be installed:
- inside the front panel behind the glove box (glove compartment);
- near the steering column, next to the accelerator pedal;
- it can also be placed in the rear wall of the engine compartment.
Let's look at how to remove the filter to determine contamination and replace it in all three places of its installation.
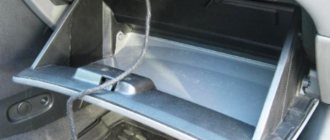
Replacing the filter installed behind the glove box
An example of removing a cabin filter installed inside the front panel will be the Toyota Corolla, since that is where it is installed.
This is how to replace a filter in a Toyota Corolla
You don't need any tools; all operations are done by hand. To access the box in which the filter is installed, you will need to lower the glove box down. To do this, after opening it, you need to press special latches on the sides, after which the box frame will lower down.
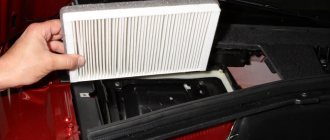
The filter is located in its own box and covered with a lid with latches. You need to unclip these latches and remove the cover. Then you need to press the edges of the filter with your fingers to compress it a little for easy removal and pull it towards you.
If severe contamination is detected, it is replaced. There is a mark on the end of the filter indicating its correct installation. The new filter also needs to be compressed a little and installed in place. Then you should press the end of the filter with your fingers so that it fits and straightens correctly. Next, the filter cover is put in place, after which the glove box is put in place by reinstalling the latches.
Changing the cleaning device in a car without air conditioning
As mentioned above, installing a cabin filter in a car without pre-installed air conditioning is much simpler and easier.
First of all, you need to open the hood and remove the protective grille, which is located opposite the passenger seat. Typically, this is where the device being replaced will be located.
The mounting bolts holding the cleaning system component in place allow the unit to be pulled out. A new cleaning device must be inserted into the cleaned seat, which usually contains accumulations of dirt and dust. By the way, you can clean the location of the device using a vacuum cleaner, after turning on the medium power mode.
Replacing the filter installed under the steering column
Replacing and installing a cabin filter on a Nissan Qashqai
Next, we will describe the operations for removing and replacing the cabin filter installed near the steering column. An example would be the Nissan Qashqai.
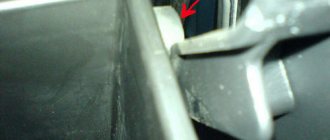
The only tool you need is a long screwdriver. To access the filter, you will need to remove the side decorative trim on the center tunnel under the front panel on the driver's side. It is held there by clips, and to dismantle it, you just need to pry off the cover with a screwdriver.
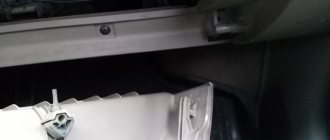
The box in which the filter is installed is located behind the accelerator pedal.
To get to the filter, you need to remove the cover from the box, secured with locking latches. To do this, pry up the lower latch with a screwdriver and remove the cover.
Extraction is carried out after preliminary squeezing it with your fingers. To make it easier to install a new filter, it is compressed on the sides, having previously found out which side it should be installed. After placing the filter, you need to straighten it by pressing the end with your fingers.
Next, the lid is placed and secured with latches, and after which the decorative trim is installed in place.
How to change the cabin filter device
In fact, this element can be changed quite simply, you just need to correctly determine its location
, and then get close to him. It is extremely important, when removing the plastic inserts behind which the filter is located, not to damage the snap elements that secure them. It is advisable to read the car’s instructions several times, which detail how to remove the mount, how to restore it, or completely replace the element due to a breakdown.
After dismantling the used filter, do not rush to install a new element in its place. Experts advise using a vacuum cleaner or otherwise cleaning the area where the filter device was located.
.
After this, you can begin installing a new filter. At the same time, do not forget to look at the indicators on the device - they will indicate which side to install the filter device correctly. Old and new filters
Some companies indicate installation diagrams for the filter device. Usually, this is an arrow that indicates the direction of air flow: when the pointer is pointing down, it means the air flow is coming from above.
If there are no indicators, you should determine on which side the grooves are deeper.
It is through this side that the air passes before it is cleaned. The logic is that grooves with greater depth require a longer collection of large debris and leaves. Let's look at how the filter device changes on some car models.
Changing the filter on Toyota
In the Corolla model, the cabin filter is located
at the passenger's feet behind the glove compartment. To change the filter, you don't need anything, just a new device.
There are special latches on both sides of the glove compartment. When they are unfastened, the drawer lowers slightly. This will give access to the filter unit. The block is held in place by 2 latches that must be released. Now nothing will prevent the installation of a new filter device.
If during installation the drawer dropped lower, you should check the micro-lift drive (small piston), which ensures smooth opening of the drawer. Most likely, it simply flew out of the mount.
How to change the filter
Changing the filter on a Chevrolet Cruze
Replacement sequence
filter device is as follows:
- From the sides, inside the glove box, you need to remove 2 snap-on stops, moving them slightly and then pulling them towards you.
- Unfasten the travel stop from the right edge.
- When the glove compartment is lowered, the plastic cover of the filter device will become visible. The element can be changed by removing the cover, which is held in place by three snap elements.
Replacing the cabin filter installed under the hood
Location of the cabin filter on Lada Priora
Structurally, the most difficult part is replacing the cabin filter installed on the rear wall of the engine compartment. The Lada Priora will serve as an example.
To perform this operation, you will need to open the hood. On the right side near the windshield there is a lattice panel, popularly called a “jabot”, under which the filter is located.
To remove the frill, you will need to remove the rubber seals. On the windshield side, this panel is secured with three self-tapping screws, covered with plugs. The plugs are removed and the screws are unscrewed. There are also three fastening screws on the engine side, which also need to be unscrewed.
After dismantling the frill, you will have access to the lattice filter cover, which is secured with four self-tapping screws. You need to unscrew the screws to remove the cover and gain access.
The new filter is installed according to the marks on it. This is important because the filters on the Priora have a foam rubber sealing edging, and if the filter is not installed correctly, due to the lack of a seal it will let dust into the cabin.
After replacement, the lattice cover is put back and fixed with self-tapping screws, after which the frill is installed and also fixed.
The installation orientation is indicated by markings on the filter. The UP mark and up arrow indicate that the air filter should be installed with this side facing up.
Some manufacturers produce markings not to install the filter, but to direct the air flow passing through the filter. The point is that the air is taken in through the top and enters the cabin, drawn towards the bottom. As a rule, such filters are marked “air flow” and a down arrow. In this case, the filter must be installed with the arrows down.
How to install the cabin filter correctly and how often to change it
How to install the cabin filter correctly and how often to change it
#1
Smok » 04 Dec 2013, 17:41
Re: Question about the cabin filter.
#2
Zembat » 04 Dec 2013, 17:50
Re: Question about the cabin filter.
#3
Smok » 04 Dec 2013, 18:03
Re: Question about the cabin filter.
#4
» 04 Dec 2013, 18:54
Re: Question about the cabin filter.
#5
Only » 04 Dec 2013, 19:05
Re: Question about the cabin filter.
#6
Smok » 04 Dec 2013, 19:44
Re: Question about the cabin filter.
#7
Only » 04 Dec 2013, 19:49
Re: Question about the cabin filter.
#8
wisky1969 » 04 Dec 2013, 19:52
Re: Question about the cabin filter.
#9
Smok » 04 Dec 2013, 20:03
Re: Question about the cabin filter.
#10
Alexandr45 » 04 Dec 2013, 20:06
Re: Question about the cabin filter.
#11
Smok » 04 Dec 2013, 20:17
Re: Question about the cabin filter.
#12
by vlad-vlad » 04 Dec 2013, 20:33
Re: Question about the cabin filter.
#13
wisky1969 » 04 Dec 2013, 21:52
Re: Question about the cabin filter.
#14
Only » 04 Dec 2013, 21:56
Re: Question about the cabin filter.
#15
Smok » 04 Dec 2013, 22:47