Comments: no Published: 08/09/2016
Rating:
Tags:Car paintVarnishes and paint
The body is considered one of the most vulnerable parts of a vehicle. Small pebbles that fly towards the car while driving at high speed damage the varnish coating. Scratches can also appear as a result of a minor traffic accident or after contact with branches. Even a shallow scratch is dangerous.
If the varnish coating is damaged, sooner or later moisture gets onto the metal, which can cause the development of corrosive formations.
To restore a car and give it a spectacular appearance, the car's paintwork is repaired.
Therefore, the faster the car's paintwork is restored, the better. Tidying up the paintwork of a car body with your own hands is a real undertaking. It is worth noting that the procedure performed independently will cost you two to three times less than the services of a specialized auto repair shop. If you want to learn how to restore paintwork (with or without painting), this article is for you!
Volkswagen Tiguan “blue crocodile” › Logbook › Do-it-yourself paintwork repair.
Recently, while chatting on our forum, I discovered that many car owners never bother with “covering up” chips and scratches.
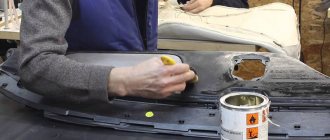
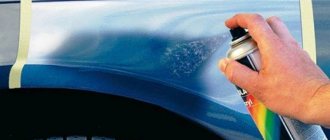
This surprised me - after all, most car manufacturers have special, so-called pencils for these purposes. VW and Skoda are no exception. On my baby Fabia, I repaired about a dozen chips in three years, half of which were down to the metal—not one of them bloomed. And the paintwork on Skoda and Vagenov is capricious. I decided to share my experience - I’m tired of writing about this on the forum. First of all, there are two types of kits: sprays and bottles with paint and varnish (for non-metallic paints without varnish). The spray is inconvenient to use, so I opted for the second option (photo below).
The set contains two bottles with brushes for painting. One with paint, the second with varnish. On the top of the paint bottle cap there is a special metal brush for removing rust.
In Exist, the set costs 300-400 rubles, depending on the color. For example, the pencil code for my color is LST 0M2 HX5
. For metallics, only the last three characters change - the paint code. For mother-of-pearl, M changes to P, for regular ones - to U, as I understand it. But there are also more intricate codes.
I would like to disappoint everyone who wants to leave paint shops without work - it will not be possible to paint over a chip to the metal unnoticeably. For large areas this set is also of little use. The easiest thing to do is to patch deep scratches using varnish followed by polishing.
Both varnish and paint can be easily washed off with strong alcohol, so you shouldn’t be afraid to experiment.
So. Below are two drawings. The first shows types of chips in layers. Let me make a reservation right away: if the scratch is shallow (1), then it is easier to polish it with the same anti-scratch agent, or you can leave it. Starting with deep scratches on the varnish (2 and further), it is worth treating, and the sooner the better. There were chips on the hood of my Skoda that seemed to be in the varnish - I spat on them. But, apparently, the varnish in these places cracked deep and allowed salt to get under the paint in winter. The result is peeling of the paintwork with the primer, so far without rust. In reality, most chips outside the city will be 3, 4 and 5 - before paint and primer. Here a patch for winter is required.
I also experimented with my brother’s Golf 6 - I gained a lot of experience. I can say one thing: the main protection of the body on metallics is varnish. If it is damaged badly enough, expect trouble in winter. You can check whether the varnish is damaged by wetting the damage with water or alcohol. If the scratch becomes invisible, we only need varnish for repair: - carefully place the varnish with a toothpick into the scratch with an overlap
on the original varnish. We wait an hour. Polish with anti-scratch polish. - if there are several scratches on the varnish at once (I once had about 20 boards “fly” into the back door on the dusty varnish), then you can use cling film with a drop of varnish applied to it, press it to the scratches and smear it over the entire area, remove the film. Polish later. To reduce the layer, you can wipe it with alcohol (the varnish will become cloudy, but will later become transparent after polishing).
If the damage lies deeper than the varnish, you will need to apply paint (with a toothpick) before the varnish. The metallic paint from the set cannot be polished - it becomes lighter with alcohol and changes color. Therefore, be careful at this stage. By and large, we only need paint to mask the damage - its structure seems to be moisture-permeable, unlike varnish. That is why we complete the repair of the chip with varnish. See the second picture (paint - green, varnish - pink). I declare with full responsibility that it will not work out better. And even if it works, the patch will not protect the chips - the varnish must be applied with an overlap and not overdo it when polishing with anti-scratch.
It makes sense to use the brushes from the set for larger areas of damage. A well-repaired chip will take 3 years to repair without problems. The unplanted one will bloom in St. Petersburg in the first winter. A quick repair of a chip takes me 15 seconds. Thorough about 15 minutes in total (not counting drying).
ps before the operation, of course, wash and degrease the area to be painted.
Source
Scratches: what they can be
- Cobweb. Circular shallow scratches (maximum one third of the thickness of the varnish) are usually removed only by polishing. It can be either abrasive or cosmetic, temporarily returning body parts to their factory shine.
- To the ground. A deep scratch can be eliminated using two methods: by touching up the paint followed by polishing, or by filling it with a wax pencil, again with polishing the body.
- To the metal. For a long-term effect, it is important to properly clean the body of rust. The rest is classic: paint, varnish and polish.
DIY car paint repair
Car damage is inevitable. Age and condition do not play a major role here. The paintwork often suffers. This happens, for example, when driving on dirt roads at high speed. Pebbles and tree branches scratch the fenders, bumper, etc.
Partial (local, spot, transition) painting of a car is a common procedure. It is needed to restore the coating and eliminate small chips. An attentive car owner does not delay this matter. If you are late, the area of damage quickly grows. Dampness additionally leads to corrosion. Driving in rain and cold is especially dangerous for paintwork. Corrosion begins in damaged areas and progresses quickly.
Spot painting is done correctly. You can take it to a service station or do it yourself. Repairs do not require much effort, skills or money.
Removing scratches on a car body without painting
To remove scratches from a car body, not in all cases the damaged areas of the paintwork need to be repainted. Often, shallow scratches can be removed without painting the car body. After all, anything can happen on the roads, and often even professional drivers are faced with the problem of various kinds of scratches appearing on the body.
The reason for their appearance is not always the level of driving skills. Scratches on the car body can be the result of careless driving by other road users. Also, the causes of scratches can be branches and tall dry grass on country roads, or aggressive dust and stones from the roadsides.
For information on the effectiveness of various methods for removing scratches without painting a car, watch the video at the end of this article.
In any case, regardless of the reasons for their appearance, scratches on the car body must be removed. However, in such situations it is not always worth turning to expensive specialists for help, since in many cases you can cope with the problem yourself.
Spot dyeing technology
You can cope with the job even without experience. Parts are often removed for spot painting. Before work, study the removal and dismantling diagrams. It’s better to find old body parts for training that you don’t mind. After mastering new skills, working parts are painted.
Repair of paintwork in each case has its own characteristics.
The following influences here:
Retouching details
Based on the severity of scratches and chips, they are divided into several types:
Check in good light. Even a bright flashlight will do.
If the damage is of minor depth or area, retouching of the details is used. This method is simple. No special skills needed. You can use a special pencil. Its color is the same as that of the car's coating.
The work consists of several steps:
How to paint over a damaged surface yourself?
Important! Despite the fact that competently carried out independent repairs are the best choice in terms of price/quality ratio, it is worth understanding that it will not be possible to repair paintwork in the same way as a professional painter. And there are three important reasons for this:
1. Lack of appropriate materials for painting;
2. Lack of necessary professional equipment (for example, a spray gun) and space (boxes with high-quality ventilation, drying chambers, and so on);
3. Lack of relevant knowledge and experience. Despite the fact that painting damage with a miniature brush seems like a simple task, it is very easy to make it worse than it was if you didn’t know, and with an inexperienced hand.
Therefore, before starting work, it is necessary not only to practice, as they say, “on cats,” but also to know what needs to be done and why, in theory.
see also
How to remove scratches on a car
Attention: parts to be painted must be cleaned and degreased in advance. To do this, it is best to use a silicone remover or a degreaser like white spirit and its analogues.
If the chip is located at the junction of parts, then for a better result you will need to first remove elements that interfere with access, such as a bumper or other elements.
Depending on the type of damage and its depth, different repair kits may be required to paint the surface. For example, this could be a scratch or chip corrector, for those cases where the chip did not go deep under the paintwork, or a full set with a small bottle of paint (it must be selected according to the code), primer and varnish.
Important nuance! Working with brushes that come with paint bottles is sometimes not very convenient. Their bristles are rough, and the brush area is often excessive. It's easy to make a smudge or bump out of paint. For better results, forums and websites for car paint repairs advise using several brushes with natural bristles, different in size. The thinner the tip, the easier it will be to apply the paint - without mistakes or smudges. A regular toothpick will also work for painting. It should be used instead of a brush in the most delicate places.
Local re-staining
In other cases, more complex repairs cannot be avoided. In case of serious coating defects, another method is used - local repainting.
For restoration, special equipment and funds are taken. This is a spray gun, a compressor, and sometimes paint in cans.
The repair takes place in several stages:
Spot painting steps
Partial repairs must be carried out correctly. This is the only way to qualitatively restore the appearance and save the car from corrosion. Each stage of work has its own rules.
Preparing the machine
You can't paint your car right away. Preparation includes several important works:
Surface cleaning
Then the surface is degreased. After the procedure, the remaining dust particles and the smallest remnants of technical oil disappear. This is necessary to avoid new defects. For degreasing, use, for example, white spirit or automotive solvent.
High-quality painting is impossible on a rough, untreated surface. Moisture accumulates under damaged enamel and rust quickly appears. All this must be removed. A small layer of enamel is removed. It turns out smooth, beautiful and safe.
To clean the surface, use sandpaper with different grain sizes. Sometimes they take a grinding machine. Some car enthusiasts use an ordinary drill for cleaning. You simply insert suitable attachments into it.
High-quality cleaning often takes a lot of time. Sometimes you have to remove a layer of paint down to the metal. Cleaning is an important stage on which the success of the entire repair depends. At the end, the surface is degreased again.
Puttying
After straightening and cleaning, small dents are sometimes still noticeable. Completely level the damaged areas using putty.
The result here also depends not only on the knowledge and skills of the master, but also on the choice of means. The composition of the putty is carefully studied. They find out the quality, look for additives for additional strength and heat resistance.
Several rules are followed in the work:
Padding
After the work done, small scratches inevitably appear and pores form. This can be dealt with using a primer. If everything is done correctly, the paint will then lie smoothly. The primer also affects the shade of the enamel. The choice of means is taken responsibly. Sometimes a primer is used in the form of an aerosol, from cans.
If the part was not removed, all adjacent areas of the body are covered so as not to get dirty. For protection, for example, plastic film, masking tape, or just newspaper are suitable.
The damaged part is covered with 2–3 layers. After each approach, wait until the primer is completely dry.
When the finishing layer hardens, be sure to do the following:
Applying paint
Then everything depends on the size of the part. If the area is large, sometimes they use a spray gun. For small parts it is convenient to use special pencils. They come in different types:
The following are important when painting:
Varnishing and polishing
After painting, all that remains is to apply the top coat. Choose a varnish that dries quickly. The last stage of restoring a car's coating is polishing. The varnish should be easy to process. Sometimes it comes in a set with paint.
In some cases, only the very top layer of the coating is restored. To check, for example, moisten the area with alcohol or water. The scratch should become invisible. Here, only varnish is needed for repairs. Sometimes apply with a regular toothpick. They go a little on the “native” surface.
The restored area is not polished immediately. After applying the paint or varnish, two days or more should pass. Then the part is ground and polished. As a rule, anti-scratch is used.
High-quality paint repairs return your car to its original appearance. A properly treated area is protected from weather, corrosion and other problems. Repairs usually do not take much time, even for a beginner.
Applying varnish to hardened paint
Those who decide to paint a car without varnishing often return to this issue over time. After all, the base layer of paint does not look so impressive and is not at all protected from damage. In addition, if you simply paint the body without applying varnish, you will not be able to remove scratches from the surface correctly and efficiently.
Applying varnish to a hardened coating differs from the method described above in the preparation of the machine. The surface will need to be matted with fine sandpaper - this will ensure better adhesion and greatly extend the life of the paint. In addition, this procedure will allow you to clean the car body from scratches and abrasions that were acquired during operation. You can learn how to properly matte the applied base coat from the video, which is dedicated to this varnishing technique.
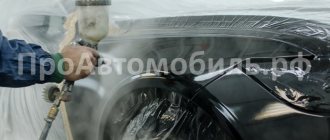
The process of varnishing a hardened coating is practically no different from applying it to a fresh base layer. First, an initial layer is sprayed onto the car body, but it should be remembered that applying varnish to a hard surface can leave a fine shagreen mark that will be difficult to cover with subsequent layers. Therefore, at this stage you should paint more evenly, avoiding large drops of varnish on the surface.
The second and third layers of varnish are applied thicker with the necessary drying periods. The final crystallization is carried out much faster if the ambient air temperature in the box is increased individually. Under no circumstances should you paint your car using pressure-type drying heaters. To do this, it is better to use devices with uniform infrared radiation.
Source
Restoration of paintwork
It is generally accepted that the surface of a car can only be damaged as a result of a traffic accident. However, according to statistics, half of the cars have some kind of minor damage as a result of normal use, be it chips, scratches or abrasions. Timely restoration of the paintwork without painting will help increase the time intervals between major repairs. Because if a small crack is not treated in time with a protective agent, then in a year rust will most likely appear in its place. And to eliminate it you will have to put in a lot more effort.
How to remove scratches on a car body
Before removing scratches from the car body, you should first wash the car thoroughly (instructions on how to properly wash a car).
Then, on a cleaned body, it will be possible to assess the degree of damage to the paintwork (abbreviated as paintwork) and the depth of the scratches, and then determine how to remove them.
Based on the depth and size of scratches on the car body, the following options for removing them are possible:
- Removing scratches and small chips by polishing the body (manually or using a polishing machine);
- Shallow scratches of the varnish coating and other minor damage are removed using a restoration pencil (for example, Fix it Pro), colored wax or nanocompositions such as RENUMAX;
- Serious damage to paintwork, such as deep scratches down to “living” metal, is almost impossible to remove without painting. In such cases, you will have to spend a lot of money on touch-up paint.
Let's look at each of the methods for removing scratches from a car body in more detail and weigh their pros and cons.
Methods for eliminating surface defects in paintwork
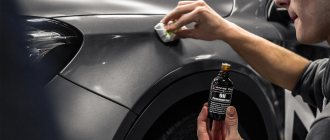
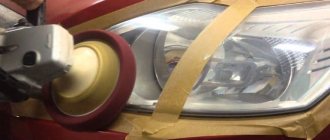
Restore shine with polishing
The shine from the surface of the car disappears, regardless of the quality of paint used. Why is this happening? The thing is that oily substances are added to modern painting products to increase shine. They tend to be removed from the surface of the machine over time due to mechanical friction or through natural evaporation.
Restoring the paintwork consists of restoring the surface gloss and protecting it from evaporation. To achieve this effect, you must first clean off a small layer of varnish and paint using one of the following methods:
The latter option requires increased caution, because the paint layer tends to absorb chemicals. To avoid this, they use the old proven method: polishing, which removes the top layer of varnish. Polish both manually and using a machine, using the following types of abrasive:
Restoring paintwork using chemistry
Polymerization of acrylics, even the fastest ones, lasts about 20 - 30 days, and the evaporation of solvents from many other materials is possible even longer. You can polish the car body after a couple of hours after it has completely dried, and it is advisable to use chemicals no earlier than after one to two months. After this time, the driver can already use the following aggressive substances against pollutants:
- damage to the paintwork by cement or slaked lime - treatment with vinegar, rinsing with water, polishing and treatment with protective polish;
- drops of resin - use a resin remover;
- industrial dust, which is very difficult to remove after just a couple of days - it is possible to remove fresh stains with a special product;
- damage to the paintwork by brake fluid - restore shine with polishes, and the swelling will be eliminated by drying for an hour (an oven or an infrared emitter can be used at a temperature of - 60 ° C);
- oxidation of paintwork from bird droppings - grinding the top layer, polishing with subsequent application of protection;
- insect residues – removing insect residues with an insect remover, then repeatedly degreasing the surface with a product containing alcohol. Finishing – cover the varnish layer with hard mastic;
- Battery acid can be removed with a simple car cleaner.
From the list above it can be seen that each chemical product has its own neutralizer. For example, traces of wood resins can be removed with kerosene and similar substances, and swelling of the paintwork can be removed by heating the car, and solid mastics are used for final fixation. It’s a different matter if the damage is mechanical or the shine is lost after a while - this problem can be solved by polishing. The shine can be restored without pre-polishing, but often defects can only be eliminated by mechanical processing.
When can chips and scratches be repaired without painting the paintwork?
Microscopic scratches on the paintwork become noticeable after the car has been automatically washed.
Defects on the fenders, hood and doors of the car are especially striking. If the factory paintwork is not affected, the car part is not deformed, and only the surface of the varnish is scratched, small scratches can be removed by polishing without subsequent painting. Then the area is treated with a protective composition according to the technology.
Regularly using polish to protect the paintwork from scratches caused by sand or a coarse brush, you can significantly save on subsequent repairs.
How to remove scuffs from a car body
So, on the agenda are three degrees of damage to the paintwork of the body.
Let's start with how to deal with the most difficult of them - a scratch that reveals metal. The technique for dealing with such a defect is simple: remove the rust, paint, varnish and finally polish with an abrasive polish. The result largely depends on the shade of paint purchased, the selection of which should be carefully chosen. The best option is to contact specialized offices that select the shade using a computer. As an example, it is necessary to have a gas tank flap with you.
Preparing metal for painting
At this stage, it is important to study the structure of the damage:
- Bent metal needs to be straightened, and straightened metal needs to be putty, and the putty also needs to be smoothed with sanding paper.
- Deep scratches that do not change the geometry of the part are sanded with fine-grained paper for subsequent painting.
But first - mechanical and chemical fight against signs of corrosion, if of course there are any.
To begin with, the rusty area is sanded with P2000 paper with an aim to include in the restoration a small area of the conditioned coating adjacent to the damage. This is necessary in order to connect the affected area with the non-oxidized one. The preventive measure will prevent corrosion and subsequent swelling of the paint at the repair site over a long period of time. Mechanical cleaning is followed by chemical cleaning. For this, a rust converter is used, preferably with zinc. The technique for working with aerosol chemistry is as follows:
- Apply a layer to the sanded area and pause for 10-15 minutes to allow everything to dry.
- Rinse the treated surface with running water.
- If rust is visible, repeat step 1 again.
The result you need to strive for is a matte gray surface without any traces of rust.
Painting
Apply several layers of paint to the prepared area. There are also features here:
- The paint must be diluted thinner to successfully apply multiple layers.
- Apply the paint material carefully using a small school brush.
- The number of layers is at least two with periodic drying for about 15-20 minutes.
Important! Do not paint over the entire thickness of the chip. Leave some depth for the varnish layer.
20-30 minutes after applying the final coat of paint, it is necessary to fill the scratch with varnish flush with the main paintwork. The squirrel brush is still used as a tool. At the finish you should get a smooth surface with a barely visible transition, which can be eliminated by polishing and another tricky trick.
It is not always possible to correctly calculate the number of paint layers the first time. As a result, the dried enamel protrudes beyond the paintwork. In this case, the protruding layer will have to be sanded again with fine-grained sandpaper P2000, and the effects of exposure to coarse abrasive will have to be eliminated by multi-stage polishing.
After finishing the painting work, after 20-30 minutes, the joints of the treated area with the main paintwork must be treated with a transition thinner, for example, Sikkens Thinner SRA. This technique helps to hide traces of body repair as much as possible.
Polishing
Treatment with polish harmoniously combines the treated area with the factory paintwork, eliminating the difference in structure between the new layer of varnish and the existing one. The polish also helps restore sanded surfaces to a shine, and in the case of “cobwebs,” simply return the body to its factory shine.
- Severe dullness and haze. They are removed with highly abrasive paste ZM 09374 or 50077. A distinctive feature of these products is a white or purple cap.
- Minor risks, barely noticeable dullness and stains. They are removed with fine abrasive paste ZM 09375. The cap of this bottle is black.
- Stains after abrasive treatment, tarnishing of paintwork. Cleaned with non-abrasive paste ZM 09376.
- Post-polish protection or otherwise gloss preservative. It is customary to protect the polished coating from the destructive effects of ultraviolet radiation and contamination, for which finishing non-abrasive polishes ZM 09377 are used.
It should be noted that polishing after painting requires all four steps to be completed. To remove barely noticeable scratches and cobwebs, processing can begin from the second point.
Important! Any abrasive polishing paste will remove the varnish layer. Therefore, it is recommended to mask light “cobwebs” with non-abrasive wax car polishes, such as Turtle Wax Color Magic, etc.
Not the last place in the “polishing” arsenal is occupied by circles. Following the ideology of the ZM manufacturer, each composition has its own tool:
- Coarse abrasive 09374 – circle 09550 (orange).
- Medium abrasive 09375 - the same circle (09550).
- Non-abrasive 09376 – sponge 09378.
- Preservative 09377 – circle 05729 or napkin 60668.
Types of polishes
Each type of polish has its own advantages. Thus, liquid polish is able to spread over the paintwork in a thin layer, which means less consumption of the product. However, the synthetic resins included in its composition make it expensive.
The easy-to-apply aerosol can be used without polishing, but only if it contains silicone resin. Solid-based polishes have the optimal balance between quality and price, eliminating minor defects without painting. But their disadvantage is the labor-intensive process of applying paintwork to a car. Based on their composition, polishes are divided into:
Method of restoring the coating with polish
The technology for using polish involves applying it to the paintwork, both with and without polishing (by rubbing it into the varnish with a damp soft rag). It is advisable to moisten creamy and hard polishes with water before use. To determine the minimum required amount of polish needed to restore the surface of a car without painting, you need to test rub it into the damaged area of the paintwork. In this case, the excess part of the product will simply flow out from under the circle of the machine. There is no need to add polish as long as the polishing machine successfully completes the job of cutting the surface layer of the paintwork.
Wipe off any remaining polish that has fallen off or leaked out with a microfiber cloth. Restoration of scratches on a car is carried out in separate areas in a certain direction. Constantly moving in the same direction should be avoided as this may result in visible marks.
Source
Features of car varnish coating when painting yourself
First of all, you need to decide on the material that will be used during the work. You need to choose a varnish - soft or one to which you need to add a hardener.
A simple soft varnish has better fluidity, but it is more difficult to cope with due to the fact that smudges and unevenness of the layer . It takes longer to dry, but is easier to process: grinding and polishing. It is recommended to apply 3-4 layers . Therefore, this type of varnish requires some experience.
Before applying hard varnish, preliminary preparation is required. It is necessary to add a special hardener to the composition, which will promote better crystallization and improve protective properties. Apply hard varnish in 1-2 layers .
Degreasing and polishing: how to restore the shine to your car without spoiling anything
With the arrival of summer, I want to see the car in its original color and shine. But owners of even one-year-old cars, when compared with a new car from a showroom, are often disappointed: the shine of their iron horse is no longer the same. There are different ways to improve the situation, and not all methods are equally useful. The cheapest option is a wash with “degreasing”, but sometimes the car service manages to persuade the client to one of the options of polishing the coating or applying an additional protective layer. All of these methods of restoring appearance have their own nuances, and not all of them are equally useful. Let's try to figure them out.
Degreasing
Let's start with the cheapest method, which is supposed to restore the original appearance. The so-called “degreasing” differs little from ordinary car washing. Unless the car is also rubbed with something pungent-smelling.
Theoretically, there really is a layer of resins and fats on the surface of the car. For those who like to wash “with wax”, its thickness reaches a significant value. The most curious thing is that a lot of interesting things are hidden in this layer. The protective properties of such a coating are insignificant; its thickness and strength are insufficient, but the layer formed is extremely uneven and includes abrasive particles, dirt and microscopic drops of water. Since it is not able to protect against the abrasive effects of sand, the destruction of the paint layer under such “cover” can proceed even faster than on a clean car. So you need to remove this layer; this will really restore the appearance of the paintwork. The only question is the removal method.
It would seem that alkaline compounds that use contactless car washes should dissolve such substances perfectly, and the surfactants in their composition will help wash everything away. But, unfortunately, bitumen contaminants, which are always abundant in the layer of “car” dirt, are highly durable. In order to wash them off, you will have to expose the paintwork to very aggressive substances for a long time. In the end, this will do more harm than good. It is necessary to use other compounds to soften and wash off the film.
Most car washes offer contact washing using household solvents or white spirit, and since the exposure time of such chemicals is clearly not enough to completely soften the film, a rag and a diligent cleaner come to the rescue. Remember when I said that this layer contains abrasive? Even if the rag is clean (which is not always the case), there is definitely abrasive in the layers of resin and fat. And he will definitely scratch the car a little. For such a “service”, it is more likely that the car owner should be paid extra, rather than the car wash. And if you perform the operation frequently, then, among other troubles, you may end up with clouding of the top layer of the paintwork due to chemical exposure. Especially when using solvents.
White spirit and special compositions – bitumen cleaners – are relatively safe for paintwork. If used correctly, you can wash off the deposits without resorting to rags: just wait the estimated time and wash off all the dirt with a high-pressure jet. However, a rag will not do much harm to old cars with already fairly scratched paintwork, but, nevertheless, I would still not recommend the use of strong solvents, solvents, acetone and other substances.
Causes of damage
First, let's identify the type of damage that has formed on the surface of the car:
First, let's look at the simplest damage to the varnish on a car, after which it is easiest to restore the car to its original appearance.
Minor scratches that do not damage the paintwork
If you notice this defect on your car, then you are in luck - its elimination is the cheapest and fastest, since it does not require repainting. Such changes in the external coating of the body occur, rather, due to long-term use rather than due to mechanical stress.
The shine of the car gradually fades, stains and many small scratches appear. Such damage is especially noticeable after washing a car under high pressure. Most often, scratches occur in places with which the owner interacts most: doors, gas filler flap, trunk lid, hood.
So, if the factory paint and varnish remain intact, and no deformation of the body element is observed, then it is enough to send the car for polishing. Here are the advantages of restoring car paint using polishing:
Many people are interested in how to completely prevent the appearance of cracks and the need for polishing. For this purpose, it is necessary to completely repaint the body with ceramic varnish. Thanks to its structure, the top layer reliably protects the paint from all influences, and the bottom layer helps to “heal” all scratches.
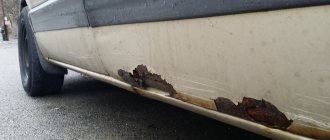
Chips with rust
Rust appears in places where varnish has been missing for a long time. It will not be possible to restore such an element without complete stripping and repainting. The complexity of the work depends on the degree of damage to the metal area, because the deeper the corrosion has affected the metal, the more difficult it becomes to clean the damaged area and the more automotive putty will be needed for restoration. You can restore a damaged element (fender, door, hood) by completely repainting it.
Fresh damage
How to restore the varnish on a car if you find fresh damage? Let's look into this problem.
When the scratch has just appeared, there can be no talk of any rust, since the bottom layer of paint has not yet been touched. In this case, it is necessary to clean the damaged area using an abrasive or chemical method to remove the thin top layer of varnish. Abrasive stripping is suitable for cars without varnish, and chemical stripping is necessary for cars with 2-component and acrylic products.
Large chips and metal deformation
This case usually occurs after collisions and accidents. At the first stage, it is necessary to restore the original shape of the part, otherwise painting is out of the question. In many cases, it is easier to purchase a new item than to restore an old one. If the restoration of the previous shape was successful, then the craftsmen begin to remove the old layer of paintwork. After this, the surface is degreased. A primer is applied on top, and after that the car element is coated with new varnish.