Checking and adjusting valve clearances on Niva 2121
During engine operation, natural wear and tear occurs on its rubbing and contacting parts, including valves, rockers, and camshafts.
The gap in the “camshaft cam-rocker valve” drive increases, a knocking noise appears. They call it “valve knock”. It is clearly distinguishable against the background of other noises, is heard at regular intervals, and its frequency is less than the frequency of any other knock in the engine. Sometimes this valve knocking noise disappears completely after the engine warms up. If you have this clicking noise, it’s time to think about adjusting the thermal gap (later adjusting the valves) between the rocker and the camshaft cam. It is better to time the valve adjustments to coincide with changing the engine oil.
Why? Dust, dirt, sand that accidentally gets into the engine during adjustment will be removed along with the old oil and oil filter.
Thermal clearances are checked and adjusted on a cold engine.
For intake valves (2, 3, 6, 7) the gap is set to 0.15 mm, and for exhaust valves (1, 4, 5, – 0.2 mm.
It is not at all necessary to memorize which intake and which exhaust valves, just look at the intake and exhaust manifolds. The intake valves will be located opposite the intake manifold pipes, and the exhaust valves will be located opposite the exhaust manifold pipes.
Try to set the gap as accurately as possible. With a large gap, severe wear of the rocker, camshaft cam and valve end occurs, and with a small gap, the valve plates burn out.
Before adjusting the valves, you must first check the fastening of the camshaft bearing housing, the alignment of the marks on the crankshaft pulley and the camshaft sprocket, and tighten the chain.
You can adjust it in two ways, using probes or using a special device with a micrometer. Adjusting with feeler gauges is a long and imprecise operation. Uneven surfaces between the rocker and the camshaft cam are not taken into account; accordingly, the gap will be plus or minus a kilometer. Therefore, it is better to give preference to a bar with a micrometer. All eight valves can be adjusted easily, accurately and quickly within 18-22 minutes. It is impossible to make a mistake in the adjustment order, since the valve number is indicated on the bar and at what angle the crankshaft must be turned to adjust it. Even a beginner can easily handle the procedure.
- Signs of valve failure on Niva 2121
- What should be the gaps between the valves on Niva 2121
- Video: VAZ 2121 NIVA Valve adjustment
- How to adjust valve clearances on a Niva 2121 with your own hands - step-by-step instructions
- Common mistakes when adjusting valves on Niva 2121
- Video: How to adjust valves on a Niva 2121 with your own hands
Adjusting the clearances in the valve drive of the VAZ-21213 Niva engine
Adjusting valves on a VAZ 2106, how to adjust the thermal clearance of VAZ valves
The need to adjust the clearances in the valve drive is indicated by a distinct loud knock heard when the VAZ-21213 carburetor engine is idling from the driver’s seat with the hood closed. Increased clearances do not lead to emergency engine breakdowns, but cause increased wear of valve mechanism parts. In addition, it is necessary to adjust the gaps after completing all work related to removing the camshaft.
To adjust the clearances in the valve drive, you will need the following tool:
— A flat-blade screwdriver. — Keys “8”, “10”, “13”, “17”. — A special key for turning the crankshaft or a 36mm socket. — Flat probe 0.15 mm thick.
When adjusting the gaps in the valve drive, use special feelers of increased width to adjust the gaps of “classic” VAZ engines. Since standard narrow feeler gauges do not cover the entire width of the gap between the camshaft cams and the pressure levers. As a result, the gap will be determined incorrectly. Sometimes there may be a table on the dipstick cover for the sequence of adjustment of the gaps.
More accurately, the clearances in the valve drive can be adjusted using a commercially available device with a dial indicator. However, working with it requires some skills. Therefore, first carefully read the instructions included with the device kit.
Why do you need to make adjustments?
Adjustment of Niva valves is required for the power plant to operate normally. Our task is to maintain the gap between the valves set by the manufacturer. If the distance between the parts exceeds the permissible norm, the driver hears unpleasant noises made by the car engine. When the valves are too tight, the power plant cannot produce maximum power, dynamics suffer and fuel consumption increases. You can find out how often this procedure needs to be carried out in the car’s operating manual; the procedure is also indicated there.
As the experience of owners of domestic models of this brand shows, correct valve adjustment is enough for 20 thousand kilometers. Determining that the gaps need adjustment is quite simple: grinding, clattering and other noises appear, which become especially loud at medium and low speeds.
It is important to know that the procedure is performed on a completely cold engine. The approximate temperature should not exceed +25 degrees Celsius. For work you will need open-end wrenches No. 17 and No. 13, a probe with a diameter of 0.15 mm. Probes should be chosen that are new or not worn out. Otherwise, the gaps will actually be smaller than necessary. Setting sequence:
- Unscrew the spark plugs and disconnect the battery.
- Remove the valve cover from the engine.
- Align the camshaft and crankshaft according to the marks at the dead center of the 4th cylinder. (Rotate with the key by the ratchet or by hand).
- Align the camshaft so that the sprocket mark coincides with the protrusion on the housing.
- Next, adjust valves 6 and 8 (counting from left to right). A 0.15 mm feeler gauge should be inserted between the rocker and the camshaft cam. It should go in with little effort.
- If the gap does not match, loosen the lock nut and use wrench No. 13 to adjust the gap (when fixing the lock nut, the set distance may decrease, so check it again with a feeler gauge).
- Next, rotate the crankshaft 180 degrees and adjust the clearances in valves 1 and 3. The adjustment principle is the same.
- Rotate the crankshaft 540 degrees and adjust 2 and 5 valves.
To make it easier to control the rotation of the crankshaft, it is recommended to put a mark on it. You can also mark the speed using the distributor slider. In this case, each pair of valves is adjusted through each 90-degree turn. In modern car services, they use a special indicator instead of a dipstick.
Step-by-step instructions with photos
When the tools are ready and the engine has cooled down, you can start working. The procedure is as follows:
- Disconnect the negative terminal from the battery - almost any repair of the power plant and car electronics begins with this procedure.
- Now remove the cylinder head cover. After this, the cap can be removed from the distributor. All fresh ignition plugs must be removed, following the order in the manual.
- Once you have access to the crankshaft, you need to turn it slowly as it rotates. Carry out this step until the marks on the bearing housing and the camshaft drive sprocket line up.
- Place the desired wrench on the ratchet and rotate the shaft with both hands.
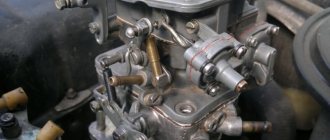
The marks are set, now we move on to adjusting the 6th and 8th valves (the order is from right to right). A feeler gauge with a thickness of 0.2 mm must be placed between the rocker and the camshaft cam, as shown in the photo:
When the gap is set correctly, the feeler gauge enters with little effort. To begin the adjustment, you need to loosen the locknut with the 17th wrench. Changing the distance between parts is done with the 13th key.
After these manipulations, check the gap again. If it corresponds to the standard, then fix the adjusting bolt and tighten the lock nut.
- The table above shows the order of pairs and degrees by which it is necessary to turn the crankshaft after adjusting the first pair of valves (8 and 6) of the VAZ 2121.
- Observing the order, rotate the crankshaft 180 degrees and adjust the gap of the next pair (4 and 7), followed by 1 and 3 in order.
Similar articles: A quick guide to how to adjust headlights on a Niva 2121
Bleeding and adjusting the Chevrolet Niva clutch: step-by-step instructions
Timing marks on a Chevrolet Niva: definition and purpose, installation tips, visual examples in photos and videos
Step-by-step instructions for adjusting the valves of a carburetor Niva 2121 with your own hands
After a certain period has passed, the valves must be adjusted for each car. In this material we will analyze in detail how this procedure is performed, what tools are needed for this, and what you should pay attention to when adjusting Niva valves. This instruction is relevant for the following Niva models: 21213, 21214, 2121 with a carburetor engine.
IMPORTANT! You should take on the job only if you already have experience in maintenance and simple repairs.
Why do you need to make adjustments?
Adjustment of Niva valves is required for the power plant to operate normally. Our task is to maintain the gap between the valves set by the manufacturer. If the distance between the parts exceeds the permissible norm, the driver hears unpleasant noises made by the car engine. When the valves are too tight, the power plant cannot produce maximum power, dynamics suffer and fuel consumption increases. You can find out how often this procedure needs to be carried out in the car’s operating manual; the procedure is also indicated there.
As the experience of owners of domestic models of this brand shows, correct valve adjustment is enough for 20 thousand kilometers. Determining that the gaps need adjustment is quite simple: grinding, clattering and other noises appear, which become especially loud at medium and low speeds.
Adjusting the VAZ carburetor: 2104, 2105, 2106, 2107, 2121, 21213
Adjustment of the VAZ carburetor may be required in various cases: after its repair, after repair of the gas distribution mechanism, ignition system, and even after changing a dirty air filter. Another reason is the transition to winter operating conditions of the car or, conversely, to summer operation. It should be borne in mind that it is possible to correctly and accurately adjust the VAZ carburetor only with the help of a special device - a gas analyzer.
Such a device is available to service station workers who perform work on repairing and adjusting carburetors.
How to adjust a VAZ carburetor with your own hands without special instruments? Before you begin adjusting the VAZ-2106 carburetor, as well as to adjust the VAZ-2104 carburetor, several prerequisites must be met. First: the engine gas distribution mechanism must be in good working order and its valve clearances must be adjusted. Second: work must be performed with a working ignition system and new or fully working spark plugs installed
The third important condition is that the Ozone carburetor itself must be in good working order, its float chamber must be cleaned and adjusted
Adjusting the fuel level in the float chamber is shown in a video by car enthusiast Konstantin Ovchinnikov from Ukraine.
Actually adjusting the VAZ-2105 carburetor consists of setting stable idle speed in a given range. A special feature of Ozone carburetors is an autonomous idle system, that is, fuel is supplied to the engine in this mode bypassing the throttle valves. The idle speed is adjusted using the screws for the amount of fuel mixture (1) and the quality of the fuel mixture (2).
It must be performed with the engine warmed up to operating temperature (about 80 degrees). This can also be done during the carburetor adjustment process. With the engine not running, both screws are screwed in all the way, and then the mixture quantity screw is turned back 3 turns, and the mixture quality screw 4-5 turns. The engine is started and the engine speed is set to around 800 rpm using the quantity screw (by tightening or unscrewing it). It is better if this value can be determined using a strobe light or tachometer on the dashboard. After this, by tightening the mixture quality screw (thereby depleting the fuel-air mixture), we determine at what position the engine speed begins to fall and becomes unstable. From this position, unscrew the mixture quality screw by 0.5 - 1 turn, slightly enriching the mixture for stable engine operation at idle speed. You can try revving the engine to make sure that the idle speed remains stable and is in the range of 800 (+50-50) rpm.
The above operations can be repeated 2-3 times to ensure the correct result. Generally speaking, the task of adjusting the carburetor is to ensure stable engine operation at the appropriate idle speed with the leanest possible fuel-air mixture and, accordingly, the lowest CO level.
Everything described is also true for adjusting the VAZ-2121 carburetor. The VAZ-2107 car is equipped with Ozone with a forced idle economizer, but the VAZ-2107 carburetor is adjusted in the same way. But the adjustment of the VAZ-21213 carburetor is somewhat different, because This model has a Solex carburetor.
Why do you need to make adjustments?
The power unit needs adjustment approximately once every twenty thousand kilometers. If this is not done, the valve clearance may become too small or too large. This will lead to unpleasant consequences.
- Excessively large gap leads to incomplete opening of the valves. This causes poor filling of the combustion chamber, disrupts the operation of the gas distribution system and, as a result, leads to a significant decrease in engine power. This is true for both carburetor and injection power units.
- In addition, an increase in the gap leads to a characteristic knock (“valves are knocking”), which experienced drivers can detect even while inside the Niva 2121 car. This sound helps to diagnose the problem in time and take measures to eliminate it.
- Reduced clearance is typical for exhaust valves. Due to wear on the seat, the parts move closer together. The impact of the cam on the valve occurs earlier, it remains open longer. This disrupts the operation of the gas distribution system and the power unit as a whole.
- Another problem of small clearance appears due to a decrease in contact time with the seat - heat transfer deteriorates. The valve overheats, which ultimately causes it to burn out.
Knocking also means that the valves are subjected to increased shock loads, which quickly reduces their service life and can lead not only to the breakdown of the parts themselves, but also to engine failure. Therefore, repair measures should be taken immediately as soon as suspicious noise appears. The clearance in the valve mechanism can and should be brought into compliance with the operating standards of the VAZ 2121 Niva.
Why do you need to adjust Niva valves?
The valve gas distribution mechanism ensures the coordinated operation of the valves and regulates their operation. Many Niva owners don’t even realize how important it is to constantly check and, if necessary, adjust the system for supplying the combustible mixture and removing exhaust gases from the engine.
When heated, all substances expand and valves are no exception. Therefore, in a cold state, with an unheated engine , there should be certain backlashes. It is their position that needs to be adjusted in order to avoid premature breakdowns and wear and tear of the “heart” of the car.
Incorrect valve adjustment is fairly easy to diagnose. By leaving too small gaps, parts will wear out and wear out faster, and engine performance will decrease. Symptoms of too much Niva valve clearance will be metallic knocking, which will also lead to rapid wear of parts and the engine as a whole.
An incorrect clearance between the camshaft cam and the valve itself causes the engine valve to open too much. This will sooner or later lead to depressurization of the valve and can quite significantly reduce the service life of the Niva engine.
You can find out what the gaps should be from the Niva user manual. It is important to take into account that clearance requirements may vary not only for different brands and models of machines, but also for different structural parts.
Final clearance check
Remember that intake valves use a 0.15mm feeler gauge and exhaust valves use a 0.20mm feeler gauge. Place the tool between the camshaft cam and the lever. If you need to apply force to move the feeler gauge between parts, then the gaps are set correctly.
Helpful advice! Not all Niva models have a crankshaft divided into degrees. In this case, it must be separated with a mark so as not to lose count and maintain order. Draw a line down the center and divide the pulley into four parts. Another option is to count the revolutions of the distributor slider. Moving the ignition slider 90 degrees equals turning the crankshaft 180 degrees.
Re-adjustment should be carried out if the tool moves too freely or does not fit into the hole at all. When tightening the locknut, the gap becomes a little loose, so ideally the adjustment should be carried out twice, following the order indicated in the table.
What kind of carburetor is installed on the Niva initially?
The Niva car is equipped with carburetors from the classic “Ozone”, which is not the best two-chamber unit with an idle economizer. The economizer is an autonomous system with a solenoid valve that automatically comes into operation when the ignition is turned on. When gaining speed above
1000, it is turned off, and the engine is maintained using the air damper.
The updated model received the French Solex design. The 1.7-liter engine required an increase in the amount of air-fuel mixture, and therefore Ozone was no longer used.
To reduce the cost of the project, it was decided to use parts and assemblies used on other engines that were in serial production at the time of 1994.
So the cylinder block was taken from the 03 Zhiguli model. The height of block 03 is 214.58 millimeters. The distance between the centers of the cylinders is 95 millimeters. Cylinders have five classes, designated by Latin symbols. The corresponding marking is located at the bottom of each cylinder.
A new piston group was developed for the new engine. The Model 213 piston has a unique design. At the bottom there is an oval hole of a specific shape. The piston diameter size has five classes. The hole for the piston pin has a diameter of 22 mm. Finger length 67 mm. Finger installation design, floating. The pin moves freely in the connecting rod head and piston bosses. Locking rings protect against axial displacement of the pin. The piston marking by bore diameter and piston diameter is applied to the bottom of the piston. The piston weighs 0.347 kg.
Connecting rod 213 is a new design model. It has a length of 136 mm. The hole for the crankpin is 47.8 mm. The diameter of the hole for the piston pin is 22 mm. For the connecting rod cap, designed new, disposable bolts. Reuse of bolts is prohibited.
The crankshaft is based on a VAZ 2103 crankshaft, the crank mechanism has a radius of 40 mm. For better dynamics and vibration prevention, the crankshaft is equipped with additional counterweights. For improved lubrication, oil lines were drilled into the connecting rod journals, and their diameters were increased by 0.02 millimeters.
The BC head is taken from the 011 Zhiguli model. The combustion chambers have undergone changes, they have been increased to 30 cubic centimeters each.
The timing chain drive is made with a double-row roller chain taken from the 03 model.
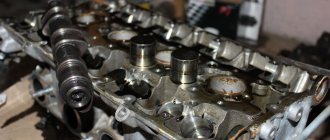
For the new engine, a new camshaft 21213-1006010 was designed. The shape of the cams on it was changed; this had to be done to increase the intake valve stroke. The valve mechanism and valves are borrowed from the VAZ 2101.
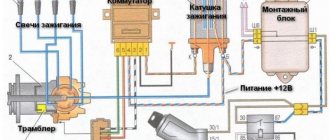
The VAZ 21213 uses a contactless ignition system with a switch, coil and ignition distributor.
An improved lubrication system has plugs for the accumulation and subsequent removal of dirt.